- Использование Android Search Dialog. Пример простого приложения
- Немного теории
- Конфигурационный файл
- Создаем Activity
- Выполнение поиска
- Исходный код
- Android Tutorial: Adding Search to Your Apps
- Local vs. global search
- Enabling search for your app
- Configuring your search
- Adding a SearchActivity
- Tying everything together in your manifest file
- Your search activity must include the intent used for search
- The meta-data pointing to your searchable.xml
- Additional meta-data to define which activity to use for search.
- Handling search yourself
- Adding specific data to the search
- Enabling your app for voice search
- Wrapping up
Использование Android Search Dialog. Пример простого приложения
Данная статья предназначена для тех, кто уже написал свой HelloWorld для Android и знает, что такое Activity и Intent, а так же где находится манифест, и зачем нужны layout’ы. В противном случае, можно ознакомиться с этим материалом, например, на developer.android.com.
В статье описывается создание несложного приложения, которое использует механизм реализации поиска, основанный на возможностях встроенного фреймворка. После прочтения вы также сможете настроить свое приложение таким образом, чтобы оно осуществляло поиск по данным, используя стандартный Android Search Dialog.
Немного теории
Android Search Dialog (далее — «диалог поиска») управляется с помощью поискового фреймворка. Это означает, что разработчику не нужно задумываться над тем как его нарисовать или как отловить поисковый запрос. За вас эту работу сделает SearchManager.
Итак, когда пользователь запускает поиск, SearchManager создает Intent, и направляет его к Activity, которое отвечает за поиск данных (при этом сам запрос помещается в экстры). То есть по сути в приложении должно быть хотя бы одно Activity, которое получает поисковые Intent’ы, выполняет поиск, и предоставляет пользователю результаты. Для реализации потребуется следующее:
- Конфигурационный xml файл (в нем содержится информация о диалоге)
- Activity, которое будет получать поисковые запросы, выполнять поиск и выводить результаты на экран
- Механизм вызова поискового диалога (так как не все устройства с Android на борту имеют на корпусе кнопку поиска)
Конфигурационный файл
xml version =»1.0″ encoding =»utf-8″ ? >
searchable xmlns:android =»http://schemas.android.com/apk/res/android»
android:label =»@string/app_name»
android:hint =»@string/search_hint»
>
searchable >
* This source code was highlighted with Source Code Highlighter .
Обязательным атрибутом является только android:label, причем он должен ссылаться на строку, которая является такой же, что и название приложения. Второй атрибут, android:hint используется для отображения строки в пустом диалоге. Например, это может быть «Поиск по Видео» или «Поиск контактов» и т.п. Этот атрибут указывает на то, по каким данным осуществляется поиск. Также важно знать, что элемент searchable поддерживает множество других атрибутов, подробнее можно прочесть Здесь.
Создаем Activity
Минимально, всё что нам нужно от пользовательского интерфейса Activity — это список для вывода результатов поиска и механизм вызова поискового диалога. Так и сделаем, добавив только поле для ввода текста и кнопку, чтобы мы сами могли заполнять базу. Забегая вперед, скажу, что данные будем хранить в БД SQLite.
Опишем интерфейс Activity следующим образом (файл находится в res/layout/main.xml).
xml version =»1.0″ encoding =»utf-8″ ? >
LinearLayout xmlns:android =»http://schemas.android.com/apk/res/android»
android:orientation =»vertical»
android:layout_width =»fill_parent»
android:layout_height =»fill_parent» >
LinearLayout
android:orientation =»horizontal»
android:layout_width =»fill_parent»
android:layout_height =»wrap_content»
android:gravity =»top» >
EditText
android:id =»@+id/text»
android:layout_width =»wrap_content»
android:layout_height =»wrap_content»
android:hint =»@string/text»
android:layout_weight =»100.0″/>
Button
android:id =»@+id/add»
android:layout_width =»wrap_content»
android:layout_height =»wrap_content»
android:text =»@string/add»/>
LinearLayout >
ListView
android:id =»@android:id/list»
android:layout_width =»fill_parent»
android:layout_height =»wrap_content»/>
TextView
android:layout_gravity =»left»
android:id =»@android:id/empty»
android:layout_width =»fill_parent»
android:layout_height =»fill_parent»
android:text =»@string/no_records»/>
LinearLayout >
* This source code was highlighted with Source Code Highlighter .
Выглядит следующим образом:
Также нам понадобится layout для вида элемента списка, опишем его простейшим образом (файл находится в res/layout/record.xml)
xml version =»1.0″ encoding =»utf-8″ ? >
TextView
android:id =»@+id/text1″
xmlns:android =»http://schemas.android.com/apk/res/android»
android:layout_width =»wrap_content»
android:layout_height =»wrap_content»
/>
* This source code was highlighted with Source Code Highlighter .
Также, не забываем про файл ресурсов, где хранятся наши строки (файл в res/values/strings.xml)
xml version =»1.0″ encoding =»utf-8″ ? >
resources >
string name =»app_name» > SearchExample string >
string name =»add» > Add string >
string name =»text» > Enter text string >
string name =»no_records» > There are no records in the table string >
string name =»search_hint» > Search the records string >
string name =»search» > Search string >
resources >
* This source code was highlighted with Source Code Highlighter .
xml version =»1.0″ encoding =»utf-8″ ? >
manifest xmlns:android =»http://schemas.android.com/apk/res/android»
package =»com.example.search»
android:versionCode =»1″
android:versionName =»1.0″ >
application android:icon =»@drawable/icon» android:label =»@string/app_name» >
activity android:name =».Main»
android:label =»@string/app_name» >
intent-filter >
action android:name =»android.intent.action.MAIN»/>
category android:name =»android.intent.category.LAUNCHER»/>
intent-filter >
intent-filter >
action android:name =»android.intent.action.SEARCH»/>
intent-filter >
meta-data
android:name =»android.app.searchable»
android:resource =»@xml/searchable»
/>
activity >
application >
uses-sdk android:minSdkVersion =»5″/>
* This source code was highlighted with Source Code Highlighter .
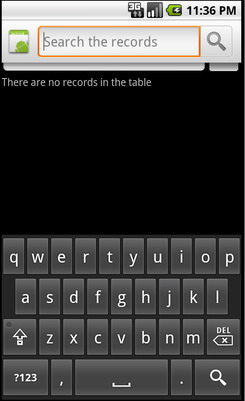
Сейчас, вы уже можете проверить, все ли вы сделали правильно. Вызвать диалог на эмуляторе можно, например, нажав кнопку поиска. Ну или если вы проверяете на девайсе, то зажав «Меню». Выглядеть должно примерно так:
Выполнение поиска
Получение запроса
Так как SearchManager посылает Intent типа Search нашему Activity, то всё что нужно сделать это проверить на Intent этого типа при старте Activity. Тогда, если мы получаем нужный Intent, то можно извлекать из него экстру и выполнять поиск.
Поиск данных
Так как тип структуры хранения данных для разных приложений может различаться, то и методы для них свои. В нашем случае, проще всего выполнить запрос по таблице БД SQLite запросом LIKE. Конечно, лучше использовать FTS3, он значительно быстрее, подробнее о FTS3 можно прочесть на сайте SQLite.org. В идеале, также нужно всегда рассчитывать, что поиск может занять продолжительное время, поэтому можно создать какой-нибудь ProgressDialog, чтобы у нас не завис интерфейс, и чтобы пользователь знал, что приложение работает.
Вывод результатов
Вообще вывод результатов — это проблема UI, но так как мы используем ListView, то для нас проблема решается простым обновлением адаптера.
Исходный код
Наконец, привожу полный исходный код двух классов с комментариями. Первый — Main, наследник ListActivity, он используется для наполнения БД и вывода результатов. Второй класс — RecordsDbHelper, он реализует интерфейс для взаимодействия с БД. Самые важные методы — добавление записей и поиск совпадений, с помощью запроса LIKE.
import android.app.ListActivity;
import android.app.SearchManager;
import android.content.Intent;
import android.database.Cursor;
import android.os.Bundle;
import android.view.Menu;
import android.view.MenuInflater;
import android.view.MenuItem;
import android.view.View;
import android.widget.Button;
import android.widget.EditText;
import android.widget.SimpleCursorAdapter;
public class Main extends ListActivity <
private EditText text;
private Button add;
private RecordsDbHelper mDbHelper;
@Override
public void onCreate(Bundle savedInstanceState) <
super.onCreate(savedInstanceState);
setContentView(R.layout.main);
//Создаем экземпляр БД
mDbHelper = new RecordsDbHelper( this );
//Открываем БД для записи
mDbHelper.open();
//Получаем Intent
Intent intent = getIntent();
//Проверяем тип Intent
if (Intent.ACTION_SEARCH.equals(intent.getAction())) <
//Берем строку запроса из экстры
String query = intent.getStringExtra(SearchManager.QUERY);
//Выполняем поиск
showResults(query);
>
add = (Button) findViewById(R.id.add);
text = (EditText) findViewById(R.id.text);
add.setOnClickListener( new View.OnClickListener() <
public void onClick(View view) <
String data = text.getText().toString();
if (!data.equals( «» )) <
saveTask(data);
text.setText( «» );
>
>
>);
>
private void saveTask( String data) <
mDbHelper.createRecord(data);
>
private void showResults( String query) <
//Ищем совпадения
Cursor cursor = mDbHelper.fetchRecordsByQuery(query);
startManagingCursor(cursor);
String [] from = new String [] < RecordsDbHelper.KEY_DATA >;
int [] to = new int [] < R.id.text1 >;
SimpleCursorAdapter records = new SimpleCursorAdapter( this ,
R.layout.record, cursor, from , to);
//Обновляем адаптер
setListAdapter(records);
>
//Создаем меню для вызова поиска (интерфейс в res/menu/main_menu.xml)
public boolean onCreateOptionsMenu(Menu menu) <
MenuInflater inflater = getMenuInflater();
inflater.inflate(R.menu.main_menu, menu);
return true ;
>
public boolean onOptionsItemSelected(MenuItem item) <
switch (item.getItemId()) <
case R.id.search_record:
onSearchRequested();
return true ;
default :
return super.onOptionsItemSelected(item);
>
>
>
* This source code was highlighted with Source Code Highlighter .
import android.content.ContentValues;
import android.content.Context;
import android.database.Cursor;
import android.database.SQLException;
import android.database.sqlite.SQLiteDatabase;
import android.database.sqlite.SQLiteOpenHelper;
import android.util.Log;
public class RecordsDbHelper <
public static final String KEY_DATA = «data» ;
public static final String KEY_ROWID = «_id» ;
private static final String TAG = «RecordsDbHelper» ;
private DatabaseHelper mDbHelper;
private SQLiteDatabase mDb;
private static final String DATABASE_CREATE = «CREATE TABLE records(_id INTEGER PRIMARY KEY AUTOINCREMENT, »
+ «data TEXT NOT NULL);» ;
private static final String DATABASE_NAME = «data» ;
private static final String DATABASE_TABLE = «records» ;
private static final int DATABASE_VERSION = 1;
private final Context mCtx;
private static class DatabaseHelper extends SQLiteOpenHelper <
DatabaseHelper(Context context) <
super(context, DATABASE_NAME, null , DATABASE_VERSION);
>
@Override
public void onCreate(SQLiteDatabase db) <
@Override
public void onUpgrade(SQLiteDatabase db, int oldVersion, int newVersion) <
Log.w(TAG, «Upgrading database from version » + oldVersion + » to »
+ newVersion + «, which will destroy all old data» );
db.execSQL( «DROP TABLE IF EXISTS tasks» );
onCreate(db);
>
>
public RecordsDbHelper(Context ctx) <
this .mCtx = ctx;
>
public RecordsDbHelper open() throws SQLException <
mDbHelper = new DatabaseHelper(mCtx);
mDb = mDbHelper.getWritableDatabase();
return this ;
>
public void close() <
mDbHelper.close();
>
//Добавляем запись в таблицу
public long createRecord( String data) <
ContentValues initialValues = new ContentValues();
initialValues.put(KEY_DATA, data);
return mDb.insert(DATABASE_TABLE, null , initialValues);
>
//Поиск запросом LIKE
public Cursor fetchRecordsByQuery( String query) <
return mDb.query( true , DATABASE_TABLE, new String [] < KEY_ROWID,
KEY_DATA >, KEY_DATA + » LIKE» + «‘%» + query + «%'» , null ,
null , null , null , null );
>
>
* This source code was highlighted with Source Code Highlighter .
Источник
Android Tutorial: Adding Search to Your Apps
Search on Android is a big topic. On every device’s homescreen is the Quick Search Box by default, older devices even had a dedicated search button. With the Quick Search Box you can quickly search the web, search for apps or contacts and search within all apps that are configured for global search. Many apps also provide local search capabilities to help you find necessary information as quickly as possible.
In this two-part tutorial series I will show you how to leverage Android’s search framework. This first part shows you the basics of Android’s search framework. In the second part I am going to cover search suggestions and global search.
Local vs. global search
There are essentially two kinds of search in Android:
- local search and
- global search
Local search enables users to search content of the currently visible app. Local search is appropriate for nearly every type of app. A recipe app could offer users to search for words in the title of the recipes or within the list of ingredients. Local search is strictly limited to the app offering it and it’s results are not visible outside of the app.
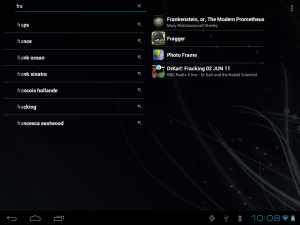
Global search on the other hand makes the content also accessible from within the Quick Search Box on the home screen. Android uses multiple data source for global search and your app can be one of it. In the next screen taken on a tablet you can see the results of a Google search on the left and some results from apps or for app titles on the right.

The user experience for local and global search is a bit different since global search uses multiple data sources. By default it provides search results from Google, searches for installed apps or contacts on the device and it also might include results from apps that enable global search. The following screenshot of a phone shows all content that is included in the list of search results.

For an app to be included in this list, the user must explicitly enable it. From the perspective of the user doing the search this is a very useful restriction. That way users can limit global search to include only what they really are interested in. For app developers that tend to think that their content is the stuff any user is most likely searching for, this of course is a big letdown 🙂
You should use global search only when your content is likely to be searched for from the Quick Search Box. That might be true for a friend in facebook but not necessarily for a recipe of a cooking app. I will cover configuring global search in more detail in the second part of this tutorial series.
Enabling search for your app
You always need to execute at least three steps to make your app searchable. If you want to provide search suggestions you have to add a fourth step:
- You have to write an xml file with the search configuration
- You have to write a search activity
- You have to tie the former two together using the AndroidManifest.xml
- You have to add a content provider for search suggestions — if needed
I am going to cover the first three steps in the following sections. And I am going to write about the content provider for search suggestions in the next part of this tutorial.
Configuring your search
You have to tell Android how you want your app to interact with Android’s search capabilities. This is done in an xml file. Following established practices you should name the file searchable.xml and store it in the res/xml folder of your app.
The least you have to configure is the label for the search box — even though the label is only relevant for global search. You also should always add a hint as Android displays this text within the form field. You can use this to guide the user.
There are many more attributes. I will cover those for global search in the next part of this tutorial and for voice search later on. You can find a list of all attributes on Android’s reference page.
Adding a SearchActivity
Whenever a users performs a search, Android calls an activity to process the search query. The intent used to call the activity contains the query string as an intent extra and uses the value of the static field Intent.ANDROID_SEARCH . Since you configure which activity to use for search (see next section), Android calls your activity with an explicit intent.
Most often your search activity will extend ListActivity to present a list of results to the user:
So why did I include the onNewIntent() method? I did this because of Android back stack. By default Android adds every new activity on top of the activity stack. That way the functionality of the back key is supported. If a user presses the back button, Android closes the top-most activity and resumes the next activity on the stack.
Now consider a typical search behavior. The user searches for a word and has a look at the results. Oftentimes she either did not find what she were looking for or she wants to search additional information. So she clicks the search key again, enters the new search phrase and selects a suggestion. Thus a new instance of your search activity would end up on top of your previous one. The activity stack would contain the search activity twice and users would have to hit the back key twice to get back to where they were before starting the search. Which probably is not what you want. Normally you want your search activity to be on the top of the stack only once.
That’s why you should declare the activity as singleTop . That way it is only once on your stack. Should a user start a new search from within your search activity, Android would recycle the instance and call the method onNewIntent() with the new search intent as its parameter. Since the old intent is still stored within your activity, you should always call setIntent(newIntent) within your onNewIntent() method to replace the original intent with the new one.
Tying everything together in your manifest file
To make search work you have to configure it within your project’s AndroidManifest.xml file. These are the things you have to put in there:
- Your search activity
- The intent used for search
- The launch mode for your activity
- The meta-data pointing to your searchable.xml
- Further meta-data to define which activity to use for search.
The following code shows a snippet of a typical configuration.
Your search activity must include the intent used for search
Android uses the value android.intent.action.SEARCH for the action within the intent when calling your search activity. So you must include this string within your activity’s intent filters. Otherwise your activity would be ignored.
The meta-data pointing to your searchable.xml
As described above you have to have an xml file to configure your search. But Android neither knows the name of this file nor its location. So Google came up with a meta-data element to point to this file.
Additional meta-data to define which activity to use for search.
Finally Android needs to know which activity to call when a search query is submitted. Again you have to use a meta-data element.
Handling search yourself
It’s important to present your user an obvious way to start search. Even when most devices had a dedicated search button you still were better of, when you added a way to manually start a search. For one users might not be familiar with the search button. But even if they know of the button they simply might not know that your app is capable of search. Thus you have to make it obvious that your app is searchable.
With the introduction of Honeycomb and Ice Cream Sandwich Android devices no longer have a search button. Instead the preferred way to present a search option is to show a search button or the search widget in the action bar.
This pattern has become common quickly and you should use an action bar with a search button even on older devices. See for example the following screenshot. It shows Gigbeat — one of my favorite apps — on an Android 2.2 device.

When the user wants to search, you have to call the search dialog from within your activity. This is done by calling onSearchRequested() . This method is part of Android’s Activity class and calls startSearch() which I will cover in a few moments.
Android’s search framework uses onSearchRequested() when the dialog should be started. Thus you should use it as well, even though it might appear odd to call a callback method directly.
Adding specific data to the search
The default search behavior is not always sufficient. First of all it only starts a local search. Most often that’s appropriate for your app, but sometimes a global search is what you need. And secondly you might want to add some specific data to the search that might depend on the state your app is in or that is specific for starting the search from this Activity only.
In these cases you have to override onSearchRequested() and call startSearch() yourself.
The method startSearch() takes four parameters which I explain in the table below.
| Parameter | Type | Meaning |
|---|---|---|
| initialQuery | String | A string with which to preload the search box. |
| selectInitialQuery | boolean | The flag that decides whether the content of the search box (that is the initialQuery) should be selected. If set to true any text entered overrides the initialQuery. |
| appSearchData | Bundle | Additional data to pass to the search activity. |
| globalSearch | boolean | The flag that decides whether global search should be used. |
The call to startSearch() of the base class Activity uses the values null , false , null , false — which means it is a local search without any further data.
Enabling your app for voice search
To enable voice search you only have to add a few lines to your search configuration.
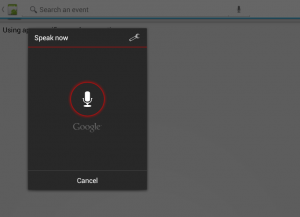
As you can see in the following screenshot, enabling voice search causes Android to display a microphone next to the search dialog.

As soon as you click the microphone the well-known voice input dialog pops up.

But not all Android devices might support voice search. If the device of a user has no voice search capabilities your voice search configuration will be ignored and the microphone symbol will not be displayed.
There are four attributes to the searchable element that deal with voice search but two should suffice in most cases.
The only obligatory attribute for voice search is android:voiceSearchMode . This attribute must contain showVoiceSearchButton , if you want to use voice search. Separated by a pipe («|») it needs a second value which determines the type of search: launchWebSearch or launchRecognizer .
It’s best to use launchRecognizer here, because the other value would use a web search — which normally wouldn’t yield the results appropriate for your app.
So the configuration should look like this:
The second important attribute is android:voiceLanguageModel . For this attribute also two types are possible: web_search and free_form .
Normally web_search should work best here — it is ideal for search like phrases where a user often won’t use correct sentences. The value free_form is more appropriate for voice input in other apps like mail or SMS that take larger chunks of well-formed text. See the developers blog post about Google’s speech input API.
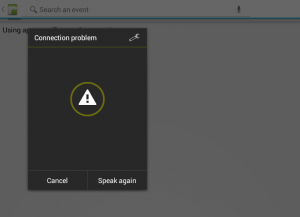
One word of advice concerning voice search though: Voice search only works if the user of the app has access to the internet. If the user has no connection to the internet, Android will display an error dialog:

Wrapping up
In this part of the tutorial I have shown you how to use Android’s search framework. You have to add some configuration and add a search activity. But all in all, it’s not too difficult to add decent search capabilities to your app.
Even adding voice search requires just two lines of configuration — though you should know its limitations.
In the next part of this tutorial I will cover how to add search suggestions to your app and to the Quick Search Box on Android’s homescreen. Stay tuned!
Wolfram Rittmeyer lives in Germany and has been developing with Java for many years.
He has been interested in Android for quite a while and has been blogging about all kind of topics around Android.
Источник


