- Использование Android Search Dialog. Пример простого приложения
- Немного теории
- Конфигурационный файл
- Создаем Activity
- Выполнение поиска
- Исходный код
- AppSearch
- Setup
- Groovy
- Kotlin
- AppSearch concepts
- Database and session
- Schema and schema types
- Documents
- Search
- Platform Storage vs Local Storage
- Kotlin
- Get started with AppSearch
- Write a document class
- Kotlin
- Open a database
- Kotlin
- Set a schema
- Kotlin
- Put a document in the database
- Kotlin
- Search
- Kotlin
- Iterate through SearchResults
- Kotlin
- Remove a document
- Kotlin
- Persist to disk
- Kotlin
- Close a session
- Kotlin
- Additional resources
- Samples
- Provide feedback
Использование Android Search Dialog. Пример простого приложения

Данная статья предназначена для тех, кто уже написал свой HelloWorld для Android и знает, что такое Activity и Intent, а так же где находится манифест, и зачем нужны layout’ы. В противном случае, можно ознакомиться с этим материалом, например, на developer.android.com.
В статье описывается создание несложного приложения, которое использует механизм реализации поиска, основанный на возможностях встроенного фреймворка. После прочтения вы также сможете настроить свое приложение таким образом, чтобы оно осуществляло поиск по данным, используя стандартный Android Search Dialog.
Немного теории
Android Search Dialog (далее — «диалог поиска») управляется с помощью поискового фреймворка. Это означает, что разработчику не нужно задумываться над тем как его нарисовать или как отловить поисковый запрос. За вас эту работу сделает SearchManager.
Итак, когда пользователь запускает поиск, SearchManager создает Intent, и направляет его к Activity, которое отвечает за поиск данных (при этом сам запрос помещается в экстры). То есть по сути в приложении должно быть хотя бы одно Activity, которое получает поисковые Intent’ы, выполняет поиск, и предоставляет пользователю результаты. Для реализации потребуется следующее:
- Конфигурационный xml файл (в нем содержится информация о диалоге)
- Activity, которое будет получать поисковые запросы, выполнять поиск и выводить результаты на экран
- Механизм вызова поискового диалога (так как не все устройства с Android на борту имеют на корпусе кнопку поиска)
Конфигурационный файл
xml version =»1.0″ encoding =»utf-8″ ? >
searchable xmlns:android =»http://schemas.android.com/apk/res/android»
android:label =»@string/app_name»
android:hint =»@string/search_hint»
>
searchable >
* This source code was highlighted with Source Code Highlighter .
Обязательным атрибутом является только android:label, причем он должен ссылаться на строку, которая является такой же, что и название приложения. Второй атрибут, android:hint используется для отображения строки в пустом диалоге. Например, это может быть «Поиск по Видео» или «Поиск контактов» и т.п. Этот атрибут указывает на то, по каким данным осуществляется поиск. Также важно знать, что элемент searchable поддерживает множество других атрибутов, подробнее можно прочесть Здесь.
Создаем Activity
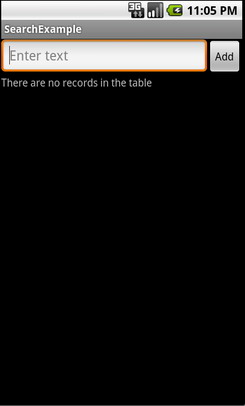
Минимально, всё что нам нужно от пользовательского интерфейса Activity — это список для вывода результатов поиска и механизм вызова поискового диалога. Так и сделаем, добавив только поле для ввода текста и кнопку, чтобы мы сами могли заполнять базу. Забегая вперед, скажу, что данные будем хранить в БД SQLite.
Опишем интерфейс Activity следующим образом (файл находится в res/layout/main.xml).
xml version =»1.0″ encoding =»utf-8″ ? >
LinearLayout xmlns:android =»http://schemas.android.com/apk/res/android»
android:orientation =»vertical»
android:layout_width =»fill_parent»
android:layout_height =»fill_parent» >
LinearLayout
android:orientation =»horizontal»
android:layout_width =»fill_parent»
android:layout_height =»wrap_content»
android:gravity =»top» >
EditText
android:id =»@+id/text»
android:layout_width =»wrap_content»
android:layout_height =»wrap_content»
android:hint =»@string/text»
android:layout_weight =»100.0″/>
Button
android:id =»@+id/add»
android:layout_width =»wrap_content»
android:layout_height =»wrap_content»
android:text =»@string/add»/>
LinearLayout >
ListView
android:id =»@android:id/list»
android:layout_width =»fill_parent»
android:layout_height =»wrap_content»/>
TextView
android:layout_gravity =»left»
android:id =»@android:id/empty»
android:layout_width =»fill_parent»
android:layout_height =»fill_parent»
android:text =»@string/no_records»/>
LinearLayout >
* This source code was highlighted with Source Code Highlighter .
Выглядит следующим образом:
Также нам понадобится layout для вида элемента списка, опишем его простейшим образом (файл находится в res/layout/record.xml)
xml version =»1.0″ encoding =»utf-8″ ? >
TextView
android:id =»@+id/text1″
xmlns:android =»http://schemas.android.com/apk/res/android»
android:layout_width =»wrap_content»
android:layout_height =»wrap_content»
/>
* This source code was highlighted with Source Code Highlighter .
Также, не забываем про файл ресурсов, где хранятся наши строки (файл в res/values/strings.xml)
xml version =»1.0″ encoding =»utf-8″ ? >
resources >
string name =»app_name» > SearchExample string >
string name =»add» > Add string >
string name =»text» > Enter text string >
string name =»no_records» > There are no records in the table string >
string name =»search_hint» > Search the records string >
string name =»search» > Search string >
resources >
* This source code was highlighted with Source Code Highlighter .
xml version =»1.0″ encoding =»utf-8″ ? >
manifest xmlns:android =»http://schemas.android.com/apk/res/android»
package =»com.example.search»
android:versionCode =»1″
android:versionName =»1.0″ >
application android:icon =»@drawable/icon» android:label =»@string/app_name» >
activity android:name =».Main»
android:label =»@string/app_name» >
intent-filter >
action android:name =»android.intent.action.MAIN»/>
category android:name =»android.intent.category.LAUNCHER»/>
intent-filter >
intent-filter >
action android:name =»android.intent.action.SEARCH»/>
intent-filter >
meta-data
android:name =»android.app.searchable»
android:resource =»@xml/searchable»
/>
activity >
application >
uses-sdk android:minSdkVersion =»5″/>
* This source code was highlighted with Source Code Highlighter .
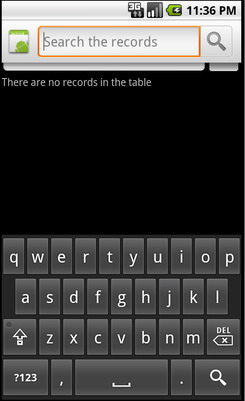
Сейчас, вы уже можете проверить, все ли вы сделали правильно. Вызвать диалог на эмуляторе можно, например, нажав кнопку поиска. Ну или если вы проверяете на девайсе, то зажав «Меню». Выглядеть должно примерно так:
Выполнение поиска
Получение запроса
Так как SearchManager посылает Intent типа Search нашему Activity, то всё что нужно сделать это проверить на Intent этого типа при старте Activity. Тогда, если мы получаем нужный Intent, то можно извлекать из него экстру и выполнять поиск.
Поиск данных
Так как тип структуры хранения данных для разных приложений может различаться, то и методы для них свои. В нашем случае, проще всего выполнить запрос по таблице БД SQLite запросом LIKE. Конечно, лучше использовать FTS3, он значительно быстрее, подробнее о FTS3 можно прочесть на сайте SQLite.org. В идеале, также нужно всегда рассчитывать, что поиск может занять продолжительное время, поэтому можно создать какой-нибудь ProgressDialog, чтобы у нас не завис интерфейс, и чтобы пользователь знал, что приложение работает.
Вывод результатов
Вообще вывод результатов — это проблема UI, но так как мы используем ListView, то для нас проблема решается простым обновлением адаптера.
Исходный код
Наконец, привожу полный исходный код двух классов с комментариями. Первый — Main, наследник ListActivity, он используется для наполнения БД и вывода результатов. Второй класс — RecordsDbHelper, он реализует интерфейс для взаимодействия с БД. Самые важные методы — добавление записей и поиск совпадений, с помощью запроса LIKE.
import android.app.ListActivity;
import android.app.SearchManager;
import android.content.Intent;
import android.database.Cursor;
import android.os.Bundle;
import android.view.Menu;
import android.view.MenuInflater;
import android.view.MenuItem;
import android.view.View;
import android.widget.Button;
import android.widget.EditText;
import android.widget.SimpleCursorAdapter;
public class Main extends ListActivity <
private EditText text;
private Button add;
private RecordsDbHelper mDbHelper;
@Override
public void onCreate(Bundle savedInstanceState) <
super.onCreate(savedInstanceState);
setContentView(R.layout.main);
//Создаем экземпляр БД
mDbHelper = new RecordsDbHelper( this );
//Открываем БД для записи
mDbHelper.open();
//Получаем Intent
Intent intent = getIntent();
//Проверяем тип Intent
if (Intent.ACTION_SEARCH.equals(intent.getAction())) <
//Берем строку запроса из экстры
String query = intent.getStringExtra(SearchManager.QUERY);
//Выполняем поиск
showResults(query);
>
add = (Button) findViewById(R.id.add);
text = (EditText) findViewById(R.id.text);
add.setOnClickListener( new View.OnClickListener() <
public void onClick(View view) <
String data = text.getText().toString();
if (!data.equals( «» )) <
saveTask(data);
text.setText( «» );
>
>
>);
>
private void saveTask( String data) <
mDbHelper.createRecord(data);
>
private void showResults( String query) <
//Ищем совпадения
Cursor cursor = mDbHelper.fetchRecordsByQuery(query);
startManagingCursor(cursor);
String [] from = new String [] < RecordsDbHelper.KEY_DATA >;
int [] to = new int [] < R.id.text1 >;
SimpleCursorAdapter records = new SimpleCursorAdapter( this ,
R.layout.record, cursor, from , to);
//Обновляем адаптер
setListAdapter(records);
>
//Создаем меню для вызова поиска (интерфейс в res/menu/main_menu.xml)
public boolean onCreateOptionsMenu(Menu menu) <
MenuInflater inflater = getMenuInflater();
inflater.inflate(R.menu.main_menu, menu);
return true ;
>
public boolean onOptionsItemSelected(MenuItem item) <
switch (item.getItemId()) <
case R.id.search_record:
onSearchRequested();
return true ;
default :
return super.onOptionsItemSelected(item);
>
>
>
* This source code was highlighted with Source Code Highlighter .
import android.content.ContentValues;
import android.content.Context;
import android.database.Cursor;
import android.database.SQLException;
import android.database.sqlite.SQLiteDatabase;
import android.database.sqlite.SQLiteOpenHelper;
import android.util.Log;
public class RecordsDbHelper <
public static final String KEY_DATA = «data» ;
public static final String KEY_ROWID = «_id» ;
private static final String TAG = «RecordsDbHelper» ;
private DatabaseHelper mDbHelper;
private SQLiteDatabase mDb;
private static final String DATABASE_CREATE = «CREATE TABLE records(_id INTEGER PRIMARY KEY AUTOINCREMENT, »
+ «data TEXT NOT NULL);» ;
private static final String DATABASE_NAME = «data» ;
private static final String DATABASE_TABLE = «records» ;
private static final int DATABASE_VERSION = 1;
private final Context mCtx;
private static class DatabaseHelper extends SQLiteOpenHelper <
DatabaseHelper(Context context) <
super(context, DATABASE_NAME, null , DATABASE_VERSION);
>
@Override
public void onCreate(SQLiteDatabase db) <
@Override
public void onUpgrade(SQLiteDatabase db, int oldVersion, int newVersion) <
Log.w(TAG, «Upgrading database from version » + oldVersion + » to »
+ newVersion + «, which will destroy all old data» );
db.execSQL( «DROP TABLE IF EXISTS tasks» );
onCreate(db);
>
>
public RecordsDbHelper(Context ctx) <
this .mCtx = ctx;
>
public RecordsDbHelper open() throws SQLException <
mDbHelper = new DatabaseHelper(mCtx);
mDb = mDbHelper.getWritableDatabase();
return this ;
>
public void close() <
mDbHelper.close();
>
//Добавляем запись в таблицу
public long createRecord( String data) <
ContentValues initialValues = new ContentValues();
initialValues.put(KEY_DATA, data);
return mDb.insert(DATABASE_TABLE, null , initialValues);
>
//Поиск запросом LIKE
public Cursor fetchRecordsByQuery( String query) <
return mDb.query( true , DATABASE_TABLE, new String [] < KEY_ROWID,
KEY_DATA >, KEY_DATA + » LIKE» + «‘%» + query + «%'» , null ,
null , null , null , null );
>
>
* This source code was highlighted with Source Code Highlighter .
Источник
AppSearch
AppSearch is a high-performance on-device search library for managing locally stored, structured data. It contains APIs for indexing data and retrieving data using full-text search. Applications can use AppSearch to offer custom in-app search capabilities, allowing users to search for content even while offline.

AppSearch provides the following features:
- A fast, mobile-first storage implementation with low I/O use
- Highly efficient indexing and querying over large data sets
- Multi-language support, such as English and Spanish
- Relevance ranking and usage scoring
Due to lower I/O use, AppSearch offers lower latency for indexing and searching over large datasets compared to SQLite. AppSearch simplifies cross-type queries by supporting single queries whereas SQLite merges results from multiple tables.
To illustrate AppSearch’s features, let’s take the example of a music application that manages users’ favorite songs and allows users to easily search for them. Users enjoy music from around the world with song titles in different languages, which AppSearch natively supports indexing and querying for. When the user searches for a song by title or artist name, the application simply passes the request to AppSearch to quickly and efficiently retrieve matching songs. The application surfaces the results, allowing its users to quickly start playing their favorite songs.
Setup
To use AppSearch in your application, add the following dependencies to your application’s build.gradle file:
Groovy
Kotlin
AppSearch concepts
The following diagram illustrates AppSearch concepts and their interactions.
 Figure 1. Diagram of AppSearch concepts: AppSearch database, schema, schema types, documents, session, and search.
Database and session
An AppSearch database is a collection of documents that conforms to the database schema. Client applications create a database by providing their application context and a database name. Databases can be opened only by the application that created them. When a database is opened, a session is returned to interact with the database. The session is the entry point for calling the AppSearch APIs and remains open until it’s closed by the client application.
Schema and schema types
A schema represents the organizational structure of data within an AppSearch database.
The schema is composed of schema types that represent unique types of data. Schema types consist of properties that contain a name, data type, and cardinality. Once a schema type is added to the database schema, documents of that schema type can be created and added to the database.
Documents
In AppSearch, a unit of data is represented as a document. Each document in an AppSearch database is uniquely identified by its namespace and ID. Namespaces are used to separate data from different sources when only one source needs to be queried, such as user accounts.
Documents contain a creation timestamp, a time-to-live (TTL), and a score that can be used for ranking during retrieval. A document is also assigned a schema type that describes additional data properties the document must have.
A document class is an abstraction of a document. It contains annotated fields that represent the contents of a document. By default, the name of the document class sets the name of the schema type.
Search
Documents are indexed and can be searched by providing a query. A document is matched and included in the search results if it contains the terms in the query or matches another search specification. Results are ordered based on their score and ranking strategy. Search results are represented by pages that you can retrieve sequentially.
AppSearch offers customizations for search, such as filters, page size configuration, and snippeting.
Platform Storage vs Local Storage
AppSearch offers two storage solutions: LocalStorage and PlatformStorage. With LocalStorage, your application manages an app-specific index that lives in your application data directory. With PlatformStorage, your application contributes to a system-wide central index. Data access within the central index is restricted to data your application has contributed and data that has been explicitly shared with you by another application. Both LocalStorage and PlatformStorage share the same API and can be interchanged based on a device’s version:
Kotlin
Using PlatformStorage, your application can securely share data with other applications to allow them to search over your app’s data as well. Read-only application data sharing is granted via a certificate handshake to ensure that the other application has permission to read the data. Read more about this API in the documentation for setSchemaTypeVisibilityForPackage().
Additionally, data that is indexed can be displayed on System UI surfaces. Applications can opt out of some or all of their data being displayed on System UI surfaces. Read more about this API in the documentation for setSchemaTypeDisplayedBySystem().
| Features | LocalStorage (compatible with Android 4.0+) | PlatformStorage (compatible with Android 12+) |
|---|---|---|
| Efficient full-text search | ||
| Multi-language support | ||
| Reduced binary size | ||
| Application-to-application data sharing | ||
| Capability to display data on System UI surfaces | ||
| Unlimited document size and count can be indexed | ||
| Faster operations without additional binder latency |
There are additional trade-offs to consider when choosing between LocalStorage and PlatformStorage. Because PlatformStorage wraps Jetpack APIs over the AppSearch system service, the APK size impact is minimal compared to using LocalStorage. However, this also means AppSearch operations incur additional binder latency when calling the AppSearch system service. With PlatformStorage, AppSearch limits the number of documents and size of documents an application can index to ensure an efficient central index.
Get started with AppSearch
The example in this section showcases how to use AppSearch APIs to integrate with a hypothetical note-keeping application.
Write a document class
The first step to integrate with AppSearch is to write a document class to describe the data to insert into the database. Mark a class as a document class by using the @Document annotation.You can use instances of the document class to put documents in and retrieve documents from the database.
The following code defines a Note document class with a @Document.StringProperty annotated field for indexing a Note object’s text.
Kotlin
Open a database
You must create a database before working with documents. The following code creates a new database with the name notes_app and gets a ListenableFuture for an AppSearchSession , which represents the connection to the database and provides the APIs for database operations.
Kotlin
Set a schema
You must set a schema before you can put documents in and retrieve documents from the database. The database schema consists of different types of structured data, referred to as «schema types.» The following code sets the schema by providing the document class as a schema type.
Kotlin
Put a document in the database
Once a schema type is added, you can add documents of that type to the database. The following code builds a document of schema type Note using the Note document class builder. It sets the document namespace user1 to represent an arbitrary user of this sample. The document is then inserted into the database and a listener is attached to process the result of the put operation.
Kotlin
Search
You can search documents that are indexed using the search operations covered in this section. The following code performs queries for the term «fruit» over the database for documents that belong to the user1 namespace.
Kotlin
Iterate through SearchResults
Searches return a SearchResults instance, which gives access to the pages of SearchResult objects. Each SearchResult holds its matched GenericDocument , the general form of a document that all documents are converted to. The following code gets the first page of search results and converts the result back into a Note document.
Kotlin
Remove a document
When the user deletes a note, the application deletes the corresponding Note document from the database. This ensures the note will no longer be surfaced in queries. The following code makes an explicit request to remove the Note document from the database by Id.
Kotlin
Persist to disk
Updates to a database should be periodically persisted to disk by calling requestFlush() . The following code calls requestFlush() with a listener to determine if the call was successful.
Kotlin
Close a session
An AppSearchSession should be closed when an application will no longer be calling any database operations. The following code closes the AppSearch session that was opened previously and persists all updates to disk.
Kotlin
Additional resources
To learn more about AppSearch, see the following additional resources:
Samples
- Android AppSearch Sample (Kotlin), a note taking app that uses AppSearch to index a user’s notes and allows users to search over their notes.
Provide feedback
Share your feedback and ideas with us through these resources:
Report bugs so we can fix them.
Content and code samples on this page are subject to the licenses described in the Content License. Java is a registered trademark of Oracle and/or its affiliates.
Источник


