- Внутреннее тестирование
- Быстрое распространение
- Удобное международное сотрудничество
- Обеспечение непрерывной интеграции
- Рекомендации
- Подробнее
- Как провести открытое, закрытое или внутреннее тестирование
- Инструменты управления выпусками в Play Console
- Тестирование приложения во время подготовки к запуску
- Тестирование мобильных игр перед запуском
- Открытое тестирование
- Тестирование функций в предварительном выпуске
- Тестирование в разных странах
- Привлечение трафика
- Рекомендации
- Полезные материалы
- Как провести открытое, закрытое или внутреннее тестирование
- Успешный запуск и обновление приложений в Google Play
- Тестирование мобильных игр перед запуском
- Тестирование приложений перед выпуском
- Testing in-app purchases on Android
- Overview
- Testing, according to the documentation
- Static responses
- Test purchases
- Testing, according to real life
- Bonus tip: faster testing for test subscriptions
- Update! 17/01/2018
- Conclusion
- Android App Testing Tutorial: A Beginners Guide
- Growth of Android
- Android Application Introduction
- ‘To Do’ list before the start of Testing Process
- Testing Types for Mobile Apps
- 1) Functional Testing:
- 2) Android UI Testing:
- 3) Compatibility Testing:
- 4) Interface Testing:
- 5) Network Testing:
- 6) Performance Testing:
- 7) Installation Testing:
- 8) Security Testing:
- 9) Field Testing:
- 10) Interrupt Testing:
- Best Practices in Android App Testing
- 1) Device Selection:
- 2) Beta Testing of the Application:
- 3) Connectivity:
- 4) Manual or Automated Testing:
- Android Testing Framework
- 1) Robotium Test Framework:
- 2) Robo-electric Test Framework:
- 3) Appium Test Framework:
- Conclusion
Внутреннее тестирование
Быстро распространяйте свое приложение среди доверенных тестировщиков, не дожидаясь результатов проверки. Используйте процессы сертификации сборки перед публикацией для более широкой аудитории.
Быстрое распространение
После добавления в Play Console сборки доступны тестировщикам уже через несколько секунд.
Удобное международное сотрудничество
Работайте удаленно с командами контроля качества со всего мира без ограничения на количество лицензий.
Обеспечение непрерывной интеграции
Автоматически развертывайте доступные для внутреннего тестирования сборки с помощью Publishing API
Рекомендации
Проведите первичную проверку качества, быстро распространив приложение среди 100 приглашенных тестировщиков.
Прежде чем выпускать версии для закрытого или открытого тестирования, проведите внутреннее тестирование. При необходимости его можно запустить одновременно с закрытым или открытым для разных версий приложения.
Напоминаем, что при открытом и закрытом тестировании платного приложения тестировщикам нужно будет его купить. При внутреннем тестировании приложение можно установить бесплатно.
Подробнее
Как провести открытое, закрытое или внутреннее тестирование
Узнайте, как настроить тестовые типы версий в Play Console
Инструменты управления выпусками в Play Console
Посмотрите эту запись выступления на конференции I/O 2018, чтобы узнать больше об инструментах управления выпусками в Play Console.
Тестирование приложения во время подготовки к запуску
Пройдите бесплатный курс в Академии Google Play и узнайте больше о тестировании приложений.
Тестирование мобильных игр перед запуском
Выпускайте ранние версии приложения для внутреннего тестирования и проводите закрытое и открытое тестирование среди доверенных пользователей.
Источник
Открытое тестирование
Получайте отзывы о качественных и количественных показателях игры или приложения от большого числа тестировщиков.
Тестирование функций в предварительном выпуске
Проверяйте новые функции среди самых вовлеченных пользователей, прежде чем выпускать их для широкой аудитории.
Тестирование в разных странах
Проводите открытое тестирование на каждом новом рынке: это поможет адаптировать функции приложения в соответствии с потребностями пользователей.
Привлечение трафика
Проверьте свою стратегию привлечения пользователей, сделав предварительный выпуск игры или приложения доступным в Google Play.
Рекомендации
Размещайте тестовые версии своего приложения на Google Play. Это позволит собрать отзывы пользователей и отследить показатели игры ещё до ее запуска.
Выявляйте проблемы в версии для открытого тестирования с помощью отчетов.
Привлекайте больше пользователей для участия в открытом тестировании – распространяйте по всем своим каналам продвижения прямые ссылки на страницу сведений о приложении в Google Play.
Собирайте личные отзывы во время открытого и закрытого тестирования и отвечайте тестировщикам через Play Console. Эти отзывы видны только вам и не влияют на общедоступную оценку приложения.
Примечание. При открытом или закрытом тестировании платного приложения тестировщикам нужно будет его купить. При внутреннем тестировании тестировщики смогут устанавливать приложение бесплатно.
Полезные материалы
Как провести открытое, закрытое или внутреннее тестирование
Перейдите в Справочный центр и узнайте, как настроить тестовую версию в Play Console.
Успешный запуск и обновление приложений в Google Play
Посмотрите презентацию с Google I/O, посвященную использованию инструментов управления выпусками.
Тестирование мобильных игр перед запуском
Публикуйте ранние версии приложения для внутреннего тестирования, проводите закрытое и открытое тестирование среди доверенных пользователей.
Тестирование приложений перед выпуском
Узнайте об оптимальных методах тестирования из курса Академии Google Play.
Источник
Testing in-app purchases on Android

An addendum to the official documentation

Overview
Monetization is one of the most important aspects of distributing your product to the rest of the world. It can make or break a small freelance developer or an established startup.
Android, being so widespread, provides ways for users to purchase products from within your app: this is referred to as In-app Billing. Through this set of APIs, developers can offer two types of products:
- Managed in-app products
As the name suggests, these products are managed by the developer, and they branch into consumable and non-consumable. A consumable product is usually temporary and, once consumed, can be bought again, whereas a non-consumable product is a one-off benefit that the user will continue having in your app. - Subscriptions
These products come with a validity period (days, months, weeks, years) and are automatically renewed at the end of each billing cycle. When a subscription is not renewed, the product is no longer active for the user.
The official documentation is very helpful when it comes to the first steps for adding in-app products to your application. In particular, the “Selling In-App Products” training is well structured and walks you through each required step:
- Adding the Play Billing Library to your app (also check out this article by Joe Birch)
- Configuring the products in the Google Play Console
- Testing the in-app products in your app
Let’s focus on the third point.
Testing, according to the documentation
According to the documentation for testing, we have two ways of testing purchases:
- Static responses from Google Play
By using a restricted set of product IDs, you can trigger static responses from Google Play, so you can test that your app correctly handles all the possible states. You should use this when integrating the Play Billing Library into our app, or for instrumentation testing. - Test purchases
A Google account whitelisted as license-test in the Play Console will be able to make purchases without being actually charged. You can use this when the app goes to QA, or for general testing.
Static responses
Using static responses sounds easy enough, right? You just use one on the following product IDs during a purchase operation:
- android.test.purchased
- android.test.canceled
- android.test.refunded
- android.test.item_unavailable
and the Play Store will reply accordingly. The code looks roughly like this:
However, if you are testing subscriptions, you’re out of luck:
Note: If you’re testing subscription purchases, you must use the product ID of an actual subscription, not a reserved product ID. [Reference]
This means that we cannot rely on static responses to test subscriptions; instead, we need to resort to test purchases.
Test purchases
By using the so-called In-app Billing Sandbox, we can enable access to test purchases. These are the closest thing we have to actual purchases, with a few notable exceptions:
- You are not being charged any amount for the product you buy
- If you’re buying a subscription, the billing period recurs on a daily basis, regardless of the duration configured in the Play Console
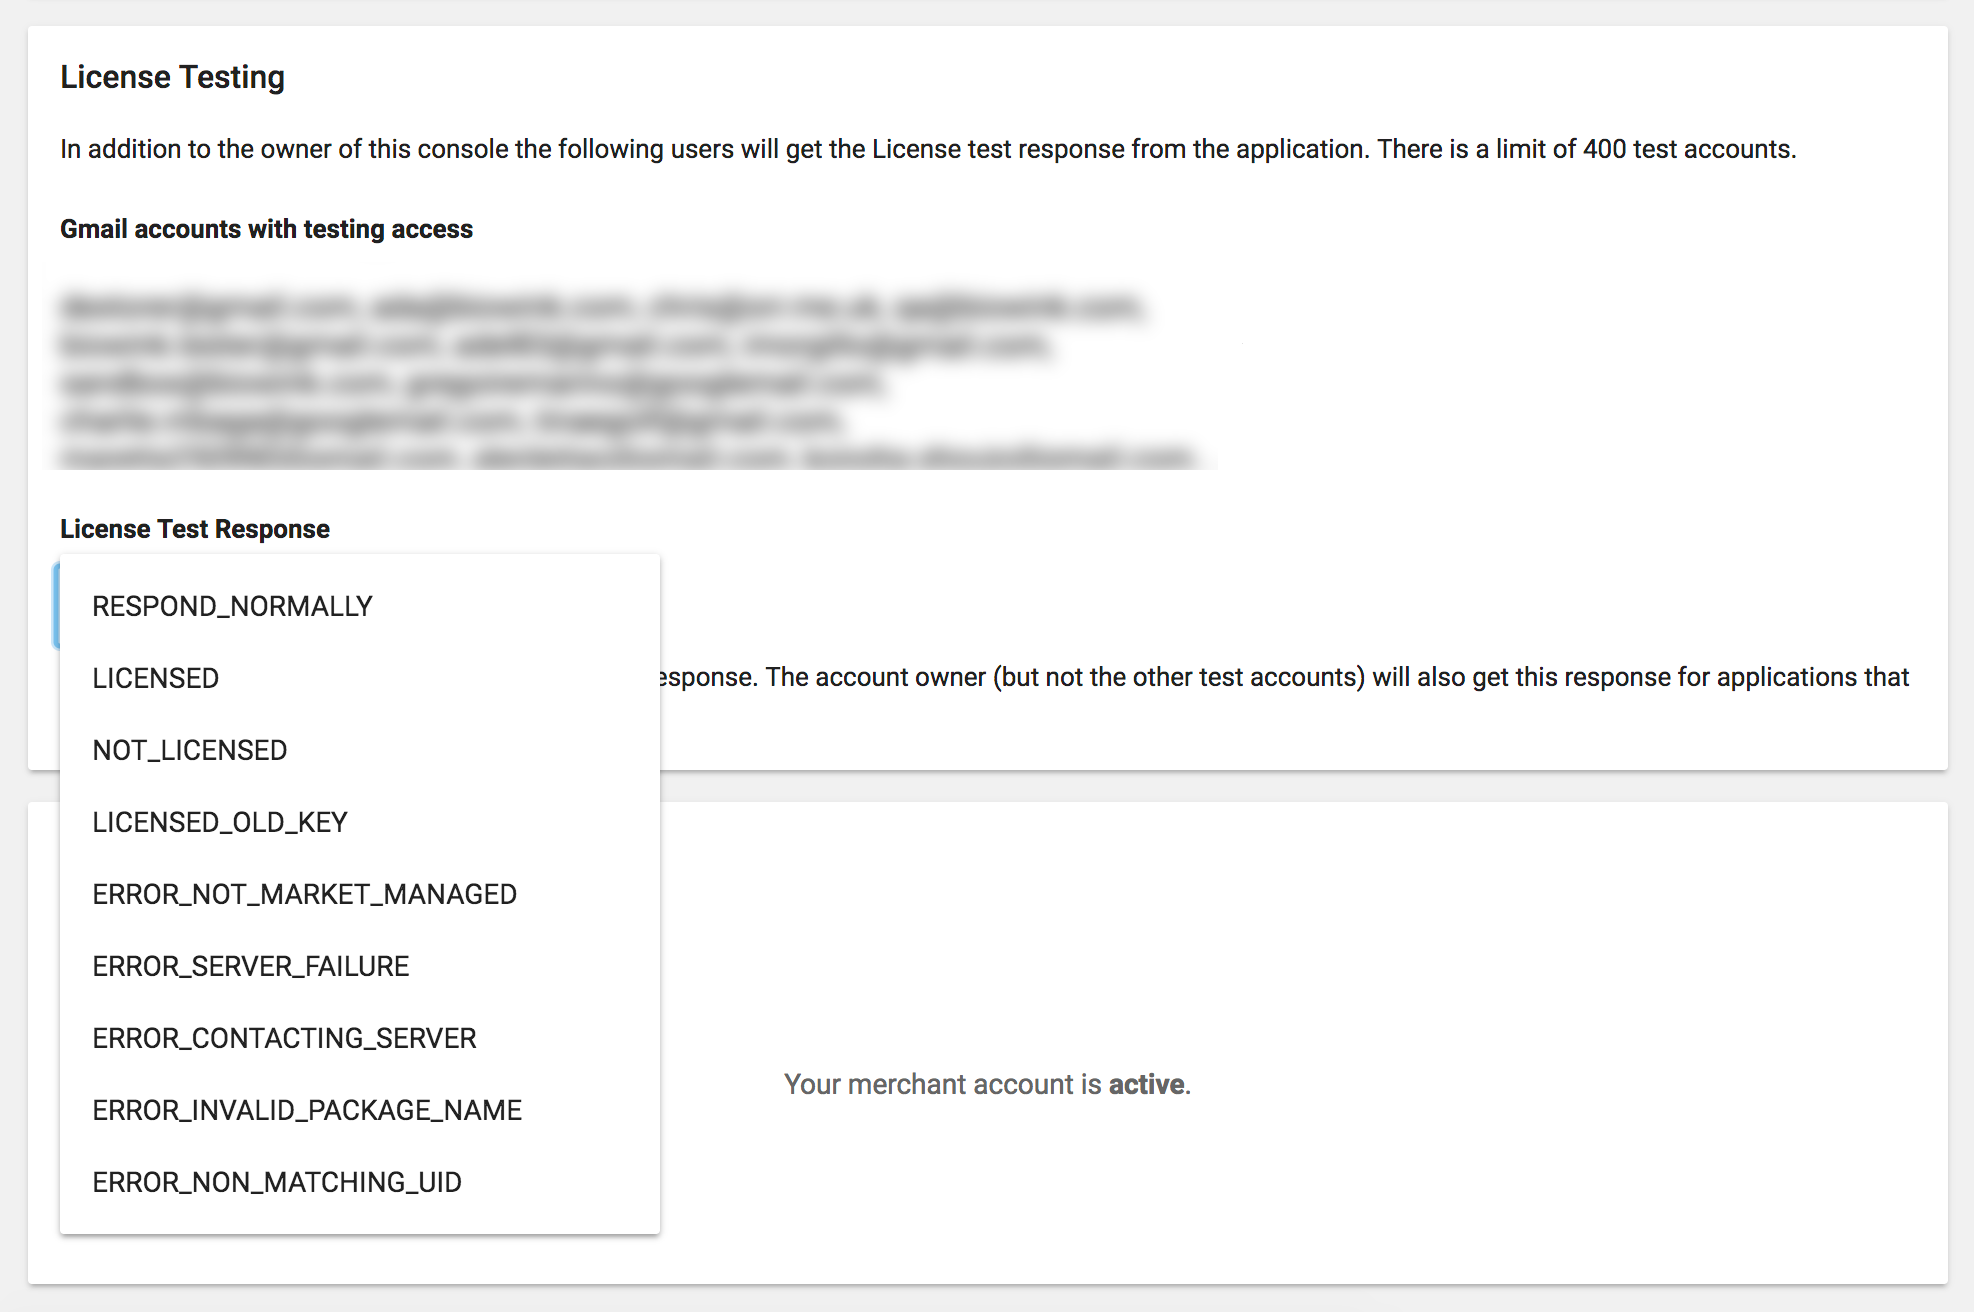
- You have manual control over the response for each purchase
The last point is particularly interesting, because we have two ways of customizing the test purchase behavior.
The first method allows for fine control over the licensing behavior for all the testers: for example, by leaving it to RESPOND_NORMALLY we have a behavior similar to the real one.
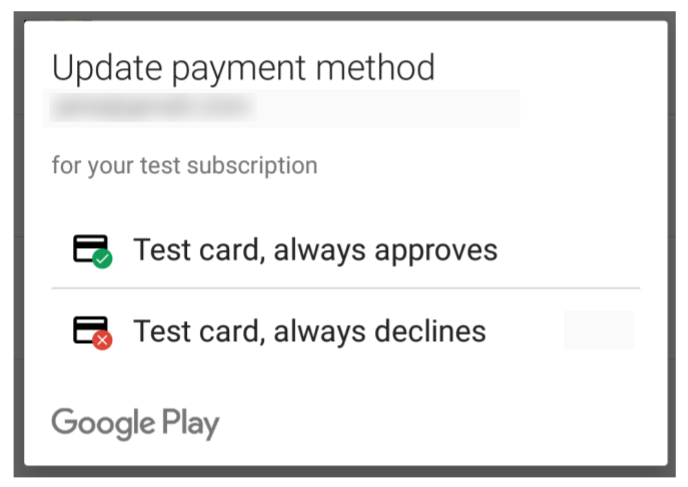
The second method, on the other hand, allows for coarse control over the response of the fake credit card: you can decide whether the card will always approve the purchase or always decline it. Intuitively enough, this second method can be customized by each tester.
In order to be eligible for test purchases, there are a few steps to go through:
- Your APK must be uploaded to the Play Console (drafts are no longer supported)
- Add license testers in the Play Console
- Have testers join the alpha/beta testing group (if available)
- Wait 15 minutes, then start testing
Sounds easy enough, right? The documentation is also very encouraging
It’s easy to set up test purchases [1]
…Sure, let’s see about that. 😒
Testing, according to real life
You religiously follow the documentation, wait 15 minutes (make it 30, just in case), you start testing and…an error occurs. What now?
It turns out that the documentation is fairly optimistic when explaining the required steps for testing in-app purchases. According to this StackOverflow answer, which in turn is a collection of various trial-and-errors by other users, plus my personal experience, there are actually 10+ conditions that you need to meet or account for before being able to properly use test products!
Let’s recap them here:
- Your app is published (i.e., not in draft).
- The APK must be published (either production, alpha or beta channels).
- The APK you uploaded matches the one you’re testing with when it comes to version code, version name, and keystore signature (this point, in my experience, is not needed).
- When testing on the device, you’re using a different account than the one tied to the Play Console (i.e., not your developer account).
- The instructions to wait 15 minutes are a bit too optimistic, as it can take up to 2 hours for changes to propagate from the Play Console.
- Double check that the SKU you’re using in the app matches the one for the product that was configured in the Play Console.
- Double check that you’re not trying to purchase an already owned product or an already active subscription.
- Double check that you have activated your products in the Play Console: by default, products in the console are deactivated and you need to manually activate them.
- If you’re using the alpha/beta channels, make sure that the account you’re testing with is part of the testing group (i.e., has clicked on “Become a tester” after following the opt-in URL).
- If you use ABI flavors, like arm-v7, arm-v8, etc., make sure the APK you’re using for testing contains all the ABI libraries.
- Make sure that, when retrieving the Intent using getBuyIntent , you’re passing the correct product type, i.e., inapp if you’re purchasing managed in-app products or subs if you’re purchasing subscriptions.
- If you’re using the public key for enhanced security, make sure it matches the one on the Play Console because it might change over time (see here).
- Check that Google Play Services are updated on the test device by going to the Google Play Services page on the Play Store.
As you can see, the sandbox is far from straightforward when it comes to real usage, but at least now we have a few extra hints to start looking for a solution!
Bonus tip: faster testing for test subscriptions
We mentioned earlier that test subscriptions have a 1-day expiration period, regardless of their original duration. This means that, even if we cancel the subscription, it will still be considered active for that day. In turn, when the app retrieves the list of purchased products, it will receive the cancelled subscription and present it as an active subscription (because it technically still is). Your UI will then react accordingly and display premium features, instead of the purchase button: again, technically correct, but very inconvenient for us to do quick testing.
However, there’s a nice way of checking whether a subscription’s auto-renewal has been cancelled: the autoRenewing field inside the INAPP_PURCHASE_DATA JSON payload that comes from the billing service (see documentation). When checking the validity of a subscription in a debug environment, you can assume that when autoRenewing is false the subscription is cancelled and you can purchase another one.
⚠️ Be careful though! This check should only be done in debug/staging environments and not in production, so make sure you limit this “strict” check to debug/staging builds only. ⚠️
Update! 17/01/2018
While this post was still being drafted, Google announced that test subscriptions will no longer be renewed daily. Instead, the renewal period will vary from 5 to 30 minutes, depending on the original billing period.
In addition to this, they are limiting the amount of times a test subscription can be renewed to 6 (it is currently unlimited).
All these modifications will be applied starting February 20th 2018.
Conclusion
While far from perfect, the in-app billing support is critical for the Android ecosystem to grow and to being able to generate revenue.
When implementing purchases in your app, it’s worth paying attention to the checklist we reported before to avoid headaches, as well as provide a reliable sandbox environment for you to develop with and for your testers to test the app.
It’s also nice to see that Google is committed for the long run, as they just released the all new Play Billing Library (compared to the old 2013 version!).
A final shout out to the Android community, for being as open and as supportive as ever!
Источник
Android App Testing Tutorial: A Beginners Guide
Basic knowledge collection before Testing Android Apps:
As the title of itself suggests, in this tutorial we will discuss more on the Android testing process.
But, before getting into the various details of the Android testing process, I would like to put forward a couple of questions.
Do you own a mobile phone?
Now, how dumb is that question! Of ‘course all of us do. Everyone has a mobile phone. Mobile phones have become a basic necessity of human existence nowadays.
Can you tell me the OS that’s there on your phone?
If you purchased your phone in between 2014-16, then the chances of your phone running on Android are around 80-85%.

What You Will Learn:
Growth of Android
The below stats describe more about the growth of Android in an easily understandable manner.
- Back in 2009, Android was a newbie and constituted only 3.9% of the total market.
- The major contributor then was the Symbian OS with a whopping number of 47% [Golden days of Nokia].
- That trend started changing over the years and Android has now reached to 85.2% in 2016.

- The above numbers are only for Mobile phones. The Android OS is also having a great impact in the tablet industry. From 4.4% market share in 2011 to 35.7% in 2015 talks about the interest that people have been developing towards Android-powered tablet devices.

- The Google Play store also has seen a rapid increase in download numbers. From 2010 to 2016 the numbers have gone up from 1 billion downloads a month to 65 billion downloads a month.
- The app downloads are also affected greatly by the low prices [Avg: 0.06$/app] of the android apps when compared to the iOS apps.
Why did I just take you through all those numbers?
It was just to make you aware of how vast Android has grown, how tricky the app development has become and how much market this OS has captured in the past decade.
Every website, windows app and Mac App has an android sibling now. Everyone goes for developing an app for Android as soon as they plan to develop a website/windows app. It has now become necessary, as the customers have also started preferring mobile apps over computer apps or websites in the recent years.
Some of the apps that are very frequently used in our day to day activities are Flipkart, Amazon, Zomato, DeliveryHero, Citi Bank, TrueCaller, Facebook, Gmail, Whatsapp etc.
The reason for the surge in the Android market is that:
- It is an open system, hence it is easy to customize, easy to learn and even app development is easier.
- Publishing an app on Google Play store is quite easy when compared to the other play stores.
- There are several manufacturers in the market for Android phones like Sony, HTC, Samsung, Motorola etc.
- There are a huge number of features on Android like DualSIM, microSD, removable battery etc, which is an added advantage to it.
- Pricing of the android phones is not too high and it is affordable etc.
Along with the development requirement of the Android Apps, there has also been a rise in the requirement for testers who are knowledgeable in android testing.
As a tester, before you start testing any android built application, you need to do a lot of homework. The first thing to do is to study the OS and its history. If you don’t know the OS you can’t test the app against the various versions. The basic functionality of the OS version, the UI, GPS, network type support, battery life etc., are some of the important facets that affect an app.
With Android, it is not just the OS but the plethora of devices that also need a study.
A vast number of devices are available in the market, hence before finalizing and freezing your test bed, you need to find out the target audience device share. The various devices offering different features like DualSIM, dual camera, screen resolution, themes etc, affect an app and they need to be tested.
Hence it is very important for a QA to gather a comprehensive knowledge about the complete Android ecosystem.
Android Application Introduction
There are various testing methods that are followed by successfully certifying an Android app.
A typical Android app architecture would look similar to the diagram shown below:

Based on the above figure, there are 2 possibilities for an app:
1) Mobile App for the web application: It may be possible that the customer has a web app and wants to make a mobile app for the same. Amazon, Jabong, Myntra etc., did the same thing, and the moment mobile apps started creating a boom in the market these commercial companies realized that soon people will move from web apps to mobile apps.
2) Mobile App as a separate business entity: I tested a similar logistics app, in order to increase the business it created a separate app for its drivers to facilitate a smooth delivery and removed the paperwork.
The drivers had the app installed on their phones to move the shipment to different stages of delivery and their corresponding status, and delivery updates were reflected in their existing web app.
Other such Examples where mobile app is a separate entity are WhatsApp, health tracking apps like S Health etc.
‘To Do’ list before the start of Testing Process
Unlike a normal testing cycle, for the very first release of a mobile app, there are a few items which need some extra research and planning for a successful delivery of the app.
Following are some of the activities that are important for a QA to carry out before the actual testing starts:
#1) Research on OS and Devices:
Apart from understanding the app requirement, you also need to understand the impact of the various OS versions and the device models. You need to create test cases or scenarios w.r.t the OS and device models.
#2) Test Bed:
Unlike desktop, web and iOS apps, the test bed creation for android apps is very tricky because of the open Android system. The decision should be taken after discussion with the BA, developers and the product owners to find the target audience.
#3) Test Plan:
As it is the first release, an approved plan with approved test bed, testing types etc., should be in place. If there is a separate time required for researching functionalities or business rules or if the testing is going to be tricky etc., everything should be covered in the plan.
#4) Automation Tools:
The automation tools required for mobile apps are very different from that of desktop or web apps. Hence you may need to spend extra time and effort to learn the tool. The time and effort required for the same should be approved by the product owner or customer.
#5) Testing Techniques or Methods:
Unlike the conventional tests that we normally do, there are few tests that are very specific to mobile apps. Namely field test, GPS test, image capture test, etc. These need to be documented in the test cases along with how these type will be tested.
Testing Types for Mobile Apps
Following types of testing are performed in order to certify an Android application:
1) Functional Testing:
Testing is normally achieved by user interface initiated test flows. Not just the flow of a use case is tested, but the various business rules are also tested. Testing is done by certifying the requirements. i.e. whether the application is working based on the requirements.
Let us take the Example of Zomato app.
When you launch the app, based on the location, the list of restaurants shows up. Now as a QA, you have to test the listing of restaurants.
This is functionality testing and here you will test functionalities like:
- Verify whether the restaurant cards are shown w.r.t the location.
- Verify whether the restaurants shown are in the given range (km) of the location.
- Verify whether the review count for each card is in sync with the reviews given.
- Check whether adding a new restaurant for a location reflects in the list.
- Verify whether the restaurants are listed based on the filtering rule of Zomato etc.

2) Android UI Testing:
This is an user-centric testing of the application. In this test phase, items such as visibility of text in various screens of the app, interactive messages, alignment of data, the look and feel of the app for different screens, size of fields etc are tested under this.
For the same above Example of Zomato, the UI tests would be:
- Verify whether the cards are shown properly aligned with the mobile screen size.
- Verify whether the image of the restaurant is shown as expected.
- Verify whether the card details, the rating of the restaurant, cuisine type, address etc, are shown properly aligned.
- Verify whether the scrolling of the list is glitch free and the cards are not shown misaligned when a long list of cards is scrolled etc.
3) Compatibility Testing:
This testing is done mostly in the form of two matrices of OS Vs app and Device model Vs app. Usually, a list of supported OS (and sometimes devices) is provided by the product owner or customer.
The need for this testing is:
- When an OS like Android is taken into account, 7 base versions are found neglecting the number of patch releases/EPs.
- Can you guess the types of Android devices currently working all over the globe? 1000? 2000? Wrong! The correct answer is 24000. There are 24000 types of unique Android devices that are present and active in the world.
- With variations such as these, compatibility testing plays a vital role in certifying an android app.
- We not only need to validate the OS and type of the device but also validate few other features which fall into compatibility testing. The features include:
- Screen size
- Screen resolution
- Network connectivity
4) Interface Testing:
In other words, it is also termed as Integration testing. This testing is done after all the modules of the app are completely developed, tested individually and all the bugs are fixed verified.
Interface testing includes tests like a complete end to end testing of the app, interaction with other apps like Maps, social apps etc, usage of Microphone to enter text, usage of Camera to scan a barcode or to take a picture etc.
Again considering Zomato, the integration tests would be like:
- Verify whether the user is able to book a table for a restaurant.
- Verify whether the user is able to view the menu and order food online.
- Verify whether the user is able to avail a PayTM coupon while ordering food.
- Verify whether the user is able to view the location of the restaurant on Google Maps.
- Verify whether the user is able to open the phone dialer and call the restaurant etc.
5) Network Testing:
The key features of Network Testing include:
- The app should talk to the intermediate service so as to carry out the process.
- During this testing, request/response to/from the service is tested for various conditions.
- This test is mainly done to verify the response time in which the activity is performed like refreshing data after sync or loading data after login etc.
- This is done for both strong wifi connection and the mobile data network.
- This is an in-house testing.
6) Performance Testing:
Performance of the application under some peculiar conditions are checked.
Those conditions include:
- Low memory in the device.
- The battery in extremely at a low level.
- Poor/Bad network reception.
Performance is basically tested from 2 ends, application end, and the application server end
7) Installation Testing:
There are two types of apps on an Android device i.e, Pre-installed applications and the applications which are installed later by the user.
For both of the above, installation testing needs to be carried out. This is to ensure smooth installation of the application without ending up in errors, partial installation etc.
Upgrade and uninstallation testing are carried out as part of Installation testing.
8) Security Testing:
Privacy and security are the 2 major requirements of an app. However, in Banking, healthcare, this becomes the primary requirement.
Testing of the data flow for encryption and decryption mechanism is to be tested in this phase. Access to stored data is also tested in this phase.
9) Field Testing:
Field testing is done specifically for the mobile data network and not in-house but by going out and using the app as a normal user. This testing is done ‘only’ after the whole app is developed, tested and regressed (for bugs and test cases).
It is basically done to verify the behavior of the app when the phone has a 2G or 3G connection. Field testing verifies if the app is crashing under slow network connection or if it is taking too long to load the information.
You can read more about field testing in our article “Importance and necessity of Field Testing for mobile applications”
10) Interrupt Testing:
This type of testing is also known as Offline Scenario Verification. Conditions where the communication breaks in the middle are called as offline conditions.
Some of the conditions where interruptions of a network can be tested are as follows:
- Data cable removal during data transfer process.
- Network outage during the transaction posting phase.
- Network recovery after an outage.
- Battery removal or Power On/Off when it is in the transactional phase.
Best Practices in Android App Testing
There are certain factors to be considered while putting a strategy for mobile app testing.
They are:
1) Device Selection:
- This is one of the most critical steps before starting the android application testing process.
- Decide which devices are to be taken into account for the testing process.
- The selection is to be done so as to maximize the number of target customers.
- Factors such as OS version, Screen resolutions and Form factors [Tablet or smart phones] play a vital role in the selection phase.
- If required, even the help of Emulators can be taken into account.
- But, Emulators should not replace the physical device testing process.
- Device emulators are cost effective and they come in handy during the initial development phase.
- But, to test the real-life scenarios, physical devices are the must. Both emulators and physical devices are to be used in a balanced manner for an optimized result.
2) Beta Testing of the Application:
- Beta testing is very effective in testing with the real-world users, real devices, actual networks and applications installed in a wide geography.
- This gives a clear picture of the network density, network variations [Wi-Fi, 4G, 3G, and 2G] and the impact on the application.
- Beta testing in the real world is one of its kind and cannot be replicated in a controlled environment.
3) Connectivity:
- Normally, Android applications are connected to the internet for various requirements.
- The connectivity on different devices plays a key role in putting up the strategy.
- Mostly the connectivity is controlled by simulation software which helps in regulating the network speed, latency, and limited connectivity while testing.
- It is said that testing under real network connections is always advisable for real-time result/data.
4) Manual or Automated Testing:
- Though automation testing takes ample amount of time for the first run, it comes in handy when the testing has to be repeated. This also reduces the overall time span of testing during the different development stages.
- Android Automation should be clubbed with Manual testing when the regression testing repetition is high in the application development phase, compatibility testing has to be done for the same application on different OS versions, backward compatibility checkpoints etc.
Android Testing Framework
There are a handful of Android testing frameworks that are available.
In this tutorial, we are going to discuss 3 different types of most commonly used frameworks:
- Robotium test framework
- Robo-electric test framework
- Appium test framework
1) Robotium Test Framework:
- This framework is used to write sophisticated and robust black box test cases for Android applications.
- It supports both native as well as hybrid clients.
- Functions, system test cases, and User acceptance test cases can be written using this framework.
- Robotium supports Android 1.6 and above and also support for Dialogs, Menus, Activities etc.
- This framework handles multiple Android activities automatically.
- A handful of methods are given as a part of Robotium for interacting with different graphical components of the Android application. Some of them are as below:
- goBack();
- getButton();
- isRadioButtonChecked();
- searchText(“User”);
- click on button(“Logout”);
2) Robo-electric Test Framework:
- This framework helps in testing Android applications on the JVM based on the JUnit4 framework.
- It uses Android API.
- This helps in writing test cases and running them on the JVM.
- Under this, all the classes are replaced by something called shadow objects.
- Whenever a method is implemented, Robo-electric internally sends the call to the shadow object.
- Based on the implementation, if a method is implemented by shadow object then a value is returned. Else, NULL is returned.
- Because of the shadow objects and JVM, the execution becomes faster.
3) Appium Test Framework:
- This framework works for native, hybrid and mobile –web apps for Android devices.
- Appium is free to use utility.
- Single API works for both Android as well as the iOS platform. This is one of the frameworks which supports cross-platform testing.
- It uses Selenium Web driver to interact with the Android application.
- Appium supports script writing using a lot of programming languages such as Java, C#, Python, PHP, Ruby etc.
Conclusion
Android application automation can be clubbed with manual as per the need. However, if Androind Automation testing is added to the strategy, selecting the correct tool is a big task. While selecting the automation tool factors like Multi-platform support, Test workflow, Price of the tool, service/support etc. should be taken into account.
There are several challenges involved in Android application testing. There are different factors to be taken into account before the Android testing process can really be implemented but once done this becomes a very interesting task.
Watch out our upcoming tutorial to know more about Mobile Testing Challenges and Solutions.
Источник


