- Тестируем Android-приложение правильно
- Чек-лист от команды AGIMA
- 1. Сдвиг элемента страницы
- 2. Обрезка текста
- 3. Отсутствие элемента страницы
- 4. Пересечение элементов
- 5. Выход элементов за границы экрана
- 6. Артефакты адаптивного дизайна
- Чек-лист
- Developing Android unit and instrumentation tests — Tutorial
- 1. Introduction into Android testing
- 1.1. Testing Android applications
- 1.2. What to test on Android applications
- 1.3. Tooling support for Android testing
- 1.4. Android project organization for tests
- 2. Android unit testing
- 2.1. Unit testing in Android
- 2.2. Required dependencies in the Gradle build file
- 2.3. Running the unit tests
- 2.3.1. Using Gradle
- 2.3.2. Using Android Studio
- 2.4. Location of test reports
- 2.5. Activating default return values for mocked methods in android.jar
- 3. Exercise: Create unit test
- 3.1. Preparation: Create Android project
- 3.2. Add JUnit dependency
- 3.3. Create test
- 3.4. Run unit tests
- 4. Writing tests to run on the Android device
- 4.1. Instrumentation tests
- 4.2. How the Android system executes tests
- 4.3. Mocking objects in Android
- 4.4. Location of instrumentation tests
- 4.5. Define dependencies and testInstrumentationRunner in the Gradle build file
- 4.6. Using the @RunWith(AndroidJUnit4.class)
- 4.7. Run the tests on Android
- 4.8. Location of test reports
- 4.9. How to replace the application for instrumentation tests
Тестируем Android-приложение правильно
Меня зовут Андрей Рыжкин, я CTO AGIMA.
Сегодня я расскажу о том, как мы тестируем приложения на Android, а также поделюсь нашим чек-листом.
Чек-лист от команды AGIMA

В 2020 году количество приложений для Android вплотную приблизилось к трём миллионам (по данным Appbrain на 28 марта). И это число продолжает расти – каждый день появляются сотни новых программ для этой операционной системы. В том числе благодаря AGIMA. Мы создаем самые разные приложения для Android – простые и сложные, узкоспециализированные и «для всех». И можем немало рассказать о нюансах их разработки.
Конечно, главное в Android-приложении – его функционал. Недочеты вёрстки редко бросаются в глаза, но качество любого продукта – в мелочах. Поэтому мы всегда тщательно тестируем приложения перед запуском. А для того, чтобы тестирование занимало минимум времени и приносило максимум пользы, мы разработали специальный чек-лист, которым рады поделиться с вами!
Но сначала перечислим шесть наиболее распространенных проблем вёрстки, избежать которых поможет наш чек-лист.
1. Сдвиг элемента страницы
При вёрстке страницы можно применить три вида выравнивания по вертикали (Align Top, Align Middle и Align Bottom) и три – по горизонтали (Align Left, Align Center, Align Right). Но если использовать их несогласованно, отдельные элементы страницы начинают «съезжать» со своих мест.
На рисунке слева всё хорошо, но стоит изменить разрешение – и заголовок сдвигается вправо.
2. Обрезка текста
Проблема появляется, когда компоненты GUI пытаются сжать, чтобы «втиснуть» в маленький экран.
Слева всё в порядке, справа часть текста обрезана из-за изменения ориентации устройства.
3. Отсутствие элемента страницы
При снижении разрешения экрана элементы увеличиваются в размере. И при неправильной вёрстке некоторые из них могут просто «исчезнуть».
4. Пересечение элементов
Иногда, также при снижении разрешения или уменьшении размера экрана, компоненты GUI «наезжают» друг на друга. В итоге на странице воцаряется полный хаос.
5. Выход элементов за границы экрана
Причина всё та же – при изменении разрешения элементы страницы увеличиваются, и экрана банально «не хватает» для их отображения. В итоге страница ужасно выглядит (и это в лучшем случае, в худшем ей становится просто невозможно пользоваться).
6. Артефакты адаптивного дизайна
При увеличении разрешения экрана может возникнуть «обратная» ситуация – компоненты GUI и текстовые символы могут уменьшиться до абсолютно нечитабельных размеров.
Согласно Material Design, размер любого элемента, с которым взаимодействует пользователь, будь то кнопка, чекбокс или радиобаттон, не должен составлять меньше 48 пикселей по любому измерению.
Гайдлайн не дает четких рекомендаций по размеру текста, однако по результатам исследования комфортным считается шрифт в 16 пикселей высотой, а приемлемым для чтения – 12-14 пикселей.
Перечисленные проблемы часто «наслаиваются» друг на друга – как известно, беда не приходит одна. И результаты таких сочетаний могут быть самыми непредсказуемыми. Но это – тема для отдельной статьи.
А теперь – обещанный чек-лист. Используйте его во время тестирования Android-приложения – и от вас не «ускользнет» ни одна ошибка!
Чек-лист
- Установка из дистрибутива происходит без уведомлений об ошибках.
- Успешно выполняется установка из магазина приложений.
- Установка обновлений не вызывает ошибок.
- Отмена установки происходит корректно, с удалением всех следов приложения.
- Повторная установка после отмены возможна и выполняется успешно.
- При попытке установки на неподдерживаемое устройство/версию ОС появляется предупреждение о несовместимости, и установка корректно завершается.
Запуск и выход из приложения:
- Приложение запускается при клике по его иконке.
- Приложение запускается в режиме разделенного экрана.
- Приложение запускается при клике по уведомлению от него.
- Приложение запускается по ссылкам из других приложений.
- Приложение запускается по голосовой команде.
- Приложение запускается при автозагрузке.
- Приложение запускается при управлении жестами.
- Приложение запускается при открытии ассоциированных файлов.
- Приложение возобновляет работу после перевода в фоновый режим.
- Время запуска приложения не слишком велико.
- Возможен выход из приложения штатным способом.
- Возможен выход из приложения при нажатии на кнопку «домой» (приложение переходит в фоновый режим).
- Управление приложением интуитивно понятно.
- Навигация в приложении соответствует требованиям, предъявленным заказчиком
- Приложение корректно обрабатывает смену ориентации экрана.
- Приложение корректно обрабатывает изменение масштаба отображения.
- Приложение корректно обрабатывает жесты multitouch.
- Вызов клавиатуры происходит корректно, клавиатура не скрывает элемент страницы, в который вводится текст.
- Элементы управления соответствуют выполняемым функции.
- Расход заряда батареи соответствует нагрузке, создаваемой приложением.
- Задержки переходов и/или открытия не критичны.
- Приложение соответствует требованиям удобства использования для платформы
- Нет «вылетов» приложения и/или неожиданно возникающих всплывающих окон.
- (если заявлено в ТЗ) В приложении присутствует помощь для новых пользователей
Вёрстка (на всех заявленных в ограничениях устройствах и разрешениях):
- Отсутствуют сдвиги элементов страницы (расположение элементов соответствует заявленному в макете).
- На страницах нет обрезки текста.
- На страницах присутствуют все заявленные элементы.
- Элементы не пересекаются и не «наслаиваются» друг на друга.
- Ни один элемент не выходит за границы экрана.
- Отсутствуют артефакты адаптивного дизайна.
- Обновления устанавливаются корректно.
- При запуске происходит проверка обновлений, и пользователю выдается информация об ограничениях текущей версии.
- Появляются уведомления при нескольких пропущенных обновлениях.
- Появляются уведомления при пропущенных критических обновлениях, препятствующих эксплуатации приложения.
- Приложение работает после обновления ОС.
- Приложение работает после прерванной или отмененной установки обновления.
- Прерывание работы приложения телефонным звонком обрабатывается корректно.
- Прерывание работы приложения получением СМС обрабатывается корректно.
- Прерывание работы приложения сменой ориентации экрана обрабатывается корректно
- Прерывание работы приложения блокировкой/разблокировкой экрана обрабатывается корректно.
- Прерывание работы приложения системными уведомлениями обрабатывается корректно.
- Прерывание работы приложения разрывом соединения с интернетом обрабатывается корректно.
- Возможна работа приложения при слабом/нестабильном соединении (в зависимости от требований).
- Возможна работа приложения в режиме энергосбережения.
- При смене сети работа приложения не прерывается.
- Работа приложения не зависит от процессов передачи данных в фоновом режиме.
- В магазине приложений нет алертов на безопасность приложения.
- При запуске приложения на устройстве не возникает коллизий (при использовании наиболее популярных антивирусных систем).
- При установке и использовании приложение запрашивает и может использовать нужные разрешения.
- Приложение корректно работает с пользовательской сессией (согласно требованиям.
И напоследок важный вопрос для всех читателей. Какие пункты вы добавили бы к нашему чек-листу? Будем рады вашим идеям!
Статья написана с ex-head QA AGIMA Рамилем Усмановым.
Источник
Developing Android unit and instrumentation tests — Tutorial
This tutorial describes how to write unit and instrumentation tests for your Android application. It describes how to execute these tests via Android studio and Gradle. This tutorial assumes that you are familiar with Android programming in general.
1. Introduction into Android testing
1.1. Testing Android applications
Android applications run on a variety of devices. Also the Android framework and the surrounding open source frameworks evolve at a high speed. To ensure that you application works well, it is import to write software tests. This helps you to enhance and maintain the Android application.
Unit testing for Android can be classified into:
Local unit tests — tests which can run on the JVM.
Instrumented unit tests — tests which require the Android system.
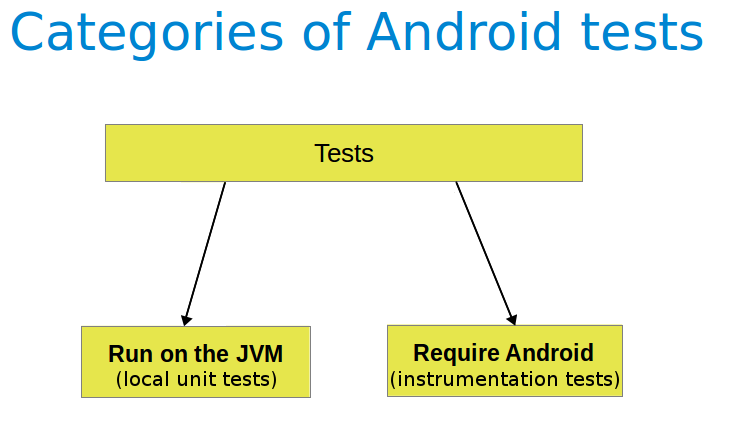
Local unit tests run much faster compared to the time required to deploy and run tests on an Android device. Prefer writing local unit tests and only run tests on Android, if you require a real Android system.
If you write local unit test and have dependencies to Android API, you need to replace them, e.g., via a mocking framework like Mockito.
1.2. What to test on Android applications
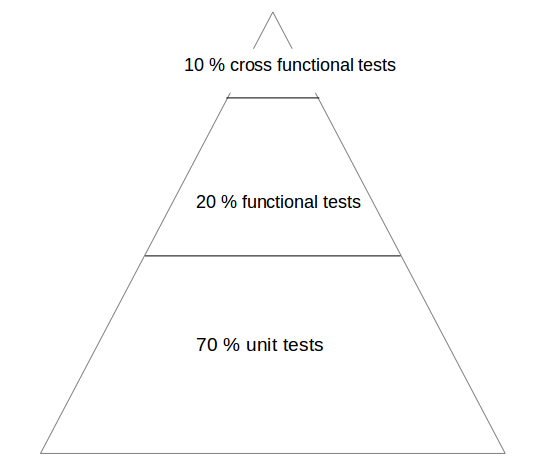
Your test should focus on the business logic of your application. A good rule of thumb is to have the following distribution of tests:
70-80 % unit tests to ensure stability of your code basis
20-30 % functional tests to ensure that the application really works
some cross functional tests if your application integrates intensively with other Application components
You should test your application at least on one device with the lowest possible configuration. In addition you should test on one device with the highest available configuration, e.g., pixel density, screen resolution to ensure that it works fine on these devices.
1.3. Tooling support for Android testing
The Android Testing Support library (ATSL) project from Google provides tooling for Android testing. For example, it ( AndroidJUnitRunner ).
If you run local unit tests, a special version of the android.jar (also known as the Android mockable jar ) is created by the tooling. This modified JAR file is provided to the unit test so that all fields, methods and classes are available. Any call to the Android mockable JAR results, by default, in an exception, but you can configure Android to return default values. See Activating default return values for mocked methods in android.jar for details.
The library provides a JUnit 4-compatible test runner ( AndroidJUnitRunner ), the Espresso test framework and the UI Automator test framework. Espresso test framework can be used to test the User Interface of your application. UI Automator allows to write cross application functional tests.
AndroidJunitRunner provides access to the instrumentation API, via the InstrumentationRegistery .
InstrumentationRegistry.getInstrumentation() , returns the Instrumentation currently running.
InstrumentationRegistry.getContext() , returns the Context of this Instrumentation’s package.
InstrumentationRegistry.getTargetContext() , returns the application Context of the target application.
InstrumentationRegistry.getArguments() , returns a copy of arguments Bundle that was passed to this Instrumentation. This is useful when you want to access the command line arguments passed to the instrumentation for your test.
It also gives access to the life cycle via the ActivityLifecycleMonitorRegistry .
1.4. Android project organization for tests
The following is the default directory structure for your application and test code:
app/src/main/java — for your source code of your main application build
app/src/test/java — for any unit test which can run on the JVM
app/src/androidTest/java — for any test which should run on an Android device
If you follow this conversion, the Android build system runs your tests on the correct target (JVM or Android device).
If you receive the following error message: «error duplicate files in path. Path in archive: LICENSE.txt» you can add the following to your app/gradle.build file.
2. Android unit testing
2.1. Unit testing in Android
A unit test verifies in isolation the functionality of a certain component. For example, assume a button in an Android activity is used to start another activity. A unit test would determine, if the corresponding intent was issued, not if the second activity was started
A unit tests for an Android application can be:
local unit test — which runs on the JVM
Android unit test — which runs on the Android runtime
If they run on the JVM, they are executed against a modified version of the android.jar Android library. In this version all final modifiers have been stripped off. This makes it easier to use mocking libraries, like Mockito.
The local unit tests of an Android project should be located in the app/src/test folder.
2.2. Required dependencies in the Gradle build file
To use JUnit tests for your Android application, you need to add it as dependency to your Gradle build file.
2.3. Running the unit tests
2.3.1. Using Gradle
Run your unit tests with the gradlew test command.
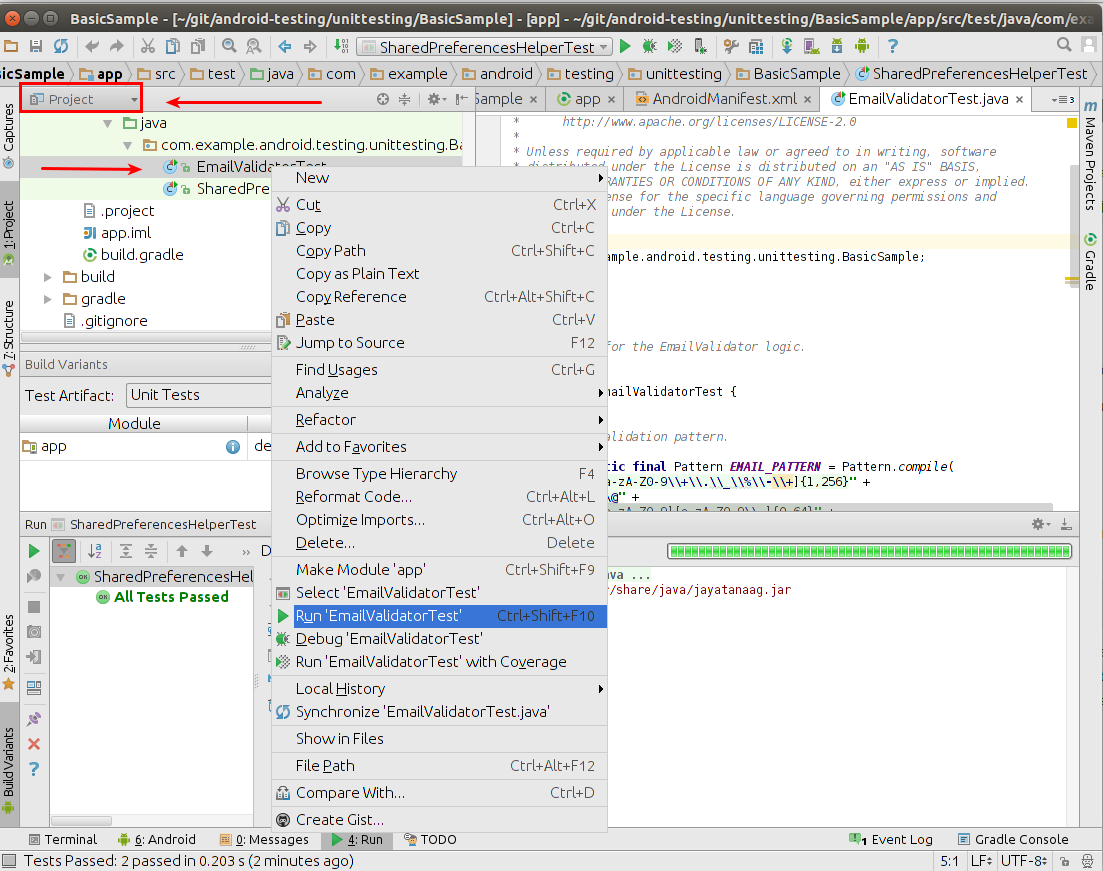
2.3.2. Using Android Studio
To run a unit test, right-click on your test class in the Project window and select Run.
2.4. Location of test reports
The Test reports are created in the app/build/reports/tests/debug/ directory. The index.html gives an overview and links to the individual test pages.
2.5. Activating default return values for mocked methods in android.jar
By default, all calls to methods in the modified android.jar file throw exceptions. This default should ensure that your unit tests only test your code and do not depend on any particular behavior of the Android platform. If you want to configure a certain behavior, you can use a mocking framework to replace these call.
You can also instruct the Gradle build system to return default values for method calls in the `android.jar`with the following configuration in your Gradle build file.
3. Exercise: Create unit test
In this exercise you learn how to create a simple JUnit4 test for an Android project.
3.1. Preparation: Create Android project
Create the Android project as described in Android temperature converter.
3.2. Add JUnit dependency
Ensure you have the dependency to Junit in your app/build.gradle file.
3.3. Create test
In your app/src/test directory create the following two test methods for the ConverterUtil class.
3.4. Run unit tests
Ensure your unit tests are correctly implemented by running test tests. They should run successfully.
4. Writing tests to run on the Android device
4.1. Instrumentation tests
The Android testing API provides hooks into the Android component and application life cycle. These hooks are called the instrumentation API and allow your tests to control the life cycle and user interaction events.
Under normal circumstances your application cannot control the life cycle events and the user drives the application. For example, if Android creates your activity the onCreate() method is called. Or if the user presses a button your corresponding code is called. Via instrumentation you can control these events via your test code. For example, your instrumentation test can start the activity. Afterwards, it can call the finish() and restart the activity to test if the instance state of the activity is correctly restored.
Instrumented unit tests are unit tests that run on Android devices and emulators instead of running on the Java virtual machine. These tests have access to the real device and its resources and are useful to unit test functionality which cannot be easily mocked by mocking frameworks. An example is a test which validates a Parcelable implementation.
An instrumentation-based test class allows you to send key events (or touch events) to the application under test.
With user interface testing framework like Espresso, the developer rarely has to use the instrumentation API directly.
4.2. How the Android system executes tests
The InstrumentationTestRunner is the base test runner for Android tests. This test runner starts and loads the test methods. Via the instrumentation API it communicates with the Android system. If you start a test for an Android application, the Android system kills any process of the application under test and then loads a new instance. It does not start the application, this is the responsibility of the test methods. The test method controls the life cycle of the components of the application.
The test runner also calls the onCreate() method of the application and activity under test during its initialization.
4.3. Mocking objects in Android
The mocking framework Mockito can also be used for instrumentation tests. This allows you to replace parts of the Android system which are not interesting for the test. The Android framework provided in the past specialized mocking classes but these are not necessary anymore.
4.4. Location of instrumentation tests
As described in Android project organization for tests the unit tests of an Android project should be located in the app/src/androidTest/java folder.
4.5. Define dependencies and testInstrumentationRunner in the Gradle build file
To use JUnit tests for your Android application you need to add the dependency to JUnit to your Gradle build file. You also need to specify android.support.test.runner.AndroidJUnitRunner as testInstrumentationRunner in the build file.
4.6. Using the @RunWith(AndroidJUnit4.class)
It is also recommended annotating the test with the @RunWith(AndroidJUnit4.class) annotation. AndroidJUnit4 extends JUnit4, so if you use pure Junit4 syntax and ActivityTestRule it is not required. But you need it, if you want to run, i.e., Espresso tests with ActivityTestRule and JUnit4.
4.7. Run the tests on Android
Run your local unit tests via Gradle with the gradlew connectedCheck command.
To run your local unit tests via Android Studio, right-click on your test class in the Project window and select Run.
4.8. Location of test reports
The test reports are created in the app/build/reports/androidTests/connected/ directory. The index.html gives an overview and links to the individual test pages.
4.9. How to replace the application for instrumentation tests
You can replace the application class for the instrumentation tests by overriding the AndroidJUnitRunner and its newApplication method.
Источник


