- Learning to Parse XML Data in Your Android App
- Introduction
- The classes for XML parsing in Android
- Instantiating your parser
- Parsing the XML
- Other Parsers used for XML
- SAX Parsers
- Conclusion
- Parsing XML data in Android Apps
- Creating a simple User Interface
- Defining XML data to parse
- Creating a Player POJO
- Preparing the XML Parser
- Parsing the XML data
- Displaying the XML data
- Our App in Action
- An introduction to XML for new Android developers – the powerful markup language
- A basic introduction to XML and markup languages
- XML in Android development
- Using XML in your Android app
- XML outside of layout files
- Getting started with XML code for Android
- Syntax
- Managing views and viewgroups
- Closing comments
Learning to Parse XML Data in Your Android App
Introduction
We are in an age where, typically, an application cannot work in total isolation and does not have all the data it needs to do its work. It generally has to communicate to some other application–maybe over the internet–and read or send some data to it.
However, the applications with which your app communicates might not be developed using the same technology as yours. For smooth data exchanges between your app and some other application you might be exchanging data in an open format like Extensible Markup language or XML.
An XML document is a human readable text document that contains some starting and ending tags with attributes and data in those tags. Most of the languages and platforms have support for parsing and creating XML documents in them. Android also provides us APIs so that we can work and process XML documents in our app with ease and flexibility. In this article, we are going to see how you can work effectively with XML documents in your Android app.
The classes for XML parsing in Android
There are various XML parsers we can use on the Android platform. For XML, Android recommends the use of the XMLPullParser . Android gives a multiple implementation of the XMLPullParser and you can use any of them in your program. Depending on the way you create your XMLPullParser , the implementation of the parser will be chosen.
Instantiating your parser
As stated above, there are multiple ways in Android you can create an XMLPullParser . The first way to do it is using the Xml class as shown below:
You have to just call newPullParser which will return you a reference to the XMLPull parser. Or you can get a reference from the XmlPullParserFactory as shown below.
Parsing the XML
Once we have the parser reference it’s now time to use it to parse an XML. We are going to use the following XML as the XML to parse. So now create a file called temp.xml in your assets folder with the content:
The code of the activity to read and parse is as follows:
In the above code we have created a small class called Product which has three members: name, quantity and color.
In the activity we first get the XMLPullParser instance then we open the temp.xml as an inputstream . Once that is done we set the inputstream as input to the parser. Then we parse the xml in our function parseXML .
In the function parseXML we create an ArrayList in which we will store all the products which we will parse from the XML. Once that is done we create a loop which will work till the end of the document is reached.
At the start of the document we created the ArrayList of products. If a tag starts and if the tag is product we know that now it’s a new product so we create a new product instance. Then if the other tags are read we will just read and add the values in our Product instance.
Once the Product tag is ended we add the product to the ArrayList . Once all the products are added we call the function printProducts in which we iterate over the ArrayList and then print the values on the screen.
If we run the activity now we will see the output as follows:

Other Parsers used for XML
There are other parsers also that can be used to parse XML in Android. The DOM parser can be used which creates a complete memory model of the XML and can be used to either create or parse XML. DOM parsers generally consume a lot of memory.
You can get the instance of a DOMBuilder as shown below
SAX Parsers
The SAXParsers can also be used to parse XML and consume much lesser memory then DOM parsers. The SAXParsers can be used only to parse XMLs not to create them. You can get the reference of a SAXParser as shown below:
Conclusion
XML documents are becoming a standard way to exchange data between applications over the internet. With our Android apps becoming smarter and smarter it might be necessary for your Android app to communicate and exchange data between different applications over the internet. Android provides a rich set of APIs to work with XML documents in your Android app.
With the help of these APIs you can easily incorporate XML into your Android app. The XML parsers do the tedious work of parsing the XML and we have to just write the code to fetch the appropriate information from it and store it for further processing.
So, have fun processing XML in your next Android app.
And if you enjoyed reading this post, you’ll love Learnable; the place to learn fresh skills and techniques from the masters. Members get instant access to all of SitePoint’s ebooks and interactive online courses, like Beginning Android Development.
Comments on this article are closed. Have a question about developing Apps? Why not ask it on our forums?
Источник
Parsing XML data in Android Apps

Jun 28, 2018 · 4 min read
JSON is become a very widespread format for the Web Services but in some cases, you would have to parse data in the good old XML format. In that tutorial, you are going to learn how to parse a XML file on Android.
Note that there are various XML parses available in the Android SDK in standard. Thus, you can use the following solutions :
- XMLPullParser API
- DOM Parser API
- SAX Parser API
As usual, each parser has its advantages and drawbacks.
The recommendation on Andr o id is to use the XMLPullParser API which consumes less memory than the DOM Parser API which loads the complete XML file in memory before parsing it.
So, in this tutorial, we will use the XMLPullParser API. Note that you can also discover this tutorial in video on YouTube :
Creating a simple User Interface
To display the parsed XML data, we need to create a simple User Interface. It will consist in a simple TextView centered on the screen :
Defining XML data to parse
Then, we define some XML data to parse inside a file under the assets directory of our Android project. This file will be named data.xml and will contain some NBA players with data like name, age and position played :
Creating a Player POJO
To map the data for each player, we create a Player POJO (Plain Old Java Object) :
Preparing the XML Parser
The first step is to load the XML file from the assets of our Android Application. For that, we define a parseXML method. We create a new instance of the XMLPullParserFactory class. Then, we create a new XMLPullParser instance by calling the newPullParser method of the XMLPullParserFactory got previously.
We got an InputStream on the XML file by calling the open method of the AssetManager instance. With that instance, we can set the input on the XMLPullParser instance. It gives us the following code :
Parsing the XML data
Now, we need to parse the XML data. The parsing will be processed in the processParsing method. We start by getting the current event type from the parser by calling the getEventType method.
Then, we enter in a loop while the event type is different of the XmlPullParser.END_DOCUMENT constant. In the loop, when we meet a XmlPullParser.START_TAG event type, we get the name of the current tag by calling the getName method.
When we have a player tag, we create a new Player instance and we add it in an ArrayList of Player. This list will be used to store all the players read from the XML file.
If the current player is not null, we are reading data for a player. We have to check if the tag is name, age or position. For each case, we call the nextText method of the parser to get the value associated to the tag. Then, we set the value on the current player.
At the end of the loop, we have stored all the players from the XML file on the ArrayList of Player. Note that just before the end of the loop, you need to call the next method of the parser to pass to the following event.
It gives us the following code :
Displaying the XML data
The last step is also the simplest. We need to display the players in our TextView via the printPlayers called at the end of the processParsing method.
In that method, we iterate on the ArrayList of Player and for each player we add its properties (name, age and position) on a StringBuilder instance. Finally, we display the text on the TextView by calling its setText method with the value of the StringBuilder instance.
It gives us the following complete code for the MainActivity :
Our App in Action
Best part of the tutorial is coming since it’s time to put our App in Action. When, you will launch the Application, you should have the following result :

That’s all for that tutorial.
To discover more tutorials on Android development, don’t hesitate to subscribe to the SSaurel’s Channel on YouTube :
Источник
An introduction to XML for new Android developers – the powerful markup language

If you’re interested in Android development, chances are you’re going to need to learn some programming.
In most cases, that will mean learning Java or Kotlin, either of which is officially supported by Android Studio, the official “IDE” for Android Development from Google. However, no one ever talks about XML, and this can lead to confusion when you open up a new project for the first time and notice that there are actually two different main files and two different types of script. Hence this article, which will serve as your introduction to XML for Android development.
Unless you’re making a game using Unity or Unreal, chances are you’re also going to need to understand this “markup language” to define your layout. If you try and skip it, eventually you’ll hit a road block.
Read on then to discover what XML is, why you need it, and how to get started.
A basic introduction to XML and markup languages

XML stands for Extensible Markup Language, which gives us a clue to what it does.
A markup language is slightly different from a programming language. Whereas a programming language (C#, C++, Java, Kotlin, Python, BASIC) will allow you to define behaviors, interactions, and conditions; a markup language is used more to describe data, and in this case, layouts. Programming languages create dynamic interactions, whereas markup languages generally handle things like static user interfaces.

- Markup languages control presentation data.
- Scripting languages mediate between programs to generate data.
- Programming languages transform data.
Despite appearances, XML is not a programming language.
Another example of a markup language is HTML, which defines the appearance of a website. HTML places the images and text on a website and sets the font and color. You couldn’t make a computer game in HTML (not a very good one anyway), which is why you might turn to something like JavaScript for more interactive elements. Though just to complicate matters, JavaScript is technically a scripting language!

In fact, XML was originally introduced by the World Wide Web Consortium (W3C) to deal with the inherent limitations of HTML. Specifically, HTML is not terribly readable for a computer, because it doesn’t explain what anything on the page actually is.
Mrs. Mary McGoon
1401 Main Street
Anytown, NC 34829
Here, you and I know the information is an address, but all the browser or computer knows is where to start new lines. That’s where something like XML comes in handy.
Here’s how the same information might look in XML:
XML is used anywhere that can benefit from adding context to data. It is used across the web to make search smarter and simplify data exchange. XML is actually based on the Standard Generalized Markup Language (SGML), which has been used by the publishing industry for decades.
XML performs the same function in Android app development: describing data and introducing elements.

Specifically, XML sets the layout of things like buttons and images, and defines the font, color, and any text that shows by default. To make those buttons actually do anything, you will need to use a programming language like Java or Kotlin, though.
XML in Android development
When you create a new project in Android Studio, you will be greeted by a hierarchy of different files and folders, which can be a little daunting for complete beginners. It’s a rather jarring introduction to XML, no doubt!
![]()
You just need to concentrate on two files for now: MainActivity.java and activity_main.xml.
To make life just a little simpler, Android Studio normally opens both these files as soon as it boots up.
You’ll also notice that both these files have a little bit of code already in them. This is called “boilerplate code,” which is code that almost every program needs, and so which Android Studio will populate for you in order to save time.
One line in MainActivity.java reads:
setContentView(R.layout.acivivty_main)
This means the activity this Java code controls will display the activity_main.xml file, and you may reference certain elements from that as you go.
You can assign any XML file to any Java file with this, and you can create as many of both as you like. However, by default MainActivity.java will always be the class (java file) Android loads first when running your programs.
Using XML in your Android app
To recap, XML describes the views in your activities, and Java tells them how to behave. To make changes to the layout of your app then, you have two main options.
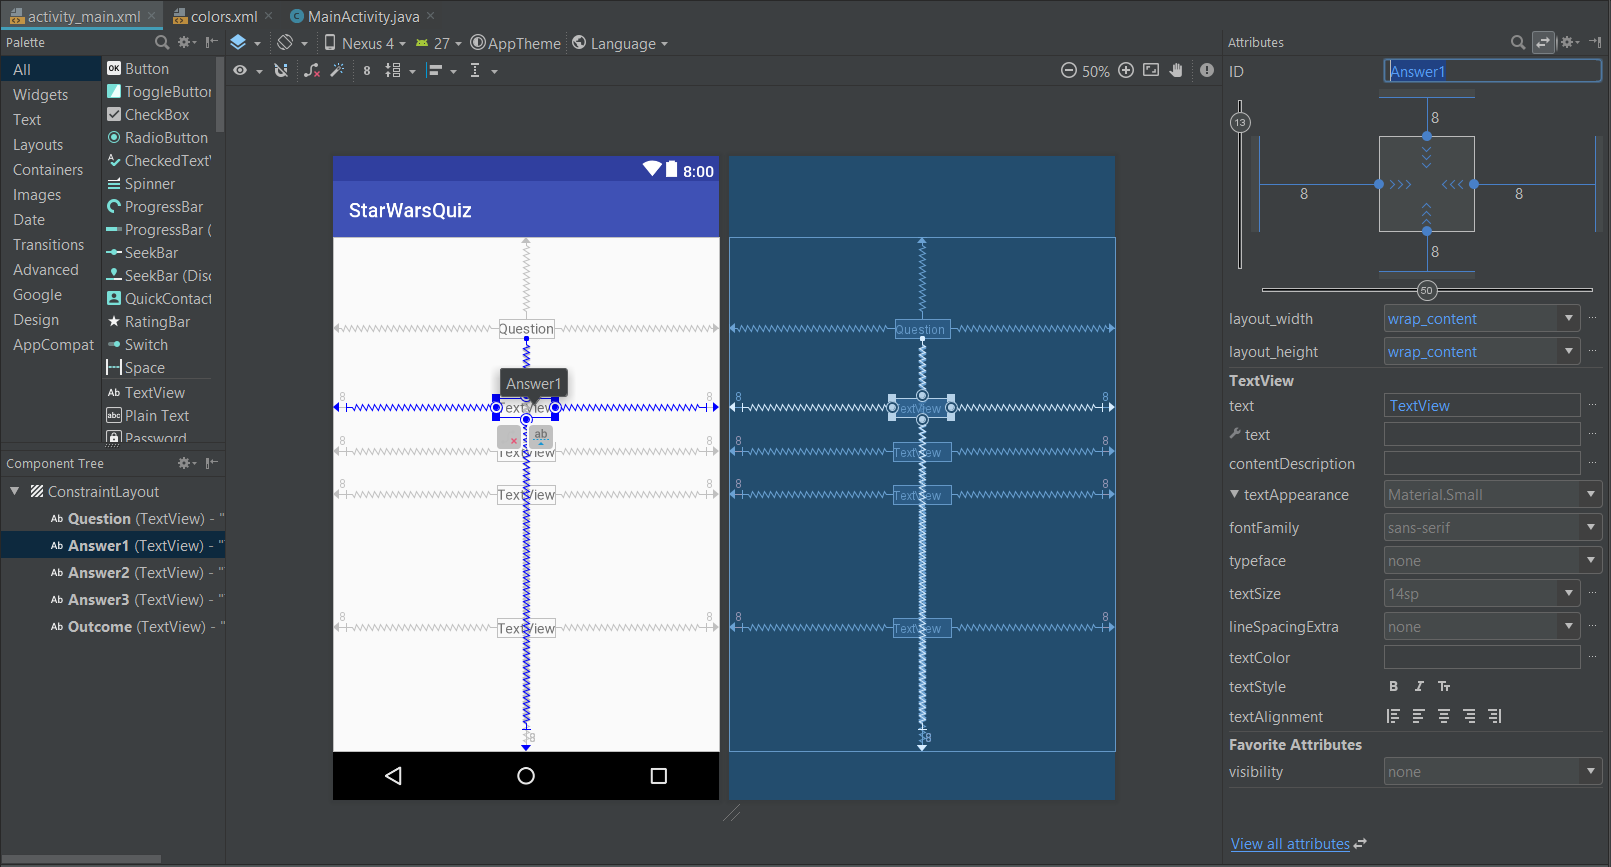
The first is to use the Design view. Open up the activity_main.xml file in Android Studio and get your first introduction to XML. You’ll notice there are two tabs at the bottom of that window: Design and Text. The Text view will show you the actual XML code, but the Design view will let you manually edit the layout by dragging and dropping elements into the render of your activity.
XML files can also help store strings. Using the Design view is easier for beginners, though it can lead to complications. For one, you will run into the limitations of XML early on when the designer refuses to let you drop items into specific places. Without the knowledge of why, this can make designing your app an exercise in frustration!

At the same time, having a better understanding of XML will also help when it comes to handling the code. Otherwise you might find yourself stumped when it comes to things like finding the ID of the view, or remembering what type of view it is you’re working with.
It is also possible to “instantiate” views at runtime from within your code, but this can be tricky to juggle if you’re creating a complex UX.
XML outside of layout files
Sometimes XML will be used to describe types of data other than views in your apps; acting as a kind of index that your code can refer to. This is how most apps will define their color palettes for instance, meaning that there’s just one file you need to edit if you want to change the look of your entire app.
You can find this information in the colors.xml file, located in app > resources > values > colors.xml, which contains tags that assign different names to various color codes:
#008577
You can then refer to this tag subsequently in your Java code or your XML code to refer to that particular hue.
Another alternative use of XML is in the Android Manifest (AndroidManifest.xml). This holds a lot of data describing your app, like the label (the app’s name), the icon, and instructions about which activities to load first. This helps launchers display the app correctly on the homescreen, and it’s also used by app stores.
Getting started with XML code for Android
Most of the time you’ll use XML to define your layouts. While we won’t go too in depth in this introduction to XML for Android, let’s go over some basics to help you get started.
Syntax
Apart from being another markup language, something else XML has in common with HTML is its use of tags.

XML mainly uses tags to introduce elements into a layout, whether they’re Views or ViewGroups. A view is basically any of the widgets that make up a typical utility app. Examples include images (ImageViews), text (TextView), editable text boxes (EditText), web pages (WebViews), and buttons (err, Button).
You’ll start by using angle brackets to open the section, then you’ll introduce the view, and then you’ll set all the parameters. Some of these parameters will be compulsory, while others will be optional.
Managing views and viewgroups
As you may already have guessed, a ViewGroup is a group of these views. These are also referred to as layouts, and serve as hierarchical arrangements of views. A linear layout for example places all its children in a linear vertical or horizontal arrangement. Meanwhile, a ConstraintLayout will allow you to define the positions of views by their relationship with other views in the layout and the boundaries of the activity. This way, the views can maintain their relative positions, even as the dimensions of the device vary.

Some Views can also be ViewGroups, such as the RecyclerView, which arranges other views in a scrolling list.
If you open up your activity_main.xml file right at the start for instance, you’ll see it is already populated with some code. This is a simple TextView that shows the words “Hello World” as is traditional. If we look at this, it can give us some insight into how XML is used:
So basically, it starts out by opening a constraint layout and telling it to “match_parent” meaning it will fill the exact same size as the parent layout. In this case, there is no parent and so the activity itself becomes the default. All parameters are set before the closing angle bracket.
Next, it introduces the EditText and sets parameters such as the width, height, text to show, ID, and position. The ID is what we will use to refer to this EditText subsequently in our Java code, should we wish to change what it shows. Because we are using a ConstraintLayout, we need to control the layout by anchoring it to something else.
Let’s use the top, bottom, and sides of the “parent,” which is the ConstraintLayout. The View is now being pulled between those four points and will therefore sit comfortably at the point in the middle. If you switch to the Design view, you can see this in action, denoted by small white arrows.
Notice that we end this section with an ending tag: a forward slash, followed by the name, and the closing angle bracket. That tells Android we’ve finished talking about the EditText.
After that, we also need to create a closing tag to close off the ConstraintLayout ViewGroup. We could now introduce a new type of layout, or we could use nested layouts by adding a new ViewGroup tag inside the ConstraintLayout tags.
Closing comments
In reality, XML is actually supremely simple and follows only a few set rules. The main complication is learning all of the different views and all of the different properties each needs defined. Fortunately, you can find a lot of this information online, or simply use the design view to experiment and see how the code should look.
You might be bashing your head against the wall right now thinking that there is “yet another thing to learn,” but once you get the hang of it, it will actually make your life much simpler.

It might not “technically” be a programming language, but many people will describe it as such anyway. So now that you’ve read our introduction to XML, you can claim to actually know two new languages!
Источник


