- Android — Testing
- Test Structure
- Testing Tools in android
- JUnit
- Monkey
- Monkey features
- Monkey Usage
- Example
- Тестирование Android приложений
- Введение
- Часть первая. SpeedConverter.
- Часть вторая. SpeedConverterTest.
- Developing Android unit and instrumentation tests — Tutorial
- 1. Introduction into Android testing
- 1.1. Testing Android applications
- 1.2. What to test on Android applications
- 1.3. Tooling support for Android testing
- 1.4. Android project organization for tests
- 2. Android unit testing
- 2.1. Unit testing in Android
- 2.2. Required dependencies in the Gradle build file
- 2.3. Running the unit tests
- 2.3.1. Using Gradle
- 2.3.2. Using Android Studio
- 2.4. Location of test reports
- 2.5. Activating default return values for mocked methods in android.jar
- 3. Exercise: Create unit test
- 3.1. Preparation: Create Android project
- 3.2. Add JUnit dependency
- 3.3. Create test
- 3.4. Run unit tests
- 4. Writing tests to run on the Android device
- 4.1. Instrumentation tests
- 4.2. How the Android system executes tests
- 4.3. Mocking objects in Android
- 4.4. Location of instrumentation tests
- 4.5. Define dependencies and testInstrumentationRunner in the Gradle build file
- 4.6. Using the @RunWith(AndroidJUnit4.class)
- 4.7. Run the tests on Android
- 4.8. Location of test reports
- 4.9. How to replace the application for instrumentation tests
Android — Testing
The Android framework includes an integrated testing framework that helps you test all aspects of your application and the SDK tools include tools for setting up and running test applications. Whether you are working in Eclipse with ADT or working from the command line, the SDK tools help you set up and run your tests within an emulator or the device you are targeting.
Test Structure
Android’s build and test tools assume that test projects are organized into a standard structure of tests, test case classes, test packages, and test projects.

Testing Tools in android
There are many tools that can be used for testing android applications. Some are official like Junit,Monkey and some are third party tools that can be used to test android applications. In this chapter we are going to explain these two tools to test android applications.
JUnit
You can use the JUnit TestCase class to do unit testing on a class that doesn’t call Android APIs. TestCase is also the base class for AndroidTestCase, which you can use to test Android-dependent objects. Besides providing the JUnit framework, AndroidTestCase offers Android-specific setup, teardown, and helper methods.
In order to use TestCase, extend your class with TestCase class and implement a method call setUp(). Its syntax is given below −
For each test implement a method which interacts with the fixture. Verify the expected results with assertions specified by calling assertTrue(String, boolean) with a boolean.
The assert methods compare values you expect from a test to the actual results and throw an exception if the comparison fails.
Once the methods are defined you can run them. Its syntax is given below −
Monkey
The UI/Application Exerciser Monkey, usually called «monkey», is a command-line tool that sends pseudo-random streams of keystrokes, touches, and gestures to a device. You run it with the Android Debug Bridge (adb) tool.
You use it to stress-test your application and report back errors that are encountered. You can repeat a stream of events by running the tool each time with the same random number seed.
Monkey features
Monkey has many features, but it can be all be summed up to these four categories.
- Basic configuration options
- Operational constraints
- Event types and frequencies
- Debugging options
Monkey Usage
In order to use monkey, open up a command prompt and just navigate to the following directory.
Once inside the directory, attach your device with the PC , and run the following command.
This command can be broken down into these steps.
- adb — Android Debug Bridge. A tool used to connect and sends commands to your Android phone from a desktop or laptop computer.
- shell — shell is just an interface on the device that translates our commands to system commands.
- monkey — monkey is the testing tool.
- v — v stands for verbose method.
- 500- it is the frequency conut or the number of events to be sent for testing.
This is also shown in the figure −
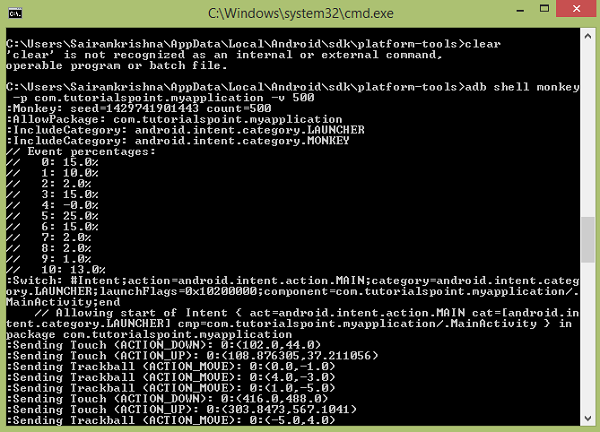
In the above command, you run the monkey tool on the default android UI application. Now in order to run it to your application , here what you have to do.
finally you will get finish as shown bellow
This has also been shown in the figure below. By typing this command , you are actually generating 500 random events for testing.

Example
The below example demonstrates the use of Testing. It crates a basic application which can be used for monkey.
To experiment with this example, you need to run this on an actual device and then follow the monkey steps explained in the beginning.
| Steps | Description |
|---|---|
| 1 | You will useAndroid studio to create an Android application under a package com.tutorialspoint.myapplication. |
| 2 | Modify src/MainActivity.java file to add Activity code. |
| 3 | Modify layouta XML file res/layout/activity_main.xml add any GUI component if required. |
| 4 | Create src/second.java file to add Activity code. |
| 5 | Modify layout XML file res/layout/view.xml add any GUI component if required. |
| 6 | Run the application and choose a running android device and install the application on it and verify the results. |
Here is the content of MainActivity.java.
Here is the content of second.java.
Here is the content of activity_main.xml.
In the below code abc indicates the logo of tutorialspoint.com
Here is the content of view.xml
Here is the content of Strings.xml.
Here is the content of AndroidManifest.xml.
Let’s try to run your Android Testing application. I assume you have connected your actual Android Mobile device with your computer. To run the app from Android studio, open one of your project’s activity files and click Run  icon from the toolbar. Before starting your application, Android studio will display following window to select an option where you want to run your Android application.

Select your mobile device as an option and then check your mobile device which will display application screen. Now just follow the steps mentioned at the top under the monkey section in order to perform testing on this application.
Источник
Тестирование Android приложений
Введение

Я уверен, что современных программистов не нужно убеждать использовать юнит тесты. И если при разработке приложений под android, модули не связанные с ним, мы можем протестировать с помощью знакомого всем JUnit’а (не всегда без костылей правда), то как тестировать user interface и использующие его классы? В этом нам помогут инструменты фреймворка android.test.
В данной статье мы напишем небольшое android приложение и протестируем его. Для работы нам будут нужны установленные jdk, android sdk, Eclipse и ADT плагин.
Часть первая. SpeedConverter.
Наше примитивное приложение будет переводить «километры в час» в «метры в секунду» и наоборот, а также выдавать сообщение Error!, если нужное значение не удается вычислить. Пользователь будет вводить данные о скорости в любой EditText и в другом получать результат. Более подробно на нем останавливаться не будем.
XML layout формы:
xml version =«1.0» encoding =«utf-8» ? >
LinearLayout xmlns:android =«schemas.android.com/apk/res/android»
android:orientation =«vertical»
android:layout_width =«fill_parent»
android:layout_height =«fill_parent»
android:padding =«12dp» >
TextView
android:id =»@+id/textKmPerHour»
android:text =»@string/kmh»
android:layout_width =«wrap_content»
android:layout_height =«wrap_content»/>
EditText
android:id =»@+id/editKmPerHour»
android:layout_height =«wrap_content»
android:layout_width =«match_parent»
android:inputType =«numberDecimal»
android:numeric =«decimal»/>
TextView
android:id =»@+id/textMetersPerSec»
android:text =»@string/ms»
android:layout_width =«wrap_content»
android:layout_height =«wrap_content»
android:paddingTop =«4dp»/>
EditText
android:id =»@+id/editMetersPerSec»
android:layout_height =«wrap_content»
android:layout_width =«match_parent»
android:inputType =«numberDecimal»
android:numeric =«decimal»/>
LinearLayout >* This source code was highlighted with Source Code Highlighter .
Далее устанавливаем listener для Kilometers per hour EditText’а и при наступлении события вычисляем скорость. Нюанс, что onKey() не наступает при активной software клавиатуре мы учтем позже в тестах. Второй EditText работает по аналогии.
// setup listener for Kilometers per hour EditText
editKmPerHour.setOnKeyListener( new OnKeyListener() <
public boolean onKey(View v, int keyCode, KeyEvent event ) <
if ( event .getAction() == KeyEvent.ACTION_UP) <
try <
double kmPerHour = Double.parseDouble(editKmPerHour
.getText().toString());
double meterPerSec = kmPerHour * 0.2777777777777778;
editMeterPerSec.setText( new Double(meterPerSec)
.toString());
> catch (NumberFormatException e) <
editMeterPerSec.setText(R. string .errorMsg);
Log.d(LOG, «e:» + e);
>
return true ;
>
return false ;
>
>);* This source code was highlighted with Source Code Highlighter .
Теперь перейдем к тестированию.
Часть вторая. SpeedConverterTest.
Android Test Project
В первой части мы создали приложение SpeedConverter. Сейчас для него нам нужно создать новое тестовое приложение. Идем в меню eclipse’a: File -> New -> Projects. в появившемся окне выбираем Android -> Android Test Project, нажимаем Next и видим такое окно:
Зададим следующие значения:
- Test Project Name: SpeedConverterTest
- Test Target: устанавливаем «An existing Android project» и выбираем наше проект SpeedConverter
- Application name и Package name подставятся автоматически
И кликаем Finish.
Создание Test Case класса
В директории src/ нашего проекта мы создадим новый класс New > Class. Назовем его SpeedConverterTest и в качестве SuperClass’а укажем android.test.ActivityInstrumentationTestCase2. Наш диалог будет выглядеть так:
Теперь немного подробней об ActivityInstrumentationTestCase2. Данный класс спроектирован для тестирования activities в android приложении. Он может создавать activity (используя InstrumentationTestCase.launchActivity()), запускать тесты в UI thread и позволяет посылать нам различные mock Intents в нашу activity. В качастве параметра мы должны будем передать SpeedConverter.
Добавим test case конструктор который будет использоваться тестирующим фреймворком. В качестве параметров мы покажем какое android приложение будет тестироваться.
public SpeedConverterTest() <
super( «com.pyjioh» , SpeedConverter. class );
>
Далее, знакомый по JUnit’у метод setUp(), который вызывается перед запуском тестов, будем инициализировать в нем переменные.
@Override
protected void setUp() throws Exception <
// TODO Auto-generated method stub
super.setUp();
activity = getActivity();
editKmPerHour = (EditText) activity
.findViewById(com.pyjioh.R.id.editKmPerHour);
editMeterPerSec = (EditText) activity
.findViewById(com.pyjioh.R.id.editMetersPerSec);
>
Начинаем добавлять тесты, они будут простыми дабы показать как взаимодействовать с UI, первый будет проверять — создалась и запустилась ли наша SpeedConverter activity, а также имеем ли мы доступ к нашим контролам.
public void testControlsCreated() <
assertNotNull(activity);
assertNotNull(editKmPerHour);
assertNotNull(editMeterPerSec);
>
Используя метод assertOnScreen() из ViewAsserts проверяем видны ли наши контролы.
public void testControlsVisible() <
ViewAsserts.assertOnScreen(editKmPerHour.getRootView(), editMeterPerSec);
ViewAsserts.assertOnScreen(editMeterPerSec.getRootView(), editKmPerHour);
>
Запускается ли приложение с пустыми EditText’ми.
public void testStartingEmpty() <
assertEquals( «editKmPerHour is not empty» , «» , editKmPerHour.getText()
.toString());
assertEquals( «editMeterPerSec is not empty» , «» , editMeterPerSec
.getText().toString());
>
Теперь добавим тест, проверяющий правильность перевода км/с в м/с. В нем мы используем TouchUtils.tapView(..) который симулирует касание по нужному нам контролу, а KeyEvent.KEYCODE_BACK убирает software клавиатуру. Метод void testConvertMsToKmh() выглядит аналогично.
public void testConvertKmhToMs() <
TouchUtils.tapView( this , editKmPerHour);
sendKeys(KeyEvent.KEYCODE_BACK, KeyEvent.KEYCODE_1, KeyEvent.KEYCODE_0,
KeyEvent.KEYCODE_0);
double meterPerSec;
try <
meterPerSec = Double.parseDouble(editMeterPerSec.getText()
.toString());
> catch (Exception e) <
meterPerSec = -1;
>
assertTrue( «100 km/h is not 27.778 m/s» , meterPerSec > 27.7
&& meterPerSec
Последний тест проверяет — получаем ли мы сообщение об ошибке.
public void testGetError() <
TouchUtils.tapView( this , editKmPerHour);
sendKeys(KeyEvent.KEYCODE_1, KeyEvent.KEYCODE_DEL);
assertEquals( «Must be Error!» ,
activity.getString(com.pyjioh.R. string .errorMsg),
editMeterPerSec.getText().toString());
>
Запустим наше тестовое приложение: Run As > Android JUnit Test. На видео ниже показано как это будет выглядеть.
Таким образом, мы протестировали функционал нашего несерьезного приложения.
Источник
Developing Android unit and instrumentation tests — Tutorial
This tutorial describes how to write unit and instrumentation tests for your Android application. It describes how to execute these tests via Android studio and Gradle. This tutorial assumes that you are familiar with Android programming in general.
1. Introduction into Android testing
1.1. Testing Android applications
Android applications run on a variety of devices. Also the Android framework and the surrounding open source frameworks evolve at a high speed. To ensure that you application works well, it is import to write software tests. This helps you to enhance and maintain the Android application.
Unit testing for Android can be classified into:
Local unit tests — tests which can run on the JVM.
Instrumented unit tests — tests which require the Android system.
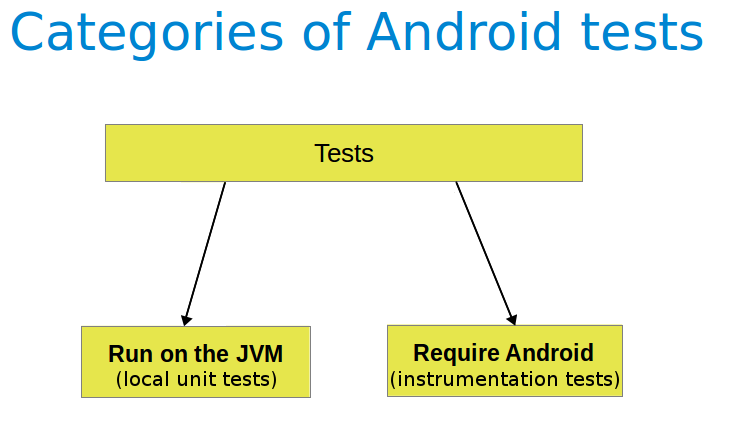
Local unit tests run much faster compared to the time required to deploy and run tests on an Android device. Prefer writing local unit tests and only run tests on Android, if you require a real Android system.
If you write local unit test and have dependencies to Android API, you need to replace them, e.g., via a mocking framework like Mockito.
1.2. What to test on Android applications
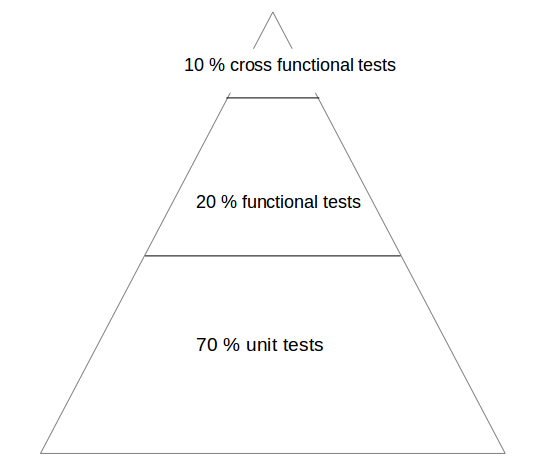
Your test should focus on the business logic of your application. A good rule of thumb is to have the following distribution of tests:
70-80 % unit tests to ensure stability of your code basis
20-30 % functional tests to ensure that the application really works
some cross functional tests if your application integrates intensively with other Application components
You should test your application at least on one device with the lowest possible configuration. In addition you should test on one device with the highest available configuration, e.g., pixel density, screen resolution to ensure that it works fine on these devices.
1.3. Tooling support for Android testing
The Android Testing Support library (ATSL) project from Google provides tooling for Android testing. For example, it ( AndroidJUnitRunner ).
If you run local unit tests, a special version of the android.jar (also known as the Android mockable jar ) is created by the tooling. This modified JAR file is provided to the unit test so that all fields, methods and classes are available. Any call to the Android mockable JAR results, by default, in an exception, but you can configure Android to return default values. See Activating default return values for mocked methods in android.jar for details.
The library provides a JUnit 4-compatible test runner ( AndroidJUnitRunner ), the Espresso test framework and the UI Automator test framework. Espresso test framework can be used to test the User Interface of your application. UI Automator allows to write cross application functional tests.
AndroidJunitRunner provides access to the instrumentation API, via the InstrumentationRegistery .
InstrumentationRegistry.getInstrumentation() , returns the Instrumentation currently running.
InstrumentationRegistry.getContext() , returns the Context of this Instrumentation’s package.
InstrumentationRegistry.getTargetContext() , returns the application Context of the target application.
InstrumentationRegistry.getArguments() , returns a copy of arguments Bundle that was passed to this Instrumentation. This is useful when you want to access the command line arguments passed to the instrumentation for your test.
It also gives access to the life cycle via the ActivityLifecycleMonitorRegistry .
1.4. Android project organization for tests
The following is the default directory structure for your application and test code:
app/src/main/java — for your source code of your main application build
app/src/test/java — for any unit test which can run on the JVM
app/src/androidTest/java — for any test which should run on an Android device
If you follow this conversion, the Android build system runs your tests on the correct target (JVM or Android device).
If you receive the following error message: «error duplicate files in path. Path in archive: LICENSE.txt» you can add the following to your app/gradle.build file.
2. Android unit testing
2.1. Unit testing in Android
A unit test verifies in isolation the functionality of a certain component. For example, assume a button in an Android activity is used to start another activity. A unit test would determine, if the corresponding intent was issued, not if the second activity was started
A unit tests for an Android application can be:
local unit test — which runs on the JVM
Android unit test — which runs on the Android runtime
If they run on the JVM, they are executed against a modified version of the android.jar Android library. In this version all final modifiers have been stripped off. This makes it easier to use mocking libraries, like Mockito.
The local unit tests of an Android project should be located in the app/src/test folder.
2.2. Required dependencies in the Gradle build file
To use JUnit tests for your Android application, you need to add it as dependency to your Gradle build file.
2.3. Running the unit tests
2.3.1. Using Gradle
Run your unit tests with the gradlew test command.
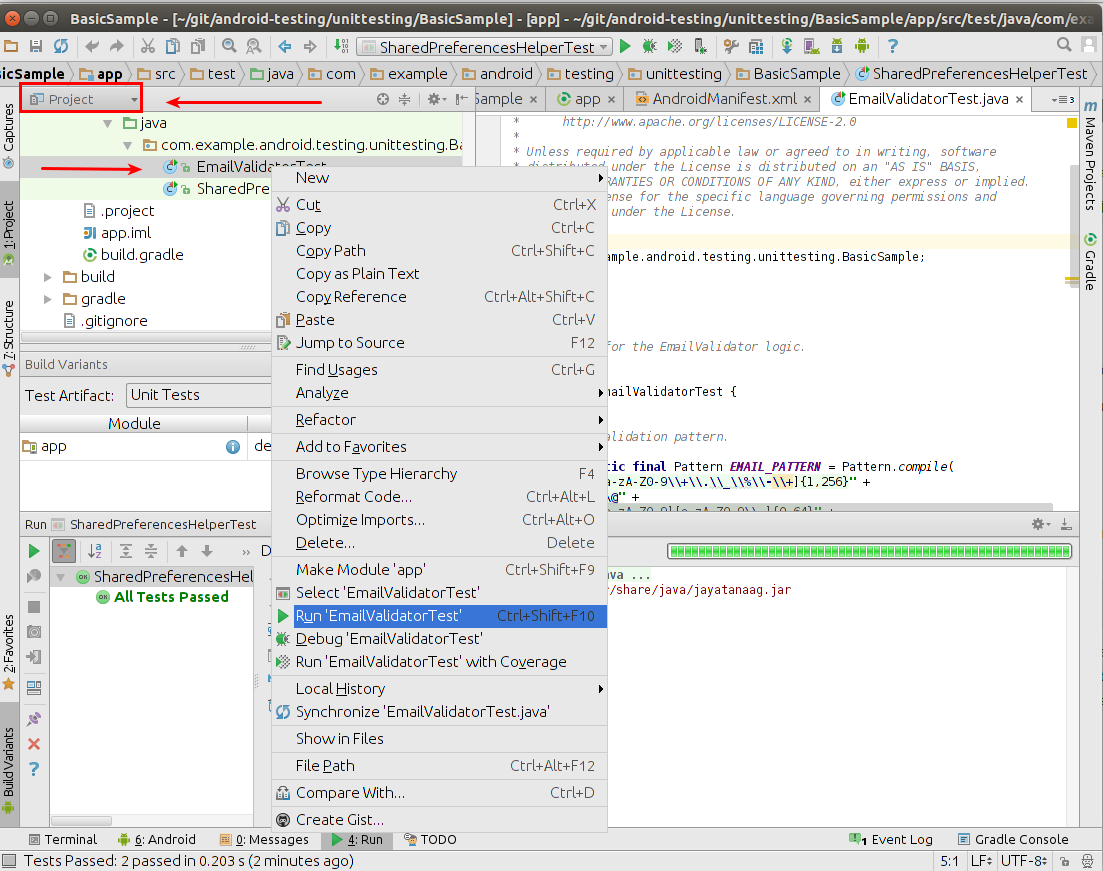
2.3.2. Using Android Studio
To run a unit test, right-click on your test class in the Project window and select Run.
2.4. Location of test reports
The Test reports are created in the app/build/reports/tests/debug/ directory. The index.html gives an overview and links to the individual test pages.
2.5. Activating default return values for mocked methods in android.jar
By default, all calls to methods in the modified android.jar file throw exceptions. This default should ensure that your unit tests only test your code and do not depend on any particular behavior of the Android platform. If you want to configure a certain behavior, you can use a mocking framework to replace these call.
You can also instruct the Gradle build system to return default values for method calls in the `android.jar`with the following configuration in your Gradle build file.
3. Exercise: Create unit test
In this exercise you learn how to create a simple JUnit4 test for an Android project.
3.1. Preparation: Create Android project
Create the Android project as described in Android temperature converter.
3.2. Add JUnit dependency
Ensure you have the dependency to Junit in your app/build.gradle file.
3.3. Create test
In your app/src/test directory create the following two test methods for the ConverterUtil class.
3.4. Run unit tests
Ensure your unit tests are correctly implemented by running test tests. They should run successfully.
4. Writing tests to run on the Android device
4.1. Instrumentation tests
The Android testing API provides hooks into the Android component and application life cycle. These hooks are called the instrumentation API and allow your tests to control the life cycle and user interaction events.
Under normal circumstances your application cannot control the life cycle events and the user drives the application. For example, if Android creates your activity the onCreate() method is called. Or if the user presses a button your corresponding code is called. Via instrumentation you can control these events via your test code. For example, your instrumentation test can start the activity. Afterwards, it can call the finish() and restart the activity to test if the instance state of the activity is correctly restored.
Instrumented unit tests are unit tests that run on Android devices and emulators instead of running on the Java virtual machine. These tests have access to the real device and its resources and are useful to unit test functionality which cannot be easily mocked by mocking frameworks. An example is a test which validates a Parcelable implementation.
An instrumentation-based test class allows you to send key events (or touch events) to the application under test.
With user interface testing framework like Espresso, the developer rarely has to use the instrumentation API directly.
4.2. How the Android system executes tests
The InstrumentationTestRunner is the base test runner for Android tests. This test runner starts and loads the test methods. Via the instrumentation API it communicates with the Android system. If you start a test for an Android application, the Android system kills any process of the application under test and then loads a new instance. It does not start the application, this is the responsibility of the test methods. The test method controls the life cycle of the components of the application.
The test runner also calls the onCreate() method of the application and activity under test during its initialization.
4.3. Mocking objects in Android
The mocking framework Mockito can also be used for instrumentation tests. This allows you to replace parts of the Android system which are not interesting for the test. The Android framework provided in the past specialized mocking classes but these are not necessary anymore.
4.4. Location of instrumentation tests
As described in Android project organization for tests the unit tests of an Android project should be located in the app/src/androidTest/java folder.
4.5. Define dependencies and testInstrumentationRunner in the Gradle build file
To use JUnit tests for your Android application you need to add the dependency to JUnit to your Gradle build file. You also need to specify android.support.test.runner.AndroidJUnitRunner as testInstrumentationRunner in the build file.
4.6. Using the @RunWith(AndroidJUnit4.class)
It is also recommended annotating the test with the @RunWith(AndroidJUnit4.class) annotation. AndroidJUnit4 extends JUnit4, so if you use pure Junit4 syntax and ActivityTestRule it is not required. But you need it, if you want to run, i.e., Espresso tests with ActivityTestRule and JUnit4.
4.7. Run the tests on Android
Run your local unit tests via Gradle with the gradlew connectedCheck command.
To run your local unit tests via Android Studio, right-click on your test class in the Project window and select Run.
4.8. Location of test reports
The test reports are created in the app/build/reports/androidTests/connected/ directory. The index.html gives an overview and links to the individual test pages.
4.9. How to replace the application for instrumentation tests
You can replace the application class for the instrumentation tests by overriding the AndroidJUnitRunner and its newApplication method.
Источник


