- Файл манифеста AndroidManifest.xml
- Назначение файла
- Общая структура манифеста
- Описание
- Атрибуты
- Работа с XML в Android
- Шаг 1.
- Шаг 2.
- Шаг 3.
- Шаг 4.
- A Complete Guide to Learn XML For Android App Development
- Basics of User Interface(UI)
- Different Types of XML Files Used in Android Studio
- android: how to load xml file from assets directory?
- 5 Answers 5
- Processing and Parsing XML in Android
- What is XML?
- XML elements
- XML Parsing
- Steps involved in XML parsing
- XML parsing example
- Conclusion
Файл манифеста AndroidManifest.xml
Файл манифеста AndroidManifest.xml предоставляет основную информацию о программе системе. Каждое приложение должно иметь свой файл AndroidManifest.xml. Редактировать файл манифеста можно вручную, изменяя XML-код или через визуальный редактор Manifest Editor (Редактор файла манифеста), который позволяет осуществлять визуальное и текстовое редактирование файла манифеста приложения.
Назначение файла
- объявляет имя Java-пакета приложения, который служит уникальным идентификатором;
- описывает компоненты приложения — деятельности, службы, приемники широковещательных намерений и контент-провайдеры, что позволяет вызывать классы, которые реализуют каждый из компонентов, и объявляет их намерения;
- содержит список необходимых разрешений для обращения к защищенным частям API и взаимодействия с другими приложениями;
- объявляет разрешения, которые сторонние приложения обязаны иметь для взаимодействия с компонентами данного приложения;
- объявляет минимальный уровень API Android, необходимый для работы приложения;
- перечисляет связанные библиотеки;
Общая структура манифеста
Файл манифеста инкапсулирует всю архитектуру Android-приложения, его функциональные возможности и конфигурацию. В процессе разработки приложения вам придется постоянно редактировать данный файл, изменяя его структуру и дополняя новыми элементами и атрибутами.
Корневым элементом манифеста является . Помимо данного элемента обязательными элементами является теги и . Элемент является основным элементом манифеста и содержит множество дочерних элементов, определяющих структуру и работу приложения. Порядок расположения элементов, находящихся на одном уровне, произвольный. Все значения устанавливаются через атрибуты элементов. Кроме обязательных элементов, упомянутых выше, в манифесте по мере необходимости используются другие элементы.
Описание
Элемент является корневым элементом манифеста. По умолчанию Eclipse создает элемент с четырьмя атрибутами:
Атрибуты
объявляет разрешение, которое используется для ограничения доступа к определенным компонентам или функциональности данного приложения. В этой секции описываются права, которые должны запросить другие приложения для получения доступа к вашему приложению. Приложение может также защитить свои собственные компоненты (деятельности, службы, приемники широковещательных намерений и контент-провайдеры) разрешениями. Оно может использовать любое из системных разрешений, определенных Android или объявленных другими приложениями, а также может определить свои собственные разрешения.
android:name название разрешения android:label имя разрешения, отображаемое пользователю android:description описание разрешения android:icon значок разрешения android:permissionGroup определяет принадлежность к группе разрешений android:protectionLevel уровень защиты
Элемент запрашивает разрешение, которые приложению должны быть предоставлены системой для его нормального функционирования. Разрешения предоставляются во время установки приложения, а не во время его работы.
android:name имеет единственный атрибут с именем разрешения android:name. Это может быть разрешение, определенное в элементе
данного приложения, разрешение, определенное в другом приложении или одно из стандартных системных разрешений, например: android:name=»android.permission.CAMERA» или android:name=»»android.permission.READ_CONTACTS»
Наиболее распространенные разрешения
- INTERNET — доступ к интернету
- READ_CONTACTS — чтение (но не запись) данных из адресной книги пользователя
- WRITE_CONTACTS — запись (но не чтение) данных из адресной книги пользователя
- RECEIVE_SMS — обработка входящих SMS
- ACCESS_COARSE_LOCATION — использование приблизительного определения местонахождения при помощи вышек сотовой связи или точек доступа Wi-Fi
- ACCESS_FINE_LOCATION — точное определение местонахождения при помощи GPS
объявляет базовое имя для дерева разрешений. Этот элемент объявляет не само разрешение, а только пространство имен, в которое могут быть помещены дальнейшие разрешения.
определяет имя для набора логически связанных разрешений. Это могут быть как объявленные в этом же манифесте с элементом
разрешения, так и объявленные в другом месте. Этот элемент не объявляет разрешение непосредственно, только категорию, в которую могут быть помещены разрешения. Разрешение можно поместить в группу, назначив имя группы в атрибуте permissionGroup элемента
Источник
Работа с XML в Android

Очень часто приходится хранить информацию форм и для этого можно использовать xml файлы. В данном уроке мы это и рассмотрим, как можно работать с файлами XML.
Библиотеки Android имеют набор классов для работы с XML-документами с произвольной структурой и содержанием.
Шаг 1.
Для того чтобы упаковать статический XML файл вместе с вашим приложением, вам нужно поместить его в папку: res/xml/
В каталоге res/ создайте подкаталог xml/ в котором будет располагаться наш ХМL-файл.
После чего вы получите возможность обращаться в коде программы к этому документу.
Шаг 2.
Рассмотрим загрузку XML-документа произвольной структуры из ресурсов в код программы.
Создадим приложения, которое будет уметь способность читать список имен, фамилий и телефонов, определенных в XML-файле.
Теперь создадим XML файл который будет хранить Имена, Фамилии и номера телефонов сотрудников фирмы и сохраним его в res/xml/ под именем contacts.xml.
Вот как будут выглядеть XML файл contacts.xml
Шаг 3.
Создадим View состоять она будет с LinearLayout и ListView и назовем main.xml:
Шаг 4.
Загружаем файл contacts.xml, созданный ранее:
Метод getXml() возвращает XmlPullParser, используя который можно прочитать загруженный XML-документ в цикле while:
В конечном итоге ваше приложение должно выглядеть так:
 Весь код MyActivity:
Обратите внимание что наследуется MyActivity не от Activity а от ListActivity.
Источник
A Complete Guide to Learn XML For Android App Development
XML stands for Extensible Markup Language. XML is a markup language much like HTML used to describe data. It is derived from Standard Generalized Markup Language(SMGL). Basically, the XML tags are not predefined in XML. We need to implement and define the tags in XML. XML tags define the data and used to store and organize data. It’s easily scalable and simple to develop. In Android, the XML is used to implement UI-related data, and it’s a lightweight markup language that doesn’t make layout heavy. XML only contains tags, while implementing they need to be just invoked.

The simple syntax of XML is
So in this article, there is a deep discussion on how to learn and understand what XML is for Android Development.
Basics of User Interface(UI)
Basically in Android XML is used to implement the UI-related data. So understanding the core part of the UI interface with respect to XML is important. The User Interface for an Android App is built as the hierarchy of main layouts, widgets. The layouts are ViewGroup objects or containers that control how the child view should be positioned on the screen. Widgets here are view objects, such as Buttons and text boxes. Considering the following simple example of the activity_main.xml file.
Output UI:

In the above example of XML file, There are 2 view groups one is LinearLayout and another is RelativeLayout and the TextView1 and TextView2 is child widgets under the ViewGroup1 that is LinearLayout. EditText1, EditText2, and Button are the child widgets under ViewGroup2 that is RelativeLayout. ViewGroup2(RelativeLayout) is nested under the ViewGroup1 which produces the following hierarchy.
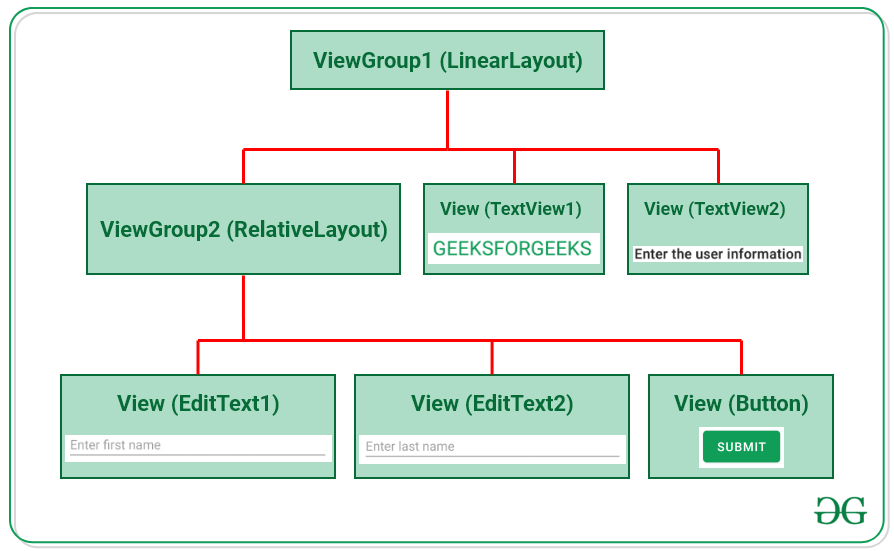
From the hierarchy, it’s been observed that every widget like EdtText, TextView, or Button is one of the View. These Views are contained inside the ViewGroup, like RelativeLayout, LinearLayout, FrameLayout, etc.
Different Types of XML Files Used in Android Studio
Different XML files serve different purposes in Android Studio. The list of various XML files in Android Studio with their purposes is discussed below.
1. Layout XML files in android
The Layout XML files are responsible for the actual User Interface of the application. It holds all the widgets or views like Buttons, TextViews, EditTexts, etc. which are defined under the ViewGroups. The Location of the layout files in Android is:
app -> src -> main -> res -> layout
Источник
android: how to load xml file from assets directory?
i have trouble loading an xml file from assets directory. using the same line of code (just changing the path) i get different results ( either ok or NPE / file corrupted ) the file «castle1.tmx» (it’s an xml file) is copied in two locations:
with this line, it works:
while with this line it doesn’t:
i get the following result:
file is found in both case. it’s just that i cannot seem to be able to read it from asset dir using that method..
any ideas how can i load my xml file from assets directory ?
5 Answers 5
In res/ folder all xml files are precompiled, whereas in assets/ folder they are not. So, you can’t use openXmlResourceParser() with non-precompiled resources. Instead use open() and read file through InputStream .
i succeded at loading and parsing my xml file from assets directory (assets/level/castle1.tmx)
here’s what i did:
then all i had to do was editing some getAttributeIntValue() lines:
and all the rest worked without modifications 🙂 ..this class is for parsing tiled xml/map files to build my game levels. before, it worked using res/ but i wanted to try to put all my files into assets/ instead. so now it works 🙂
thanks for the help
The reason is because you are trying to load a binary XML file (your error is java.io.FileNotFoundException: Corrupt XML binary file ).
All of the Android XML files (layouts, strings etc) stored in res are automatically compiled to binary XML when your project is compiled. XML files in assets are treated as standard XML files and so are not compiled to binary XML.
In summary: Android XML files must be in the res folder. You can only store plain-text XML in the assets folder (not layout files and such-like).
Источник
Processing and Parsing XML in Android
Sharing data over the internet is very popular. We share our information with the other users over the internet. Let’s take a very common example, since we all are developers and to be more precise, we all are Android Developers and we all must have visited the StackOverflow website whenever we are stuck into some problem in our projects and in every 99 out of 100 cases, we find the solution to our problem. The answer that we get from the StackOverflow website consists of various parts that we are less bothered about. In general, the answers or the questions present on the website contains the id of the question, type of the question, author name of the article or question, publishing data, URL and many other things are there on the website. But we want only meaningful data i.e. we want answers and the authors and nothing else.
The problem arises when you want to access the data of a particular website in your Android Application. This is because the data present on the websites are in JSON format or in XML format. So, in order to use that data or to extract the meaningful information from that data, you have to parse that XML file or a JSON file.
So, in this blog, we will learn how to process and parse the XML data in Android. So, let’s get started.
What is XML?
XML stands for Extensible Markup Language. It is a set of rules that are used to encode data or documents in a Machine-readable language. There are many websites that use an XML format to share data on the internet. For example, many blogging websites use an XML format to share data between users. So, XML parsing and processing become an important task to use that data in our Android Application.
XML elements
In general, an XML file consists of a number of elements that together make an XML file. They are the basic building blocks of XML document. These elements are used to store some text elements, attributes, media, etc. Below is the syntax of XML element:
Here, element-name is the name of the element and attributes are used to define the property of XML element. Following is an example of an XML document that is used to describe the data of the student:
We can broadly divide the XML elements in four parts:
- Prolog: It is the first line that contains the information about the XML file i.e. it is the first line of the XML file.
- Events: An XML file contains a number of events like document start, document end, Tag start, Tag end, etc.
- Text: In between the tags(opening and closing), there can be some text. For example, in the above example, “John” is the text.
- Attributes: These are the properties of XML elements.
XML Parsing
So, we have seen the introduction of XML and our next task is, How to parse the XML in Android? So, let’s find out.In Android, there are various parsers that can be used to parse the XML file in Android. Some of these are:
- XMLPullParser
- DOM Parser
- SAX Parser
Among these three parsers, XMLPullParser is the most commonly and most widely used parsers in Android. This is because XMLPullParser is very efficient and easy to use. Also, unlike the DOM Parser which loads the whole file in the memory and then parses it, the XMLPullParser consumes less memory.
Steps involved in XML parsing
Following are the steps that are involved in XML parsing:
- Analyze the feed: There are many cases when you will be provided with a number of data but you need only few of them. SO, before parsing the XML, your first step should be to find the desired element in the XML data. For example, here is example of XML file of StackOverflow:
Here, if you want to extract the data present in the entry tag and the data of its sub tags then you should keep note of these things.
- Create XMLPullParser object: Our next step is to create the object of XMLPullParser and specify the file name for the XMLPullParser that contains XML. You can use a file or a stream. Following is the code to create an object of the XMLPullParser and then passing the file name for the XMLPullParser:
- Read the desired data: Our last step is to parse the data of the XML file. The following readFeed() function is used to parse the XML file and extract only the values of entries and store it into a list:
Here, XMLPullParser.END_TAG is used to find if the parser has reached to the last tag of the file or not. If it has reached then return and it has not reached then we will check for the entry tag and if found then will add the value to the entries list. If the values are not found be to of entries type then we can skip the parser. At last, we return entries.
Following are the methods that can be used while parsing an XML file:
- getEventType(): This method is used to get the event type. For example, Document start, Document End, Tag start, Tag end, etc.
- getName(): This is used to get the tag name in a file. For example, in the above code, the tag name is entry.
- getAttributeValue(): This method is used to get the attribute value of a particular tag.
- getAttributeCount(): It returns the total number of attributes of the current tag.
- getAttributeName(int index): It returns the attribute name at a particular index.
- getColumnNumber(): It returns the current column number using a 0 based indexing.
- getName(): It returns the name of the tag.
- getText(): It returns the text present in a particular element.
XML parsing example
Now, let’s do one example to understand the concept of XML parsing ina very easy and clear manner.
Open Android Studio and create a project with Empty Activity template.
The very first step is to create the XML file. Either you create your own XML file or you can use mine. To create an XML file, go to java folder and then right click on it. Then click on New > Folder > Assets folder and then OK. One assets folder will be created for you. Now right click on that folder and create a file and name it as example.xml. Following is the XML content of example.xml file:
This is a simple example of student data containing the name, surname, mobile and section of the student. In this example, we will extract the name, surname and section of the student. We will ignore the mobile number.
Now, let’s code for the UI part of our application. Here we will display the desired data on a TextView. So, open the activity_main.xml file and add the below code:
So, we are done with the UI part. Now, let’s write the code for the XML parsing. Below is the code for the MainActivity.kt file:
Now, run the application on your mobile phone and try to add more data to your XML file i.e. the example.xml file.
Conclusion
In this blog, we learned about XML parsing in Android. We learned how to parse the data present in the XML format in Android Application. We saw how to use XMLPullParser to do XML parsing. At last, we did one example of XML parsing. You can get more contents about XML parsing at the Android Developer Website.
Источник


