- How to move apps to an SD card on Android
- How to move apps to an SD card on Android
- Use SD card as internal storage
- SD карта как внутренняя память для переноса приложений на Android 6, 7, 8, 9, 10 и 11
- Настройка SD карты как внутренней памяти
- Как отформатировать карту памяти при помощи ADB
- Как перенести приложения на карту памяти на Android 6, 7, 8, 9, 10 и 11
- AppMgr III (App 2 SD) – программа для переноса приложений
- How to Install Apps on SD Card on Android
- Android Tips
- How to Install Apps on SD Card Androidпјџ
- Set Up an SD Card as Internal Storage?
- Download and Install Apps on SD Card?
- Bonus Tip. How to Transfer Apps From Android To Android
- The Bottom Line
How to move apps to an SD card on Android
Are you running out of memory? In this guide, you’ll learn how to move apps to your SD card, so that you can free up storage and get the most from your storage space.
Managing storage space has become easier with the help of cloud services, streaming, and smartphones getting more internal memory. Regardless, it’s often a matter of time before you find yourself looking around for apps to delete so that you can make space for more files and apps. Many of you may own budget devices, which usually make sacrifices in the storage department. You might also enjoy games, and these apps are known to use up a significant amount of storage.
The good news is that if your device comes with expandable storage, you’ll be able to move apps to an SD card. Additionally, you can turn your microSD card into internal storage. This will effectively make it possible to move apps to your SD card, as well as all other data you may have on your phone. We’ll show you how to do both, so let’s get to it.
How to move apps to an SD card on Android

The good news is that it’s effortless to move apps to SD card on Android. Just keep in mind some apps don’t allow this feature. Manufacturers might also remove this capability.
How to move apps to SD card:
-
- Open the Settings app.
- Go into Apps.
- Access the app you want to move to the SD card.
- Select Storage.
- If the app supports the feature, you will see an option called Storage used. To change where the app is stored, tap the Change button right under.
- Select the SD card.
- Tap on Move.
- The phone will transfer the files.
This process is reversible, so if you should decide you want the app back on your internal storage, you can move it again using the same process.
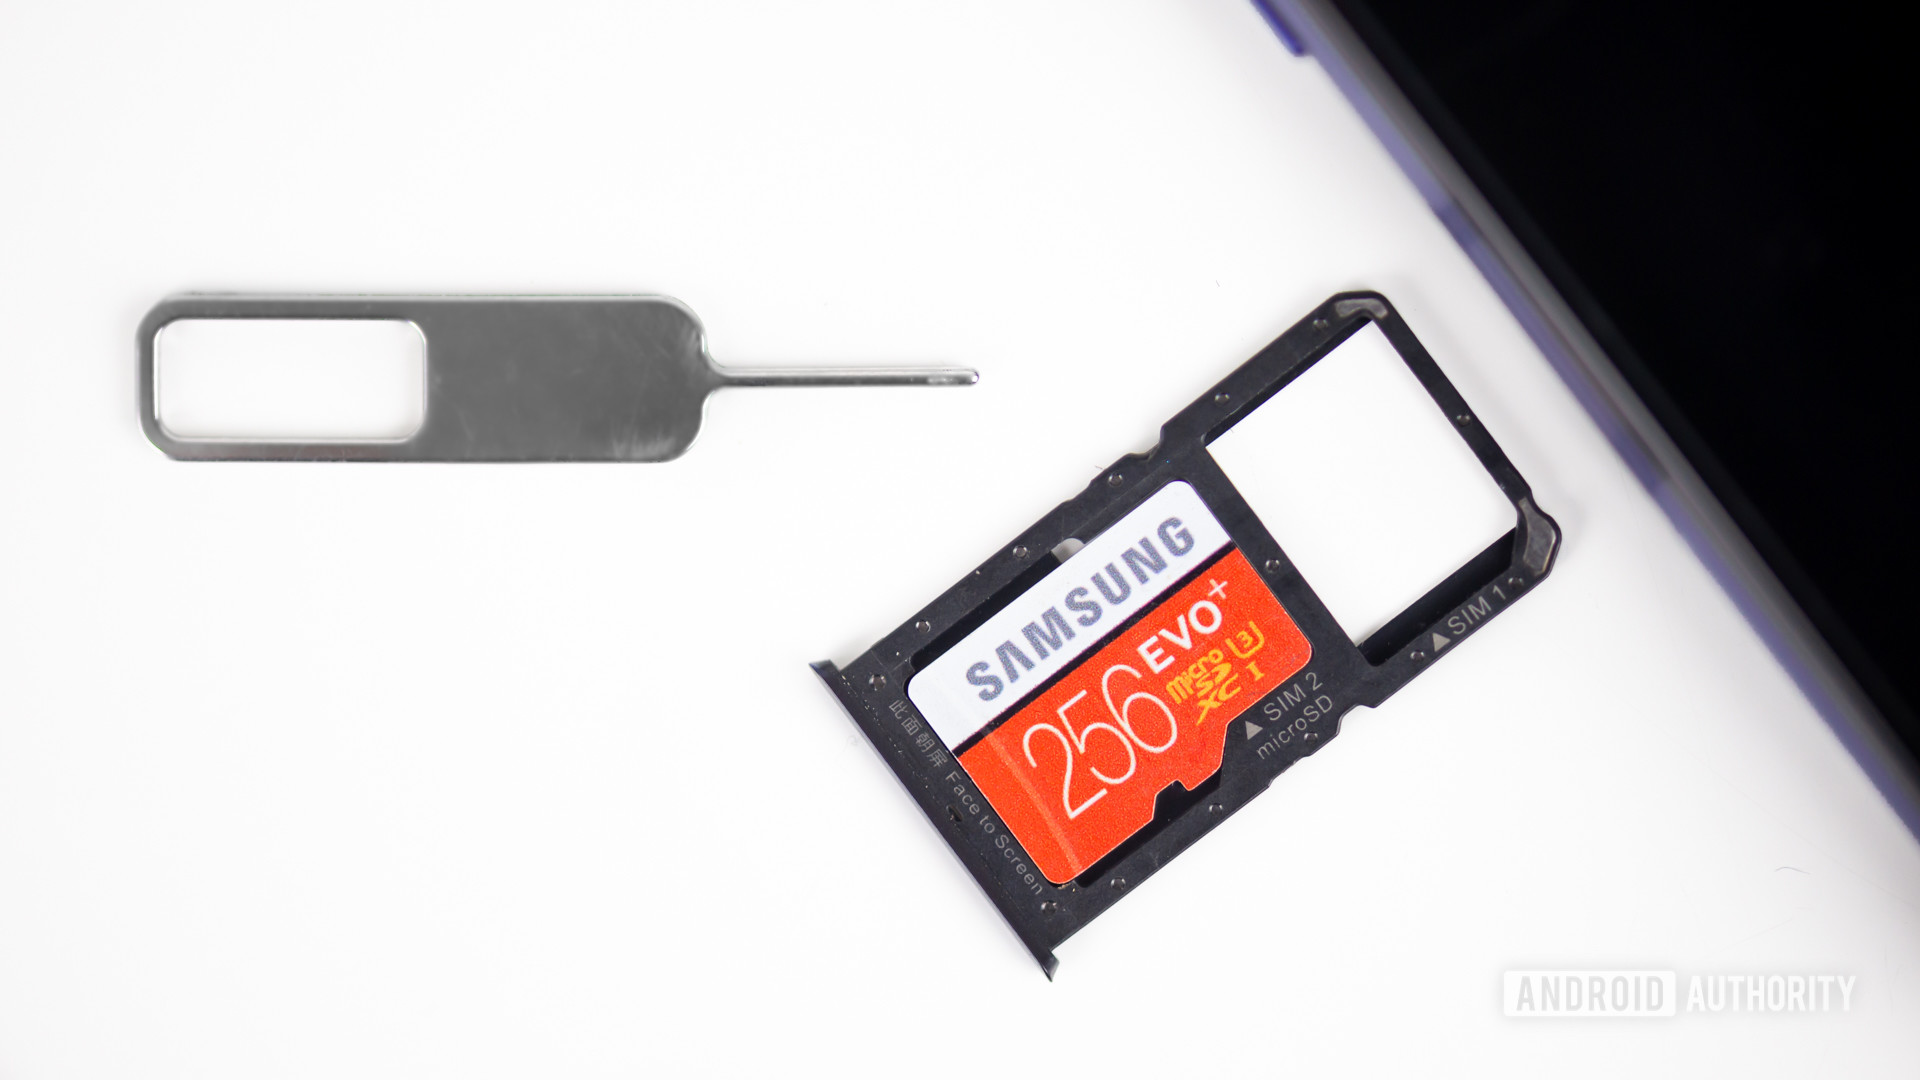
Note: These instructions were put together using a Samsung Galaxy S10 Plus running Android 11. Keep in mind steps might be slightly different depending on your device and Android version.
Use SD card as internal storage
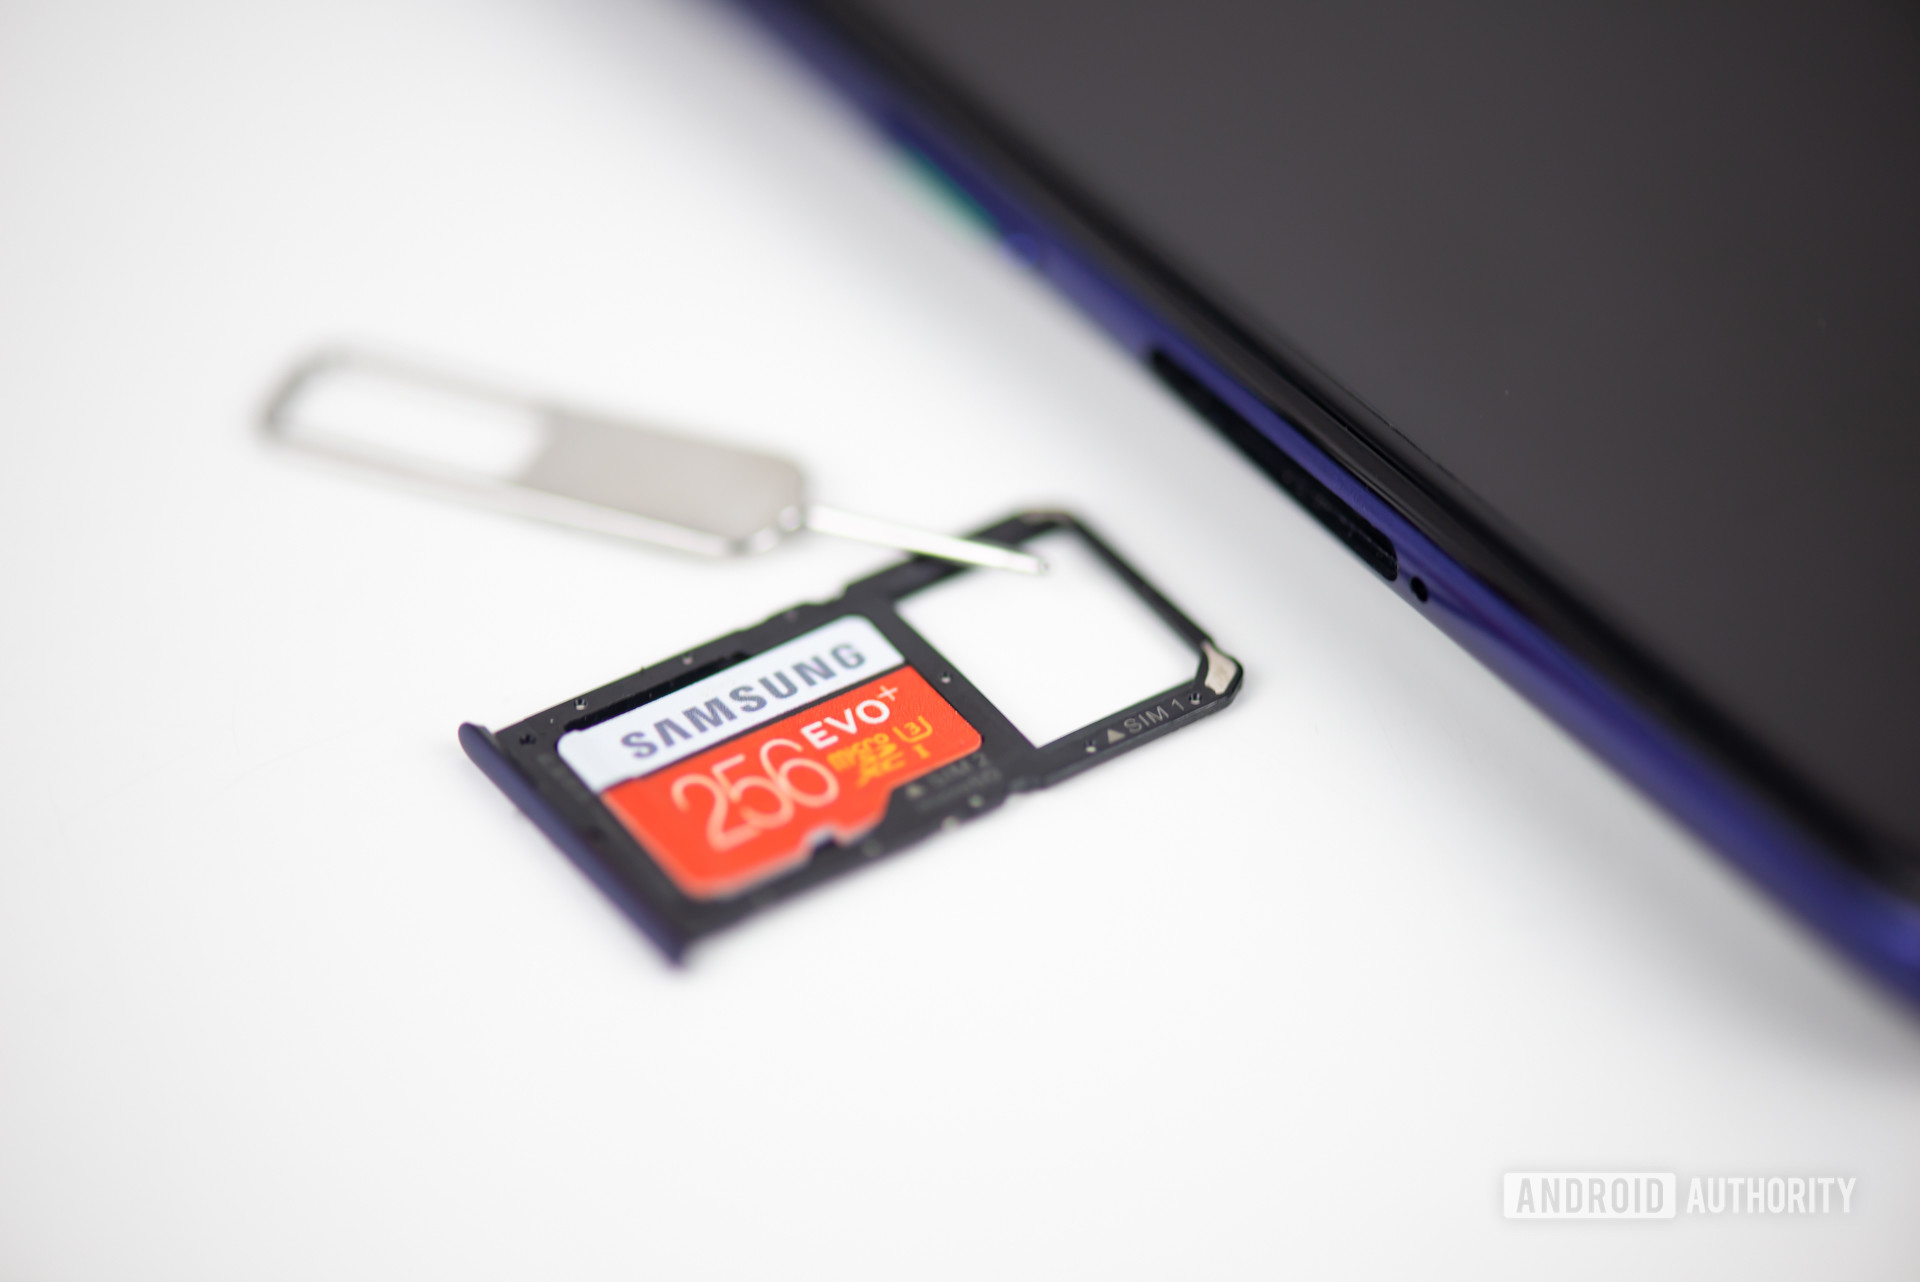
If the previous method isn’t good enough or isn’t supported by your apps/manufacturer, then there’s still another way to move apps to microSD on Android. It might actually be a more convenient option. You can make Android treat your SD card as internal storage. This will make everything much more convenient, as you no longer have to worry about where to put apps and files. Your internal storage and SD card will turn into one conglomerate.
Turning your microSD card into internal storage has its downsides. Once you turn an SD card into a phone’s internal storage, you will only be able to use that storage unit with that specific phone (unless you format it again). Furthermore, the phone will also only work when said microSD card is inserted. Removing it will trigger a factory data reset.
Aside from turning your phone and SD card into slaves to each other, you might also have to worry about performance. SD cards can be slow. Make sure you get one that’s fast enough to keep performance healthy on your Android device. Lastly, not every phone out there supports this feature, even if it has expandable storage.
Adopt SD card the easy way:
- Insert the microSD card into the phone.
- If the device supports it, a notification will ask you how you want to use it.
- Choose to adopt external storage. This will format and encrypt the microSD card.
How to adopt SD card from the settings:
- Put the microSD card in your Android phone.
- Open the Settings app.
- Select Storage.
- Tap on the SD card you inserted.
- Hit the menu button and select Storage settings.
- Choose Format as internal.
- Hit Erase and format.
- Hit OK.
- Migrate your data (or choose to do so later).
Источник
SD карта как внутренняя память для переноса приложений на Android 6, 7, 8, 9, 10 и 11
В старых версиях Android, не имея root прав, нельзя было использовать SD карту как внутреннюю память. Такая функция появилась только в Android 6.0 Marshmallow (работает на Android 7, 8, 9, 10 и 11) и позволила переносить установленные приложения на карту памяти. Чтобы игры и программы быстро запускались и работали без сбоев, желательно использовать SD карту высокого класса.
![]()
В некоторых прошивках функция отсутствует, несмотря на подходящую версию Android. Но это не значит, что карту памяти нельзя использовать как внутреннее хранилище – просто SD придется форматировать при помощи ADB.
После форматирования карты памяти, она не будет считываться другими мобильными устройствами. Если понадобится установить SD в новый смартфон или подключить в кардридер в ноутбуке, отформатируйте карту как портативный носитель.
Настройка SD карты как внутренней памяти
После подключения карты памяти, в области уведомлений появится оповещение об обнаружении новой SD карты. Нажмите «Настроить» и отформатируйте ее как внутреннюю память, следуя указаниям. Сохраненные на SD карте файлы будут удалены, так что заранее позаботьтесь о создании резервной копии.

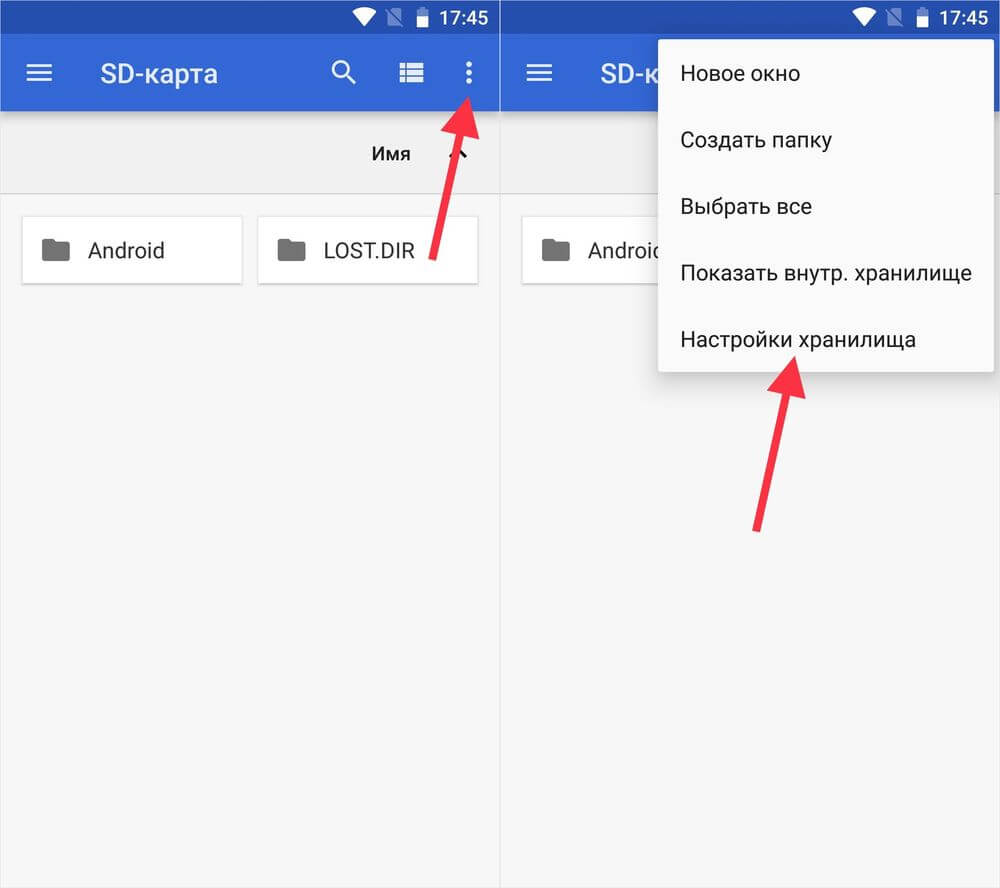
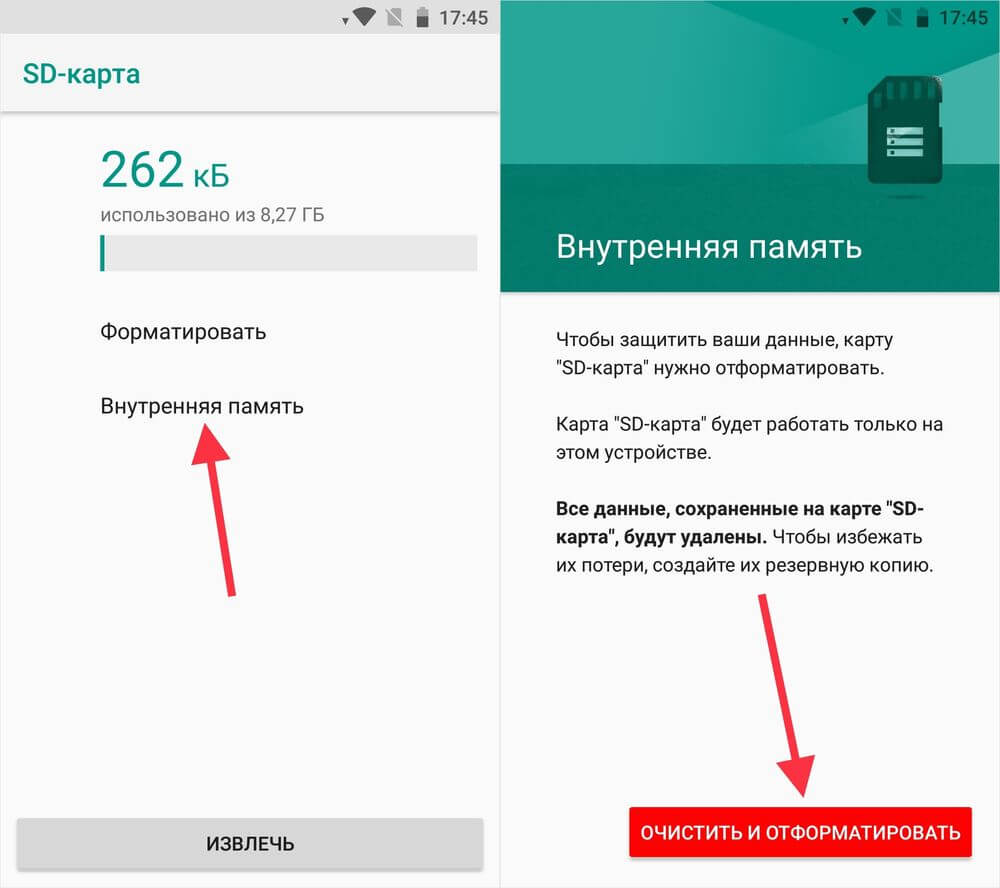
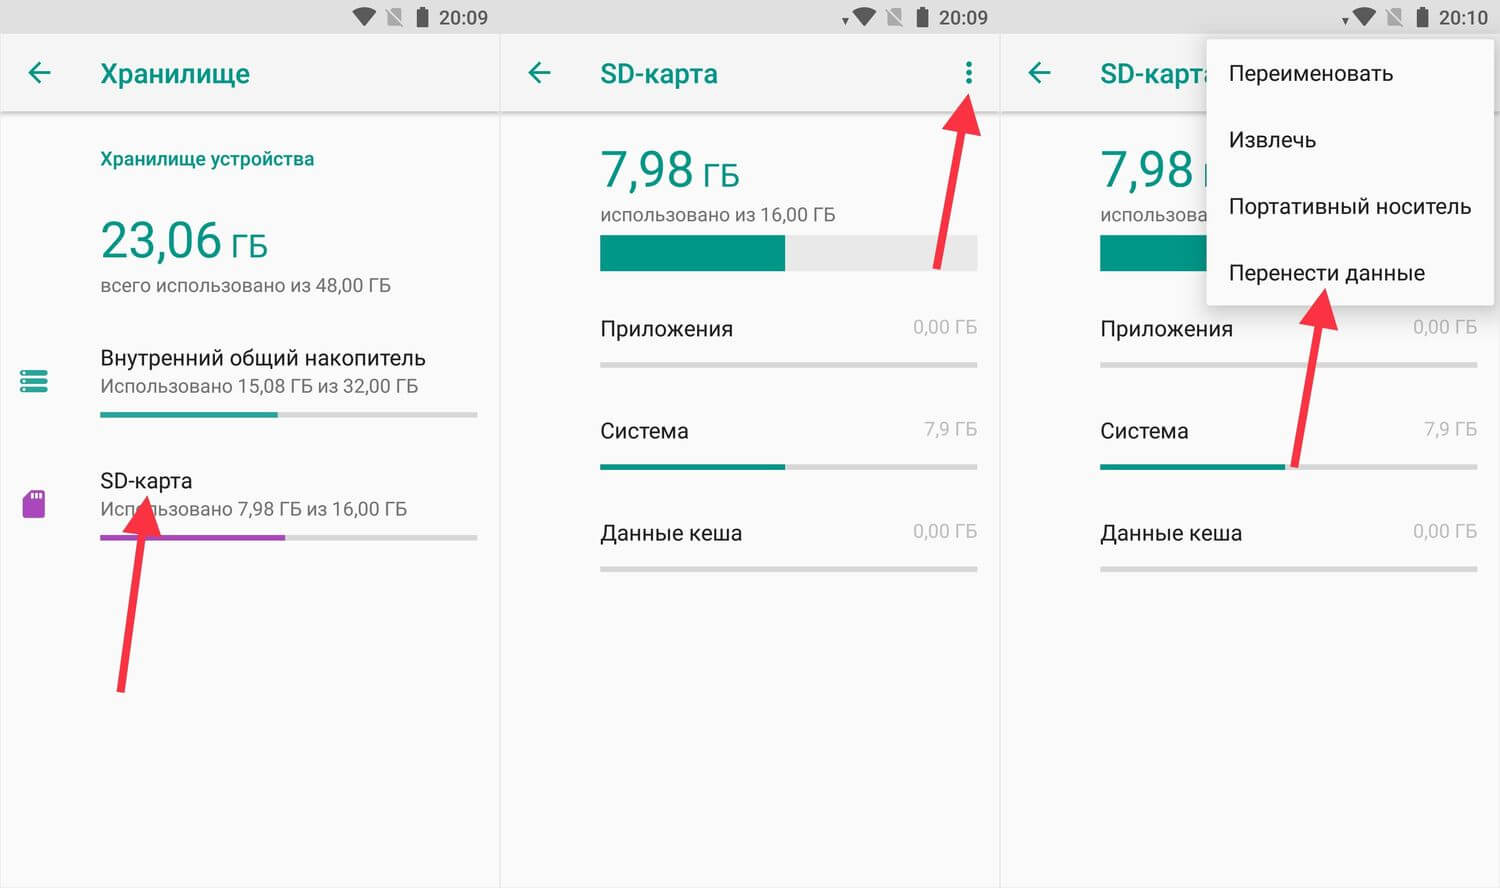
Также карта памяти форматируется через меню настроек. Для этого перейдите в «Хранилище» (в некоторых прошивках называется «Хранилище и USB-накопители», «Накопители» или «Память») и щелкните по пункту «SD-карта».
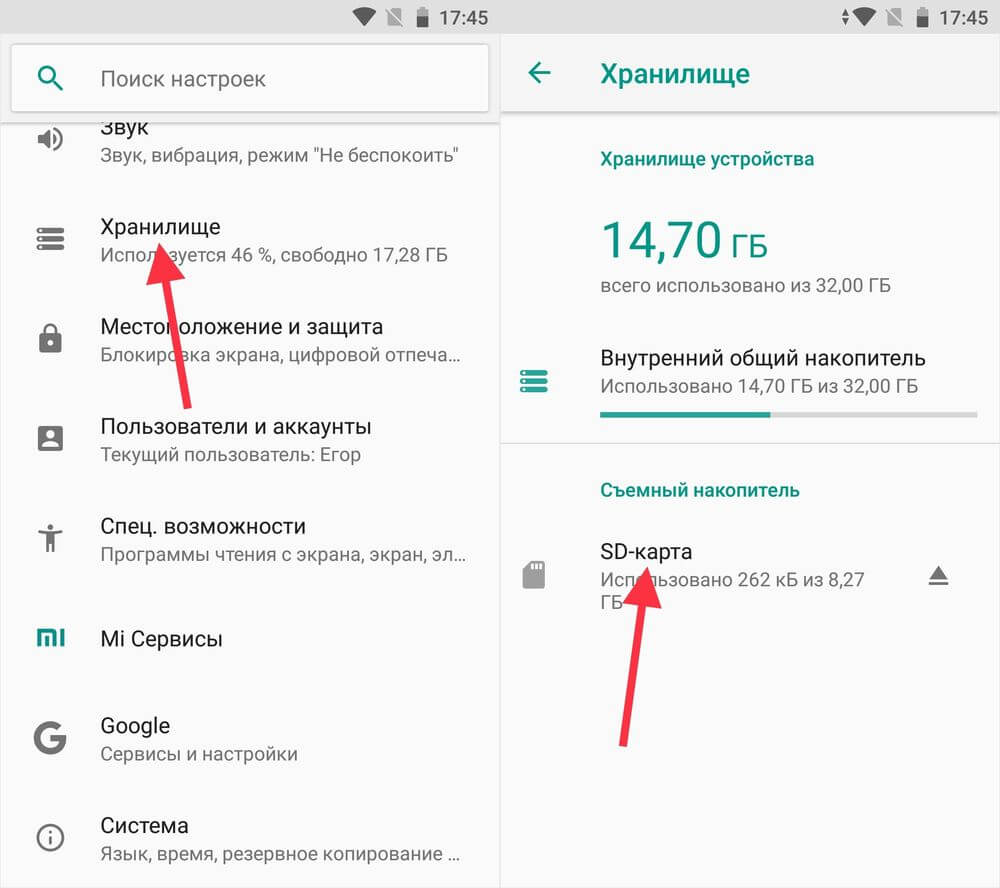
Раскройте меню и выберите «Настройки хранилища».
Нажмите на пункт «Внутренняя память» и в следующем окне щелкните «Очистить и отформатировать». Не забудьте перед этим сохранить данные с карты памяти, потому что они будут удалены.
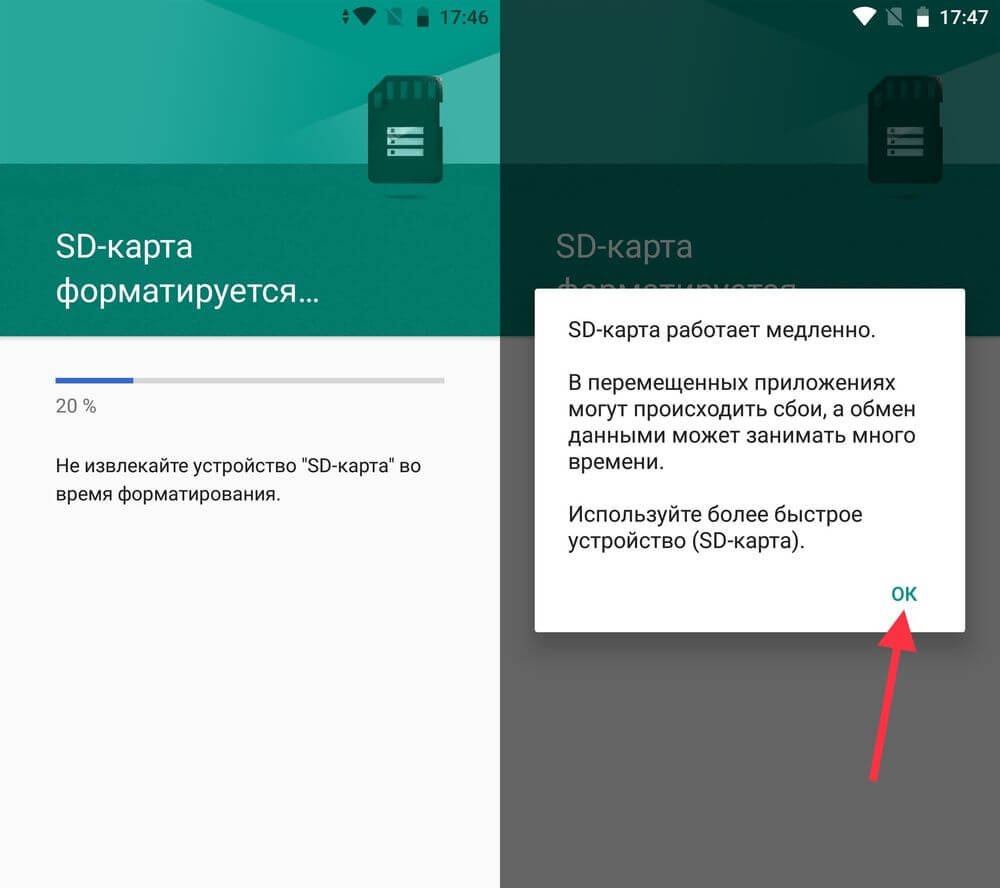
Если после завершения форматирования, на экране появится оповещение, что SD-карта работает медленно, значит, используемая карта памяти низкого класса. Такие SD не рекомендуются к использованию, потому что они работают в разы медленнее накопителей в мобильных устройствах. Приложения, перенесенные на карту с невысокой скоростью чтения и записи, могут медленно работать.
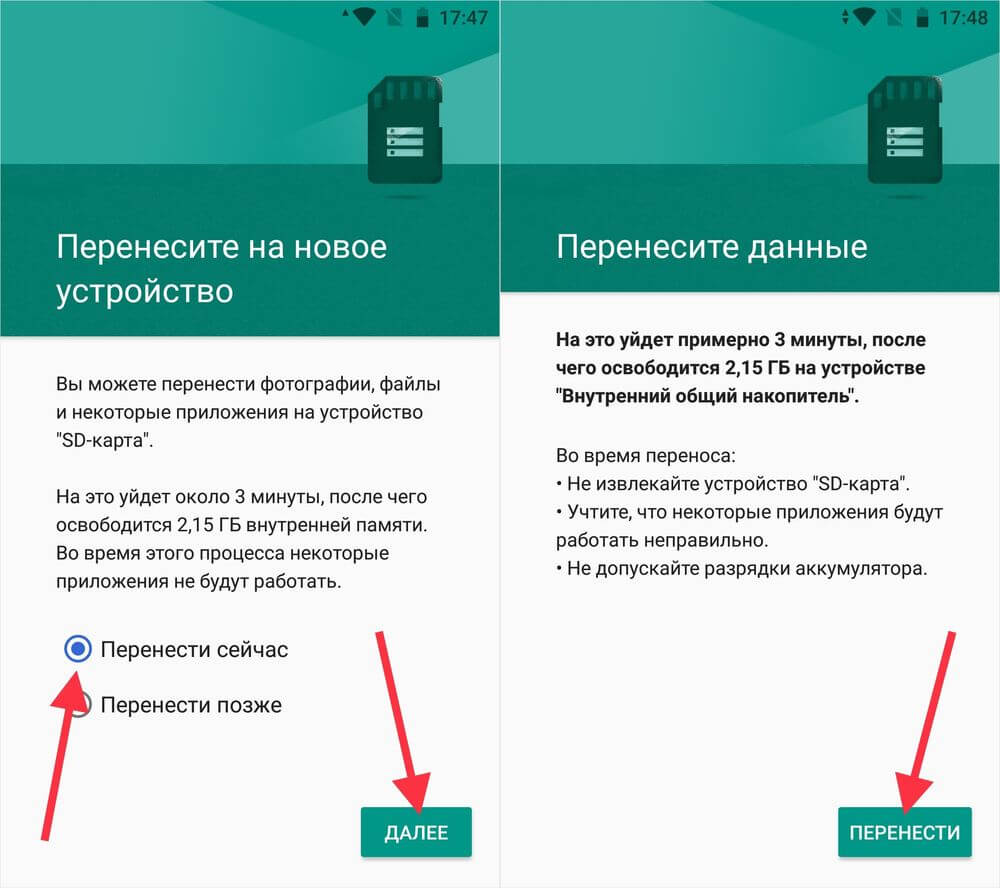
Далее будет предложено перенести некоторые приложения, фотографии и файлы на отформатированную карту. Выберите «Перенести сейчас», нажмите «Далее», а в следующем окне щелкните на «Перенести».
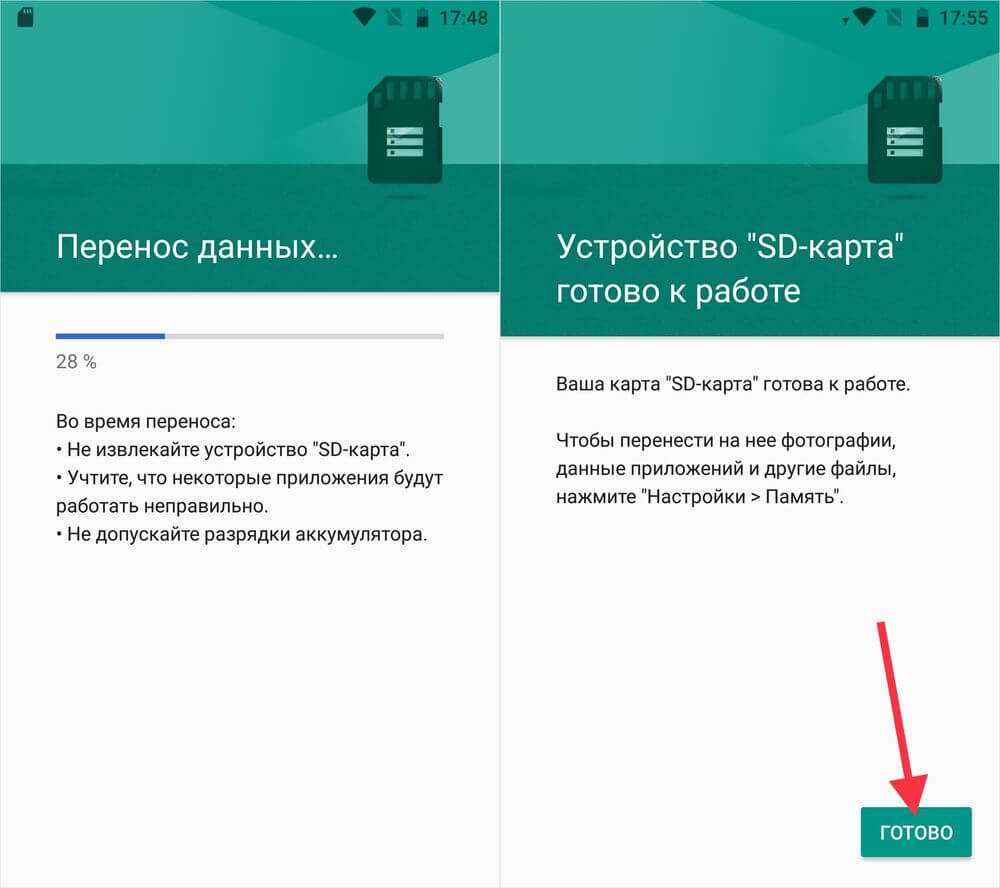
Процесс переноса данных займет некоторое время. В конце появится сообщение, что SD карта готова к работе.
Как отформатировать карту памяти при помощи ADB
Если функция форматирования карты памяти отсутствует в меню настроек, несмотря на подходящую версию Android, значит, производитель мобильного устройства не добавил эту опцию в систему. При этом возможность отформатировать карту памяти никуда не делась, но для этого понадобится ADB.
ADB (Android Debug Bridge, отладочный мост Android) – инструмент, который входит в Android SDK и при помощи него устанавливается связь с консолью Android. ADB работает из командной строки (cmd.exe) либо из Windows PowerShell (доступен в последних сборках Windows 10). Проще говоря, подключив мобильное устройство к ПК через USB и активировав отладку, можно управлять смартфоном с компьютера, используя ADB-команды.
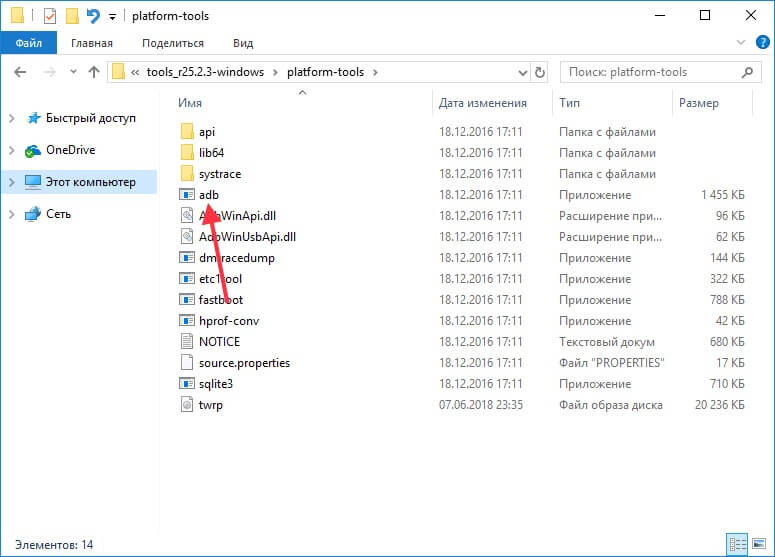
Чтобы скачать ADB, перейдите по ссылке, загрузите архив «platform-tools» и разархивируйте его на диске «C:». ADB будет внутри.
Также перейдите на эту страницу официального сайта Oracle, поставьте галочку в чекбоксе «Accept License Agreement» и скачайте установочный файл Java Development Kit, соответствующий разрядности операционной системы на компьютере. После завершения загрузки запустите установку.
Включите на устройстве отладку по USB. Эта функция находится в скрытом разделе «Для разработчиков». Чтобы сделать раздел видимым, откройте «Настройки» → «О телефоне» («Настройки» → «Система» → «О телефоне» на Android 8 Oreo, Android 9 Pie, Android 10 и Android 11) и щелкните 5-7 раз по пункту «Номер сборки».
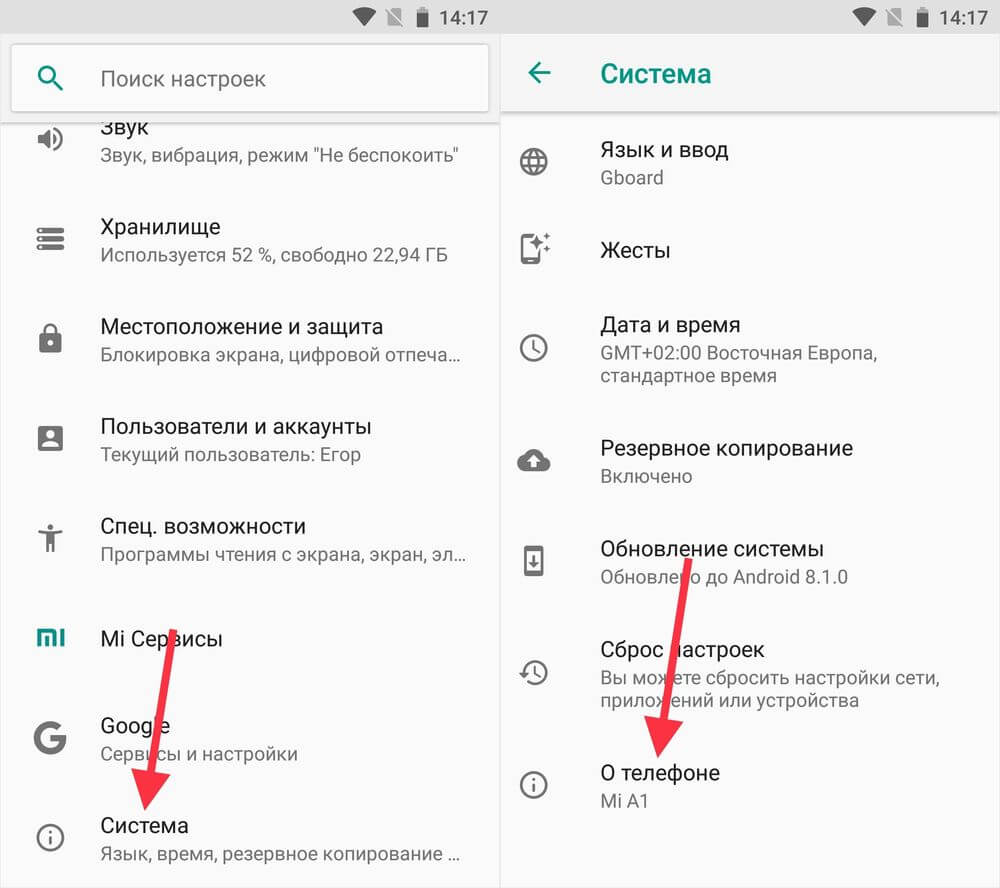
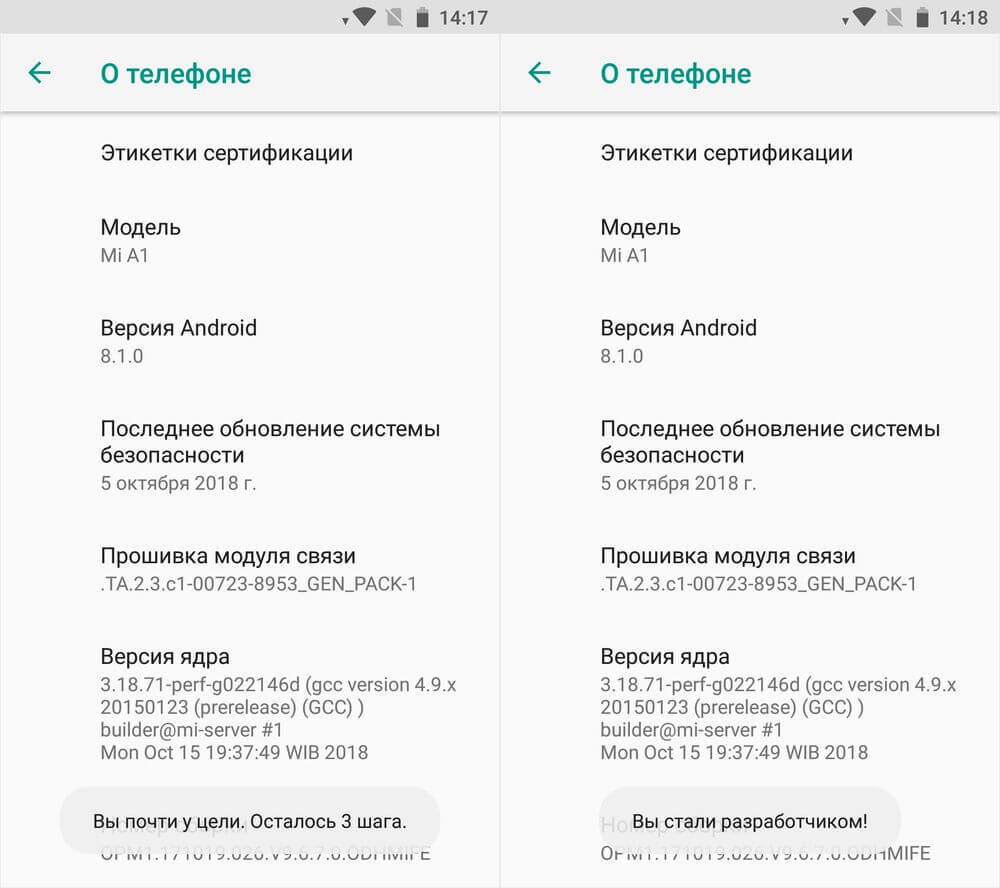
После выполненных действий пункт «Для разработчиков» появится в меню настроек («Настройки» → «Система» на Android 8 Oreo, 9 Pie, 10 и 11). Перейдите в раздел «Для разработчиков», активируйте пункт «Отладка по USB» и подтвердите, выбрав «ОК».

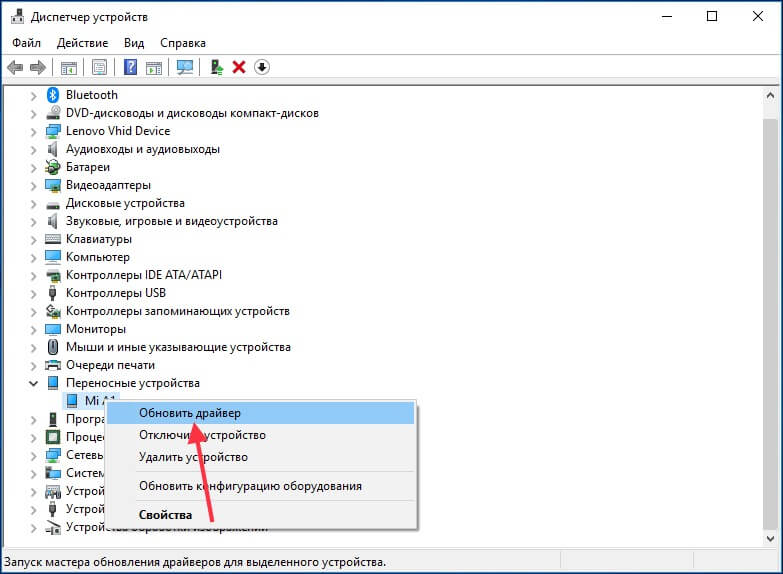
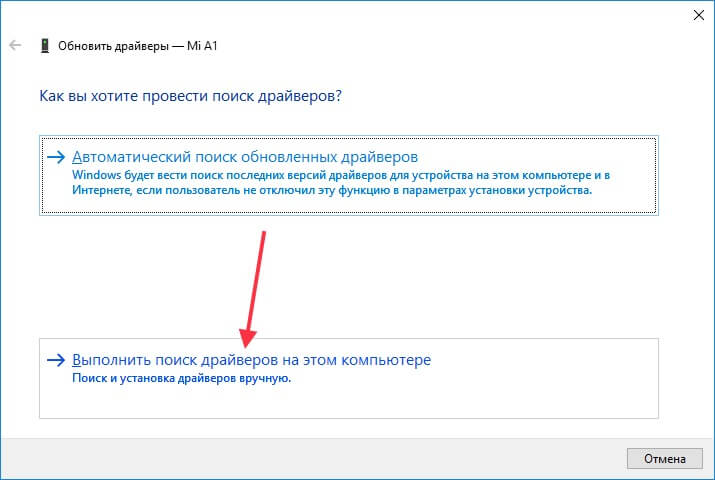
Подключите смартфон к ПК через USB. Если вы делаете это впервые, на компьютер установятся драйверы USB. Обычно драйверы загружаются автоматически, но если этого не произошло, скачайте драйвер с сайта производителя устройства либо установите универсальный драйвер. Если драйвер без установщика, зайдите на компьютере в «Диспетчер устройств», выберите аппарат (устройство будет определяться неправильно с вопросительным или восклицательным знаком), щелкните по нему правой клавишей мышки и нажмите «Обновить драйверы». Выберите «Выполнить поиск драйверов на этом компьютере», укажите путь к папке с драйверами, щелкните «Далее» и дождитесь завершения установки.
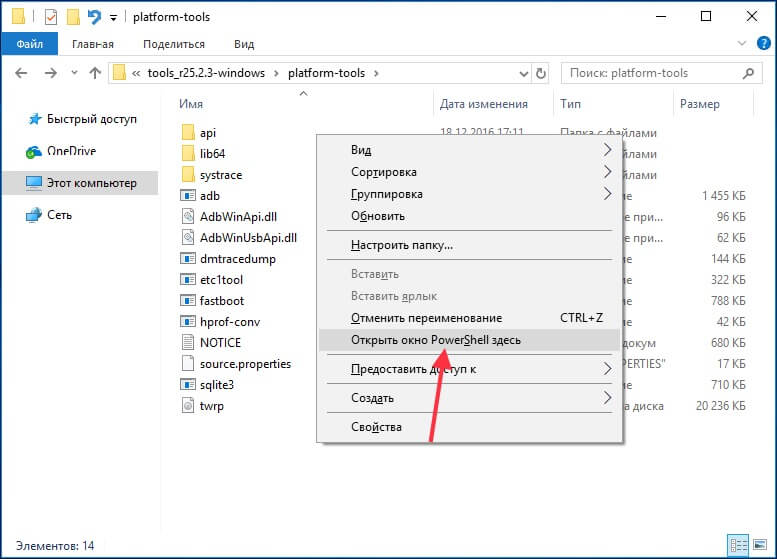
Теперь перейдите в папку «platform-tools» и удерживая клавишу «Shift» щелкните правой кнопкой мыши по пустой области. В списке опций выберите «Открыть окно команд» или «Открыть окно PowerShell здесь» (на Windows 10). Запустится командная строка либо PowerShell.
На смартфоне появится запрос на разрешение отладки с этого компьютера. Выберите «ОК», чтобы подтвердить. Если запрос не появился, это произойдет позже – во время выполнения первой команды.

Введите следующую команду и нажмите «Enter» (в PowerShell добавьте ./ перед командой):
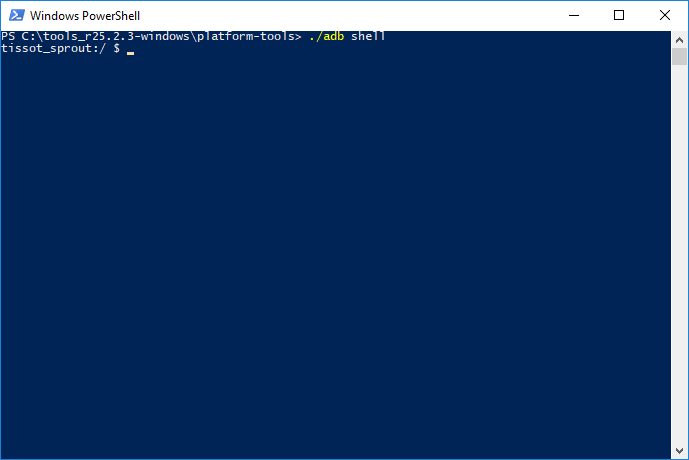
В консоли появится знак «$». Введите команду:
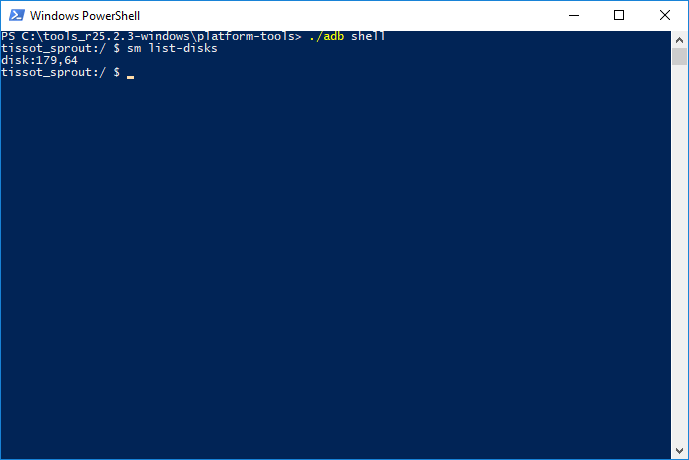
Будет выдан идентификатор карты памяти вида disk:XXX,XX. Скопируйте следующую команду, замените в ней XXX,XX на полученные цифры и выполните команду:
sm partition disk:XXX,XX private

Теперь зайдите в «Хранилище», выберите карту памяти, откройте ее настройки и щелкните «Перенести данные».

Как перенести приложения на карту памяти на Android 6, 7, 8, 9, 10 и 11
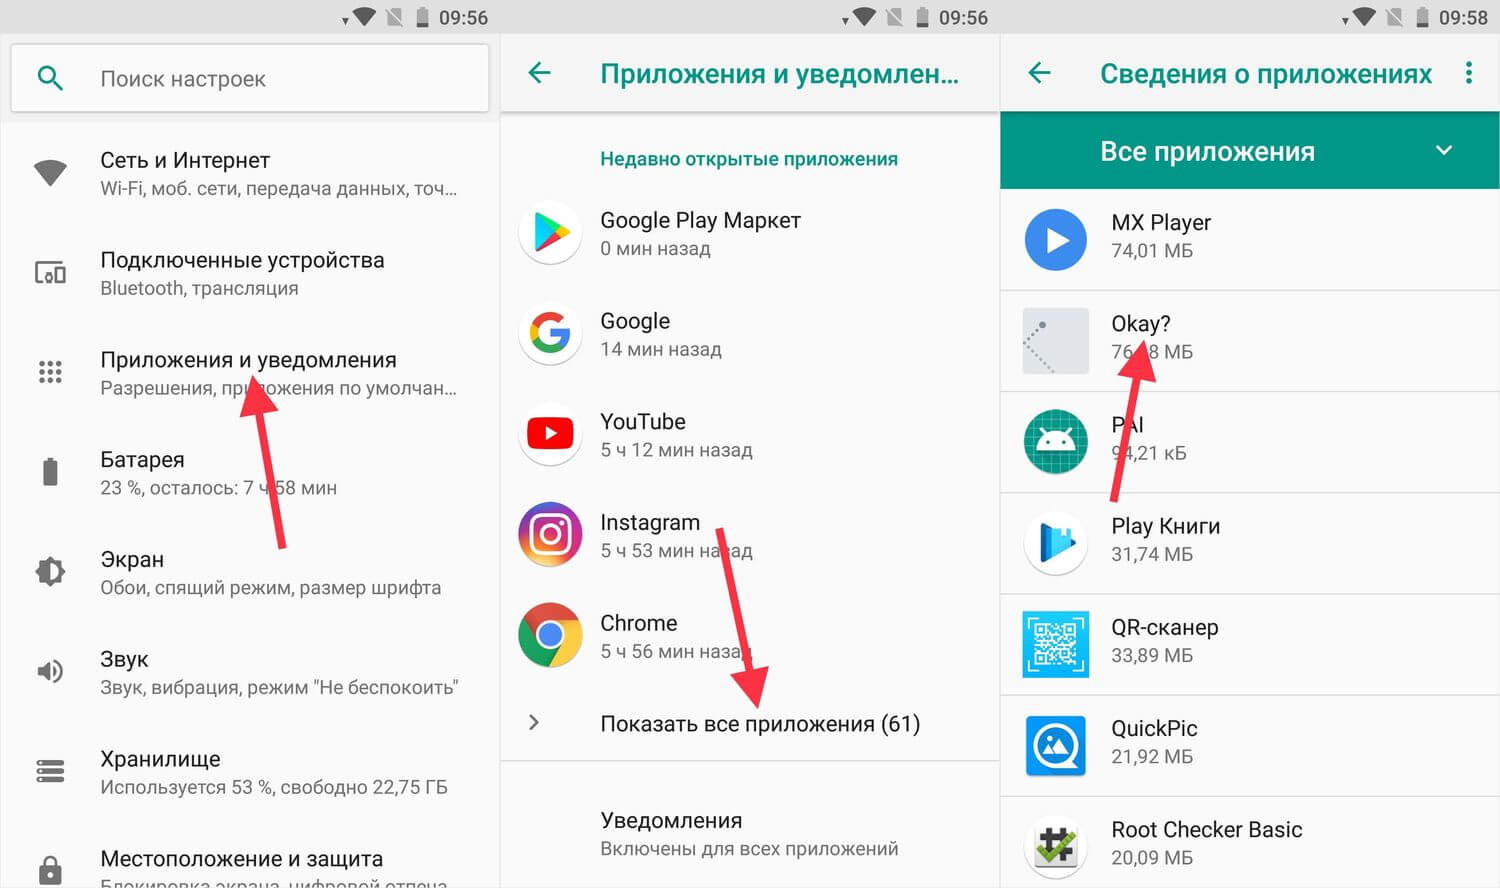
После форматирования SD карты остается перенести на нее установленные приложения. Откройте «Настройки», выберите «Приложения и уведомления», нажмите «Показать все приложения» или «Сведения о приложениях» (если таких пунктов в меню нет, пропустите) и щелкните на игру либо программу, которую собираетесь переносить.
Откройте «Хранилище» (или «Память»), нажмите «Изменить» и выберите карту памяти.
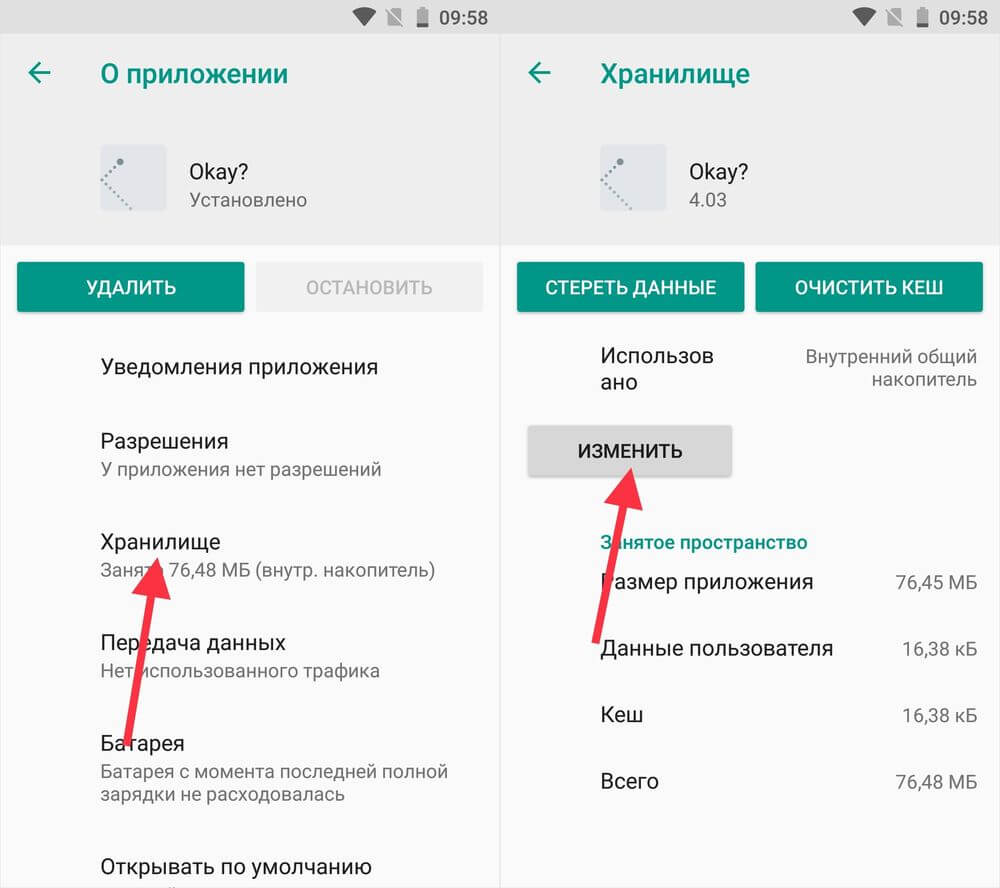
В появившемся окне щелкните на кнопку «Переместить» и подождите пока приложение переносится.

AppMgr III (App 2 SD) – программа для переноса приложений
Если не хочется вручную перемещать каждое приложение, загрузите программу, которая упростит этот процесс. При помощи AppMgr III (App 2 SD) можно в пару тапов перенести неограниченное количество приложений на карту памяти.
Источник
How to Install Apps on SD Card on Android
Troubled by Insufficient memory and want to install apps on SD card. Go through this article to learn how to install apps on SD card.
Android Tips
Common Android Tips
Locked Android Tips
Insufficient Storage notifications always pop out on Android phones. The most likely reason for this problem is that phone memory is set as the default storage. If you download and install various applications, the phone’s memory would be full, affecting its productivity. By using SD Cards, you can expand your device storage memory with respect to your needs. However, is it possible to install apps on SD card? and if it is, how to install apps on SD card?
Not only this, there are many other queries raised by Android users like How to transfer apps to SD Card Android and How to download apps directly to SD card. Well, this article will provide you satisfying methods and results to resolve all these issues.
Running apps on SD card can make them work slower than with the phone memory. You need to be careful with installing apps on SD card. It may affect the performance of your Android device.
How to Install Apps on SD Card Androidпјџ
To download apps on an SD card , you need to set up an SD card as the internal storage first. Follow the steps below to set up an SD card as the internal storage and at the same time, move Android apps to your SD card. Afterward, you will learn how to install apps on an SD card on Android, directly and easily.
Set Up an SD Card as Internal Storage?
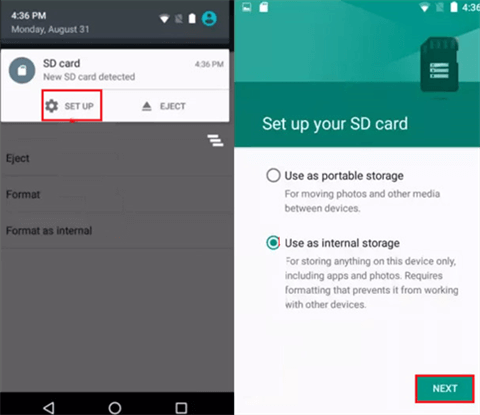
Step 1. Insert the SD card into your devices. The notification will pop up on the screen when it detects your new SD Card. Click on “Set up” in order to format it as the internal storage. If you don’t see any such notification, then go to Settings > Storage and USB to set up your SD card as internal storage.
Step 2. Once you’ve seen the pop-up window as “Set up your SD card”, click on “Use as Internal Storage”. A message will display on the screen asking you to set up the SD card for internal storage. Create a backup of your SD card and click “Erase and Format”.
Set up Your SD Card
Step 3. Wait for some time till the device is formatting the data on it. After that, you will be asked to move the data to the SD card. To move the data select “Move Now”. Select “Move Later” if you want to manage the data migration some other time.
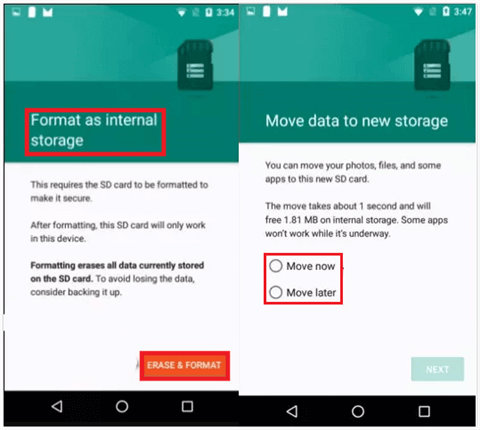
Format an Internal Storage
Step 4. After you have done with the SD Card encryption and formatting, the screen will display the message as “SD card is ready”, click “Done”. Now, you can check the internal phone storage and your SD card storage by navigating to Settings > Device Storage. The next time you download apps on Android, they will be stored on your SD card.
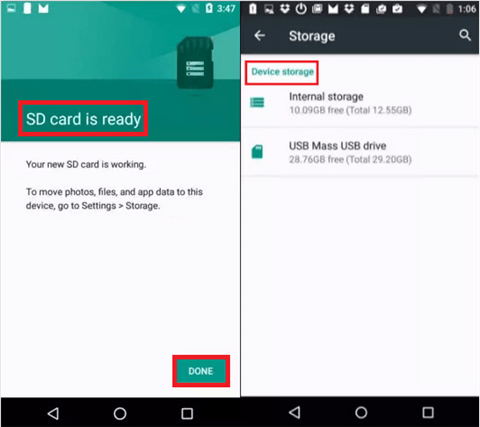
SD Card Is Ready
Download and Install Apps on SD Card?
Once you have set up your SD card as the internal storage and move old apps to your new SD card, you can install new apps on the SD card with a few clicks. Normally, you can directly search your favorite app in the “App store”. However, considering different brand of Android phones has different “app store”, you may fail to find the app you need. Nevertheless, with the help of AppTrans, you can also directly install an app on SD card, as long as you have the .apk file on your computer. Freely download AppTrans and keep reading to figure out how to make it with a few clicks.
* 100% Clean & Safe
Step 1. Open AppTrans on your computer > Click App Install and Install Now on the welcome page.
![]()
Tap App Install and Install Now
Step 2. Connect your Android phone to the computer and select the app you’d like to install from the computer.
![]()
Select the App to Install
Step 3. Navigate to the app file on your computer and open it.
![]()
Navigate and Open the App
Step 4. When AppTrans starts to install the app, you’ll see the following interface.
![]()
Wait for Installing the App
Step 5. Once you have seen theВ App installation completed interface on your computer, your Android phone will receive a message, asking you to allow AppTrans to install apps on your Android phone.
![]()
App Installation Permission
Bonus Tip. How to Transfer Apps From Android To Android
After making a purchase of a new Android phone, transferring important data like contactsВ orВ photos from your old Android phone to the new device is necessary as it would be rather inconvenient to start with a brand new phone. When it comes to apps, traditionally, you might have to only download them one by one.
We all know that downloading and installing apps is quite time-consuming. Things could be worse if you have lots of apps waiting to be downloaded. Under this circumstance, we strongly suggest you try AnyDroid.
* 100% Clean & Safe
AnyDroid, developed by iMobie inc., aims at providing all Android users a more convenient way to manage data on their phones. One of the most famous features of it is transferring apps from Android to Android. For this function, AnyDroid has the following outstanding performance:
- Transfer apps from Android to Android directly, with which you don’t have to go through the complicated transferring process.
- Transfer data at a blazing fast speed. According to statistics, it can transfer 1.7 GB of data from Android to Android within 1 minute.
- Keep data safe and secure. It is developed by a trustworthy developer and you have our guarantee that while using this software, no information leakage or data loss would occur.
![]()
Select Apps to Transfer from Android to Android
The Bottom Line
That’s all for how to install apps on an SD card on Android. If you still have any questions, please do leave comments below. AppTrans is indeed a nice tool to install apps in SD card . Besides, it can also help you to transfer apps between different brands of mobile phones. Why not download it now to your computer to take a try?

Member of iMobie team as well as an Apple fan, love to help more users solve various types of iOS & Android related issues.
Источник


