Authorizing with Google for REST APIs
In this document
Try it out
When you want your Android app to access Google APIs using the user’s Google account over HTTP, the GoogleAuthUtil class and related APIs provide your users a secure and consistent experience for picking an account and retrieving an OAuth 2.0 token for your app.
You can then use that token in your HTTP-based communications with Google API services that are not included in the Google Play services library, such as the Blogger or Translate APIs.
Note: An OAuth 2.0 token using GoogleAuthUtil is required only for certain types of Google APIs that you need to access over HTTP. If you’re instead using the Google Play services library to access Google APIs such as Google+ or Play Games, you don’t need an OAuth 2.0 token and you can instead access these services using the GoogleApiClient . For more information, read Accessing Google Play Services APIs.
To get started with GoogleAuthUtil for accessing Google’s REST APIs, you must set up your Android app project with the Google Play services library. Follow the procedures in Setup Google Play Services SDK.
Register Your App
Before you can publish an app that retrieves an OAuth 2.0 token for Google REST APIs, you must register your Android app with the Google Cloud Console by providing your app’s package name and the SHA1 fingerprint of the keystore with which you sign your release APK.
Caution: While you are testing an APK that’s signed with a debug key, Google does not require that your app be registered in Google Cloud Console. However, your app must be registered in Google Cloud Console in order to continue working once it is signed with a release key.
To register your Android app with Google Cloud Console:
- Visit Google Cloud Console.
- If you have an existing project to which you’re adding an Android app, select the project. Otherwise, click Create project at the top, enter your project name and ID, then click Create.
Note: The name you provide for the project is the name that appears to users in the Google Settings app in the list of Connected apps.
To get the SHA1 fingerprint for your app, run the following command in a terminal:
For example, you’re using a debug-key with Eclipse, then the command looks like this:
Then the keystore password is «android».
The Credentials page then provides the available credentials such as an OAuth 2.0 client ID and an Android Key, but you don’t need these to authorize your Android users. Simply registering your app with the package name and SHA1 makes the Google services accessible by your app.
To acquire the OAuth 2.0 token that will grant you access to Google APIs over HTTP, you need to first identify the user’s Google account with which you’ll query the servers. For this task, the Google Play services library provides a convenient account picker dialog you can invoke using AccountPicker . The result delivered to your activity from the account picker is the account name you’ll use to request the OAuth 2.0 token in the next lesson.
Note: In order to use the APIs discussed here, you must include the Google Play services library with your project. If you haven’t set up your project with the library yet, read the guide to Setup Google Play Services SDK.
Invoke the Account Picker
To open the account picker dialog that’s managed by the Google Play services library, call startActivityForResult() using an Intent returned by AccountPicker.newChooseAccountIntent .
When this code executes, a dialog appears for the user to pick an account. When the user selects the account, your activity receives the result in the onActivityResult() callback.
Most apps should pass the newChooseAccountIntent() method the same arguments shown in the above example, which indicate that:
- There is no currently selected account.
- There is no restricted list of accounts.
- The dialog should list only accounts from the «com.google» domain.
- Don’t prompt the user to pick an account if there’s only one available account (just use that one). However, even if only one account currently exists, the dialog may include an option for the user to add a new account.
- There is no custom title for the dialog.
- There is no specific auth token type required.
- There are no restrictions based on account features.
- There are no authenticator-specific options.
For more details about these arguments, see the newChooseAccountIntent() method documentation.
Retrieve the Account Name
Once the user selects an account, your activity receives a call to its onActivityResult() method. The received Intent includes an extra for KEY_ACCOUNT_NAME , specifying the account name (an email address) you must use to acquire the OAuth 2.0 token.
Here’s an example implementation of the callback onActivityResult() that receives the selected account:
You can now pass the account name held by mEmail to GoogleAuthUtil.getToken() (which is what the getUsername() method does), but because it performs network transactions, this method should not be called from the UI thread. The next lesson shows how to create an AsyncTask to get the auth token on a separate thread.
Once you have retrieved the account name for the user’s Google account, you can call GoogleAuthUtil.getToken() , which returns the access token string required by Google API services.
Calling this method is generally a straightforward procedure, but you must be aware that:
- The GoogleAuthUtil.getToken() method requires a network connection, so your app must acquire the INTERNET permission. You should also check whether the device has a network connection at runtime by querying NetworkInfo , which requires that your app also acquire the ACCESS_NETWORK_STATE permissions—for more details, read Connecting to the Network.
- Because the GoogleAuthUtil.getToken() method performs a synchronous network transaction, you should always perform this call from a worker thread to avoid blocking your app’s UI thread.
- As is true when performing any network transaction, you should be prepared to handle exceptions that may occur. There are also specific exceptions that GoogleAuthUtil.getToken() may throw, defined as GoogleAuthException objects.
This lesson shows how you can gracefully handle these concerns by performing authentication in an AsyncTask and providing users with the appropriate information and available actions during known exceptions.
Note: The code shown in this lesson, using GoogleAuthUtil.getToken() , is appropriate when you will be requesting the OAuth token from an Activity . However, if you need to request the OAuth token from a Service , then you should instead use getTokenWithNotification() . This method works the same as GoogleAuthUtil.getToken() , but if an error occurs, it also creates an appropriate notification that allows the user can recover from the error. The sample available for download above includes code showing how to use this method instead.
Extend AsyncTask to Get the Auth Token
The AsyncTask class provides a simple way to create a worker thread for jobs that should not run on your UI thread. This lesson focuses on how to create such a thread to get your auth token; for a more complete discussion about AsyncTask , read Keeping Your App Responsive and the AsyncTask class reference.
The doInBackground() method in your AsyncTask class is where you should call the GoogleAuthUtil.getToken() method. You can also use it to catch some of the generic exceptions that may occur during your network transactions.
For example, here’s part of an AsyncTask subclass that calls GoogleAuthUtil.getToken() :
In order to call GoogleAuthUtil.getToken() , you must provide the app Context , the account name retrieved from the account picker, and the scope for your auth token request. The above sample code (and the attached sample) defines these arguments with class members that the host activity passes to the AsyncTask class constructor. For more information about setting the scope, see the Specifying Scopes section below.
Note: As shown by the fetchToken() method above, you must handle special exceptions that may occur during the GoogleAuthUtil.getToken() method. The next section shows how you should respond to these exceptions.
Once you have an AsyncTask subclass defined, you can instantiate and execute an instance after you get the user’s account name from the account picker. For example, back in the Activity class you can do something like this:
The pickUserAccount() method is shown in the first lesson, Picking the User’s Account.
For information about how to check whether the device is currently online (as performed by the isDeviceOnline() method above), see the attached sample app or the Connecting to the Network lesson.
The only part left is how you should handle the exceptions that may occur when you call GoogleAuthUtil.getToken() .
Specifying scopes
The scope string is used to specify which Google services can be accessed by an app using the requested auth token. An auth token can be associated with multiple scopes.
When specifying the scopes in your auth token request, prefix the scope string with «oauth2:» followed by a list of one or more OAuth scope values. Use a space to separate each scope value in the list. To see a list of valid OAuth scope values for Google services, browse the OAuth 2.0 Playground.
Tip: Specify «oauth2: » for a single scope. Specify «oauth2: » for multiple scopes (using a space to separate each scope).
For example, to access the Google Books API, the scope is «oauth2:https://www.googleapis.com/auth/books» . To add an additional scope, say for Google+ login, your code might look like this:
Handle Exceptions
As shown in the fetchToken() method above, you must catch all occurrences of GoogleAuthException when you call GoogleAuthUtil.getToken() .
To provide users information and a proper solution to issues that may occur while acquiring the auth token, it’s important that you properly handle the following subclasses of GoogleAuthException :
UserRecoverableAuthException This is an error that users can resolve through some verification. For example, users may need to confirm that your app is allowed to access their Google data or they may need to re-enter their account password. When you receive this exception, call getIntent() on the instance and pass the returned Intent to startActivityForResult() to give users the opportunity to solve the problem, such as by logging in. GooglePlayServicesAvailabilityException This is a specific type of UserRecoverableAuthException indicating that the user’s current version of Google Play services is outdated. Although the recommendation above for UserRecoverableAuthException also works for this exception, calling startActivityForResult() will immediately send users to Google Play Store to install an update, which may be confusing. So you should instead call getConnectionStatusCode() and pass the result to GooglePlayServicesUtil.getErrorDialog() . This returns a Dialog that includes an appropriate message and a button to take users to Google Play Store so they can install an update.
For example, the fetchToken() method in the above sample code catches any occurrence of UserRecoverableAuthException and passes it back to the activity with a method called handleException() . Here’s what that method in the activity may look like:
Notice that in both cases, the REQUEST_CODE_RECOVER_FROM_PLAY_SERVICES_ERROR request code is passed with the request to handle the exception with a dialog or activity. This way, when the user completes the appropriate action to resolve the exception, your onActivityResult() method receives an intent that includes this request code and you can try to acquire the auth token again.
For example, the following code is a complete implementation of onActivityResult() that handles results for both the REQUEST_CODE_PICK_ACCOUNT action (shown in the previous lesson, Picking the User’s Account) and the REQUEST_CODE_RECOVER_FROM_PLAY_SERVICES_ERROR action, which occurs after the user completes one of the actions above to resolve an exception.
For a complete set of code that acquires the OAuth token and queries a Google service over HTTP (including how to use getTokenWithNotification() when you need to acquire the token from a Service ), see the sample app available for download at the top of this page.
Источник
Аутентификация OAuth2 в приложении посредством Google Sign-In. Непрерывный доступ к API Google
«С 20 апреля 2017 года отправка запросов на авторизацию из встроенных браузеров будет блокироваться».
Такое сообщение с 1 марта можно увидеть в некоторых приложениях, где необходима авторизация. Об этом Google написали в своём блоге еще в августе 2016, и это значит, что скоро во многих приложениях придется переписывать реализацию регистрации. Приятного мало, однако выход есть – использовать рекомендуемый способ авторизации Google Sign-in.
Об этом способе и будет идти речь в уроке, а также как получить токены, необходимые для работы с API Google.
В уроке будет присутствовать частичный перевод официальных документаций. Но сперва немного предыстории из моей практики и первой работы с OAuth2, возможно кто-то окажется в похожей ситуации.
Понадобилось мне для приложения получить чат с прямой трансляции YouTube. И тогда я узнала, что для отправки запросов на получение трансляции (и только потом чата) необходимо провести OAuth2 аутентификацию пользователя. Я начала искать. Информации по такой теме очень мало, она разрознена, не подходила для моего случая, и конечно же всё было на английском языке. В основном информация была для работы с наиболее популярными API: Drive, Cloud, Google Plus. В официальной документации API YouTube есть готовый код, бери да пользуйся, однако для Android он не подходит. Потратив немалое количество времени, методом проб и ошибок я пришла к рабочему решению. Первое, что мне захотелось сделать после, это собрать информацию «в кучу» и разложить по полочкам, что и сподвигло на написание этого урока.
Изначально моё решение начиналось с того, что перед пользователем открывался WebView для авторизации (ввод email, пароля). Далее запрашивалось разрешение на использование данных, и только после разрешения в ответе приходил код аутентификации (AuthCode), подробнее что с ним делать будет далее. Url, который открывался в WebView был следующий:
Это ни что иное, как post запрос, в ответ на который приходила страница, содержащая authCode, причем код был в заголовке страницы. Всё, как по рекомендации к API, а действия для сокрытия этого кода от пользователя оставили на разработчика.
Всё работало хорошо, приложение опубликовано, но в один прекрасный день я увидела следующее:
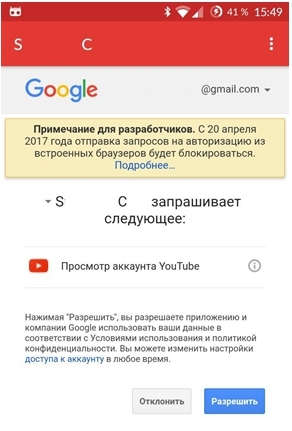
Перейдя по ссылке «Подробнее» попадаем в блог, где сказано, что во имя безопасности, аутентификация через WebView работать не будет с 20 апреля. Ну вот, думаю я, только сделала и придется переделывать через Sign-In. Причем первоначально я пыталась сделать реализацию именно через этот сервис. Однако с уже имеющимися знаниями «что и зачем» получилось довольно быстро. И так, начнем.
1. Получение учетных данных
В Диспетчере API создаем новый проект (или выбираем существующий):

Для авторизации понадобится файл конфигурации, который можно получить в мастере:

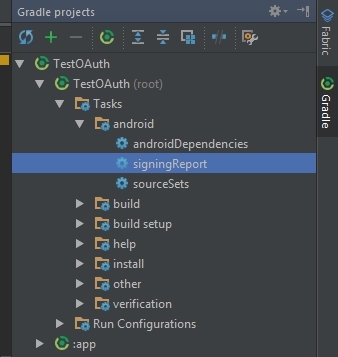
Заполняем поля название приложения и пакет. Далее выбираем какой сервис подключаем (Google Sign-In), здесь нужно ввести SHA1 ключ приложения, получить его просто: в Android Studio находим вкладку Gradle, раскрываем вкладки Tasks-android-signingReport. Щелкаем два раза, и в логах появится информация о ключах. Находим ключ SHA1, копируем.

Жмем кнопку «Generate configuration file», а после «Download google-services.json». Этот файл json сохраняем в папку проекта «app».
Важно! Если вы собираетесь публиковать приложение в Google Play, debug ключ SHA1 нужно будет заменить на release ключ, соответственно и заменить файл конфигурации.
Заходим в Диспетчер API, видим, что сгенерировались ключи и идентификаторы клиентов OAuth. Нам понадобятся только данные Web client (идентификатор клиента и секрет клиента).

Во вкладке «Окно запроса доступа OAuth» можно поменять email и название продукта — это то, что будет написано, когда будет запрашиваться разрешение «Приложение **** запрашивает: …»
2. Настройка Sign-In клиента
Чтобы получить доступ к Google Api Client, в файл gradle app нужно добавить в зависимости:
И плагин (в конец файла):
В файл gradle project в зависимости:
Здесь наибольший интерес вызывают строки:
requestServerAuthCode(getString(R.string.server_client_id)) – запрашиваем authCode, передавая параметр идентификатор клиента (весь полностью), который получили выше.
requestScopes(new Scope(«***»)) – запрашиваем необходимую для используемого API область/области доступа. Есть некоторые уже определенные области в Scopes, но, если нужной там не нашлось, можно задать свою, как в моём случае. Для пользователя будет отображаться как доступ «к чему» хочет получить приложение.
Тут всё по стандарту из документации:
enableAutoManage(this, this) – в параметры передается активити и слушатель соединения (реализуем интерфейс GoogleApiClient.OnConnectionFailedListener).
addApi(Auth.GOOGLE_SIGN_IN_API, gso) – указываем, что используем Sign In api и ранее созданный объект опций.
Теперь для запуска авторизации нужна кнопка (либо любой другой элемент). Можно использовать стандартную кнопку Sign In Button. Разметка xml:
Выглядит она так:

В активити кнопка определяется как и все другие view, на нее повешаем слушатель и по клику выполним метод:
Код вызываемого метода представляет собой создание интента и вызов активити для авторизации:
В параметр передаем сконфигурированный mApiClient. RC_AUTH_CODE любое число, как и всегда, для отслеживания результата активити.
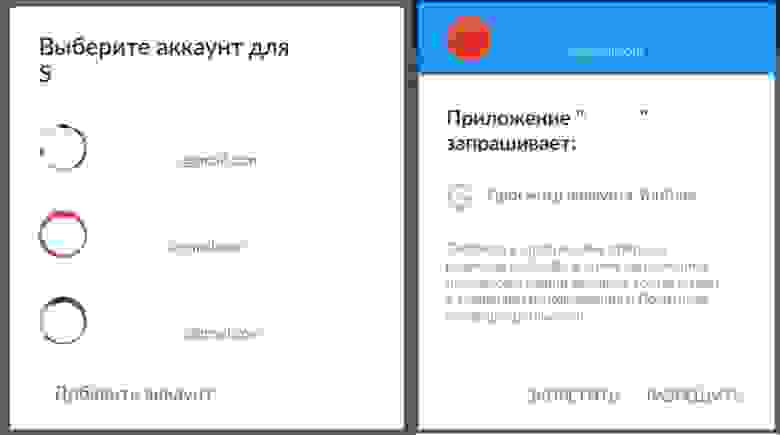
При нажатии на копку, будет предложено выбрать аккаунт для входа, либо добавить новый. После выбора, приложение запросит разрешение:
3. Получение Auth code
После того, как пользователь даст разрешение, в onActivityResult получаем данные его аккаунта:
В результате получаем auth code как обычную строку, выглядит он примерно так:
Так же из аккаунта можно получить email пользователя, username и аватарку:
acct.getEmail()
acct.getDisplayName()
acct.getPhotoUrl()
Эти данные могут понадобиться, например, чтобы вставить их в header NavigationView.
4. Получение Access Token и Refresh Token
Получили auth code, теперь его нужно поменять на необходимые для запросов к API токены. Для этого формируем запрос по адресу https://www.googleapis.com/oauth2/v4/token. Например я сделаю это с помощью OkHttp.
Рассмотрим подробнее параметры. В Request.Builder() Передаем url по которому получаем токены:
В header указываем Content-Type:
Указываем, что это метод POST, в него передаем body:
Сформированный requestBody обязательно должен содержать параметры:
«grant_type», «authorization_code» – указываем, что передавать будем auth code
«client_id», getString(R.string.server_client_id) – параметр является client id, полученный в Диспетчере API
«client_secret», getString(R.string.client_secret) — секрет клиента, полученный в Диспетчере API
«code», authCode – собственно полученный код.
Запрос асинхронный, в ответе получаем обычный json со всеми нужными для работы данными:
«access_token» – токен доступа, ради которого всё проводилось
«expires_in» – время жизни access токена, по умолчанию токен живет 1 час, а в сутки можно получать по запросу 25 токенов, не более.
«token_type» – тип токена, его тоже необходимо запомнить, он также вставляется в запрос к api в дальнейшем.
«refresh_token» – токен для обновления access токена, когда пройдет час жизни. Refresh токен неизменен. Часто на форумах видела проблему, с которой сталкивалась и сама: в запросе не приходил этот токен. Ошибки заключаются в неправильном получении учетных данных, либо неправильные запросы. Если авторизация проводилась через WebView, и в url не указывался такой важный параметр как access_type=offline, то refresh токен попросту не приходил.
5. Обновление Access токена
Час прошел, access токен больше не активен, необходим новый. После этого посыпятся ошибки 401 или 403, сервер скажет, что пользователь не авторизован или не имеет доступа. Запрашивать новое разрешение не годится, если нам нужна непрерывная сессия, например как у меня, нужно непрерывно получать сообщения из чата в течении трансляции, а это несколько часов. Что делать? Посылать запрос на получение нового токена.
Запрос в основном такой же как в пункте 4, за исключением некоторых параметров:
Здесь важные параметры:
«grant_type», «refresh_token» – в типе указываем что посылаем refresh токен
«refresh_token», mRefreshToken – и сам токен
Ответом будет json, содержащий новый access токен, с которым снова можно обращаться к API:
На этом авторизация и аутентификация пользователя завершена.
Для примера покажу как выглядит запрос к API, а также как я выполняю обновление токена.
Для запроса к API я использую Retrofit2 + RxAndroid. Так выглядит запрос на получение чата прямой трансляции:
Здесь важно заметить, что в header по ключу Authorization должны передаваться тип токена и сам access токен. То есть так:
Далее делаю запрос через RxAndroid, и так как в коллбэк onError приходят всевозможные ошибки, то туда же приходит ошибка HttpException с кодом 401 Unauthorized по истечении часа. Здесь же я обрабатываю её, проверяю, если это та самая ошибка, то привожу к соответствующему типу, проверяю действительно ли это код 401 и выполняю метод получения нового токена, затем повторяю запрос.
Так же для проверки токена существует GET запрос:
В ответ придут данные о токене, если он еще активен, либо ошибка, если его время жизни истекло.
Опять же, реализацию обновления токена Google оставляет на разработчика.
Выйти из аккаунта и отозвать авторизацию намного проще, в официальной документации найти не составит труда, если понадобится.
Рекомендую перед началом работы проверять запросы в стороннем приложении/расширении, например Postman, чтобы убедиться в правильности ввода параметров и полученных ответах. Я буду очень рада, если кому-то урок окажется полезным!
Источник


