- How to Install Google’s Android Bootloader Interface Drivers
- What are Google’s Android Bootloader Interface Drivers
- How to Install Android Bootloader Interface Drivers
- About Chief Editor
- Sadique Hassan
- Ручная установка драйвера ADB
- Android Bootloader Interface Drivers Download
- Find All Android Bootloader Interface Drivers
- Recent Help Articles
- Popular Driver Updates for Android Bootloader Interface
- How to Install Drivers
- Open Device Manager
- Install Drivers With Device Manager
- Install Drivers Automatically
- Benefits of Updated Drivers
How to Install Google’s Android Bootloader Interface Drivers
In this guide, we will show you the steps to install Google’s Android Bootloader Interface Drivers on your PC. There are quite a few USB drivers that you might have heard of, all related to your device. The first one is the general Android USB Drivers. These are the most frequent ones and are used to carry out some of the basic yet most important tasks.
These include the likes of transferring files between your device and PC, using it in PTP Mode, or sharing your device’s WiFi with your PC via the USB Tethering Mode. Then comes the turn of Android SDK Platform Tools. This tool is officially provided by Google and contains all the necessary binary files needed to execute ADB and Fastboot Commands.
Next up, are the Qualcomm USB drivers which are installed on your PC so that it is able to interact with your device in EDL Mode (Emergency Download Mode). These drivers are only applicable for devices with underlying Qualcomm chipsets and are used when the device is hard bricked. So in all these, where does Google’s Android Bootloader Interface Drivers fits it? Well, let’s check it out.
Table of Contents
What are Google’s Android Bootloader Interface Drivers
Once you boot your device to Fastboot or Bootloader Mode (via the adb reboot bootloader command or the hardware key combination), the regular Android USB Drivers wouldn’t come in handy. Their role ends as soon as the device leaves the booted OS. So when your device is booted to Fastboot or Bootloader mode, you will need the help of additional drivers.
And these additional drivers are Android Bootloader Interface. All in all, whenever a device is connected to either of the two aforementioned modes, your PC will only be able to identify it when it gets the required driver files, of which Google’s Android Bootloader Interface Drivers plays an integral part. So with this, you would have got perfect knowledge regarding the usage of these drivers. Let’s now check out its installation steps. Follow along.
- How to Execute Android ADB Fastboot Commands Wirelessly
- How to Run ADB Fastboot Commands directly on Android without Root
- Use ADB and Fastboot Commands on Android Without PC
- How to fix ADB Device not found [List of Devices Attached is blank]
How to Install Android Bootloader Interface Drivers
- To begin with, download the Android USB Driver and extract it to any convenient location on your PC.
- Upon extraction, you should get the usb_driver folder. Within that, there will be the android_winusb.inf file, which we will be using here.

- Now connect your device to the PC via USB cable.
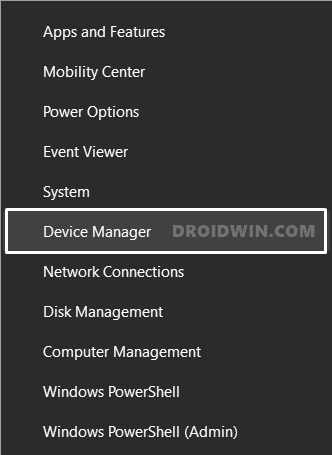
- Use the Windows+X shortcut keys and select Device Manager from the menu.
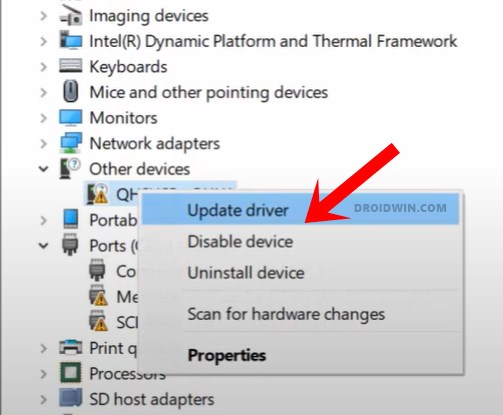
- Within that, go to the Other Devices section and your device will be listed there with a yellow exclamation mark. [If it’s not there, then don’t forget to check the Port or the Universal Serial Bus Controllers section as well].
- Right-click on it and select Update Drivers.
- Then click on Browse my computer for driver software.
- After this, select Let me pick from the list of device drivers on my computer.
- Then select Show all devices and hit Next.
- Now click on the Have Disk button, then click on Browse.
- Navigate to the usb_driver folder, select the android_winusb.inf file and click Open > OK.
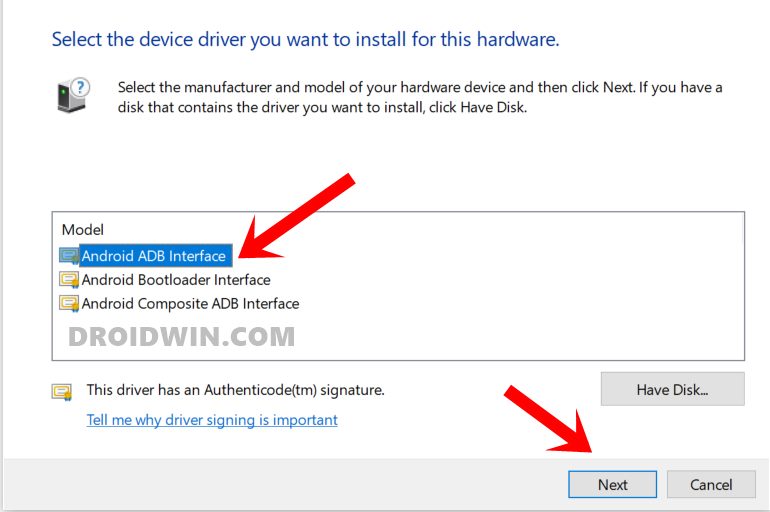
- Select Android ADB Interface and click Next.
- You will now get an update driver warning, click YES, and finally click Install.
- The installation process will now begin and once completed, you will be notified of the same.
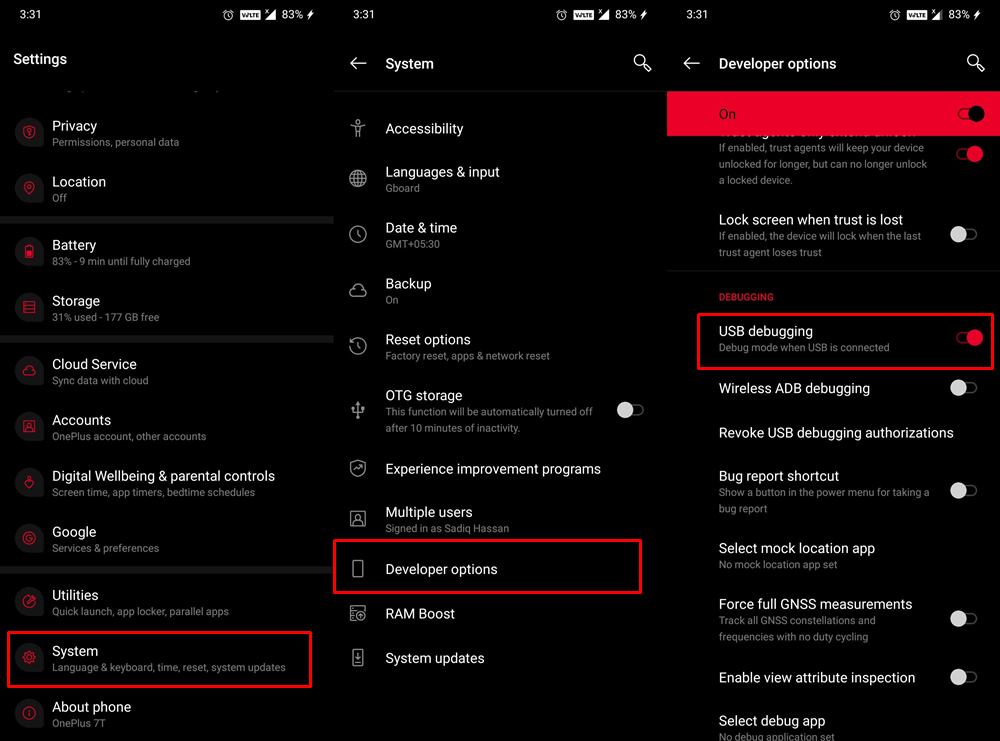
- Now enable USB Debugging on your device. Go to Settings > About Phone > Tap on Build Number 7 times > Go back to Settings > System > Developer Options > Enable USB Debugging.
- Once that is done, download the Android SDK Platform Tools onto your PC. Extract it and you should get the platform-tools folder.
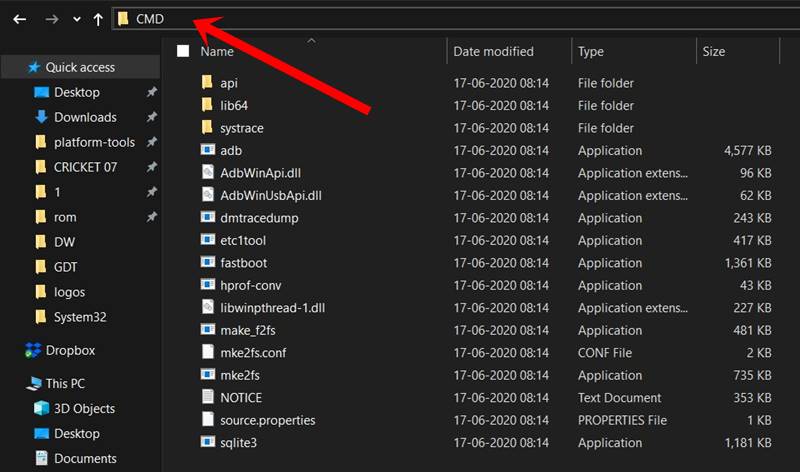
- Go to this folder, type in CMD in its address bar, and hit Enter. This shall launch the Command Prompt.
- Type in the below command in this CMD window to boot your device to authorize the ADB connection


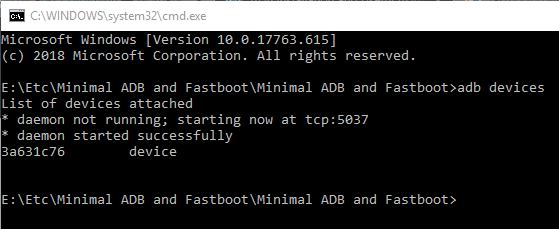


Your device will now be booted to Fastboot. To verify the same, type in the below command and the result shall be a device ID followed by the fastboot keyword:

So this was all from this guide on how to install Google’s Android Bootloader Interface Drivers. If you have any queries concerning the aforementioned steps, do let us know in the comments. We will get back to you with a solution at the earliest.
About Chief Editor
Sadique Hassan
A technical geek by birth, he always has a keen interest in the Android platform right since the birth of the HTC Dream. The open-source environment always seems to intrigue him with the plethora of options available at his fingertips. “MBA by profession, blogger by choice!”
Источник
Ручная установка драйвера ADB
Я хочу поделиться с вами простым способом установки ADB драйвера под Windows. Эта статья понадобится тем, у кого этот драйвер или не устанавливается вовсе, или устанавливается, но adb все равно в упор не видит устройство(как было у меня), или вы вообще этот драйвер не нашли. Так что всех, у кого есть/были похожие проблемы, или кому просто интересно, прошу под кат.
Начну с предыстории. Решил я купить себе недорогой планшетик на Android для чтения книг(DJVU/PDF), и выбор пал на устройство российского конечно же китайского производства TeXet TM-7025. Жаба давила покупать что-то дорогое, а для простого чтения книг каких-то сверх-характеристик не требуется. Позже я обнаружил что на нем неплохо идут большинство игрушек, удобно полазить в инете пока ты сидишь in da kabin и т. д. А поскольку передо мной маячило изучение Android, я решил, что будет весьма удобно пользоваться для этого железным девайсом вместо мучений с эмуляторами.
И вот тут меня ждал неприятный сюрприз — то ли родной драйвер оказался кривым, то ли винда, то ли провод… вообщем драйвер то встал, диспетчер устройств Windows рапортовал о полной работоспособности девайса, но на запрос adb devices в консоли я получал пустой список и, естественно, тестировать приложение на планшете не удавалось.
Я написал запрос в службу поддержки TeXeT, мне даже ответили ссылкой на сам драйвер, который, как я уже убедился, не работал. Я начал искать ответ в интернете и нашел кучу разных сборок этого драйвера и мануалов, но все равно ни один из них не завелся как надо, и даже родной драйвер из SDK вообще никак не становился, что повергло меня в уныние… но не отчаяние.
Вот тут я решил попробовать свои силы в написании драйверов старом добром методе научного тыка и открыл inf-файл драйвера. Надежду мне давало понимание, что софтверная часть adb интерфейса со стороны планшета должна быть идентичной для всех устройств, а USB и так работал. И вот, после нескольких неудачных проб ручной правки inf-файла я нашел рецепт лечения приправы inf-файла так, чтобы оно поставилось и, главное, работало.
Шаг 1. Скачать драйвер. Если вы этого еще не сделали, откройте Android SDK Manager, найдите раздел Extras, поставьте галочку напротив Google USB Driver и нажмите Install Packages. Все просто. Ждете, пока загрузится.
Шаг 2. Найдите драйвер и сделайте его копию в отдельную папку. Зайдите в папку %android-sdk%\extras\google\ и увидите там заветную папочку usb_driver. Вот ее скопируйте куда-то, и там же будем проводить дальнейшие манипуляции. В принципе, можете править и «оригинал», но я предпочел сохранить оригинал нетронутым на всякий пожарный.
Шаг 3. Правим inf-файл. В папочке открываем файл android_winusb.inf и ищем там строки такого вот вида:
Делаем копию этих строк, заменяем Google Nexus One на %имя_вашего_девайса% для идентификации в будущем и… открываем диспетчер устройств Windows. Ищем там наше устройство(Android, Android Composite ADB Interface или что-то в этом стиле). Открываем свойства устройства, вкладка «Сведения», в списке выбираем пункт «ИД оборудования» и видим такую вот картину. 
Копируем строчку, которая больше всего похожа на ту, что показана на рисунке(Она, по идее просто немного короче), и вставляем ее в наш inf-файл.
В %SingleAdbInterface% мы конец строки удаляем, как видно, в %CompositeAdbInterface% вставляем целиком. Повторять два раза все, наверное, не надо, но у меня уже все стоит и мне лень экспериментировать 🙂
Сохраняемся(будьте внимательны — в некоторых случаях для этого нужно запускать блокнот с правами администратора, т. к. в пользовательском режиме вам не дадут перезаписать inf-файл).
Шаг 4. Установка драйвера. Теперь, когда все подготовлено, возвращаемся в диспетчер устройств и удаляем все ранее установленные adb драйверы(если были). Обновляем список устройств и видим наш девайс без драйверов. Открываем его свойства и выбираем «обновить драйверы», выбираем установку из папки, указываем папку с поправленым inf-ом и запускаем установку — наш драйвер моментально находится, но при установке он может ругаться о несовместимости с вопросом «продолжать ли, насяльнека?». Продолжаем. Все, драйвер установлен.
Шаг 5. Финал. Для точности делаем вынь-всунь USB-порта, ждем пока все обнаруживается, открываем консоль(Win+R, вводим cmd) и пишем adb devices. Если все прошло хорошо — видим заветный пункт списка, обозначающий, что adb теперь видит наш девайс.
С этого момента можно спокойно запускать eclipse и строить программы, наслаждаясь удобной автоматической сборкой, установкой и возможностью дебага прямо на нашем устройстве.
Если команда adb у вас вообще не работает. Компьютер -> Свойства -> Переменные среды. Ищем переменную Path и в конце дописываем(ни в коем случае не перезаписываем) в конце точку с запятой, а после адрес папки, где живет adb(обычно %android-sdk%\platform-tools\). После перезагрузки должно заработать.
Иногда adb не запускается автоматически при старте системы. Запустите вручную.
Что это было?
На самом деле все просто. В силу неких причин(винда мастдай/у прогеров кривые руки/гугловский инф-файл писался только для родных гугловских девайсов/в вашем компьютере все испортили бозоны Хиггса) винда не хочет кушать гугловский драйвер для негугловских девайсов, не записанніх в inf-файл. Видимо, там все как раз завязано на этих ИД-оборудования. Но ведь софтверная часть на подавляющем большинстве андроид-устройств в части дебаггер-коннектора к ПК идентична, потому драйвер должен нормально общаться с любым Андроид-устройством. Наша задача — обмануть Windows и заставить ее принять девайс за «драйверо-подходящий», что мы и сделали путем дописывания его ИД в inf-файл драйвера.
Надеюсь, кому-то данный мануал поможет завести свой китайский или другой девайс, для которого при сборке системы забыли сделать нормальный драйвер adb, или тем, кого задалбывает качать официальный драйвер от производителя устройства(это бывает настолько гемморно, что быстрей сделать все вышеописанное — у меня так было с драйвером для телефона LG E510).
P. S. Я не проводил массового тестирования данного метода, так что не могу гарантировать, что он заработает в 100% во всех случаях. Но у меня он заработал на Windows 7, а после и на Windows 8. Файл приходилось править для каждого раза отдельно, но не думаю, что это такая уж проблема.
Источник
Android Bootloader Interface Drivers Download
Download the latest version of the Android Bootloader Interface driver for your computer’s operating system. All downloads available on this website have been scanned by the latest anti-virus software and are guaranteed to be virus and malware-free.
Find All Android Bootloader Interface Drivers
- Updates PC Drivers Automatically
- Identifies & Fixes Unknown Devices
- Supports Windows 10, 8, 7, Vista, XP
Recent Help Articles
Popular Driver Updates for Android Bootloader Interface
If you have had recent power outages, viruses or other computer problems, it is likely that the drivers have become damaged. Browse the list above to find the driver that matches your hardware and operating system. To see more matches, use our custom driver search engine to find the exact driver.
Tech Tip: If you are having trouble deciding which is the right driver, try the Driver Update Utility for Android Bootloader Interface. It is a software utility that will find the right driver for you — automatically.
DriverGuide maintains an extensive archive of Windows drivers available for free download. We employ a team from around the world which adds hundreds of new drivers to our site every day.
How to Install Drivers
Once you download your new driver, then you need to install it. To install a driver in Windows, you will need to use a built-in utility called Device Manager. It allows you to see all of the devices recognized by your system, and the drivers associated with them.
Open Device Manager
In Windows 10 & Windows 8.1, right-click the Start menu and select Device Manager
In Windows 8, swipe up from the bottom, or right-click anywhere on the desktop and choose «All Apps» -> swipe or scroll right and choose «Control Panel» (under Windows System section) -> Hardware and Sound -> Device Manager
In Windows 7, click Start -> Control Panel -> Hardware and Sound -> Device Manager
In Windows Vista, click Start -> Control Panel -> System and Maintenance -> Device Manager
In Windows XP, click Start -> Control Panel -> Performance and Maintenance -> System -> Hardware tab -> Device Manager button
Install Drivers With Device Manager
Locate the device and model that is having the issue and double-click on it to open the Properties dialog box.
Select the Driver tab.
Click the Update Driver button and follow the instructions.
In most cases, you will need to reboot your computer in order for the driver update to take effect.
Visit our Driver Support Page for helpful step-by-step videos
Install Drivers Automatically
If you are having trouble finding the right driver, stop searching and fix driver problems faster with the Automatic Driver Update Utility. Automatic updates could save you hours of time.
The Driver Update Utility automatically finds, downloads and installs the right driver for your hardware and operating system. It will Update all of your drivers in just a few clicks, and even backup your drivers before making any changes.
Once you download and run the utility, it will scan for out-of-date or missing drivers:
When the scan is complete, the driver update utility will display a results page showing which drivers are missing or out-of-date: 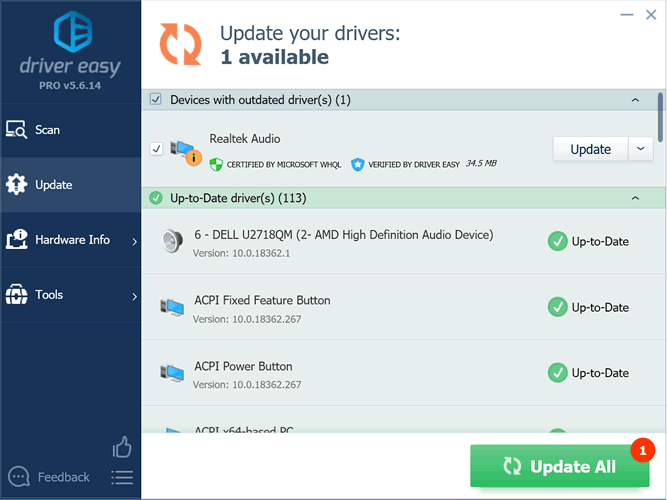
Next, update individual drivers or all of the necessary drivers with one click.
Benefits of Updated Drivers
Many computer problems are caused by missing or outdated device drivers, especially in Windows 10. If your deskttop or laptop is running slow, or keeps crashing or hanging, there is a good chance that updating your drivers will fix the problem.
Ensures your hardware runs at peak performance.
Fixes bugs so your system will have fewer crashes.
Unlocks new features and configuration options in your devices, especially with video cards and gaming devices.
Источник


