- Generate an Android Archive( AAR) Using Android Studio and Add to an Android Project
- Create an Android Library and use in your Android Project
- This blog is providing information that why modular code structure is important and how the android library can play an…
- Please follow the steps>>
- Что Такое .Aar Библиотеки?
- Published Jul 15, 2015 by Andriy Druk
- 1. Что такое .aar бибилотеки?
- 2. Как посторить .aar библиотеку?
- 3. Как подключить .aar бибилиотеку?
- 3.1 Подключение модуля
- 3.1 Плоский репозиторий
- 3.2 Локальный репозиторий
- 3.3 Удаленный репозиторий
- Building an AAR Library in Android Studio
- Purpose of AAR
- AAR File Format
- Creating an AAR library project
- Using AAR
- Manifest Merging
- References
- How to Build *.so Library Files into AAR Bundle in Android Studio
- What’s inside aar file?
- How to create a basic aar file?
- How to package prebuilt .so library files into .aar file?
- How to automatically build native code into .aar file in Android Studio?
- Static library libtwolib-first.a
- Shared library libdbr.so and barcode.aar bundle
- How to import .aar file to an Android project?
Generate an Android Archive( AAR) Using Android Studio and Add to an Android Project

This article provides Information for creating AAR for an Android Library module and use It with another android Project.
I have posted an article for creating an Android Library module in an Android Project and use that with the UI app module.
Please see the article if you need to know about creating the Library module in Android Project.
Create an Android Library and use in your Android Project
This blog is providing information that why modular code structure is important and how the android library can play an…
In this article, I will explain how we can generate the Android Archive( AAR) file for an Android Library module and Use that in different Android projects so that we can understand the Library creation can really save our redevelopment time cost by using the same module in different projects.
I will use Android Studio 4.0.2 and the same Project mention in the above-attached article.
I have created a project and a Library module It is shown below.
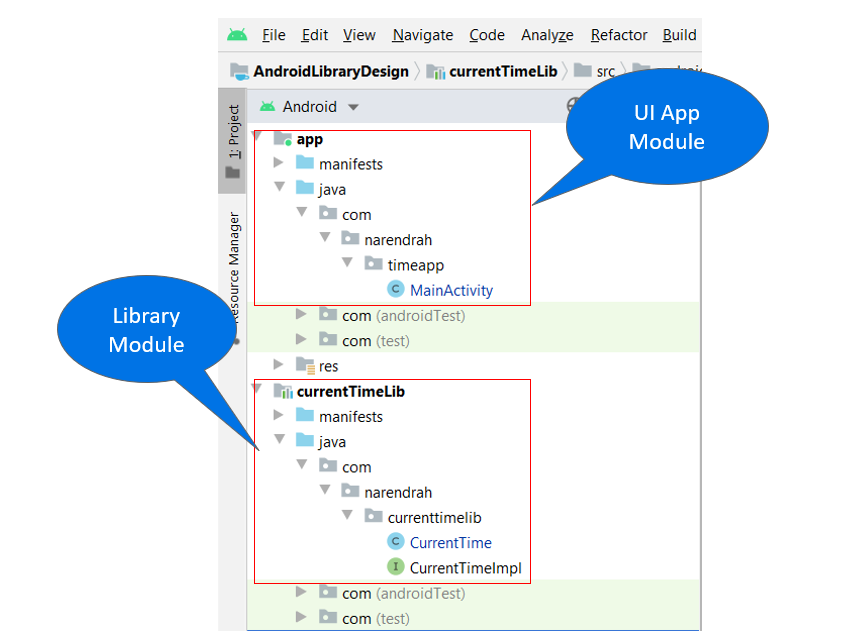
It is mentioned that I have created a Library Module named as currentTimeLib and I am using that module successfully within the project, now I will generate the AAR file and I will Import the AAR file into a different Android Project.
If you already know about creating the Library module then you can follow the steps directly.
If you want to Implement it then either complete the previous article (Click here) or pull the code from Git and try on that(Click here).
Please follow the steps>>
Step1: Start the Android Studio and open the project where you want to generate the AAR file.
Step2: Click the Gradle option in right most corner of android studio.
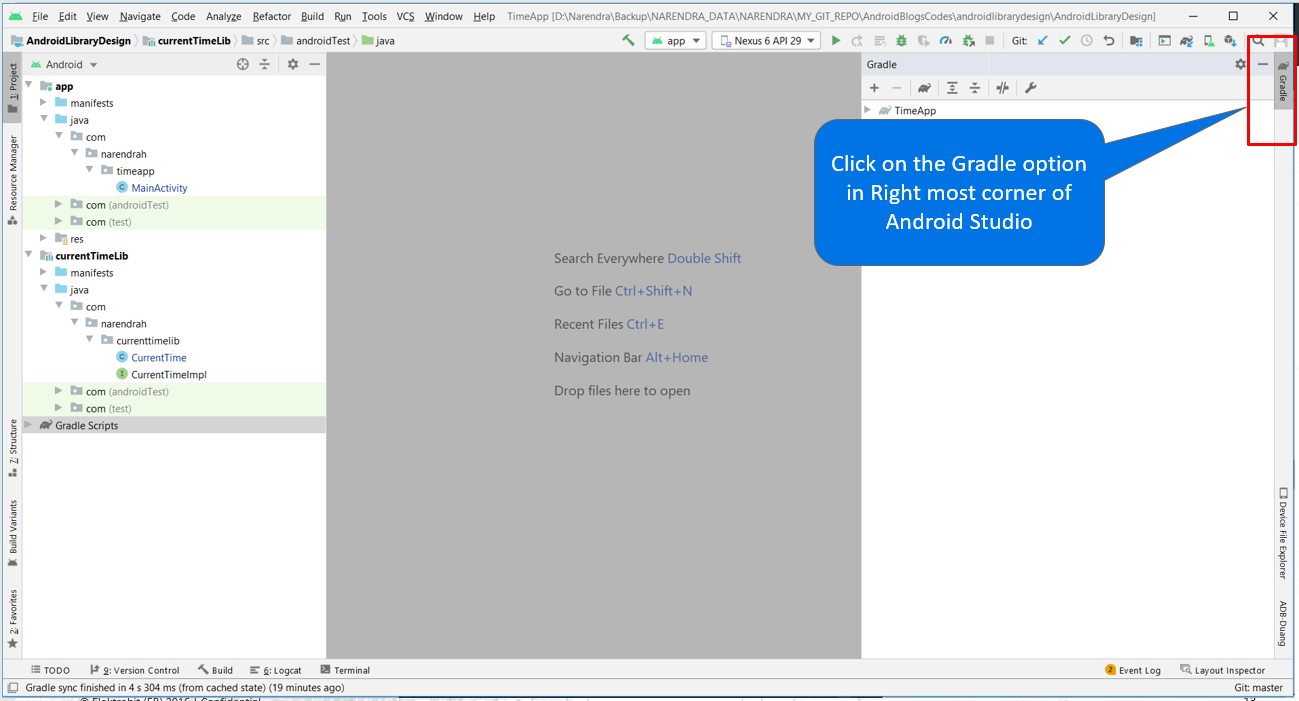
Step3: You will see the App name in the window, please unfold the options in the sequence shown below.
Источник
Что Такое .Aar Библиотеки?
Published Jul 15, 2015 by Andriy Druk
Уже прошло больше года с анонса Android New Build System, работа над которой кипит и по сей день: в экспериментальной области все еще находится несколько увлекательных возможностей Jack and Jill Tool Chain и NDK Integration.
Но одной из самых ожидаемых возможностей новой системы сборки стала поддержка aar бибилотек — нового бинарного формата бибилотек, который в отличии от jar бибилотек может содержать android ресурсы (res, assets, native libraries, etc). В это статье я хотел поделиться своим опытом работы с aar бибилиотеками.
1. Что такое .aar бибилотеки?
Официальная документация говорит о том что aar — это бинарный дистрибутив Android Library Project и прдеставляет собой zip файл с расширением .aar, котороый содержит:
- /AndroidManifest.xml (mandatory)
- /classes.jar (mandatory)
- /res/ (mandatory)
- /R.txt (mandatory)
- /assets/ (optional)
- /libs/*.jar (optional)
- /jni/ /*.so (optional)
- /proguard.txt (optional)
- /lint.jar (optional)
Разберем подробней. AndroidManifest.xml это оригинальный манифест с вашей библиотеки. Файл сlasses.jar содержит скомпилированные java классы библиотеки (они будут слиты с остальными во время компиляции основного проекта). Исходя из документации R.txt это выходной файл aapt (Android Asset Packaging Tool) с флагом –output-text-symbols, тоесть это часть вашего R.java который будет слит с остальными результатами работы aapt при сборке основного проекта. Далее идут директории assets, res, libs и jni, которые содержат оригинальные файлы из каталога src вашей бибилотеки (часть содержимого каталога res может быть удаленно после выполнения обфускации). Файл proguard.txt копируется из вашей root директории библиотеки для того чтобы передать правила обфускации в основной проект. При работе с .aar стоит учитывать что если флаг minifyEnabled в build.gradle файле вашей библиотеки установлен в true, то при сборке она будет обфусцирована. Также aar бибилитека может содержать пользовательские lint правила в lint.jar, они будут распостраняться и на основной проект.
2. Как посторить .aar библиотеку?
Для того чтобы построить aar бибилотеку достаточно выполнить ./grdlew assemble в корне вашего проекта. Эта команда соберет все flavour и buildTypes. Но по причине ограничений gradle по умолчанию приложениями будет использоваться всегда defaultRelease сборка вашей aar бибилотеки. Если вы хотите поменять default конфигурацию, это можно сделать так
В первом случае в качестве default конфигурации используется debug build, во втором debug build варианта flavor1. Кроме того вы можете включить публикацию всех конфигураций:
3. Как подключить .aar бибилиотеку?
Существует 4 способа подключения aar библиотек:
- Подключение в качестве модуля
- Плоский репозиторий (Flat directory)
- Локальный репозиторий (Local maven repo)
- Удаленный репозиторий (Remote maven repo)
3.1 Подключение модуля
Это пожалуй самый простой способ и с ним знакомо большинство Android разработчиков. Вы можете импортировать библиотеку как модуль в ваш проект и установить зависимость в своем основном проекте следующим образом:
Такой подход позволяет вам легко вносить изменения в код вашей библиотеки и тут же получать aar при перекомпиляции. По большому счету вам даже не стоит задумывать о том что aar файл строится при сборке вашего проекта, в данном случае он выступает лишь в роли промежуточного звена сборки. Дальше мы расмотрим подходы подлючения собраных aar файлов.
3.1 Плоский репозиторий
Самый простой способ подключения aar бибилотек в собраном виде это простое копирование в директорию проекта. Для того чтобы установить зависимость на такой файл нужно включить директорию в список своих репозиториев в build.gradle
После этого можно подключать библиотеку:
Версия бибилиотеки и namespace в данном случая ни на что не влияют, так как flatDir репозитории их просто игнорируют.
3.2 Локальный репозиторий
Для использования такого подхода вам нужен maven репозиторий разположений локально на вашем компьютере. Существует множество готовых gradle плагинов для публикации aar бибилиотек, но мы воспользуемся консольной устилитой mvn. Для начала следует проверить наличие установленого maven в вашей системе.
Если он отсутвует, его следует установить. Для публикации артефакта (в нашем случае .aar библиотеки) в репозиторий используйте команду:
На самом деле команда mvn install выполнит копирование вашего aar файла в директорию локального репозитория и сгенерирует соотвествующий pom.xml файл. Перейдем в
/.m2/repository директорию на вашем компьютере. После выполнения команды install в этой директории должны появится поддиректории вашего домена, в случае моего приемера это
В это каталоге располгаются все версии вашего aar артефакта (под этим термином подразумевается любой бинарный файл помещеный в maven репозиторий). В моем случае это директория 1.0.0 в которой содержится 3 файла: _remote.repositories, mDNSShared-1.0.1.aar, mDNSShared-1.0.1.pom. Теперь подключим бибилотеку из локального репозитория. Прежде всего нужно добавить локальный maven репозиторий в список доступных:
После этого можно устанавливать зависимости с помощью ключего слова compile также как мы это делает с flatDir
Именно такой подход распотсранения aar использован в Android Support Libraries. Все локальные maven репозитории разпаковуются и обновляются вместе с sdk. Можете заглянуть в директории ANDROID_HOME/extras/android/m2repository или ANDROID_HOME/extras/google/m2repository.
3.3 Удаленный репозиторий
Подход с использвованием удаленного репозитория ничем не отличается от локального за исключением необходимости указания ссылки на репозиторий. Gradle соддержит ссылки на Maven Central и JCenter репозитории. Кроме этого gradle позволяет указывать прямой url на сервер maven репозитория:
Установка зависимостей аналогична предыдущим способам:
Источник
Building an AAR Library in Android Studio
Purpose of AAR
Library reuse has long been available in Java based applications through Java Archive (.jar) files. Android AAR files build upon this concept to allow you to package not only the source code but also the libraries self contained Android resources. The library can have its own manifest and resources and can also optionally provide assets, NDK built libraries, proguard configuration and even its own custom lint filters. This is all bundled into a zip archive that can be published to a repository for your team (or the world!) to get easy access from a Gradle build.
AAR File Format
- /AndroidManifest.xml (mandatory)
- /classes.jar (mandatory)
- /res/ (mandatory)
- /R.txt (mandatory)
- /assets/ (optional)
- /libs/*.jar (optional)
- /jni/ /*.so (optional)
- /proguard.txt (optional)
- /lint.jar (optional)
Creating an AAR library project
The good news is creating an AAR library is easy and Android Studio will do all the hard work for you.

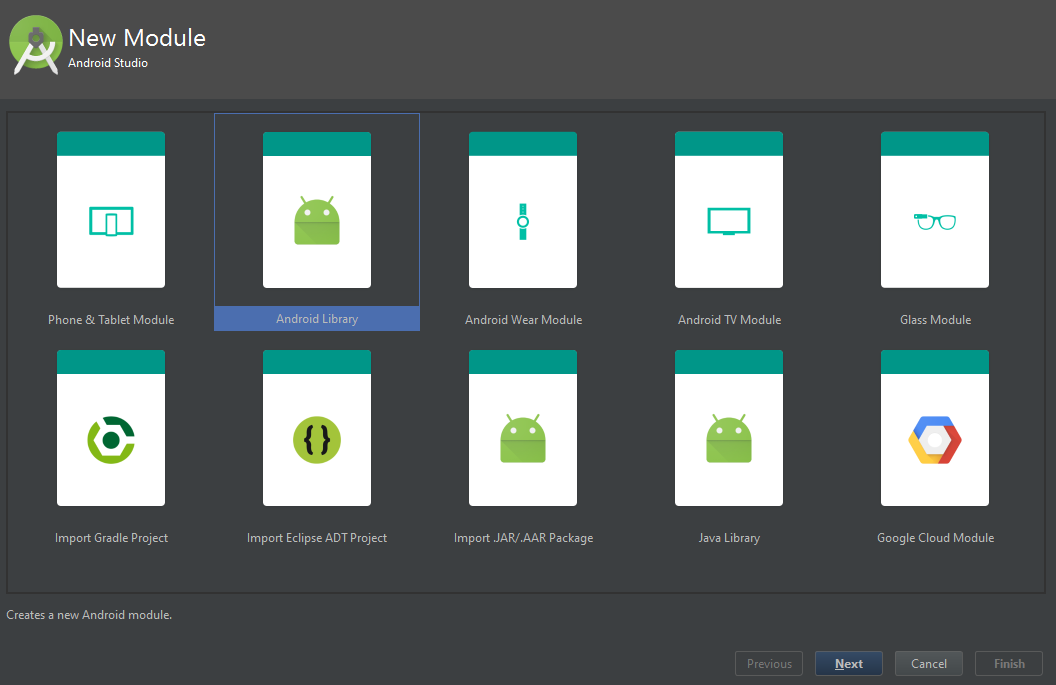
Figure 1: Create an Android Library
- Start by selecting New Module… from the File menu
- Select Android Library as the module to be created (see Figure 1)
- Step through the process of using a template for the creation of your library much like creating a new project
One key difference in the created library and an Android application will be the libraries Gradle build script includes apply plugin: ‘com.android.library’ instead of apply plugin: ‘com.android.application’.
When you build your project the AAR file will automatically be assembled and placed in these folders (Android Studio 1.0+)
Using AAR
You have a few choices as to how to include your AAR library in your project:
- Publish to a external Maven repository
- Publish to a local repository
- Access from a local folder
While Gradle can be used to directly publish to repositories such as Maven Central, this article doesn’t cover publishing your AAR file to Maven repositories.
To include your AAR library as a dependency from a local folder:
1. Copy the AAR file into the libs folder in your project. Create this folder if it doesn’t exist. It needs to be located in the same folder as your application Gradle build file, not the top level project folder.
2. Declare the libs folder as a dependency repository in your application Gradle script.
The Gradle flatDir repository declaration allows you to declare a file system directory that is a repository for dependencies for the project. In the example above I am using the libs folder which needs to be located relative to the location of the build script. The name of this folder does not have to be libs and it is also possible to declare multiple fileDir folders in the one project.
3. Declare your AAR library as a dependency:
Manifest Merging
Earlier in this article we noted that the AndroidManifest.xml is a compulsory item in an AAR library. When an app includes your AAR library the manifest must be merged with that of the app, as there will be only one manifest included in an APK.
Merging manifests can quickly get messy when multiple conflicting manifests are all merged. The android tools user guide to manifest mergers is the best resource available to explain all the ins and outs of how the merge will happen and how you can control the merge.
The most basic rule of the merge is the order of priorities given to different manifests. From most influential to least:
- Product flavors and build types specific manifest files.
- Main manifest file for the application.
- Library manifest files.
So you can see your Library manifest sits at the bottom of the pecking order.
Most of the time this merging will happen like magic, without the need for intervention. If issues arise in the manifest merge there are a couple of places to start looking in order to track down the issue. The first place to check is the final outputted manifest file. The next place to check is the manifest merge report (which is saved into the app\build\outputs\logs\ folder of your project). The format and contents of the logging in the merge report is explained here.
References
AAR File Format
Manifest merging user guide
Источник
How to Build *.so Library Files into AAR Bundle in Android Studio
When making third party libraries and SDKs for Android development, you could build so files, jar files, or aar files. I prefer providing aar files for distribution since aar file is a simple zip file which includes so files, jar files, and other resources.
What’s inside aar file?
- /AndroidManifest.xml (mandatory)
- /classes.jar (mandatory)
- /res/ (mandatory)
- /R.txt (mandatory)
- /assets/ (optional)
- /libs/*.jar (optional)
- /jni//*.so (optional)
- /proguard.txt (optional)
- /lint.jar (optional)
The structure of aar is similar to apk.
How to create a basic aar file?
Click File > New > New Module and select Android Library:
Comparing build.gradle files, you will see the main difference is that the plugin name for aar is “com.android.library”, whereas the plugin name for application is “com.android.application”.
How to package prebuilt .so library files into .aar file?
The simplest way to add so files into an aar file is to create a folder jniLibs under src/main. And then copy *.so files into the folder:
After building the module, you can open build/outputs/aar/*.aar to verify **jni//*.so**.
How to automatically build native code into .aar file in Android Studio?
Let’s do something more complicated:
- Create a static library *.a with command line tool.
- Write JNI code and create a shared library *.so in Android Studio with the static library.
Static library libtwolib-first.a
Referring to the NDK sample two-libs, quickly create libtwolib-first.a with ndk-build.
Makefile Android.mk:
Header file first.h:
Source file first.c:
Shared library libdbr.so and barcode.aar bundle
To enable NDK integration for building JNI applications, use the new experimental plugin of Gradle instead of the original plugin.
Create a new module barcode with JNI folder and dbr.c:
Copy libtwolib-first.a and first.h to the jni folder.
Create BarcodeReader.java:
Modify build.gradle:
A better way to link prebuilt library:
Build debug and release version with Gradle:
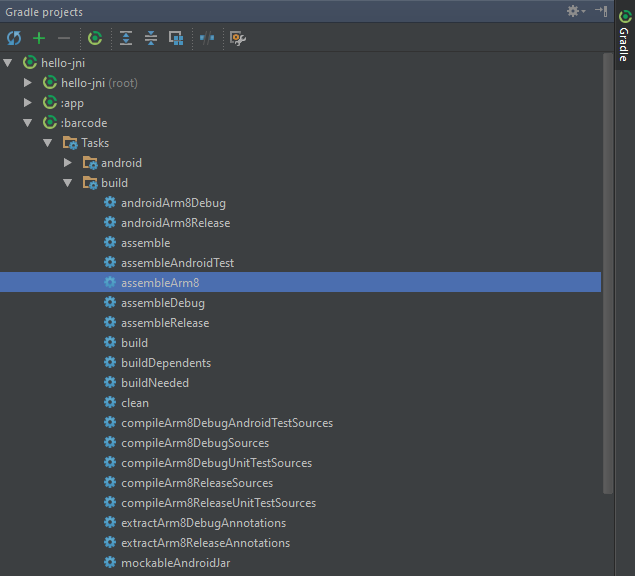
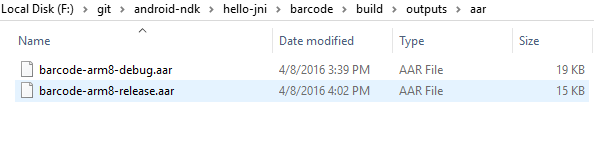
You can download more NDK Gradle project samples from https://github.com/googlesamples/android-ndk.git
How to import .aar file to an Android project?
Create an empty Android project.
Click File > New > New Module and choose Import .JAR/.AAR Package:
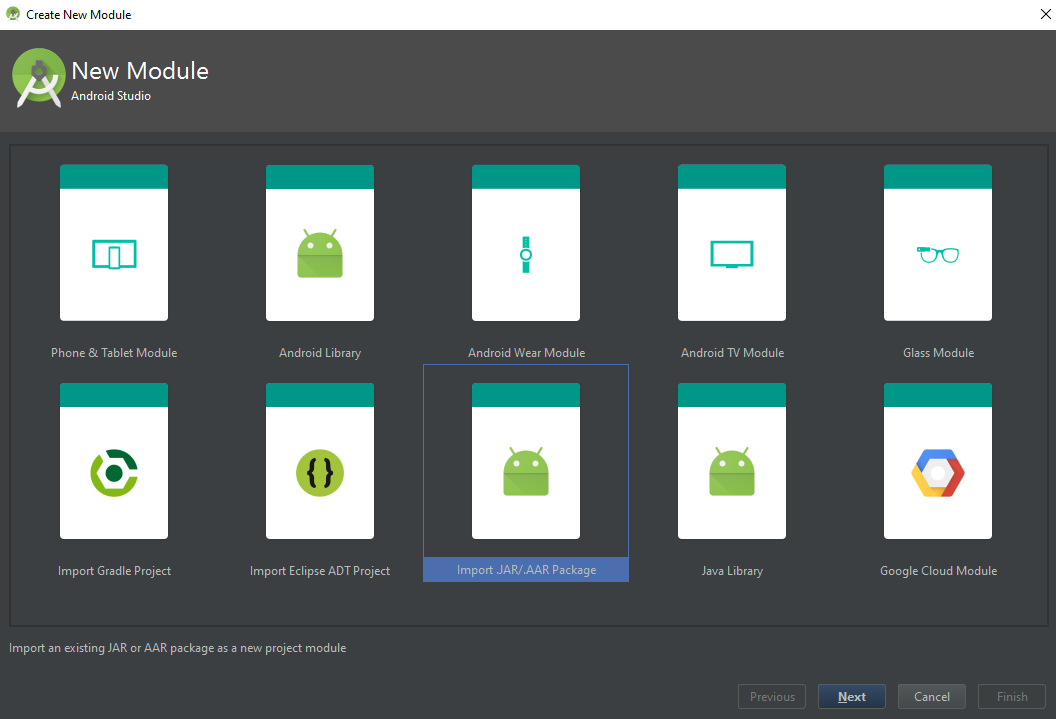
Click Next to specify the file name. E.g. f:\barcode-arm8-debug.aar.
Once clicked the “Finish” button, the aar file will be packaged into your Android project as a module. Press F4 to open Project Structure, and then add the dependent module:
Источник


