- How to make Android apps without IDE from command line
- How to do Android development faster without Gradle
- IntelliJ IDE, but not Gradle
- 1. Install Java
- 2. Install all SDK tools
- Download Android Studio and SDK Tools | Android Studio
- Download the official Android IDE and developer tools to build apps for Android phones, tablets, wearables, TVs, and…
- 3. Code the application
- How to use JavaMail on Android (without Gradle)
- Hello guys!
- 4. Build the code
- 5. Sign the package
- 6. Align the package
- 7. Test the application
- 8. Make a script
- Notes
- Пишем и собираем приложения для Android в linux консоли
- Введение
- Железо
- Операционная система
- Установка пакетов
- Настройка adb
- Постановка задачи
- Создание подписи
- Манифест
- Layout
- Исходный код приложения
- Скрипт для сборки
- Сборка и установка
- Заключение
- Build and run your app
- Change the run/debug configuration
- Change the build variant
- Build your project
- Monitor the build process
- Apply Changes
- Requirements
- Use Apply Changes
- Enable Run fallback for Apply Changes
- Platform-dependent changes
- Limitations of Apply Changes
- Code changes that require app restart
- Libraries and plugins
- Code that directly references content in an installed APK
How to make Android apps without IDE from command line

Nov 26, 2017 · 5 min read
A HelloWorld without Android Studio
Update: I’ve made a new course that explain how you can avoid Android Studio and Gradle, but still use IntelliJ iDE:
How to do Android development faster without Gradle
IntelliJ IDE, but not Gradle
In this tutorial, I will show you how you can build/compile an APK (an A n droid app) from your java code using terminal (on Linux) without IDE or in other words without Android Studio. At the end, I will also show you a script to automate the process. In this example, I will use Android API 19 (4.4 Kitkat) to make a simple HelloWorld. I want to say that I will do this tutorial without android command which is deprecated.
1. Install Java
First, you need to install java, in my case, I install the headless version because I don’t use graphics (only command line):
2. Install all SDK tools
Then download the last SDK tools of Android which you can find here:
Download Android Studio and SDK Tools | Android Studio
Download the official Android IDE and developer tools to build apps for Android phones, tablets, wearables, TVs, and…
I recommend to unzip it in the /opt directory inside another directory that we will call “android-sdk”:
Now, we have to install platform tools (which contain ADB), an Android API and build tools.
In fact, if you are on Debian, you can avoid installing platform-tools package and only install ADB like that:
3. Code the application
In this example, I want to compile a simple HelloWorld. So, first, we need to make a project directory:
Then we have to make the files tree:
If you use exernal libraries (.jar files), also make a folder for them:
You have an example here:
How to use JavaMail on Android (without Gradle)
Hello guys!
Make the file src/com/example/helloandroid/MainActivity.java and put that inside:
Make the strings.xml file in the res/values folder. It contains all the text that your application uses:
The activity_main.xml is a layout file which have to be in res/layout:
You also have to add the file AndroidManifest.xml at the root:
4. Build the code
Now, I recommend to store the project path in a variable:
First, we need generate the R.java file which is necessary for our code:
- -m instructs aapt to create directories under the location specified by -J
- -J specifies where the output goes. Saying -J src will create a file like src/com/example/helloandroid/R.java
- -S specifies where is the res directory with the drawables, layouts, etc.
- -I tells aapt where the android.jar is. You can find yours in a location like android-sdk/platforms/android-/android.jar
Now, we have to compile the .java files:
If you have use an external, add it the classpath:
The compiled .class files are in obj folder, but Android can’t read them. We have to translate them in a file called “classes.dex” which will be read by the dalvik Android runtime:
But if you use external libraries, do rather:
If you have the error UNEXPECTED TOP-LEVEL EXCEPTION , it can be because you use old build tools and DX try to translate java 1.7 rather than 1.8. To solve the problem, you have to specify 1.7 java version in the previous javac command:
The -source option specify the java version of your source files. Note that we can use previous versions of Java even we use OpenJDK 8 (or 1.8).
We can now put everything in an APK:
Be aware: until now, we used three AAPT commands, the first and the second one are similar but they don’t do the same. You have to copy the classes.dex file at the root of project like above! Otherwise, AAPT won’t put this file at right place in the APK archive (because an APK is like a .zip file).
The generated package can’t be installed by Android because it’s unaligned and unsigned.
If you want, you can check the content of the package like this:
5. Sign the package
To do so, we firstly create a new keystore with the command keytool given by Java:
Just answer the questions and put a password.
You can sign an APK like this:
Note that apksigner only exist since Build Tools 24.0.3.
6. Align the package
It’s as simple as that:
Alignment increase the performance of the application and may reduce memory use.
7. Test the application
To test the application, connect your smartphone with a USB cable and use ADB:
But before run this command, I recommend to run this one:
If there is an error during installation or running, you see it with that command.
Voila! Here’s the result:

8. Make a script
If you don’t want to run all these steps every time you would like to compile your app, make a script! Here’s mine:
Notes
- You can remove “test” if you just want to compile without testing.
- This script only compile and run the app on the phone. But I can also make a script to automatically generate a new project like this one. I think I have a good idea to do so, but I need to know if you are interested. If it’s the case, please leave a comment or send me an e-mail.
- I can also complete the script for external libraries. Likewise, let me know if you want this.
If you have any questions, don’t hesitate to ask them below or by e-mail ;-)! EDIT: Well I’m very busy actually…
Источник
Пишем и собираем приложения для Android в linux консоли

В данной статье я покажу как можно собрать apk файл в Ubuntu используя лишь
утилиты командной строки.
Обычно для создания приложений для Adroid используется Android Studio. Но для сборки небольших программ можно обойтись командной строкой. Например, когда ресурсы компьютера ограничены и ваше приложение очень простое.
В качестве постоянной среды разработки это, возможно, не очень удобно, но если вам нужно
иногда собирать какие-нибудь мелкие утилиты — это в самый раз.
Введение
Разработка под Android не является основным направлением моей деятельности, я иногда делаю какие-то небольшие приложения для своих нужд.
Раньше я использовал QPython, но он достаточно тяжел и неудобен в работе. Поэтому я перешел к разработке нативных программ. Даже при поверхностном знании Java
это не составляет больших трудностей.
Данное руководство в большой степени базируется на этом документе: Building an Android App
from the Command Line. Кому интересны подробности, обращайтесь к первоисточнику.
Похожая статья: Пишем, собираем и запускаем HelloWorld для Android в блокноте уже встречалась на этом ресурсе, но в ней было рассмотрена разработка в Windows.
Здесь же я рассмотрю, как можно собрать приложение в linux.
Железо
Тестирование проводилось на стареньком нетбуке с процессором Атом, 1Гб ОЗУ
и 8Гб SSD диска.
Операционная система
Я тестировал приложение на Ubuntu 17.04. Начиная с Ubunu 16.04 android-sdk можно установить через пакетный менеджер.
В принципе, тот же SDK можно
скачать с сайта.
Качать файл из раздела ‘Get just the command line tools’
По сути это не сильно меняет процесс, но через пакетный менеджер все гораздо проще.
Разница будет лишь в путях и установке дополнительных пакетов «android-platform».
Установка пакетов
Итак, приступим к установке.
Будет установлено большое количество пакетов, включая Java.
Далее, в зависимости от требуемой версии Android, необходимо установить нужную
версию пакетов. Для lolipop 5.1 необходимо ставить:
Так же необходимо установить дополнительный пакет.
Если вы планируете устанавливать apk-пакет через adb, то необходимо немного дополнительных настроек.
Настройка adb
С помощью lsusb найти подключенное устройство
И создать файл с правилом:
В файл добавить одну строку:
Здесь «1782» взято из вывода lsusb.
После подключения через adb, на устройстве необходимо подтвердить соединение.
Теперь все готово к работе.
Постановка задачи
Приложение, которое будем собирать немного сложнее, чем ‘Hello world’.
- Требуется по нажатию кнопки взять строку из буфера обмена.
- Вырезать подстроку
- Записать подстроку обратно в буфер.
- С помощь Toast вывести подстроку или сообщение об ошибке.
В общем-то все просто.
Я подготовил пример который возьмем за основу.
Создание подписи
Сначала создадим ключ для подписи файла:
Это нам пригодится позже.
Манифест
Здесь указываем имя приложения в атрибуте «android:label». Так же приложение будет использоваться свою иконку, она указана в атрибуте «android:icon». Сама иконка лежит в каталоге «res/drawable-mdpi» файл «icon.png». В качестве иконки можно взять любой небольшой png файл.
Layout
Файл с расположением элементов находится в каталоге «/res/layout/».
В него можно добавлять виджеты, если вы захотите расширить функционал.
Исходный код приложения
Исходный код приложения находится здесь «java/ru/kx13/extractvidid»
Код весьма прост и примитивен, но этот шаблон можно использовать в других приложениях.
Скрипт для сборки
Я не стал использовать утилит сборки типа make или ant, т.к. весь код находится в одном файле и особых преимуществ это не даст. Поэтому это обычный shell скрипт:
Некоторые замечания по поводу путей.
- По умолчанию, переменная BASE указывает на путь, в который пакетный менеджер сохраняет файлы. Если вы ставите SDK вручную, то путь надо будет изменить.
- Если вы используете версию API отличную от 22, то вам надо подправить переменные BUILD_TOOLS и PLATFORM
Сборка и установка
Для сборки просто запустите
Если все настроено правильно никаких сообщений не будет выведено, а в каталоге «build» появится файл «Extractor.apk»
Теперь надо установить наше приложение
Если все прошло нормально, на устройстве появится новое приложение. Можно запускать и пользоваться.
В общем случае можно перекинуть файл apk на устройство любым удобным способом.
Заключение
Как видно из статьи начать разработку в консоли совсем несложно.
Консольные утилиты позволяют разрабатывать программы при весьма небольших ресурсах.
Источник
Build and run your app
Android Studio sets up new projects to deploy to the Android Emulator or a connected device with just a few clicks. Once your app is installed, you can use Apply Changes to deploy certain code and resource changes without building a new APK.
To build and run your app, follow these steps:
- In the toolbar, select your app from the run configurations drop-down menu.
From the target device drop-down menu, select the device that you want to run your app on.
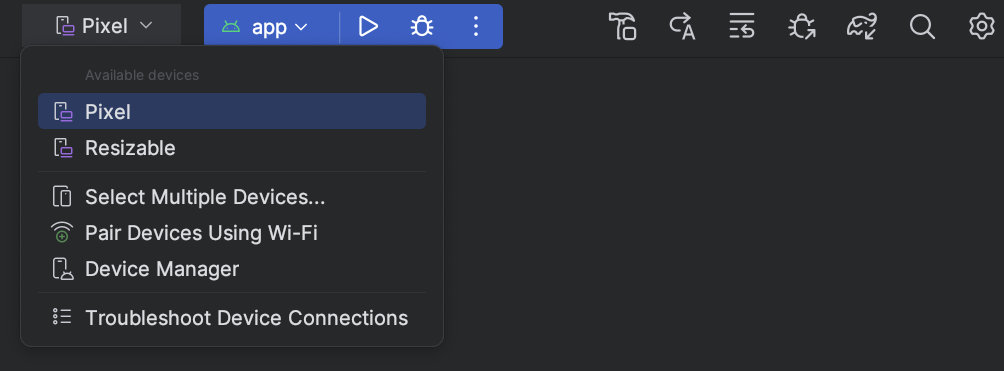
If you don’t have any devices configured, then you need to either connect a device via USB or create an AVD to use the Android Emulator.
Click Run .
Change the run/debug configuration
When you run your app for the first time, Android Studio uses a default run configuration. The run configuration specifies whether to deploy your app from an APK or an Android App Bundle, the module to run, package to deploy, activity to start, target device, emulator settings, logcat options, and more.
The default run/debug configuration builds an APK, launches the default project activity, and uses the Select Deployment Target dialog for target device selection. If the default settings don’t suit your project or module, you can customize the run/debug configuration, or even create a new one, at the project, default, and module levels. To edit a run/debug configuration, select Run > Edit Configurations. For more information, see Create and Edit Run/Debug Configurations.
Change the build variant
By default, Android Studio builds the debug version of your app, which is intended for use only during development, when you click Run.
To change the build variant Android Studio uses, select Build > Select Build Variant in the menu bar.
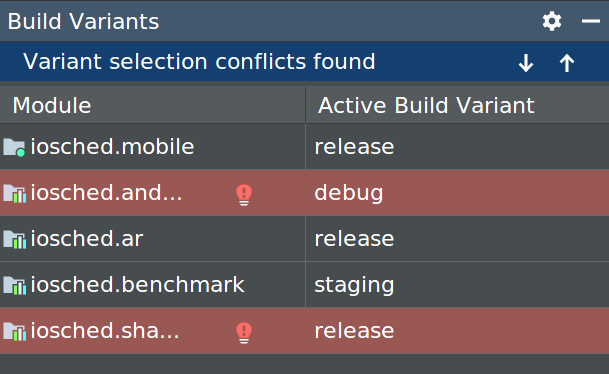
For projects without native/C++ code, the Build Variants panel has two columns: Module and Active Build Variant. The Active Build Variant value for the module determines which build variant the IDE deploys to your connected device and is visible in the editor.

Figure 1. The Build Variants panel has two columns for projects that do not have native/C++ code
To switch between variants, click the Active Build Variant cell for a module and choose the desired variant from the list field.
For projects with native/C++ code, the Build Variants panel has three columns: Module, Active Build Variant, and Active ABI. The Active Build Variant value for the module determines the build variant that the IDE deploys to your device and is visible in the editor. For native modules, the Active ABI value determines the ABI that the editor uses, but does not impact what is deployed.

Figure 2. The Build Variants panel adds the Active ABI column for projects with native/C++ code
To change the build variant or ABI, click the cell for the Active Build Variant or Active ABI column and choose the desired variant or ABI from the list. After you change the selection, the IDE syncs your project automatically. Changing either column for an app or library module will apply the change to all dependent rows.
By default, new projects are set up with two build variants: a debug and release variant. You need to build the release variant to prepare your app for public release.
To build other variations of your app, each with different features or device requirements, you can define additional build variants.
Conflicts in Android Studio’s Build Variants dialog
In Android Studio’s Build Variants dialog, you might see error messages indicating conflicts between build variants, such as the following:
This error does not indicate a build issue with Gradle – it is only indicating that the Android Studio IDE itself cannot resolve symbols between the variants of the selected modules.
For example, if you have a module M1 that depends on variant v1 of module M2 , but M2 has variant v2 selected in the IDE, you have unresolved symbols in the IDE. Let’s say that M1 depends on a class Foo which is only available in v1 . When v2 is selected, that class is not known by the IDE and it will fail to resolve it and show errors in the code of M1 .
These error messages appear because the IDE cannot load code for multiple variants simultaneously. In terms of your app’s build, however, the variant selected in this dialog will have no effect because Gradle builds your app with the source code specified in your Gradle build recipes, not based on what’s currently loaded in the IDE.
Build your project
The Run button builds and deploys your app to a device. However, to build your app to share or upload to Google Play, you’ll need to use one of the options in the Build menu to compile parts or all of your project. Before you select any of the build options listed in table 1, make sure you first select the build variant you want to use.
Table 1. Build options in the Build menu.
| Menu Item | Description |
|---|---|
| Make Module | Compiles all source files in the selected module that have been modified since the last build, and all modules the selected module depends on recursively. The compilation includes dependent source files and any associated build tasks. You can select the module to build by selecting either the module name or one of its files in the Project window. |
| Make Project | Makes all modules. |
| Clean Project | Deletes all intermediate/cached build files. |
| Rebuild Project | Runs Clean Project for the selected build variant and produces an APK. |
| Build Bundle(s) / APK(s) > Build APK(s) | |
| Build Bundle(s) / APK(s) > Build Bundle(s) | |
| Brings up a dialog with a wizard to set up a new signing configuration, and build either a signed app bundle or APK. You need to sign your app with a release key before you can upload it to the Play Console. For more information about app signing, see Sign your app. |
Note: The Run button builds an APK with testOnly=»true» , which means the APK can only be installed via adb (which Android Studio uses). If you want a debuggable APK that people can install without adb, select your debug variant and click Build Bundle(s) / APK(s) > Build APK(s).
For details about the tasks that Gradle executes for each command, open the Build window as described in the next section. For more information about Gradle and the build process, see Configure Your Build.
Monitor the build process
You can view details about the build process by clicking View > Tool Windows > Build (or by clicking Build in the tool window bar). The window displays the tasks that Gradle executes in order to build your app, as shown in figure 3.
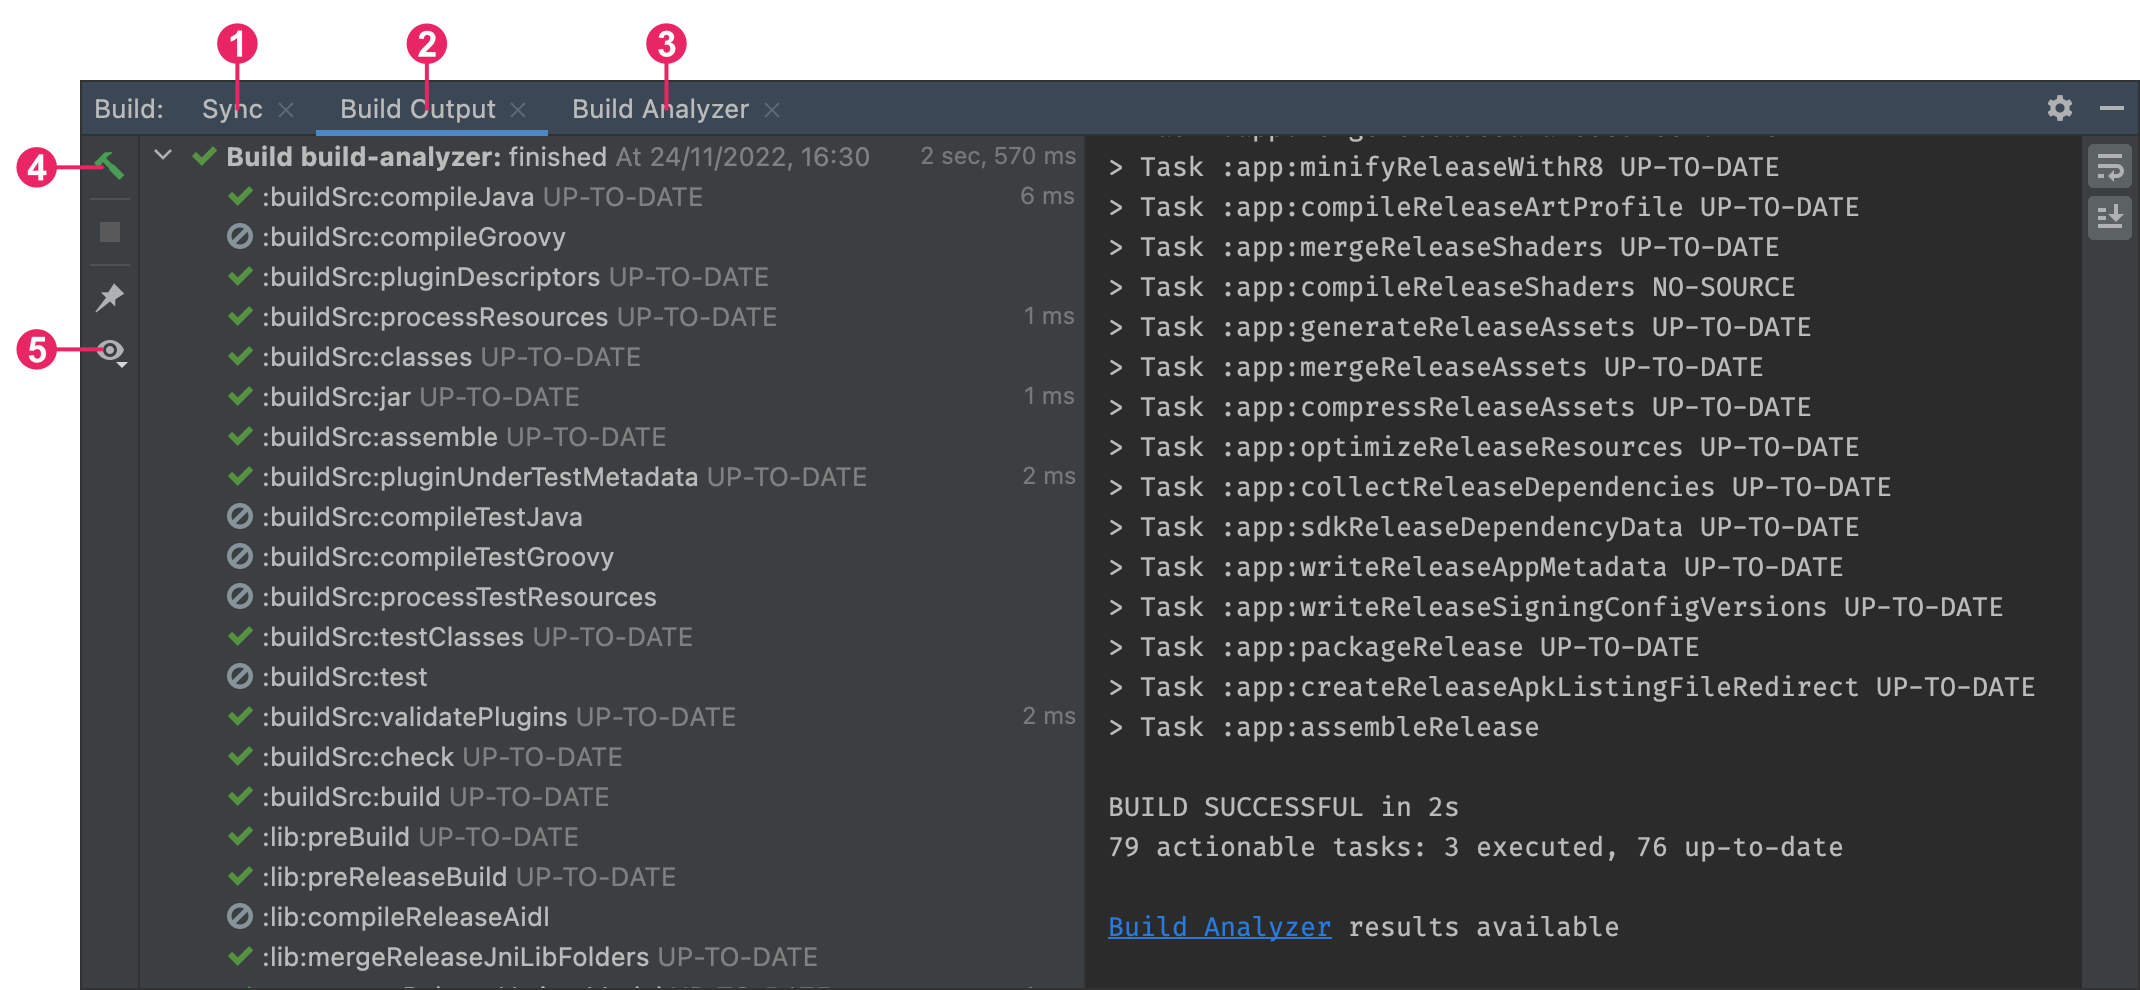
Figure 3. The Build output window in Android Studio
- Build tab: Displays the tasks Gradle executes as a tree, where each node represents either a build phase or a group of task dependencies. If you receive build-time or compile-time errors, inspect the tree and select an element to read the error output, as shown in figure 4.
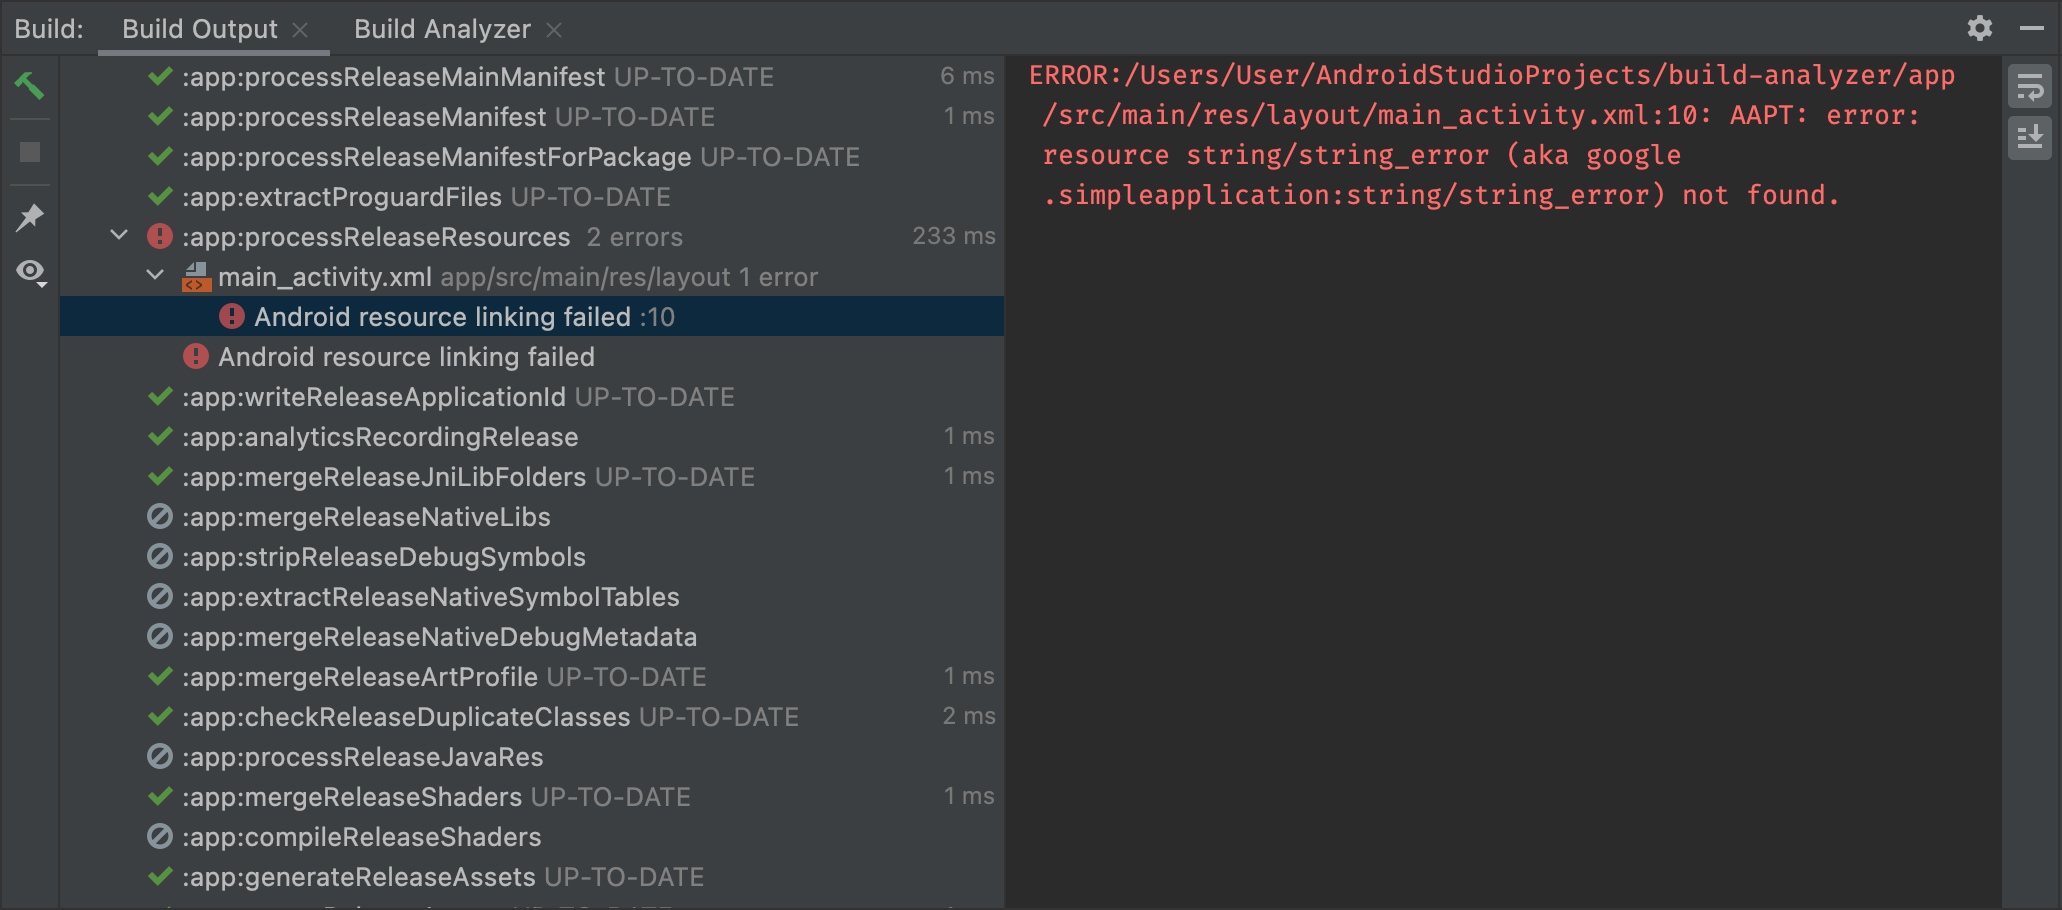
Figure 4. Inspect the Build output window for error messages
If your build variants use product flavors, Gradle also invokes tasks to build those product flavors. To view the list of all available build tasks, click View > Tool Windows > Gradle (or click Gradle in the tool window bar).
If an error occurs during the build process, Gradle may recommend some command-line options to help you resolve the issue, such as —stacktrace or —debug . To use command-line options with your build process:
- Open the Settings or Preferences dialog:
- On Windows or Linux, select File >Settings from the menu bar.
- On Mac OSX, select Android Studio >Preferences from the menu bar.
- Navigate to Build, Execution, Deployment >Compiler.
- In the text field next to Command-line Options, enter your command-line options.
- Click OK to save and exit.
Gradle applies these command-line options the next time you try building your app.
Apply Changes
In Android Studio 3.5 and higher, Apply Changes lets you push code and resource changes to your running app without restarting your app—and, in some cases, without restarting the current activity. This flexibility helps you control how much of your app is restarted when you want to deploy and test small, incremental changes while preserving your device’s current state. Apply Changes uses capabilities in the Android JVMTI implementation that are supported on devices running Android 8.0 (API level 26) or higher. To learn more about how Apply Changes works, see Android Studio Project Marble: Apply Changes.
Requirements
Apply Changes actions are only available when you meet the following conditions:
- You build the APK of your app using a debug build variant.
- You deploy your app to a target device or emulator that runs Android 8.0 (API level 26) or higher.
Use Apply Changes
Use the following options when you want to deploy your changes to a compatible device:
Apply Changes and Restart Activity
Attempts to apply both your resource and code changes by restarting your activity but without restarting your app. Generally, you can use this option when you’ve modified code in the body of a method or modified an existing resource.
You can also perform this action by pressing Ctrl+Alt+F10 (or Control+Shift+Command+R on macOS).
Apply Code Changes
Attempts to apply only your code changes without restarting anything. Generally, you can use this option when you’ve modified code in the body of a method but you have not modified any resources. If you’ve modified both code and resources, use Apply Changes and Restart Activity instead.
You can also perform this action by pressing Ctrl+F10 (or Control+Command+R on macOS).
Run
Deploys all changes and restarts the app. Use this option when the changes that you have made cannot be applied using either of the Apply Changes options. To learn more about the types of changes that require an app restart, see Limitations of Apply Changes.
Enable Run fallback for Apply Changes
After you’ve clicked either Apply Changes and Restart Activity or Apply Code Changes, Android Studio builds a new APK and determines whether the changes can be applied. If the changes can’t be applied and would cause Apply Changes to fail, Android Studio prompts you to Run your app again instead. However, if you don’t want to be prompted every time this occurs, you can configure Android Studio to automatically rerun your app when changes can’t be applied.
To enable this behavior, follow these steps:
Open the Settings or Preferences dialog:
- On Windows or Linux, select File > Settings from the menu bar.
- On macOS, select Android Studio > Preferences from the menu bar.
Navigate to Build, Execution, Deployment > Deployment.
Select the checkboxes to enable automatic Run fallback for either of the Apply Changes actions.
Click OK.
Platform-dependent changes
Some features of Apply Changes depend on specific versions of the Android platform. To apply these kinds of changes, your app must be deployed to a device running that version of Android (or higher).
| Type of change | Minimum platform version |
|---|---|
| Adding a method | Android 11 |
Limitations of Apply Changes
Apply Changes is designed to speed up the app deployment process. However, there are some limitations for when it can be used. If you encounter any issues while using Apply Changes, file a bug.
Code changes that require app restart
Some code and resource changes cannot be applied until the app is restarted, including the following:
- Adding or removing a field
- Removing a method
- Changing method signatures
- Changing modifiers of methods or classes
- Changing class inheritance
- Changing values in enums
- Adding or removing a resource
- Changing the app manifest
- Changing native libraries (SO files)
Libraries and plugins
Some libraries and plugins automatically make changes to your app’s manifest files or to resources that are referenced in the manifest. These automatic updates can interfere with Apply Changes in the following ways:
- If a library or plugin makes changes to your app’s manifest, you can’t use either Apply Code Changes or Apply Changes and Restart Activity and have to restart your app before you can see your changes.
- If a library or plugin makes changes to your app’s resource files, you can’t use Apply Code Changes , and you must use Apply Changes and Restart Activity to see your changes.
You can avoid these limitations by disabling all automatic updates for your debug build variants.
For example, Crashlytics updates app resources with a unique build ID during every build, which prevents you from using Apply Code Changes and requires you to restart your app’s activity to see your changes. You can disable this behavior so that you can use Apply Code Changes alongside Crashlytics with your debug builds.
Code that directly references content in an installed APK
If your code directly references content from your app’s APK that’s installed on the device, that code can cause crashes or misbehave after clicking Apply Code Changes . This behavior occurs because when you click Apply Code Changes, the underlying APK on the device is replaced during installation. In these cases, you can click Apply Changes and Restart Activity or Run , instead.
Content and code samples on this page are subject to the licenses described in the Content License. Java is a registered trademark of Oracle and/or its affiliates.
Источник


