- Gradle: Android Build Variables Done Right
- Using Gradle to create build variables, avoid mistakes and improve continuous integration
- Proposal
- How Android building works
- Build variables for build variants
- Gradle properties
- Gradle build variables
- 1 — BuildConfig.java
- 2 — AndroidManifest.xml
- 3 — System env
- Conclusion
- Github
- Android Environments
- Предисловие
- Проблема
- Способ решения проблемы
- Решение
- How to Use Environment Variables with Gradle
- Enabling Environment Variables in Gradle
- Setting Environment Variables in Appcircle
Gradle: Android Build Variables Done Right
Using Gradle to create build variables, avoid mistakes and improve continuous integration

May 8, 2018 · 6 min read
Gradle helps teams build, automate and deliver better software, faster. From mobile apps to microservices, from small startups to big enterprises.
Proposal
Present how developers can use just Gradle system to set up, develop, deliver and integrate Android projects using build variables.
How Android building works
Gradle is the standard build tool for Android Studio. So, it can do a lot of heavy work like to build classes for constants and resources, compile project, export .apk, execute tests, etc.
And, not less important, Gradle can handle build types and a team can create an environment to automate tasks like deploy.

Build variables for build variants
Here is the most important part of setting a great environment with consistent variables. For every build type such as development, staging, release (I’ll write something about build types) we can create specific configuration or a group of variables.
Common project constant variables:
#1 Base URLs (hostnames)
#2 File paths or filenames
All of these constants above could be defined as build variables. In this case, developers don’t need to concern about these definitions. Also, a member of the team who doesn’t have permissions can’t change variables for release deploy — of course, if the team creates a secure CI environment.
For example, imagine your app needs to pre-populate a SQLite database and the file is on your root project. One day a developer decides to play with this database, add ‘test’ data and forget to remove it. Boom! The data is in production and your product has a little problem. Believe me, it happens more than we think. We can solve that using a database file on deploy server and defining a build variable in Gradle with its file path to load it.
Gradle properties
Before talking about how Gradle injects variables in our Android project, we need to understand where we can store values and use them as build variables.
By default, Gradle uses a file called gradle.properties in the root directory for Android Projects. This extension file is widely used in Java projects, so it is also used for Android projects. The file has a simple key — value data structure.
What most developers don’t know is we can use gradle.properties to store constants and override them in an environment, and we can create a specific properties file for every Android module and override their parent.

By default, there area properties file in Gradle Home where Gradle system lives in your environment, they are loaded automatically by Gradle— if the filename is gradle.properties — we can use these variables in app/build.gradle just writing their names.
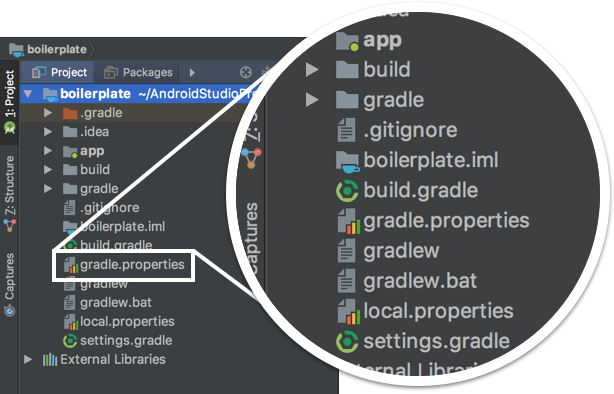
Below a default Gradle properties file created by Android Studio:
And the following is an example of app/gradle.properties :
Gradle build variables
After understanding how to store values used by Gradle, we need to understand how to use and set build variables. By default, Gradle compiles and manipulates some Android project files to inject variables.
Below are common injection/loading variables:
1 — BuildConfig.java
Gradle can add a field to BuildConfig.java file which can be easily used in the project. This file is generated automatically by Gradle system.
How Gradle inject values through its buildConfigField method to Java:

So, if you need to access variables in Java classes as a build variable now you can do it using Gradle buildConfigField . Because it’s an automatically generated file, we can see a lot of static fields there:
2 — AndroidManifest.xml
Another way to use build variables from Gradle is to inject or update a Manifest file in build time.
Imagine our app has an intent filter to open when a specific URLs is called by Android System. In this case, we can set a placeholder for the manifest file with specific hostname for each build type.
Defining a placeholder for the AndroidManifest.xml in app/build.gradle :
And using placeholder in AndroidManifest.xml :
3 — System env
Finally, the most important part of Gradle build is to get variables from system environment. It’s a typical usage with CI — Continuous integration — for release deployment type.
Common usage of system variables in Gradle:
Note that System.getEnv(«HOSTNAME») is used to load variables directly from system environment.
We need to define the variable using export (UNIX):
or add to .bash_profile :
After that, your project is ready to use variables from system environment, yet this approach is always recommended to be used via command line or with a CI tool.
Conclusion
Gradle already has a lot of features that we can use to improve our Android project. Defining build variables may not be important for solving problems without a good environment to develop, deliver and maintain a project.
There are a lot of aspects we need to consider about building apps:
- What is the deployment environment?
- How secure is our deployment environment?
- Who does decide what can be a build configuration?
- Who does maintain private information?
Below I created an image of a simple structure of build configuration:
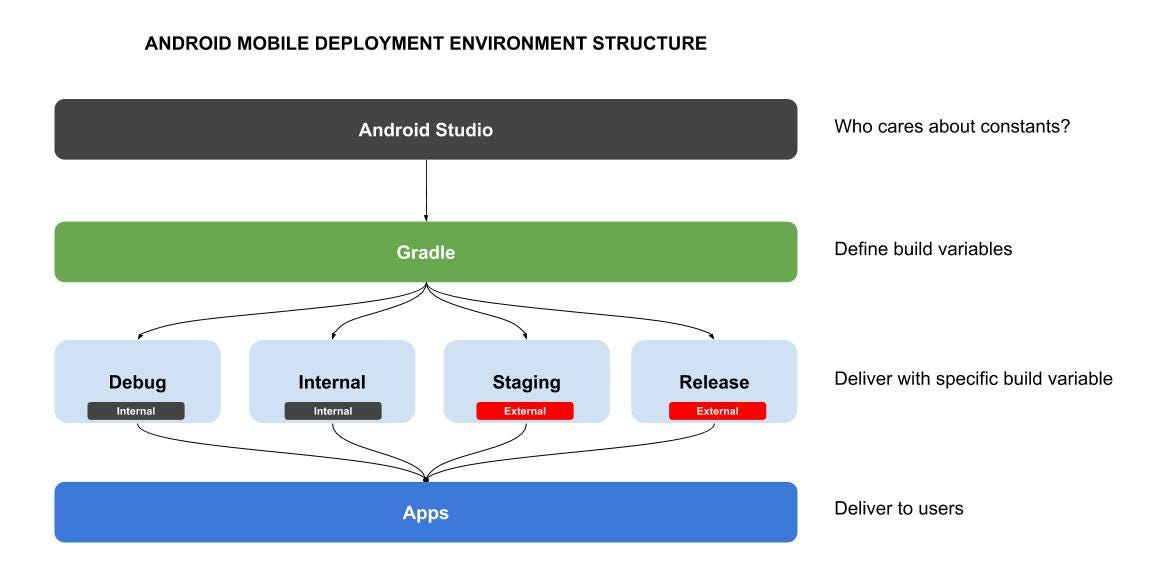
As we can see in the image, we have 4 build types:
- Debug: for developers who don’t need to know about build variables.
- Internal: Testing or QA. The team also doesn’t need to know about variables, but needs to deploy different build types using CI.
- Staging: External testing or validation.
- Release: Production/App Store. All variables for this build type should be secure in deployment environment.
Github
Check a boilerplate repository that I’ve created using build variables as a part of a study about development environment:
Источник
Android Environments
Предисловие
Из далекого 2012, на просторах Хабра мне запомнился коммент:
Топик далеко не про хардварную составляющую. Разбирая свою проблему, я убедился в верности сия суждения и постарался навести порядок на своей пыльной полке.
Недавно ко мне обратился заказчик, который попросил добавить в его проект поддержку нескольких сервисов. Задача заключалась в том, что мне нужно было подключить сервис «А» и перед выкладкой приложения в продакшн, обкатать этот сервис на тестовом окружении. Я решил проанализировать свои предыдущие решения и… ужаснулся.
Для различного типа сборок я использовал различные конфигурационные файлы с описанием переменных окружения. Но проблема заключалась в том, что только лишь для проброса значения в реальный код, на каждый тип приходилось писать один и тот же код.
Проблема
Google дает нам возможность пробрасывать кастомные значения для каждой
сборки.
После анализа build.gradle скрипта, android tools заберет все значения buildConfigFileds из buildTypes и productFlavors и сгенерирует BuildConfig файлы для каждого типа сборок:
Никакой проблемы, на первый взгляд. Особенно, когда в вашем приложении не столь много флейворов и кастомных значений. В моем проекте их было >20 и 3 окружения (internal/alpha/production). Очевидно, что проблема для меня была одна — избавиться от бойлерплейта.
Не менее важная проблема — значения перменных окружения не должны быть отражены в вашем проекте. Даже в конфигурационном файле. Вы обязаны затрекать через VCS ваш build.gradle конфиг. Но вы не должны прописывать ваши ключи напрямую, для этого, вам необходим сторонний механизм(например файл, сервисы вашего CI). В моей практике было несколько проектов, где для release production сборки у меня не было доступа к значениям некоторых библиотек. Это уже проблема бизнеса и в его интересах не делать лишних затрат. Вы не должны использовать ключи предназначенные для продакшена во время отладки или внутреннего тестирования.
Способ решения проблемы
В одном из старых проектов, для хранения значений переменных окружения, мы использовали простые .properties файлы, которые предоставляли доступ к полям через классический key:value map. Проблему биндинга данный подход не решает. Но он решает проблему поставки данных, который следует применить. Кроме того, мы можем взять за основу .properties файлы как определенного рода контракт предоставления данных.
Если вернуться чуть назад, у нас есть промежуточный этап: из buildConfigField в поле класса BuildConfig. Но кто же это делает? Все довольно банально, за это отвечает gradle plugin который вы подключаете абсолютно во всех проектах Android.
Именно он отвечает за то, что после анализа вашего build.gradle файла будет сгенерирован класс BuildConfig для каждого флейвора со своим набором полей. Таким образом, я могу написать свое лекраство, которое расширит возможности com.android.application и избавит
меня от этой головной боли.
Решение проблемы выглядит следующим образом: предоставить контракт,
в котором будут описаны все ключи и значения для всех сборок.
Разложить конфигурационные файлы на подтипы. Отдать все плагину.
Решение
Выше мы разобрались со структурой решения, осталось дело за малым — воплотить все это в жизнь. Казалось бы, тривиальное решение и проблему можно решить простым расширением билд файла. Изначально, я так и поступил.
А вот тут сразу же возникли те трудности, о которых я и не задумывался — пыльная полка.Я решил «продать» свое реше коллегам. Я подготовил доку, пнул дело на обсуждение и… Понял, что все мы люди, а программисты — это ленивые люди. Никому не хочется вставлять неизвестный ему участок кода в проект, его же по хорошему нужно изучить, прочитать? А вдруг он нерабочий? А вдруг он делает еще что-то не так? Это же груви, а я его не знаю и непонятно как с ним работать. А уже давно переехал на котлин скрипт, а портировать с груви я не умею и проч.
Самое интересное, что все эти суждения уже исходили от меня, т.к. я понял, что меня такая интеграция решения не устраивает. Плюс, я заметил несколько моментов, которые мне бы очень хотелось бы улучшить. Внедрив решение в проект А, мне бы хотелось бы его поддержать в проекте Б. Выход один — надо писать плагин.
А какие же проблемы решит плагин и его удаленная поставка пользователю?
- проблему ленивого програмиста. Нам лень углубляться в корень проблемы и возможные способы его решения. Нам куда проще взять что-то, что былоуже сделано до тебя и использовать это.
- поддержка. Она включает в себя поддержку кода, его развитие и расшириения возможностей. При решении своей проблемы, я решал только проброспеременных окружения только лишь в код, совсем позабыв о возможности проброса в ресурсы.
- качество кода. Бытует такое мнение, что некоторые разработчики даже не смотрят на open source код, который не покрыт тестами. На дворе 2019 и мы с легкостью можем подключить себе сервисы для отслеживания качества кода https://sonarcloud.io либо https://codecov.io/
- конфигурация. Расширение билд файла заставляет меня изучить этот код и внести изменения вручную. В моем случае — мне не всегда нужно использовать конфигурацию для buildTypes либо productFlavors, хочу что-то одно или все сразу.
- уборка пыльной полки. Я наконец-то навел порядок на одной из них и смог это решение по-дальше своей комнатушки.
В подробности и проблемы при написании плагина я вдаваться не буду, тянет на новый топик. Взять решение с его интеграцией, предложить свою идею либо внести свой вклад можно
здесь.
Источник
How to Use Environment Variables with Gradle

Environment variables are the variables set outside the projects and typically embedded into the operating system or the service platform the project will be built on.
Developers constantly feel the need to use environment variables in their applications for various reasons. Some of these reasons can be:
- Using different values for the same variables depending on the project “environments” like development, testing, staging and production
- Keeping sensitive values and secrets such as API keys and passwords secure so that they are not revealed within the source code
- Limit the number of modification to the source code by keeping some information outside the project code and change those values when needed, suitable for things like feature flags and A/B testing
For mobile applications, where building the apps is required with every change, environment variables are even more crucial for high configurability. You can enable environment variables in Gradle and configure your CI/CD system to use these values while building.
Enabling Environment Variables in Gradle
Android developers can use environment variables using Gradle’s module-level build configuration. This module-level Gradle configuration file lets you specify build settings for that application module.
To use environment variables in your Android app project, specify a new buildConfigField method in the Android block of your build.gradle file, as shown below:
During the build, Gradle will generate the buildConfig class and these variables will be accessible within your application in the runtime.
You can now use this variable in your application. Here is an example showing how to use the defined environment variable in a view:
Setting Environment Variables in Appcircle
Appcircle allows you to create groups of environment variables to be used during your builds. You can create environment variable groups for different environments of your project like development, staging and production or for different app configurations.
Like the Android sample above, you may want to use different API endpoints for development, staging and production.
To create different values of the same variable, first create an environment variable group for each environment/configuration:

Then, create an environment variable with the same name in each group and set the proper values for each branch.
You can duplicate variable groups for easy environment creation

Once the variable groups are set, you can specify which variable group to use in the build configuration for the specific branch. You can set different groups for different branches.

During the build, the build agent will get the values for the variables from the designated group for the branch from which you are building your application. Then the build.gradle file in your module will consume the environment variable values for your application to use them during the runtime:

With Appcircle, you can easily utilize environment variables in your Android and iOS projects from a single source of truth and keep your secrets secure. You can change environments easily and receive automated builds for different branches utilizing different environment configurations with instant iOS and Android app previews in your browser.
Источник


