- Android Fingerprint API: приделываем аутентификацию по отпечатку
- Кратчайший ликбез
- Где сенсор?
- Подготовка
- Хранилище
- Шифровальщик
- Шифровка и расшифровка
- Не тот палец
- Android Fingerprint Authentication Tutorial
- Dialog View
- Fingerprint Controller
- Class Properties
- Listening For Authentication
- Handle Fingerprint Authentication Callbacks
- Fingerprint Dialog
- Cryptography Components
- Summary
Android Fingerprint API: приделываем аутентификацию по отпечатку
Привет, Хабр! Прошло достаточно много времени, как появился Fingerprint API для Android, в сети много разрозненных сэмплов кода по его внедрению и использованию, но на Хабре по какой-то причине эту тему обходили стороной. На мой взгляд, настало время исправить это недоразумение. Всех заинтересовавшихся прошу под кат.

Кратчайший ликбез
Итак, что же представляет собой Fingerprint API? API позволяет пользователю аутентифицироваться посредством своего отпечатка, очевидно. Для работы с сенсором API предлагает нам FingerprintManager, достаточно простой в освоении.
Как его использовать? А вот это уже интереснее. Практически везде, где требуется аутентификация по паролю, можно прикрутить аутентификацию по отпечатку. Представьте себе приложение, состоящее из LoginActivity и MainActivity. При запуске мы попадаем на экран логина, вводим пин-код, проходим к данным. Но мы хотим заменить вход по пин-коду на вход по отпечатку. К слову, полностью заменить не получится, мы можем лишь избавить пользователя от ручного ввода пин-кода, подставляя ранее сохраненный пин-код (имеется ввиду клиент-серверное приложение, в котором нужно отправить пароль серверу).
Где сенсор?
Чтобы начать получать профит от нового API, первым делом нужно добавить permission в манифесте:
Само собой, использовать Fingerprint API можно только на устройствах, его поддерживающих: соответственно, это устройства Android 6+ с сенсором.
Совместимость можно легко проверить с помощью метода:
FingerprintManagerCompat — это удобная обертка для обычного FingerprintManager’а, которая упрощает проверку устройства на совместимость, инкапсулируя в себе проверку версии API. В данном случае, isHardwareDetected() вернет false, если API ниже 23.
Дальше, нам нужно понять, готов ли сенсор к использованию. Для этого определим enum состояний:
И воспользуемся методом:
Код достаточно тривиальный. Небольшое недопонимание может вызвать момент, когда мы проверяем заблокировано ли устройство. Нам нужна эта проверка, так как, хоть Android и не позволяет добавлять отпечатки в незащищенное устройство, некоторые производители это обходят, поэтому подстраховаться не помешает.
Различные состояния можно использовать для того, чтобы дать пользователю понять, что происходит и направить его на путь истинный.
Подготовка
Итак, не зацикливаясь на проверке пин-кода на валидность, прикинем следующую упрощенную логику действий:
- Пользователь вводит пин-код, если SensorState.READY, то мы сохраняем пин-код, запускаем MainActivity.
- Рестартим приложение, если SensorState.READY, то считываем отпечаток, достаем пин-код, имитируем его ввод, запускаем MainActivity.
Схема была бы достаточно простой, если бы не одно но: Гугл настойчиво рекомендует не хранить приватные данные пользователя в открытом виде. Поэтому нам нужен механизм шифровки и расшифровки для, соответственно, сохранения и использования. Займемся этим.
Что нам нужно для шифровки и расшифровки:
- Защищенное хранилище для ключей.
- Криптографический ключ.
- Шифровальщик
Хранилище
Для работы с отпечатками система предоставляет нам свой кейстор — “AndroidKeyStore” и гарантирует защиту от несанкционированного доступа. Воспользуемся им:
Следует принять, понять и простить, что кейстор хранит только криптографические ключи. Пароли, пин и другие приватные данные там хранить нельзя.
На выбор у нас два варианта ключей: симметричный ключ и пара из публичного и приватного ключа. Из соображений UX мы воспользуемся парой. Это позволит нам отделить ввод отпечатка от шифрования пин-кода.
Ключи мы будем доставать из кейстора, но сначала нужно их туда положить. Для создания ключа воспользуемся генератором.
При инициализации мы указываем, в какой кейстор пойдут сгенерированные ключи и для какого алгоритма предназначен этот ключ.
Сама же генерация происходит следующим образом:
Здесь следует обратить внимание на два места:
- KEY_ALIAS — это псевдоним ключа, по которому мы будем выдергивать его из кейстора, обычный psfs.
- .setUserAuthenticationRequired(true) — этот флаг указывает, что каждый раз, когда нам нужно будет воспользоваться ключом, нужно будет подтвердить себя, в нашем случае — с помощью отпечатка.
Проверять наличие ключа будем следующим образом:
Шифровальщик
Шифровкой и дешифровкой в Java занимается объект Cipher.
Адовая мешанина в аргументе — это строка трансформации, которая включает в себя алгоритм, режим смешивания и дополнение.
После того, как мы получили Cipher, нужно подготовить его к работе. При генерации ключа мы указали, что будем использовать его только для шифровки и расшифровки. Соответственно, Cipher тоже будет для этих целей:
где initDecodeCipher() и initEncodeCiper() следующие:
Нетрудно заметить, что зашифровывающий Cipher несколько сложнее инициализировать. Это косяк самого Гугла, суть которого в том, что публичный ключ требует подтверждения пользователя. Мы обходим это требование с помощью слепка ключа (костыль, ага).
Момент с KeyPermanentlyInvalidatedException — если по какой-то причине ключ нельзя использовать, выстреливает это исключение. Возможные причины — добавление нового отпечатка к существующему, смена или полное удаление блокировки. Тогда ключ более не имеет смысла хранить, и мы его удаляем.
Метод, который собирает всю цепочку подготовки:
Шифровка и расшифровка
Опишем метод, который зашифровывает строку аргумент:
В результате мы получаем Base64-строку, которую можно спокойно хранить в преференсах приложения.
Для расшифровки же используем следующий метод:
Опа, на вход он получает не только зашифрованную строку, но и объект Cipher. Откуда он там взялся, станет ясно позднее.
Не тот палец
Для того чтобы наконец использовать сенсор, нужно воспользоваться методом FingerprintManagerCompat:
Хендлер и флаги нам сейчас не нужны, сигнал используется, чтобы отменить режим считывания отпечатков (при сворачивании приложения, например), коллбеки возвращают результат конкретного считывания, а вот над криптообъектом остановимся поподробнее.
CryptoObject в данном случае используется как обертка для Cipher’a. Чтобы его получить, используем метод:
Как видно из кода, криптообъект создается из расшифровывающего Cipher. Если этот Cipher прямо сейчас отправить в метод decode(), то вылетит исключение, оповещающее о том, что мы пытаемся использовать ключ без подтверждения.
Строго говоря, мы создаем криптообъект и отправляем его на вход в authenticate() как раз для получения этого самого подтверждения.
Если getCryptoObject() вернул null, то это значит, что при инициализации Chiper‘а произошел KeyPermanentlyInvalidatedException. Тут уже ничего не поделаешь, кроме как дать пользователю знать, что вход по отпечатку недоступен и ему придется заново ввести пин-код.
Как я уже говорил, результаты считывания сенсора мы получаем в методах коллбека. Вот как они выглядят:
В случае успешного распознавания мы получаем AuthenticationResult, из которого можем достать объект Cipher c уже подтвержденным ключом:
Теперь можно с чистой совестью отправить его на вход в decode(), получить пин-код, сымитировать его ввод и показать пользователю его данные.
На этом на сегодня всё, замечания, комментарии, предложения и вопросы приветствуются.
Простейший вариант работы кода можете посмотреть на гитхабе.
Источник
Android Fingerprint Authentication Tutorial
Originally published on Android Essence.
When Android released version 6.0 Marshmallow (yes, a little outdated at this point), a whole slew of new developer APIs came with it. One that I’ve personally enjoyed as a consumer is fingerprint authentication. I skimmed over the official docs, and even through their Fingerprint Dialog Sample but had a difficult time following what was going on.
Eventually, though, I was able to recreate the flow. This post is going to be a step by step guide to integrating your own fingerprint dialog in your Android application.
Dialog View
When adding fingerprint authentication to your app, you have full control over how that flow should be designed. However, there is a material design specification for the fingerprint authentication flow. This page dicusses certain text that should be included, what the behavior looks like, and the icon that you should use. This is necessary because we, as developers, want to make sure our apps are providing a consistent flow compared to other apps doing similar work.
From the above specification, you’ll notice that Google has supplied the red lines for creating a dialog:
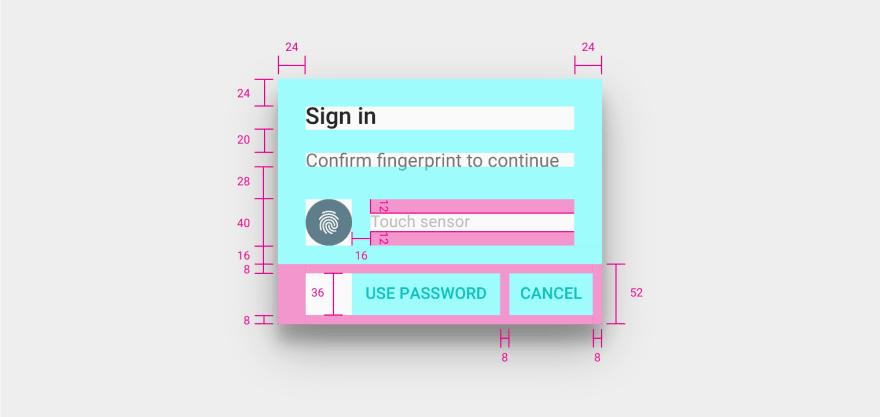
For the purposes of this tutorial, we won’t be including a «use password» fallback, and will focus solely on the fingerprint authentication. Using the above red lines, I was able to create an XML file for the dialog using a ConstraintLayout. The following code is inside my dialog_fingerprint.xml file, which you can see on GitHub.
Fingerprint Controller
Before writing out the actual dialog, we need to create a helper class that handles some of the fingerprint authentication flow. While much of this code could be written inside the DialogFragment class, it is better to abstract it out for separation of concerns, and only give the controller the info that it needs. Let’s look at how we define our FingerprintController.kt class:
Exit fullscreen mode
This looks overwhelming, so we can break it down by each bit:
- FingerprintManagerCompat class is a class used to connect with the fingerprint hardware. There is a FingerprintManager class, but as discussed in the beginning these APIs were only added in API 23 (Marshmallow), and so it is best to use the Compat class to better support older Android versions.
- Callback is an interface that lets the view know when fingerprint authentication is completed.
- title, subtitle, errorText, and icon are all views that may be modified throughout the fingerprint authentication flow, based on successful or unsuccessful attempts.
- Our controller extends the AuthenticaitonCallback() class which handles the various callback possibilities from the authentication attempts.
Class Properties
In addition to all of the properties accepted via the constructor, there are some values that we need to create inside the class itself. We need:
- A cancellation signal to alert us when authentication should be cancelled.
- A boolean flag to know if cancellation occured by our controller or some other source.
- A boolean flag to tell us if this device should support fingerprint authentication.
- A runnable that resets the dialog to its initial state. We’ll run this when the class is instantiated.
Here is what our class looks like now:
Exit fullscreen mode
Listening For Authentication
Now that we’ve defined all of the fields required for our controller, we can tell it to start listening for authentication and to stop. In order to do so, we’ll need a crypto object that we’ll be authenticating via fingerprint, but more on that later. Our start listening method will check for hardware support, and if it’s there, resets the cancellation signal and flag, and called the authenticate method of the fingerprint manager. When we want to stop listening, we check if we have a cancellation signal by using Kotlin’s let delgate, so that we only execute the block of code if the signal is not null. Here is what all of that looks like:
Exit fullscreen mode
You may notice that the code simply returns from the start listening method if there is no support for fingerprint. Later, when we add this dialog to our activity, we will want to do a check then as well so we don’t even prompt the user for fingerprint if it’s unnecessary. This will also come later.
Handle Fingerprint Authentication Callbacks
As discussed in the first part of this section, our controller class extends FingerprintManagerCompat.AuthenticationCallback . There are four methods in this class that we will implement, and another utility method. These are:
- onAuthenticationError — called when a fatal error for fingerprint authentication occurs.
- onAuthenticationHelp — called when an error occurs, but it wasn’t a fatal exception. This will be things like moving your finger too fast, or the sensor being dirty.
- onAuthenticationFailed — called when a fingerprint is valid, but not one of the enrolled fingerprints on the device.
- onAuthenticationSucceeded — called when a valid and enrolled fingerprint was scanned.
- showError — this is a helper method we will use to display an error to the user. This error will be displayed for about a second and a half before resetting the view.
Sample code for each one may look like this. Everything below is inside our FingerprintController.kt file:
Exit fullscreen mode
Fingerprint Dialog
Once we’ve created our XML layout, and our FingerprintController class, we can begin to setup the dialog. Let’s get the generalized code, not specific to new fingerprint functionality, out of the way first. We need:
- A DialogFragment that implements our FingerprintController.Callback interface.
- A reference to a FingerprintController for use inside the dialog.
- A new instance method that creates this dialog with a specific title and subtitle, initialized once dialog is created.
To save space on the blog itself, I’ll be omitting that code but you can find it on GitHub.
Cryptography Components
So, admittedly, this is where I struggled myself to understand what was happening. I followed along with the FingerprintDialog samples from Google, and learned that you’re required to have a FingerprintManagerCompat.CryptoObject to supply to the FingerprintManager. The purpose of this CryptoObject is to manage a symmetric key which gets assigned to the Android KeyStore, which can only be used once the user has actually authenticated with a fingerprint. That is how you know the user has biometrically authenticated themselves. You can learn more about this flow, and specifically how to connect it to a backend, in this great talk by Ben Oberkfell from American Express. Let’s lay out the steps of what we need to do, and follow it with the code required:
- Create a class level variable for the crypto object, the Android keystore, and a key generator.
- In the DialogFragment’s onCreate() method, we will get an instance of the keystore and the generator.
- Once we have those instances, we’ll create a key by some default name to be stored in the keystore.
- When we have our key, we can initialize our crypto object.
- Last, we setup our controller to start listening in onResume() and stop in onPause() .
Here is what our class looks like now, with code removed for simplicity:
Exit fullscreen mode
Summary
Congrats! If you’ve made it this far, you made it through the toughest chunk of fingerprint authentication code. The only remaining step is to setup your MainActivity to launch this dialog.
As usual, you can find a full sample application for this post on GitHub, where everything is documented. If you have questions or improvements, please leave them in the comments!
Источник


