- Android environment setup
- 1. Download the Android SDK
- 1a. Install the Android SDK using the command line tools
- 1b. Install the SDK using Android Studio
- 2. Enable USB debugging on your device
- 3. Configure the Android SDK path in Unity
- 4. Download and set up the Android NDK
- Using an alternate Java Development Kit
- How To Install Android SDK Tools On Windows
- Step 1 — Download SDK Tools
- Step 2 — Install Command Line Tools
- Step 3 — Install Platform Tools
- Step 4 — Configure Environment Variable
- Step 5 — Configure Commands
- Step 6 — Using the SDK Manager
- Step 7 — Using the Emulator and AVD Manager
- Summary
Android environment setup
Whether you’re building an Android application in Unity or programming it from scratch, you must set up the Android Software Development Kit (SDK) before you can build and run any code on your Android device. By default, Unity installs a Java Development Kit based on OpenJDK.
1. Download the Android SDK
You can install the Android SDK using command line tools or through Android Studio. Android Studio provides an easy to use GUI based tool but installs additional software on your computer. Using the command line tools is a smaller download and does not install additional software, but it can be more challenging to use.
1a. Install the Android SDK using the command line tools
Install or unpack the Android SDK. After installing, open the Android SDK Manager and add at least one Android SDK Platform, the Platform Tools, the Build Tools, and the USB drivers if you’re using Windows.
To install an Android platform SDK and the associated tools:
Unzip the tools folder to a location on your hard drive.
Open a command-prompt window.
Navigate to the bin folder in the location where you unzipped the tools folder:
install folder > tools > bin
Use the sdkmanager command line tool to retrieve the list of packages that you can install. The installable packages include the Platform SDKs, Build Tools, Platform tools, and other tools.
Select a version of the Platform SDK to install. Platform SDKs take the following form in the list: platforms;android-xx. The xx indicates the SDK level. The larger the number, the newer the package. Typically, you can install the latest available version. However, there might be cases where Google has released a new version of the SDK that causes errors when you build your Unity Project. In that case, you must uninstall the SDK and install an earlier version. The general format of the command for package installation is sdkmanager
. You can install the corresponding Platform Tools and Build Tools at the same time.
Example: sdkmanager “platform-tools” “platforms;android–27” “build-tools;27.0.3”
- If you are running on Windows, install the USB device drivers:
This installs the SDK to a directory named platforms in the same directory you unzipped the tools folder to.
c: \platforms
1b. Install the SDK using Android Studio
Install Android studio from the Android developer portal. The Android developer portal provides detailed installation instructions.
Note: Android Studio provides some ease of use benefits, but it is not fully tested for compatibility with Unity installs. If you encounter errors, Unity recommends using the command line method.
When installing the Android platform SDK and other tools, you can typically install the latest available version. There might be cases in which Google has released a new version of the SDK that causes errors when you build your Unity Project. In that case, uninstall the SDK and install an earlier version.
Install the associated Platform and Build tools at the same time. If you are running on Windows, install the USB device drivers.
2. Enable USB debugging on your device
To enable USB debugging, you must first enable Developer options on your device. To do this, find the build number in your device’s Settings menu. The location of the build number varies between devices; for stock Android, it’s usually in Settings > About phone > Build number. For specific information on your device and Android version, refer to your hardware manufacturer.
After you navigate to the build number using the instructions above, tap on the build number seven times. A pop-up notification saying “You are now X steps away from being a developer” appears, with “X” being a number that counts down with every additional tap. On the seventh tap, Developer options are unlocked.
Note: On Android versions prior to 4.2 (Jelly Bean), the Developer options are enabled by default.
Go to Settings > Developer options, then enable USB debugging. Android now enters debug mode when it is connected to a computer via USB.
Connect your device to your computer using a USB cable. If you are developing on a Windows computer, you might need to install the device-specific USB driver. See the manufacture website for your device for additional information.
The setup process differs for Windows and macOS and is explained in detail on the Android developer website. For more information on connecting your Android device to the SDK, refer to the Running Your App section of the Android Developer documentation.
3. Configure the Android SDK path in Unity
The first time you create a Project for Android (or if Unity later fails to locate the SDK), Unity asks you to locate the folder in which you installed the Android SDK.
If you installed the SDK using the sdkmanager, you can find the folder in \platforms .
If you installed the SDK when you installed Android Studio, you can find the location in the Android Studio SDK Manager. To open the SDK Manager from Android Studio, go to Tools > Android > SDK Manager or select SDK Manager in the toolbar.
To change the location of the Android SDK, in the Unity menu bar go to Unity > Preferences > External Tools.
4. Download and set up the Android NDK
If you are using the IL2CPP A Unity-developed scripting back-end which you can use as an alternative to Mono when building Projects for some platforms. More info
See in Glossary scripting backend A framework that powers scripting in Unity. Unity supports three different scripting backends depending on target platform: Mono, .NET and IL2CPP. Universal Windows Platform, however, supports only two: .NET and IL2CPP. More info
See in Glossary for Android, you need the Android Native Development Kit (NDK). It contains the toolchains (such as compiler and linker) needed to build the necessary libraries and produce the output package (APK). If you are not targeting the IL2CPP backend, you can skip this step.
Download Android NDK version r16b (64-bit) from the NDK Downloads web page. Extract the android-ndk-r16b folder to a directory on your computer and note the location.
The first time you build a Project for Android using IL2CPP, Unity asks you to locate the folder in which you installed the Android NDK. Select the root folder of your NDK installation. To change the location of the Android NDK, in the Unity Editor, navigate to the menu: Unity > Preferences to display the Unity Preferences dialog box. Here, click External Tools.
Using an alternate Java Development Kit
Unity recommends that you use the JDK installed with the Android build tools, to ensure that you receive the correct version and configuration.
If you have manually installed the JDK and do not want to duplicate the installation, you can specify the location in the Unity Preferences window. To do this, go to Preferences > External tools and enter the directory path in the JDK field:
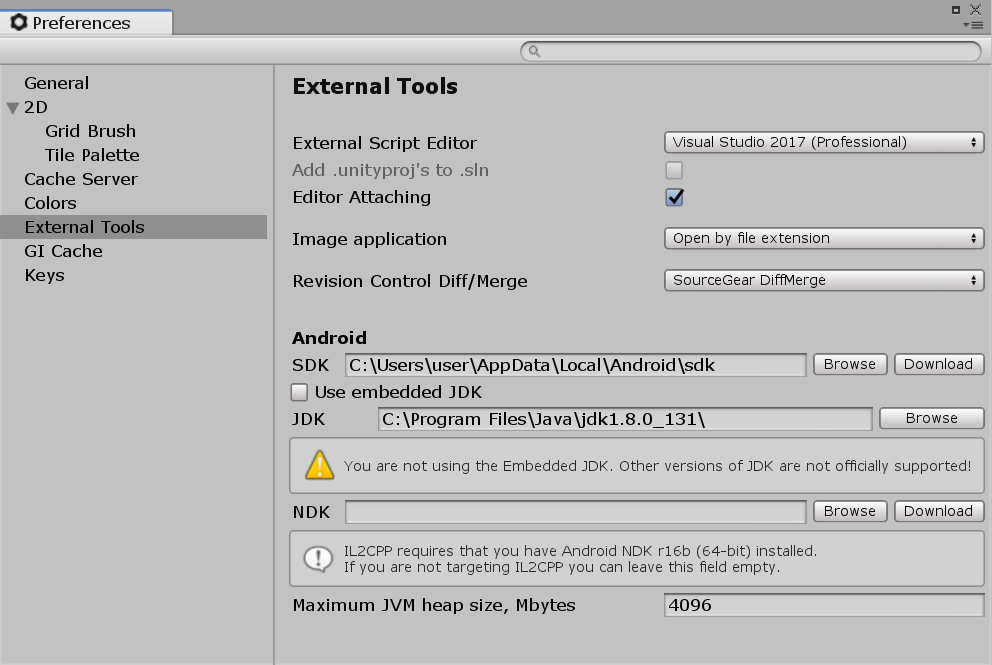 Preferences for Android external tools
Warning: The Android tools do not support JDK 9 or later; an alternate JDK must be version 8. Unity does not officially support versions of the JDK other than the one embedded in the Android Build Tools.
To change the JDK that Unity uses to build Android apps:
Open the Project.
In the left navigation column, select External Tools.
Uncheck JDK Installed with Unity (recommended).
In the JDK field enter the path to the JDK or use the Browse button to locate it.
2018–11–21 Page amended with editorial review
Did you find this page useful? Please give it a rating:
Источник
How To Install Android SDK Tools On Windows
It provides all the steps required to install Android Platform Tools and SDK Manager on Windows 10 without using Android Studio.
In this tutorial, we will discuss all the steps required to install Android Platform Tools and SDK Manager on Windows 10. This tutorial provides the steps for Windows 10, though the steps should be the same on other versions of Windows.
This post is useful for the developers using Android Platform Tools and SDK manager without installing Android Studio for the use cases including hybrid app development using Ionic. It also assumes that a valid JAVA_HOME environment variable exists pointing to the installation directory of Java.
You can follow How To Install Java 8 On Windows 10, How To Install Java 11 On Windows, How To Install Java 15 On Windows, or How To Install OpenJDK 15 On Windows to install Java on Windows. In case you are interested in developing Android applications using Android Studio, you can also follow How To Install Android Studio On Windows.
Step 1 — Download SDK Tools
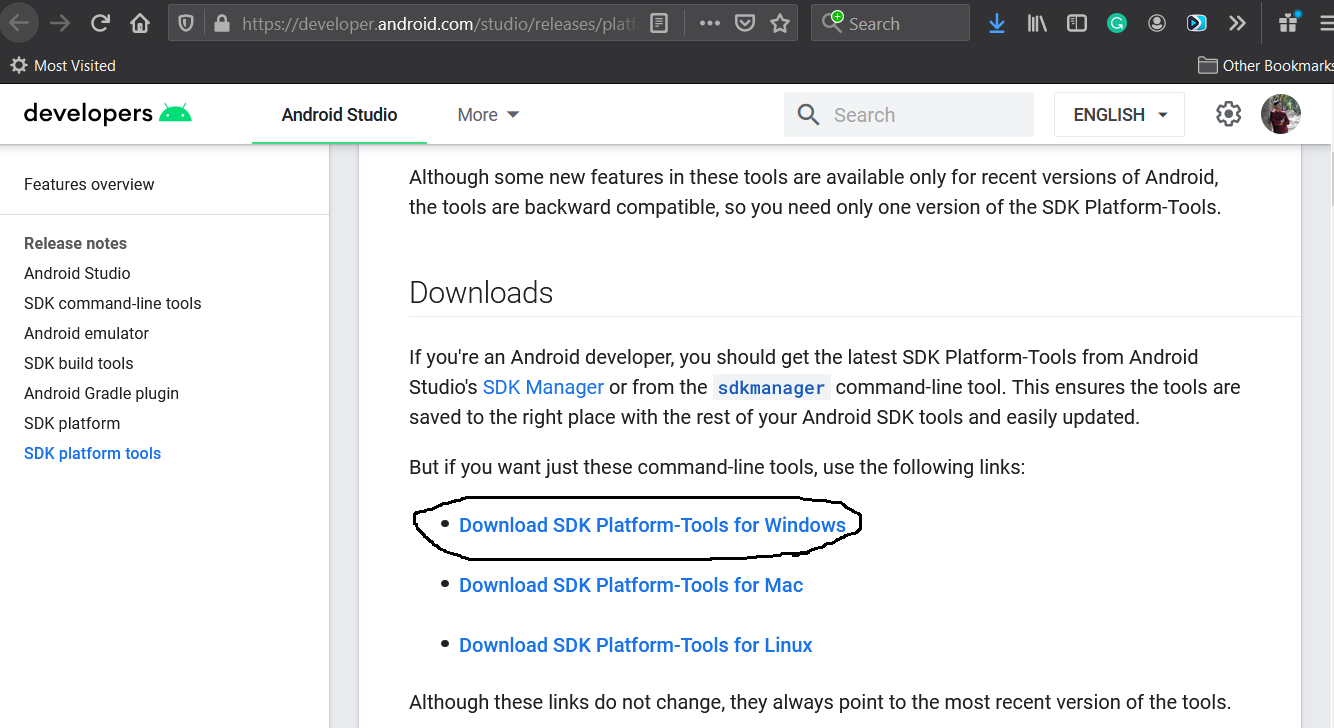
Open the download tab of Android Studio and scroll down to the Command line tools only section. This section shows various options to download the SDK tools as shown in Fig 1.
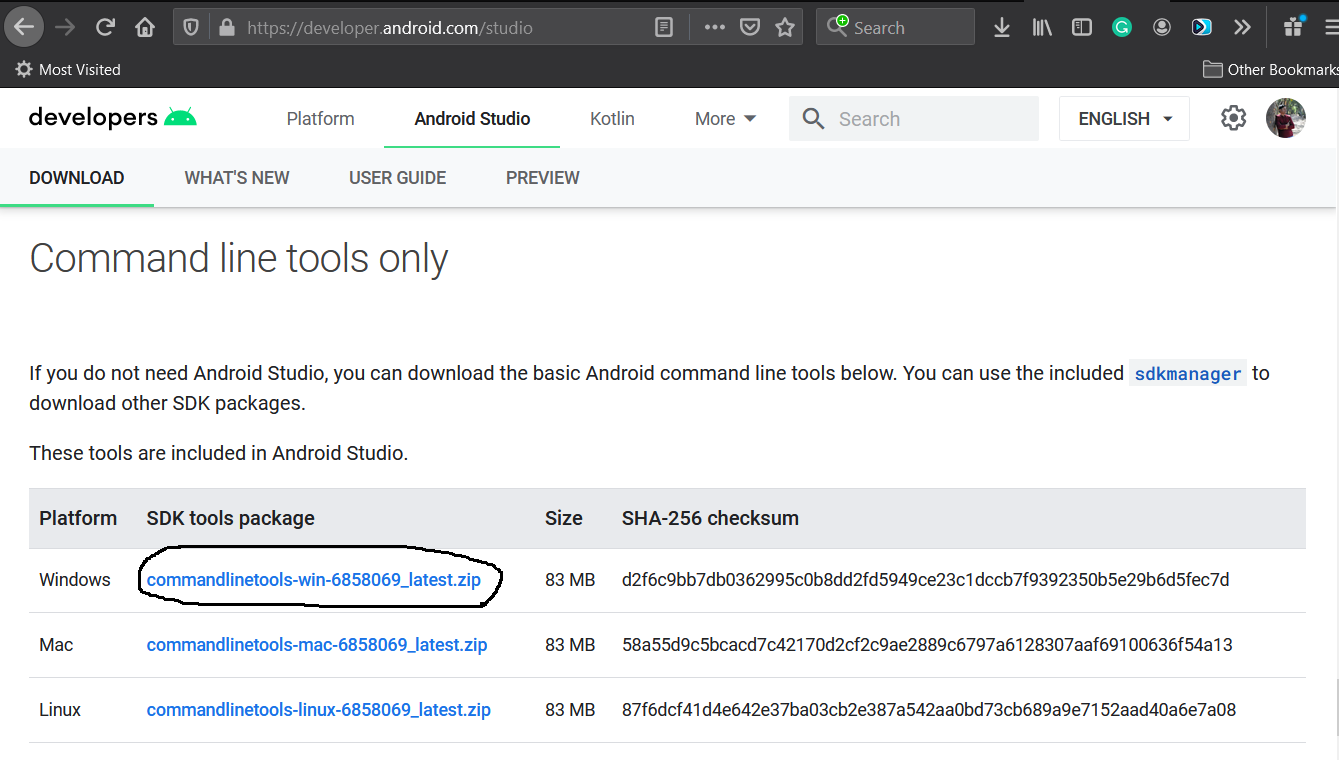
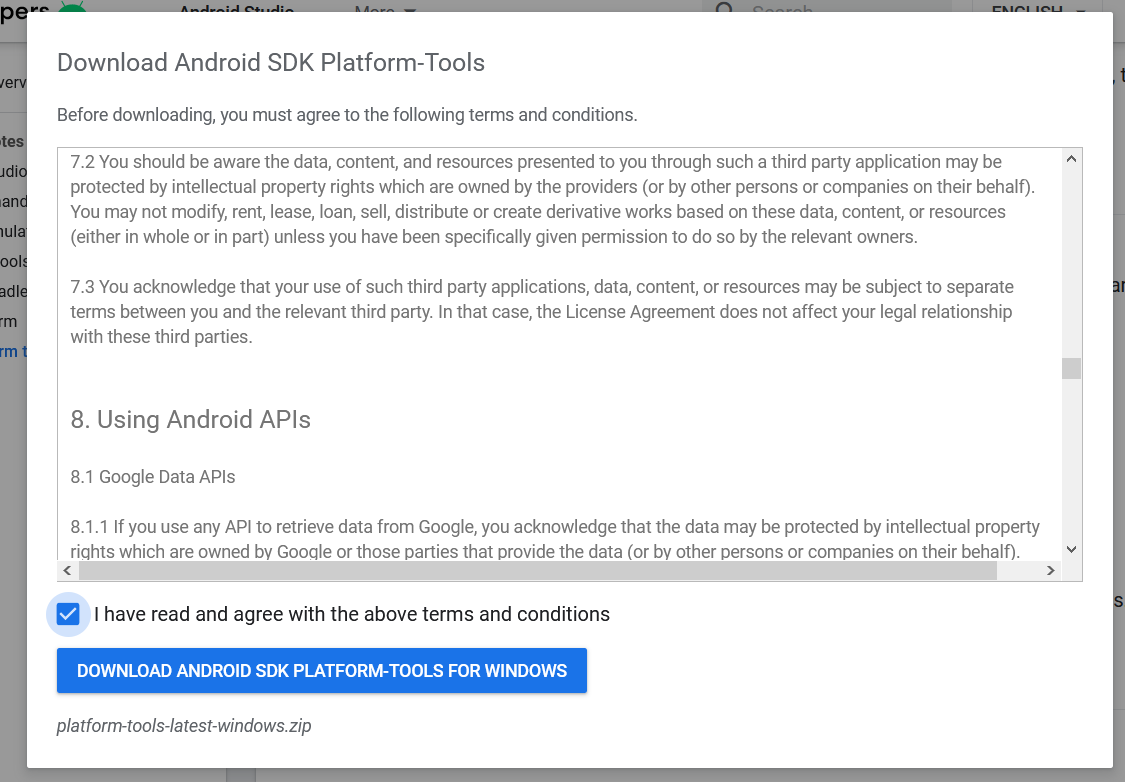
Click the first link having the download option for Windows as highlighted in Fig 1. It will ask to accept to terms and conditions as shown in Fig 2.
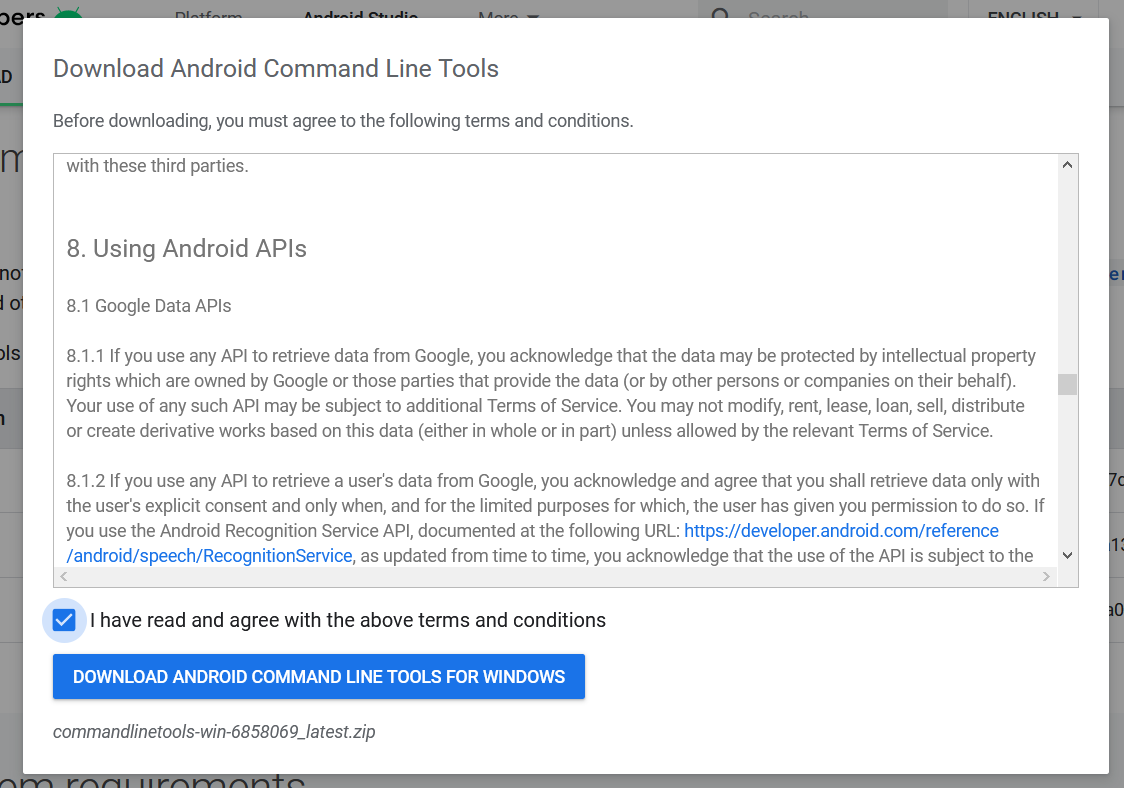
Go through the details, agree on the terms and conditions and click the Download Button to start the download.
Step 2 — Install Command Line Tools
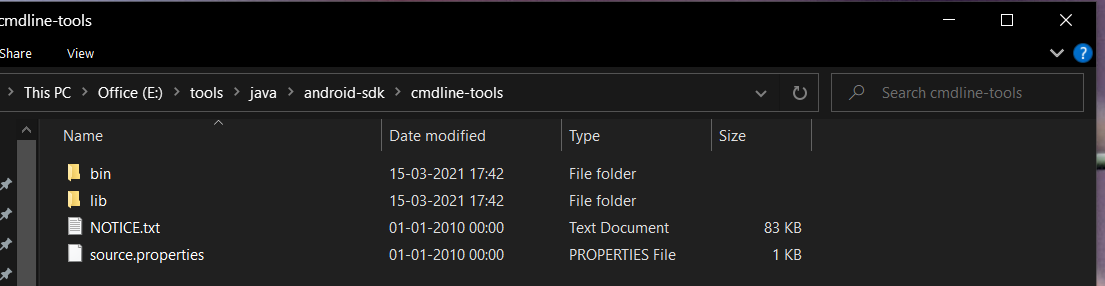
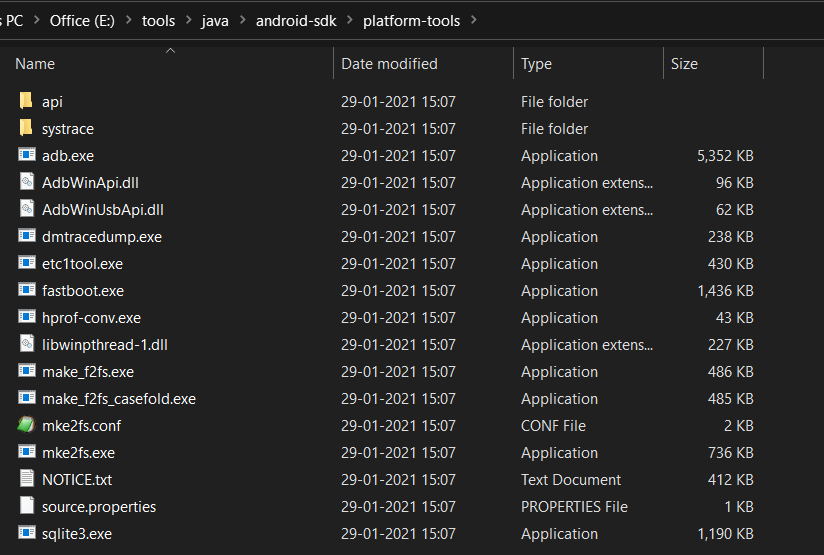
In this step, we will install the Android Command Line Tools on Windows 10. Create the directory android-sdk at your preferred location and extract the content of the downloaded SDK Tools zip to this directory. Make sure that the extracted content is available within the android-sdk directory created by us as shown in Fig 3.
Step 3 — Install Platform Tools
In this step, we will install the Android Platform Tools on Windows 10. Follow the same steps similar to Android SDK Tools to install Android Platform Tools using the download link as shown in Fig 4, Fig 5, and Fig 6.
Step 4 — Configure Environment Variable
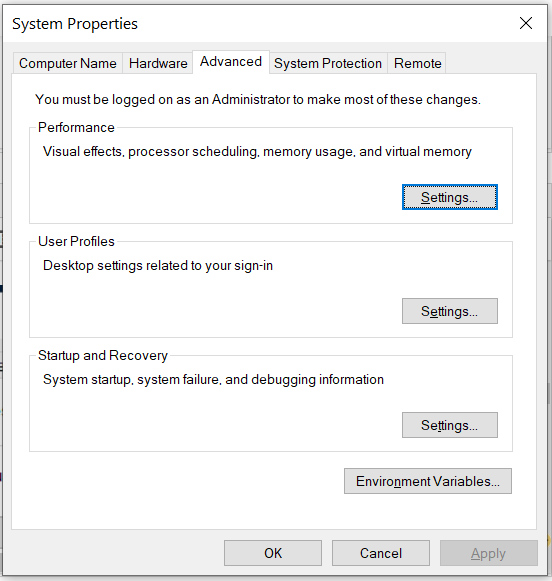
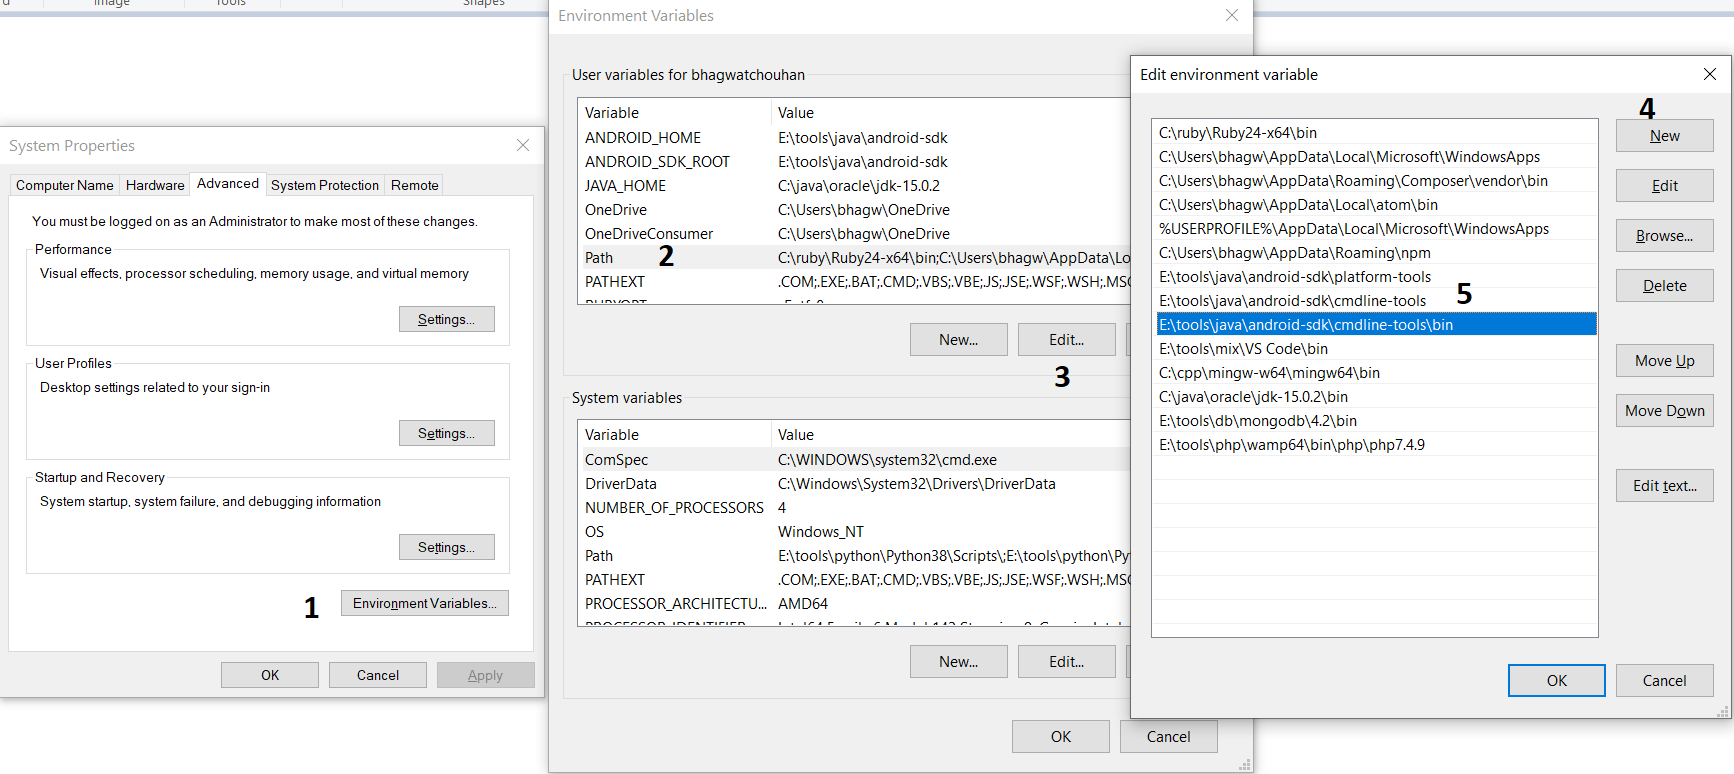
Right-click the My Computer or This PC on the desktop and click the Properties Option. Now click the Advanced system settings. It will show the System Properties dialog having Advanced Tab options as shown in Fig 7.
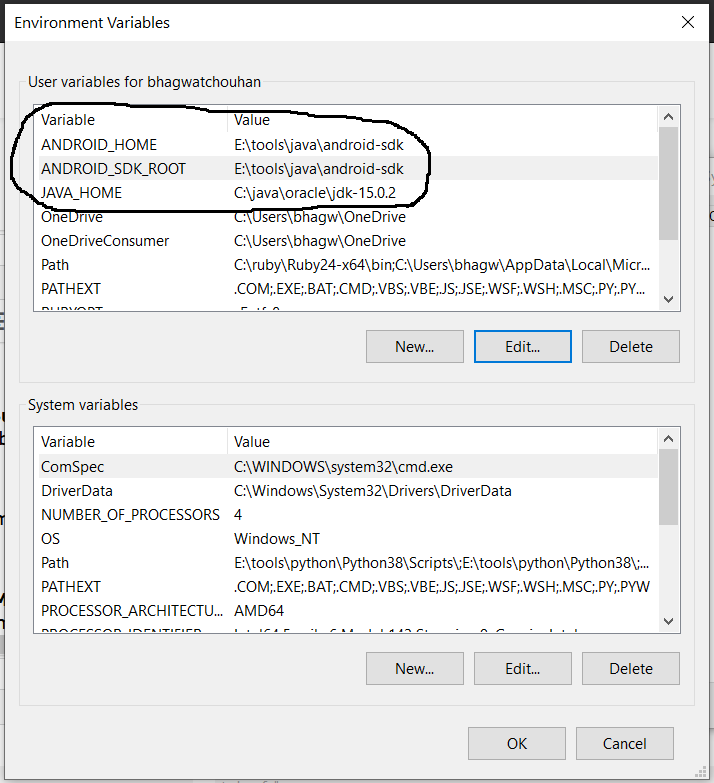
Click the Environment Variables Button and click the New Button in the first section. Set the Variable Name field to ANDROID_HOME and Variable Value to the android-sdk directory created by us in the previous step.
Similarly, also configure the environment variable ANDROID_SDK_ROOT to the android-sdk directory.
Also , make sure that the JAVA_HOME environment variable is set to the JDK installation directory. It must not end with the bin as we do with the system path variable.
Step 5 — Configure Commands
In previous steps, we have downloaded and extracted the Command Line Tools and Platform Tools to the android-sdk directory. Both the tools provide several command-line utilities which we need to run by going to the appropriate directory having the executable files.
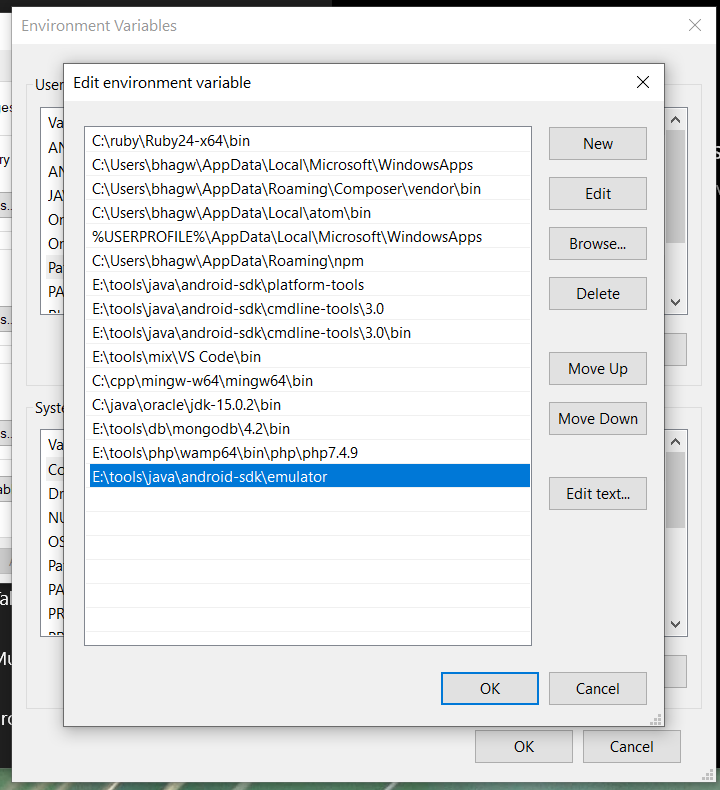
We can make these commands available at the system level without going to these directories by adding the path to tools, tools\bin, and platform-tools to the system path as shown in Fig 9. Make sure that these executables do not break other commands having the same name before adding these paths to the PATH environment variable.
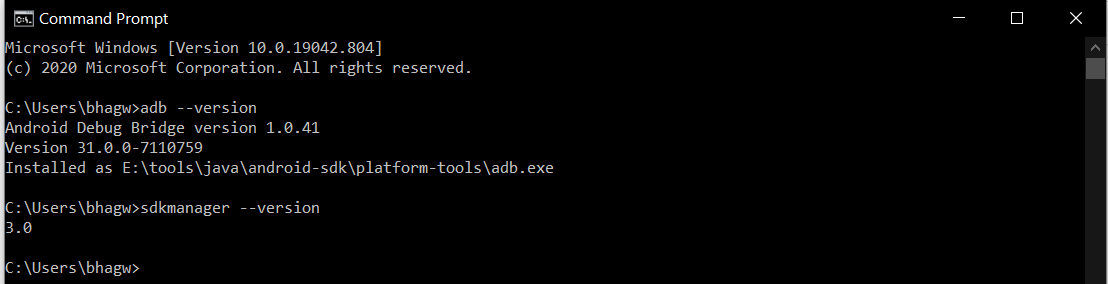
Now open the Command Prompt and check the ADB and SDK Manager versions as shown in Fig 10. You might be required to restart the system to apply the environment variables set by us.
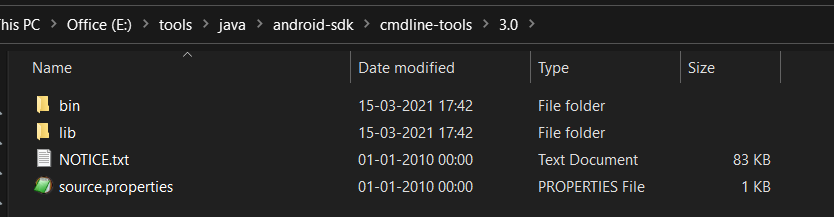
We can see that the ADB command works well and shows the version details, but the sdkmanager shows an error — «error: could not determine sdk root. error: either specify it explicitly with —sdk_root= or move this package into its expected location: \cmdline-tools\latest\» since it expects the Command Line Tools in a version-specific directory. Now open the source.properties file from the cmdline-tools directory to check the version. It will show the version details as shown below.
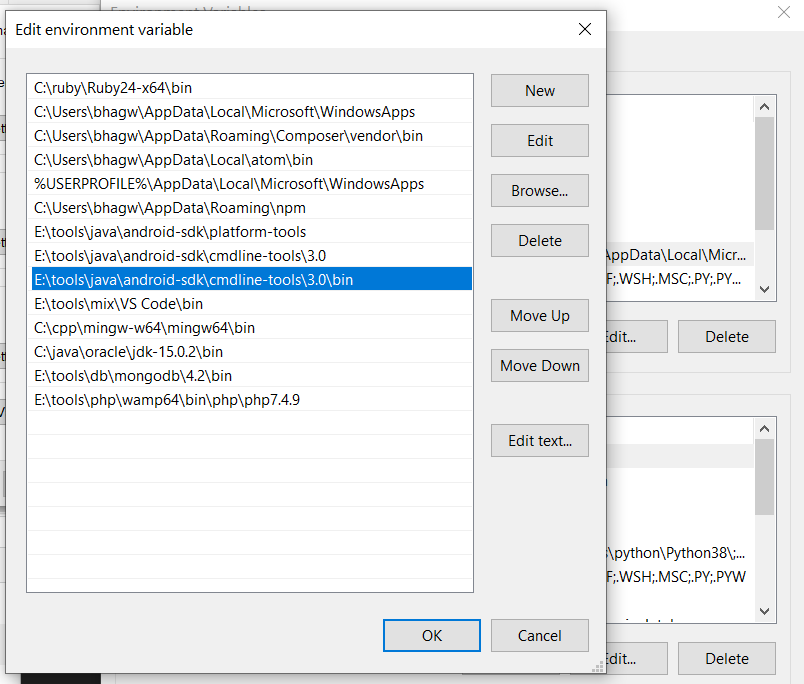
Now move all the files to the directory cmdline-tools/3.0 as shown in Fig 10.
Also, update the system path as shown in Fig 11.
Now close and open the Command Prompt. Also, check the ADB and SDK Manager versions as shown in Fig 12.
Step 6 — Using the SDK Manager
List — We can list the installed and available packages and images using the list command as shown below.
Install Platform — Use the below-mentioned command to install the Android 10 (API level 30) using the SDK manager.
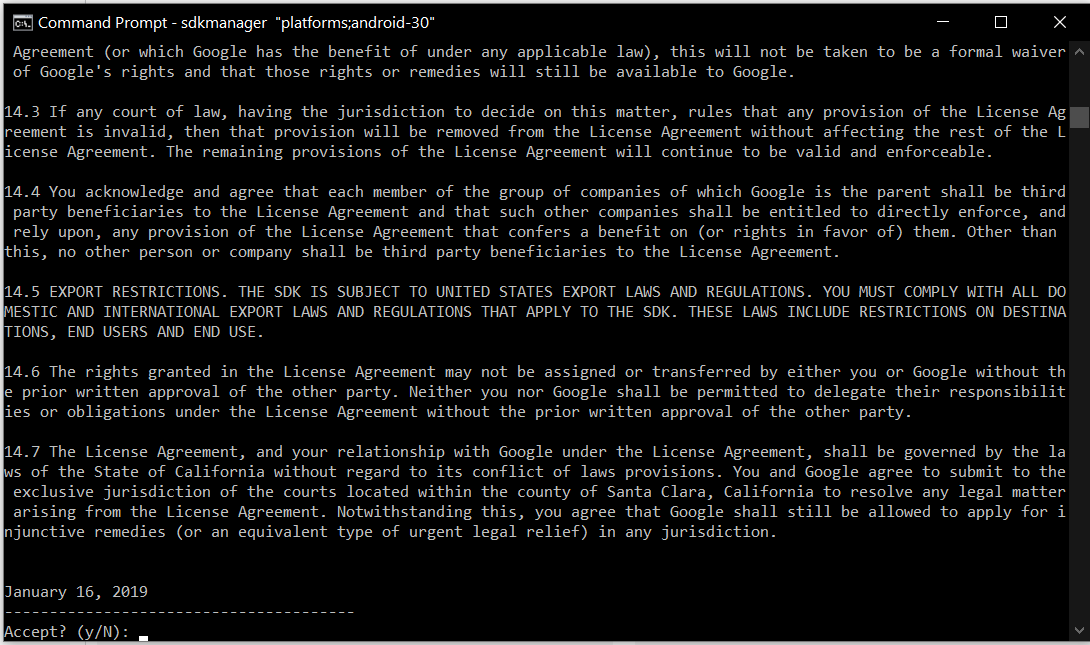
It will ask to accept the terms and conditions as shown in Fig 13. Enter y and hit Enter Key to accept the terms and conditions. This command creates the directory platforms within android-sdk and installs the package android-30 having all the required files to run the emulator for Android 10.
If we again check the installed packages, the list command shows the installed options as shown below.
Update SDK Manager — Update the SDK manager using the below-mentioned command.
Add System Image — We can add system images from available images shown by the list command using the SDK manager as shown below. We are adding the most recent default 64-bit system image.
Accept the License Agreement to complete the download.
There are several projects which need Google Play Services. We need system images specific to Google Play Services as shown below.
Accept the License Agreement to complete the download.
Install Emulator — We need to install the emulator before creating the AVD using SDK Manager.
Accept the License Agreement to complete the download.
Install Build Tools — Install the most recent build tool listed by the list command.
Step 7 — Using the Emulator and AVD Manager
Create Android Emulator — Create the emulator using the system image downloaded in the previous step as shown below. Replace with the actual name preferred by you.
The above commands ask a bunch of questions to configure the AVD if we choose the custom hardware profile option. We have excluded the details of these options from this tutorial since these configuration details depend on the actual needs. After completing all the configurations, it creates the AVD using the name provided by us while configuring it.
Similarly, we can also install the AVD of older versions as shown below.
List Android Emulators — Now go to the tools directory on the command line and check the installed platform as shown below.
Notes: Add Emulator to the system path as shown in Fig 14.
Close and re-open the Command Prompt to check the AVDs created by us in the previous steps.
It will list all the AVDs installed by us.
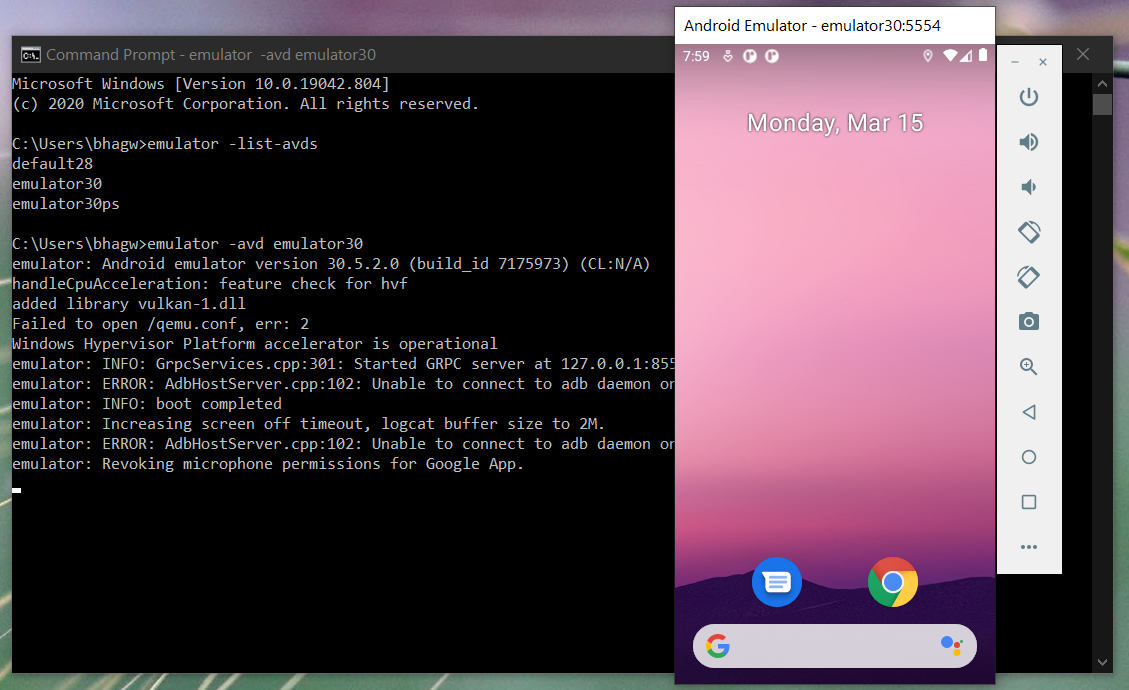
Run Emulator — We can run the emulator created by us as shown below.
The emulator will take some time to completely launch the AVD. The final results should look similar to Fig 15.
Delete Emulator — We can also delete an existing emulator as shown below.
Summary
This tutorial provided all the steps required to install Android Platform Tools and Android SDK Manager on Windows 10. It also provided the steps required to create and launch the AVDs using the Emulator.
Источник


