- Полный список
- Полный список
- Преобразования
- Сохранение и возврат состояния
- 11.1C: Applying clipping to a Canvas object
- What you should already KNOW
- What you will LEARN
- What you will DO
- App overview
- Task 1. Create an app that demonstrates clipping regions
- 1.1 Create the ClippingExample project
- 1.2 Add convenience variables for the ClippedView class
- 1.3 Add constructors for the ClippedView class
- 1.4 Understand the drawing algorithm
- 1.5 Add a helper method to draw clipped rectangles
- 1.6 Override the onDraw() method
- Solution code
- Summary
- Related concepts
Полный список
Обычно нам для рисования доступна вся канва. Но бывают случаи, когда надо нарисовать объект так, чтобы прорисовалась только какая-то его часть, а остальное – нет.
Из жизни можно провести аналогию с двумя бумажными листами. Кладем один лист на стол. А во втором вырезаем отверстие нужной нам формы и кладем второй лист поверх на первый. Далее полностью закрашиваем второй лист краской и убираем его. В итоге получаем на первом листе нужную нам форму ровно закрашенную.
Вот что-то подобное делает clip. Он на канве определяет область, где рисование будет работать. А в остальных местах ничего рисоваться не будет.
Project name: P1481_CanvasClip
Build Target: Android 2.3.3
Application name: CanvasClip
Package name: ru.startandroid.develop.p1481canvasclip
Create Activity: MainActivity
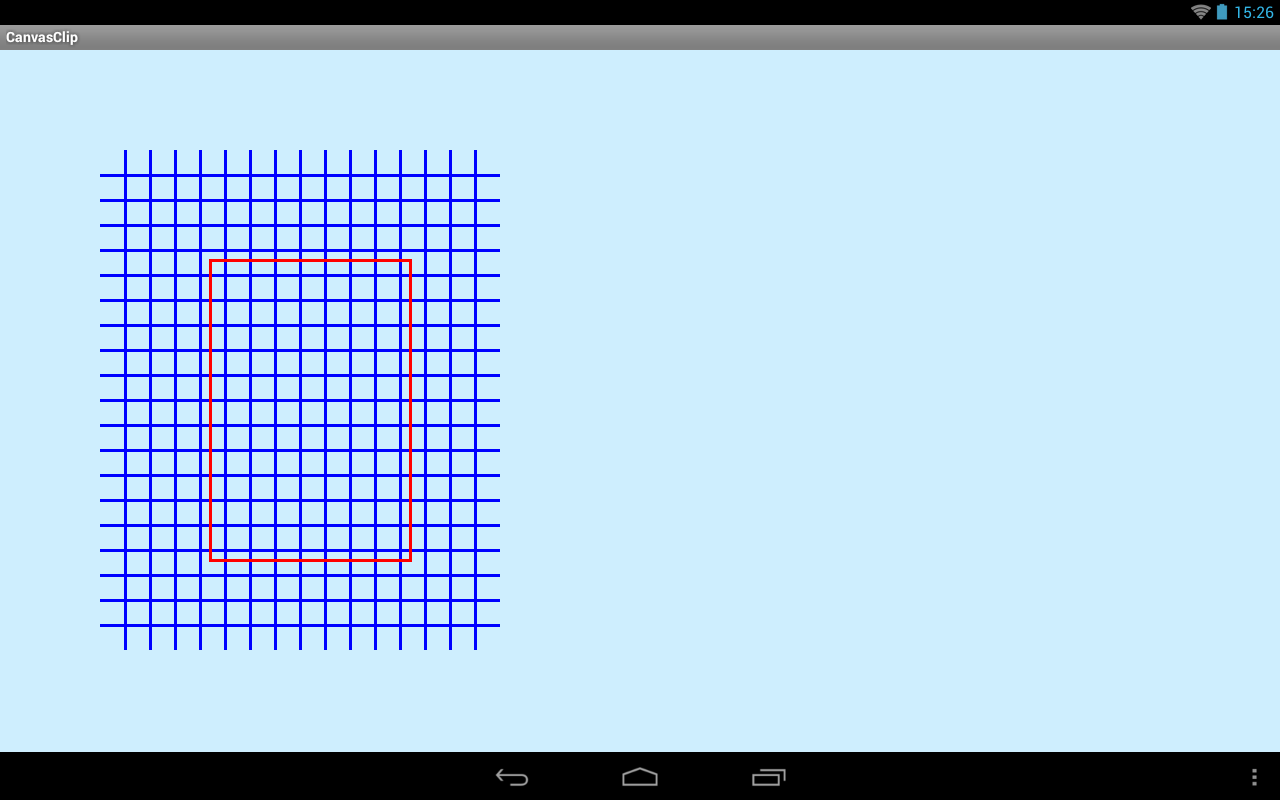
Изменим пример так, чтобы красный прямоугольник ограничивал область рисования на канве.
Мы снова выводим синие линии и красный прямоугольник. Затем смещаемся вправо и вместо рисования красного прямоугольника мы методом clipRect говорим канве, что теперь рисование доступно только в этой области. И рисуем синие линии.

Видим, что справа линии нарисовались только в области rect, т.к. мы задали это методом clipRect.
Разумеется, clip-область будет работать только для последующих рисований. Все, что было нарисовано до задания этой области, остается как было.
При задании clip-области мы можем использовать несколько прямоугольников. Для добавления прямоугольников используется эта версия метода: clipRect(Rect rect, Region.Op op). Здесь используются режимы взаимодействия областей, которые мы подробно рассмотрели в прошлом уроке про регионы.
Посмотрим на примере. Перепишем класс DrawView:
При использовании UNION, области прямоугольников объединились в одну область и она стала clip-областью.

Чтобы убрать clip-область, можно использовать метод restore. Все те механизмы сохранения/восстановления канвы, что мы рассмотрели в Уроке 146 относятся не только к матрице, но и к clip.
Я в этом уроке использовал объекты Rect. Но у канвы существуют и другие версии метода задания clip-области. Можно использовать RectF, Region и Path.
Присоединяйтесь к нам в Telegram:
— в канале StartAndroid публикуются ссылки на новые статьи с сайта startandroid.ru и интересные материалы с хабра, medium.com и т.п.
— в чатах решаем возникающие вопросы и проблемы по различным темам: Android, Kotlin, RxJava, Dagger, Тестирование
— ну и если просто хочется поговорить с коллегами по разработке, то есть чат Флудильня
— новый чат Performance для обсуждения проблем производительности и для ваших пожеланий по содержанию курса по этой теме
Источник
Полный список
— используем матрицу канвы для преобразований
Канва имеет свою матрицу, которая будет срабатывать для любого объекта, который вы собираетесь нарисовать. Методы настройки этой матрицы нам уже известны из Урока 144:
— translate (перемещение)
— scale (изменение размера)
— rotate (поворот)
— skew (наклон)
У канвы эти методы являются pre-методами. Т.е. помещают преобразование в начало матрицы, сохраняя остальные.
Рассмотрим это на примере.
Преобразования
Project name: P1461_CanvasTransform
Build Target: Android 2.3.3
Application name: CanvasTransform
Package name: ru.startandroid.develop.p1461canvastransform
Create Activity: MainActivity
Рисуем черным цветом path с прямоугольником. Затем настраиваем матрицу на поворот на 30 градусов относительно точки (0,0) (т.к. не указана иная) и на перемещение на 500 вправо. Т.к. используем методы pre, то сначала будет перемещение, потом поворот. Преобразуем path и выводим синим цветом.
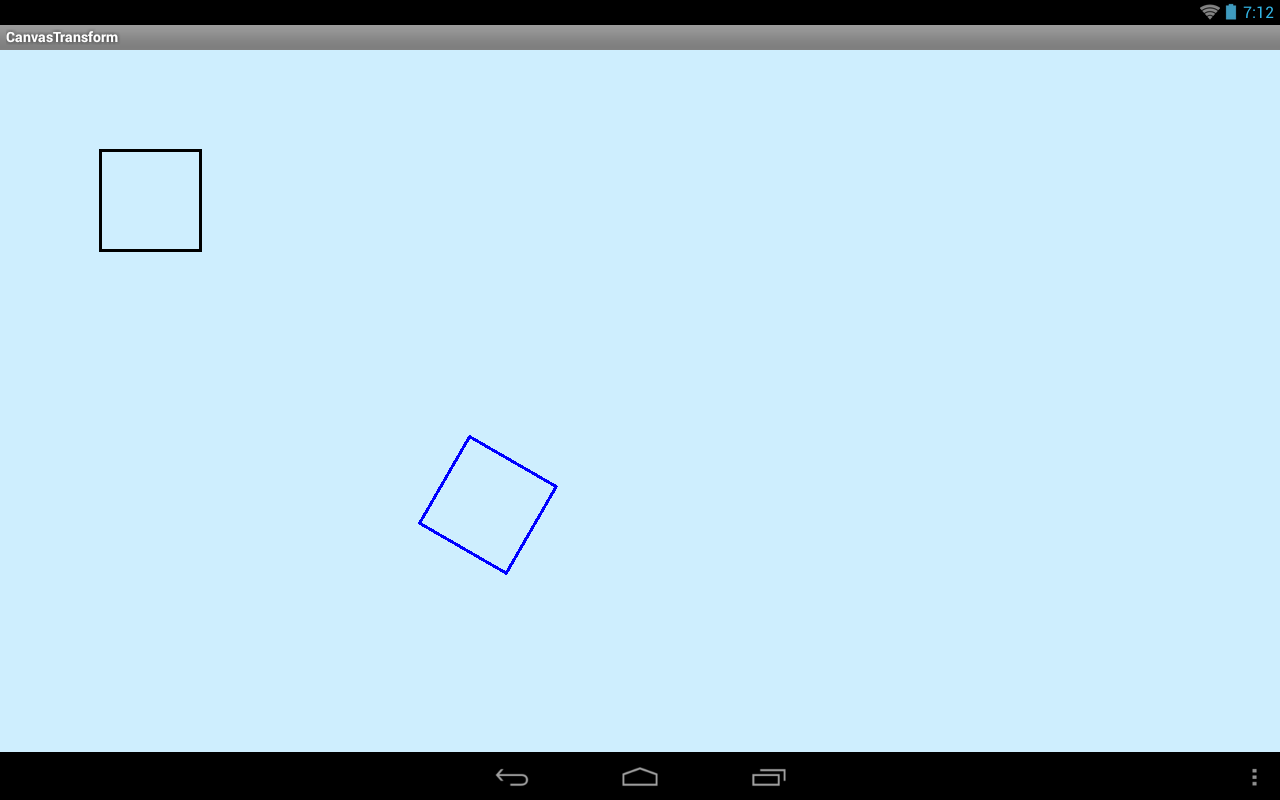
Попробуем сделать то же самое, с помощью канвы.
Сначала выводим прямоугольник rectf черным цветом. Затем настраиваем матрицу канвы. Задаем те же преобразования, в том же порядке. Т.к. эти методы являются аналогами pre-методов, то сначала выполнится перемещение, затем поворот.
Матрица канвы настроена, теперь все объекты, которые мы будем рисовать на канве, будут преобразованы согласно ее матрице. Нарисуем тот же прямоугольник rectf зеленым цветом.
Заметьте, что мы никак не преобразуем rectf. Он остается с теми же координатами. Канва сама преобразует его при рисовании.

Зеленый прямоугольник находится там же, где в прошлый раз был синий. Т.е. преобразования с помощью отдельной матрицы идентичны преобразованиям матрицы канвы.
Сохранение и возврат состояния
Мы можем запоминать состояние матрицы канвы и потом восстанавливать его.
Рассмотрим это на примерах. Перепишем DrawView:
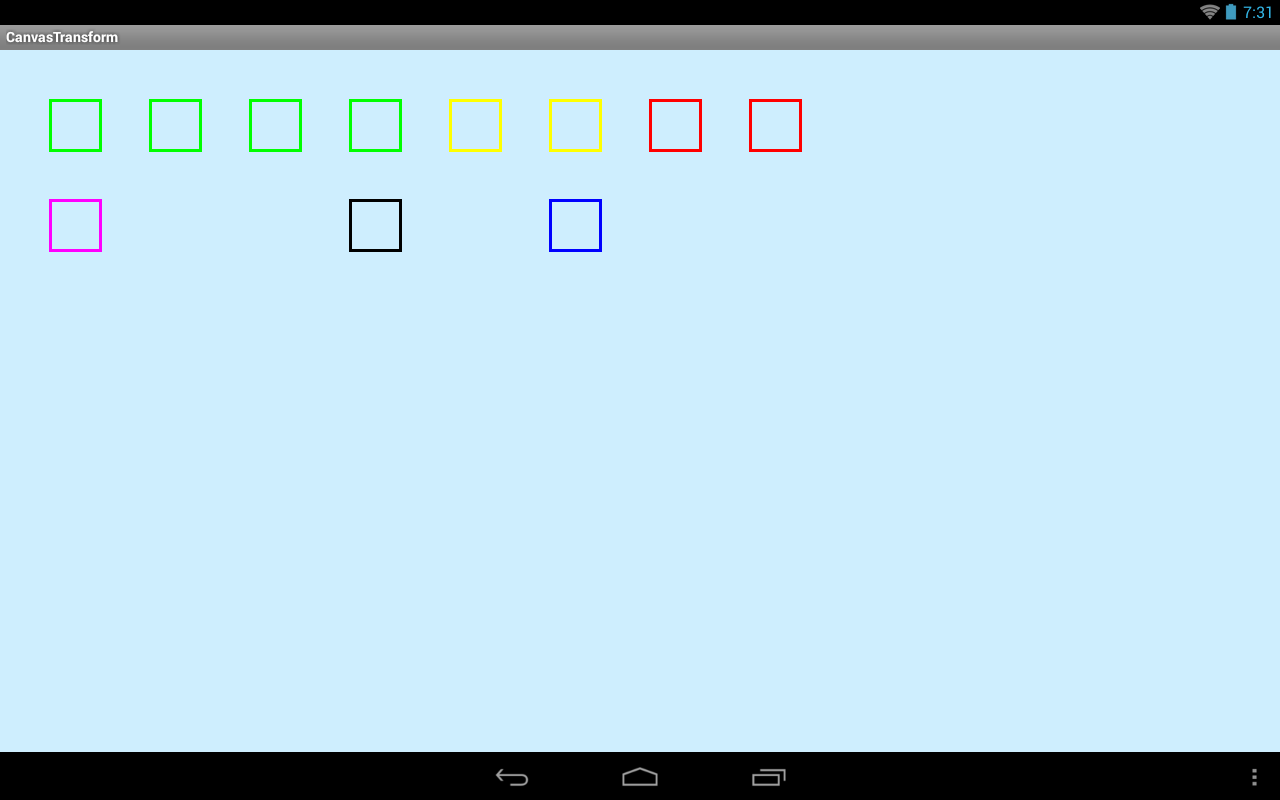
Нарисуем пару квадратов, первый — зеленым цветом, а второй — синим.
Без всяких преобразований они выглядят так:

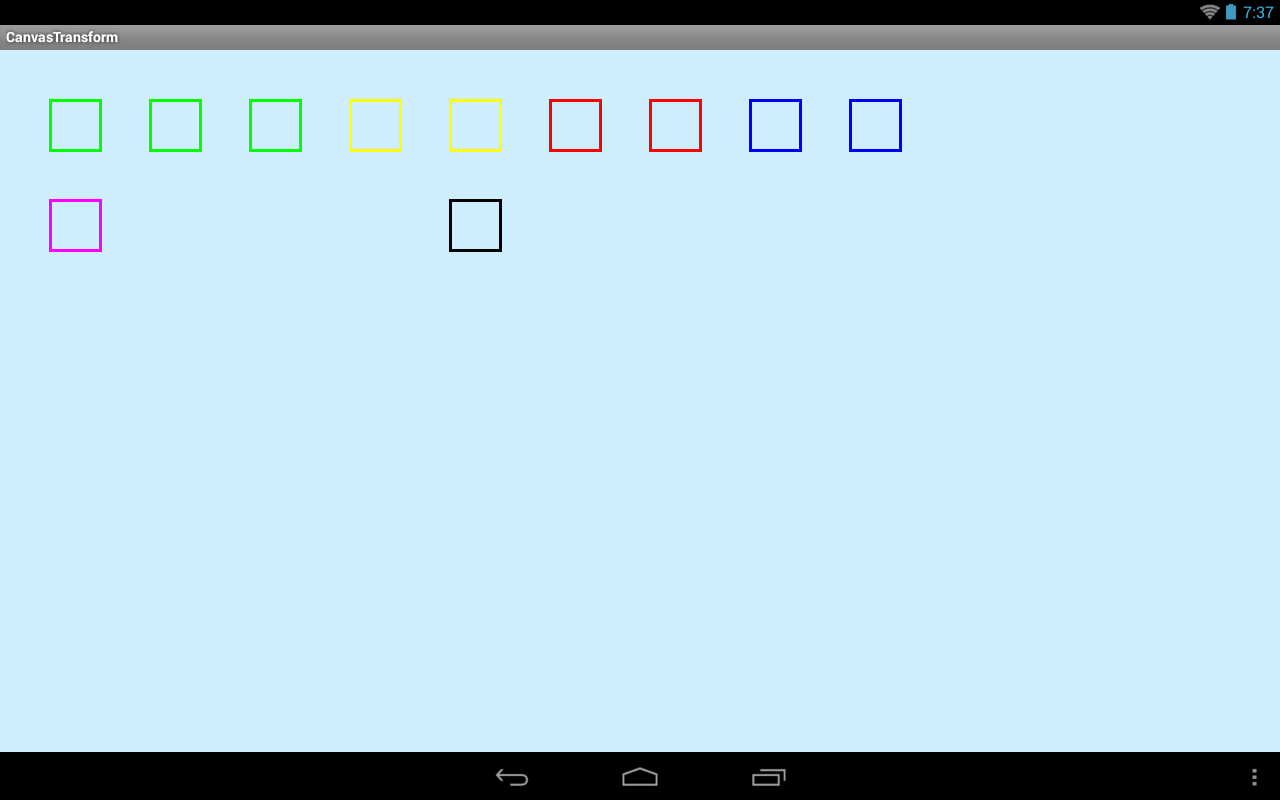
Несколько раз настраиваем перемещение на 100 вправо и каждый раз рисуем первый квадрат зеленым цветом. Затем сбрасываем матрицу канвы методом restore в изначальное состояние. И рисуем второй квадрат синим цветом.

Видим, что первый (зеленый) квадрат рисовался со смещением согласно настройкам канвы, а метод restore все эти настройки преобразования сбросил и второй (синий) квадрат был нарисован без преобразований.
Можно настроить канву так, что метод restore будет сбрасывать ее настройки не в изначальное, а в промежуточное, сохраненное нами, состояние.
Снова несколько раз настраиваем перемещение на 100 вправо и каждый раз рисуем первый квадрат зеленым цветом. Затем для канвы выполняем метод save. Он запомнит текущие настройки матрицы. Далее еще пару раз перемещаем вправо на 100 и рисуем первый квадрат, но уже красным цветом, чтобы визуально отличить вывод до и после сохранения канвы.
Затем выполняем метод restore, который сбросит канву в состояние, которые было сохранено методом save. И рисуем второй квадрат синим цветом.

Видим, что второй (синий) квадрат нарисован с тем состоянием канвы, которое было сохранено методом save. Метод restore вернул нас к нему из текущего состояния.
Сохранение методом save не затирает предыдущее сохраненное состояние. Т.е. вы можете несколько раз вызывать save и все эти состояния будут хранится в некоем стеке. А методом restore состояния из этого стека вытаскивать.
Мы несколько раз применяем перемещение на 100, рисуя первый квадрат. При этом периодически сохраняем состояние матрицы методом save, при этом меняя цвет для более удобного визуального восприятия.
Далее, мы несколько раз вызываем метод restore, который возвращает канву в сохраненные ранее состояния и рисуем второй квадрат. В итоге мы приходим к изначальному состоянию канвы.
Метод save возвращает нам int значение. Это значение мы можем передать в метод restoreToCount и матрица вернется к указанному состоянию, минуя остальные.
Мы запоминаем состояние в самом начале и сохраняем значение метода save в переменную initSave. Далее мы выполняем перемещения, несколько раз сохраняем канву, и один раз пишем значение сохранения в needSave.
Затем мы возвращаемся к сохраненным состояниям, используя метод restoreToCount и переменные initSave и needSave.
В прошлом примере мы методом restore перебирали все сохраненные состояния. А здесь метод restoreToCount позволил нам вернуться сразу к необходимому состоянию.
И напоследок еще три метода канвы
setMatrix(Matrix matrix) – меняет матрицу канвы на указанную матрицу
getMatrix() – позволяет получить копию матрицы канвы
concat(Matrix matrix) – добавляем в начало текущей матрицы преобразования из указанной матрицы
На следующем уроке:
Присоединяйтесь к нам в Telegram:
— в канале StartAndroid публикуются ссылки на новые статьи с сайта startandroid.ru и интересные материалы с хабра, medium.com и т.п.
— в чатах решаем возникающие вопросы и проблемы по различным темам: Android, Kotlin, RxJava, Dagger, Тестирование
— ну и если просто хочется поговорить с коллегами по разработке, то есть чат Флудильня
— новый чат Performance для обсуждения проблем производительности и для ваших пожеланий по содержанию курса по этой теме
Источник
11.1C: Applying clipping to a Canvas object
Contents:
For the purpose of this practical, clipping is a method for defining regions of an image, canvas, or bitmap that are selectively drawn or not drawn onto the screen. One purpose of clipping is to reduce overdraw . You can also use clipping to create interesting effects in user interface design and animation.
For example, when you draw a stack of overlapping cards as shown below, instead of fully drawing each card, it is usually more efficient to only draw the visible portions. «Usually», because clipping operations also have a cost. 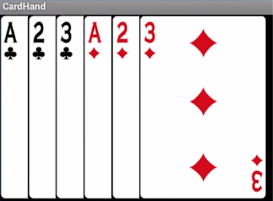
You do this by specifying a clipping region for each card. For example in the diagram below, when a clipping rectangle is applied to an image, only the portion inside that rectangle is displayed. The clipping region is commonly a rectangle, but it can be any shape or combination of shapes. You can also specify whether you want the region inside the clipping region included or excluded. The screenshot below shows an example. When a clipping rectangle is applied to an image, only the portion inside that rectangle is displayed. 
What you should already KNOW
You should be able to:
- Create apps with Android Studio and run them on a physical or virtual mobile device.
- Add event handlers to views.
- Create a custom View .
- Create and draw on a Canvas .
- Create a Bitmap and associate it with a View ; create a Canvas for a Bitmap ; create and customize a Paint object for styling; draw on the canvas and refresh the display.
- Create a custom View , override onDraw() and onSizeChanged() .
What you will LEARN
You will learn how to:
- Apply different kinds of clipping to a canvas.
- How to save and restore drawing states of a canvas.
What you will DO
- Create an app that draws clipped shapes on the screen.
App overview
The ClippingExample app demonstrates how you can use and combine shapes to specify which portions of a canvas are displayed in a view. 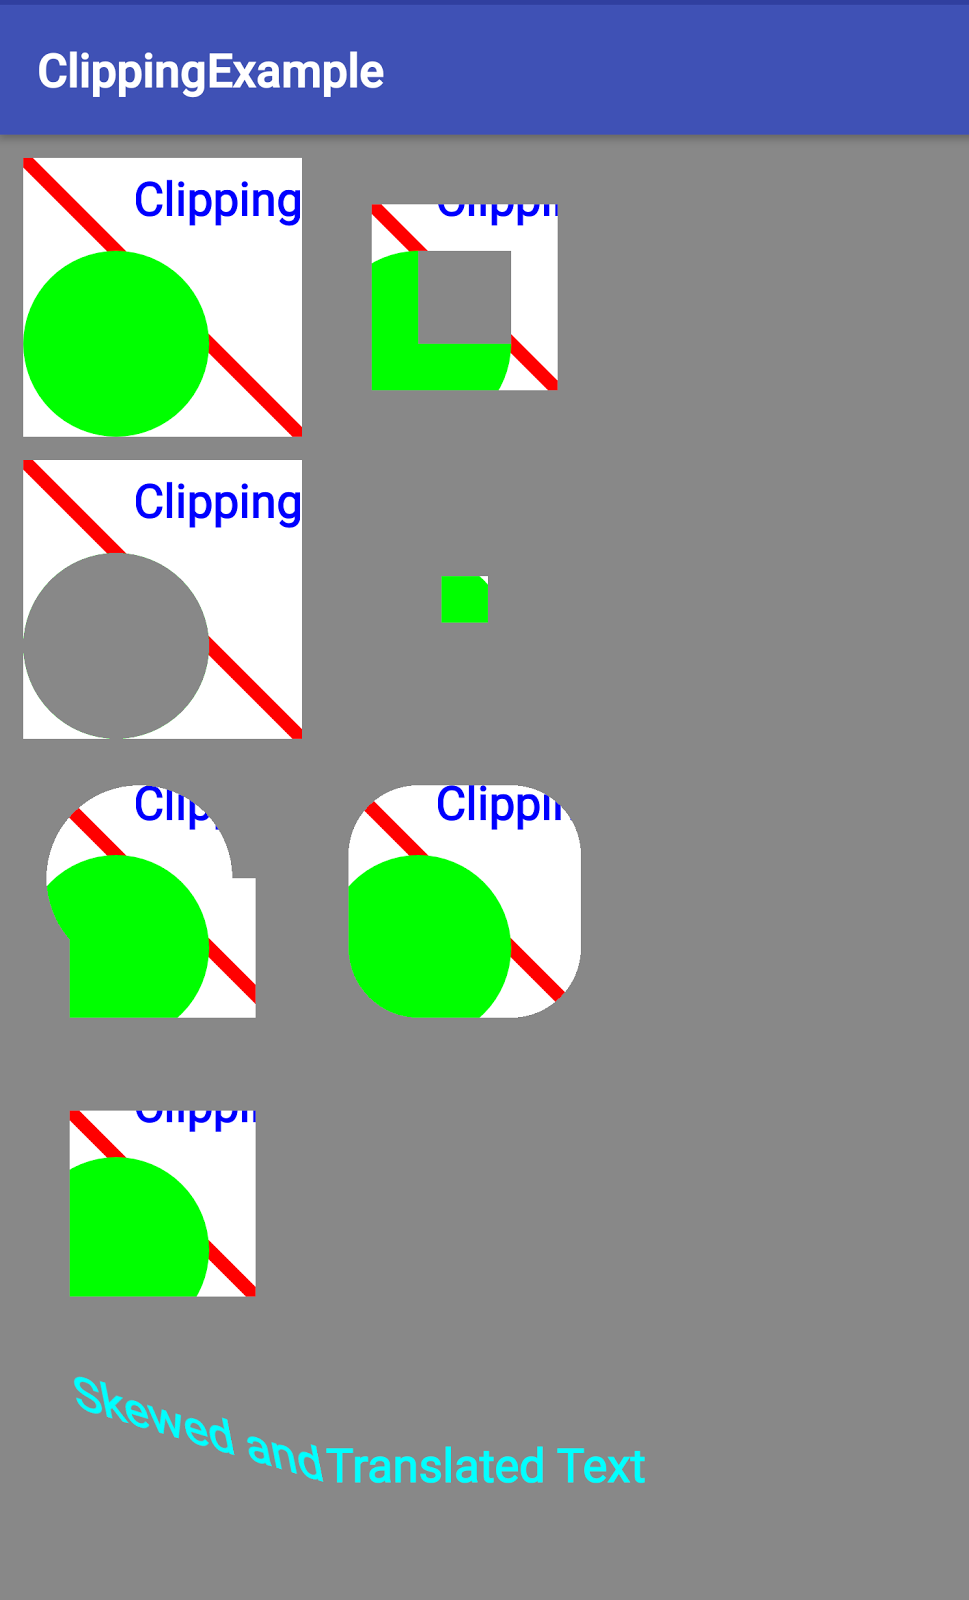
Task 1. Create an app that demonstrates clipping regions
1.1 Create the ClippingExample project
- Create the ClippingExample app with the Empty Activity template. Uncheck Generate layout file as you don’t need it.
- In the MainActivity class, in the onCreate() method, set the content view to a new instance of ClippedView .
- Create a new class for a custom view called ClippedView which extends View . The rest of the work will all be inside ClippedView .
1.2 Add convenience variables for the ClippedView class
- Define member variables mPaint and mPath in the ClippedView class.
For the app to look correct on smaller screens, define dimensions for the smaller screen in the default dimens.xml file.
Create a values-sw480dp folder and define values for the larger screens in dimens.xml in the values-sw480dp folder. (Note: If the empty folder does not show up in Android Studio, manually add a resource file to the ClippingExample/app/src/main/res/values-sw480dp directory. This makes the folder show in your Project pane.)
In ClippedView , add convenience member variables for dimensions, so that you only have to fetch the resources once.
In ClippedView , add convenience member variables for row and column coordinates so that you only have to calculate them once.
1.3 Add constructors for the ClippedView class
Add a constructor that initializes the Paint and Path objects for the canvas.
Note that the Paint.Align property specifies which side of the text to align to the origin (not which side of the origin the text goes, or where in the region it is aligned!). Aligning the right side of the text to the origin places it on the left of the origin.
Run your app to make sure the code is correct. You should see the name of the app and a white screen.
1.4 Understand the drawing algorithm
In onDraw() , you define seven different clipped rectangles as shown in the app screenshot below. The rectangles are all drawn the same way; the only difference is their defined clipping regions.
The algorithm used to draw the rectangles works as shown in the screenshot and explanation below. In summary, drawing a series of rectangles by moving the origin of the Canvas . (1) Translate Canvas . (2) Draw rectangle. (3) Restore Canvas and Origin . 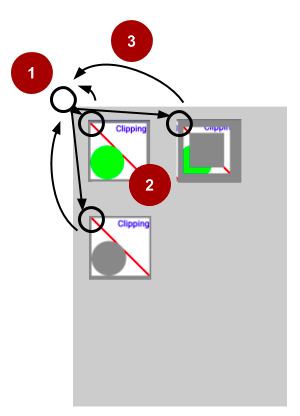 Canvas . (1) Translate Canvas . (2) Draw rectangle. (3) Restore Canvas and Origin . » title=» Drawing a series of rectangles by moving the origin of the Canvas . (1) Translate Canvas . (2) Draw rectangle. (3) Restore Canvas and Origin . «>
- Fill the Canvas with the gray background color.
- Save the current state of the Canvas so you can reset to that initial state.
- Translate the Origin of the canvas to the location where you want to draw the next rectangle. That is, instead of calculating where the next rectangle and all the other shapes need to be drawn, you move the Canvas origin, that is, its coordinate system, and then draw the shapes at the same location in the translated coordinate system. This is simpler and slightly more efficient.
- Apply clipping shapes and paths.
- Draw the rectangle.
- Restore the state of the Canvas .
- GOTO Step 2 and repeat until all rectangles are drawn.
1.5 Add a helper method to draw clipped rectangles
The app draws the rectangle below seven times, first with no clipping, then six time with various clipping paths applied. 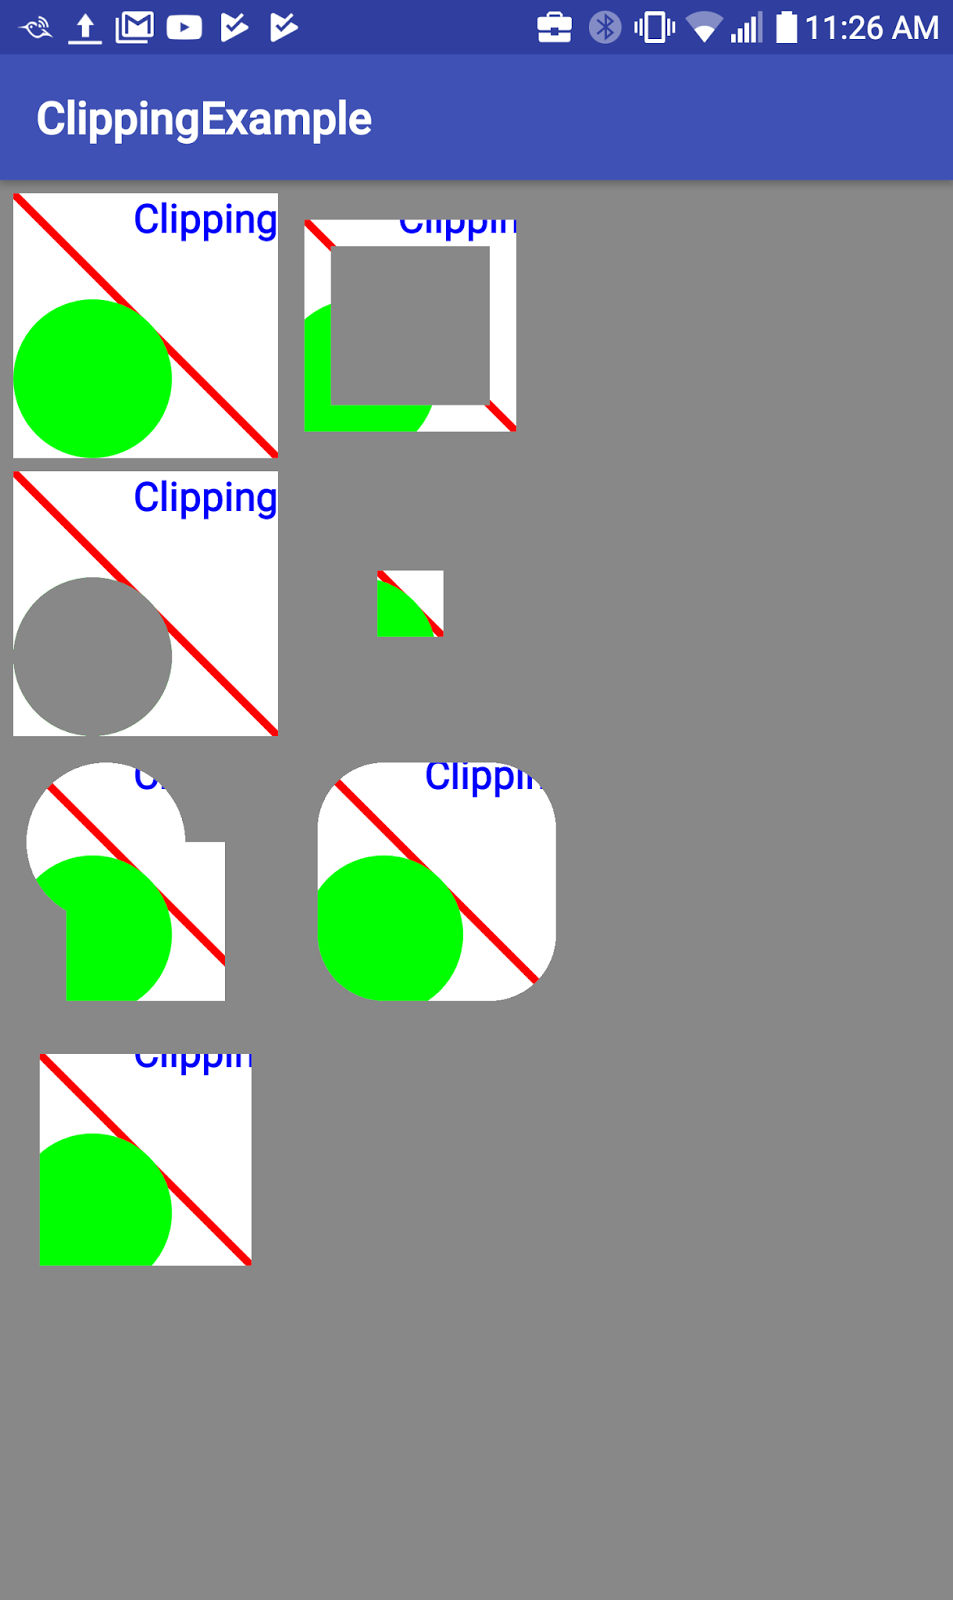
The drawClippedRectangle() method factors out the code for drawing one rectangle.
- Create a drawClippedRectangle() method that takes a Canvas canvas argument.
Apply a clipping rectangle that constraints to drawing only the square to the canvas .
The Canvas.clipRect(left, top, right, bottom) method reduces the region of the screen that future draw operations can write to. It sets the clipping boundaries ( clipBounds ) to be the spatial intersection of the current clipping rectangle and the rectangle specified. There are lot of variants of the clipRect() method that accept different forms for regions and allow different operations on the clipping rectangle.
Fill the canvas with white color. Because of the clipping rectangle, only the region defined by the clipping rectangle is filled, creating a white rectangle.
After you paste the code, create a string resource «Clipping» to get rid of the error for R.string.clipping in the last line.
1.6 Override the onDraw() method
In the onDraw() method you apply various combinations of clipping regions to achieve graphical effects and learn how you can combine clipping regions to create any shape you need.
When you use View classes provided by the Android system, the system clips views for you to minimize overdraw. When you use custom View classes and override the onDraw() method, clipping what you draw becomes your responsibility.
Create the onDraw() method, if it is not already present as a code stub.
Next, add code to draw the first rectangle, which has no additional clipping.
In onDraw() , fill the canvas with gray color.
Save the drawing state of the canvas .
Context maintains a stack of drawing states. Each state includes the currently applied transformations and clipping regions. Undoing a transformation by reversing it is error-prone, as well as chaining too many transformations relative to each other. Translation is straightforward to reverse, but if you also stretch, rotate, or custom deform, it gets complex quickly. Instead, you save the state of the canvas, apply your transformations, draw, and then restore the previous state.
Next, add code to draw the second rectangle, which uses the difference between two clipping rectangles to create a picture frame effect.
Use the code below which does the following:
- Save the canvas.
- Translate the origin of the canvas into open space to the right of the first rectangle.
- Apply two clipping rectangles. The DIFFERENCE operator subtracts the second rectangle from the first one.
- Call the drawClippedRectangle() method to draw the modified canvas.
- Restore the canvas state.
- Run your app.Next, add code to draw the third rectangle, which uses a circular clipping region created from a circular path.
Here is the code:
Next, add code to draw the intersection of two clipping rectangles.
Here is the code:
Next, combine shapes and draw any path to define a clipping region.
Here is the code:
Next, add a rounded rectangle which is a commonly used clipping shape:
Here is the code:
Next, clip the outside around the rectangle.
Here is the code:
Finally, draw and transform text. ![]()
In the previous steps you used the translate transform to move the origin of the canvas. You can apply transformations to any shape, including text, before you draw it, as shown in the following example.
Solution code
Android Studio project: ClippingExample
Summary
- The Context of an activity maintains a state that preserves transformations and clipping regions for the Canvas .
- Use canvas.save() and canvas.restore() to draw and return to the original state of your canvas.
- To draw multiple shapes on a canvas, you can either calculate their location, or you can move (translate) the origin of your drawing surface. The latter can make it easier to create utility methods for repeated draw sequences.
- Clipping regions can be any shape, combination of shapes or path.
- You can add, subtract, and intersect clipping regions to get exactly the region you need.
- You can apply transformations to text.
Related concepts
The related concept documentation is in The Canvas class.
Источник


