- Как изменить цвет линии в EditText
- Как изменить цвет линии в EditText
- Programmer Think
- Android Custom EditText Cursor and Underline Colors
- 1. First impression: native EditText
- 2. Custom cursor color
- 3. EditText after background cancellation
- 4. Custom Subject Modification Underline
- 6. Customize underscores when inheriting Activity
- 7. Postscript
Как изменить цвет линии в EditText
Я создаю EditText в моем XML-файле макета
Но я хочу изменить цветную линию в EditText от Holo до (например) красного цвета. Как это можно сделать?

Это лучший инструмент, который вы можете использовать для всех просмотров и его БЕСПЛАТНО благодаря @ Jérôme Van Der Linden .
Android Holo Colors Generator позволяет вам легко создавать компоненты Android, такие как EdiText или spinner с вашими собственными цветами для вашего приложения Android. Он будет генерировать все необходимые девять активов патчей плюс связанные с ними XML-графики и стили, которые вы можете скопировать прямо в свой проект.
Это изображение помещено в фон EditText

ОБНОВИТЬ
Для API 21 или выше вы можете использовать android:backgroundTint
Мне не нравятся предыдущие ответы. Лучшее решение – использовать:
Android: backgroundTint для EditText работает только на API21 + . Из-за этого мы должны использовать библиотеку поддержки и AppCompatEditText .
Примечание: мы должны использовать app: backgroundTint вместо android: backgroundTint.
Вы также можете быстро изменить цвет подчеркивания EditText, изменив цвет фона EditText следующим образом:
Чтобы изменить цвет подчеркивания Edittext:
Если вы хотите, чтобы все приложение делилось этим стилем, вы можете сделать следующий путь.
(1) перейти к файлу styles.xml. Ваш AppTheme, который наследует родителя Theme.AppCompat.Light.DarkActionBar (в моем случае), будет основным родителем всех файлов стиля в вашем приложении. Измените его имя на «AppBaseTheme». Сделайте другой стиль под ним, который имеет имя AppTheme и наследует от AppBaseTheme, который вы только что отредактировали. Он будет выглядеть следующим образом:
Затем измените «colorAccent» на любой цвет, который вы хотите на цвет линии EditText.
(2) Если у вас есть папки с другими значениями с style.xml, этот шаг очень важен. Поскольку этот файл наследуется от вашего предыдущего родительского xml-файла. Например, у меня есть значения-19 / styles.xml. Это специально для Kitkat и выше. Измените родительский элемент на AppBaseTheme и убедитесь, что вы избавились от «colorAccent», чтобы он не переопределял цвет родителя. Также вам нужно сохранить элементы, характерные для версии 19. Тогда это будет выглядеть так.
Цвет линии определяется с помощью свойства фона EditText . Чтобы изменить его, вы должны изменить android:background в файле макета.
Следует отметить, что этот стиль достигается за счет использования 9-патча. Если вы посмотрите в SDK, вы увидите, что фон EditText – это изображение:

Чтобы изменить его, вы можете открыть его в программе обработки изображений и покрасить его в нужный цвет. Сохраните его как bg_edit_text.9.png а затем поместите его в папку с выделением. Теперь вы можете применить его в качестве фона для вашего EditText например:
Фон виджета зависит от уровня API .
АЛЬТЕРНАТИВА 1
Вы можете предоставить собственное изображение на свой фон EditText
Ваше изображение должно выглядеть примерно так. Это даст вам желаемый эффект.

АЛЬТЕРНАТИВА 2
Установите этот xml в свой фоновый атрибут EditText .
Это будет иметь одинаковый внешний вид вашего EditText для каждого API.
Если вам нужна плоская линия, вы можете сделать это легко с помощью xml. Вот пример xml:
Замените фигуру селектором, если вы хотите предоставить различную ширину и цвет для сфокусированного edittext.
Используйте этот метод .. и измените его в соответствии с именами имени ur. Этот код отлично работает.
Я думаю, что лучший способ – по теме:
Используйте свойство android: background для этого edittext. Передайте изображение с возможностью рисования на него. Например,
Лучшим подходом является использование AppCompatEditText с атрибутом backgroundTint пространства имен app . т.е.
Когда мы используем android:backgroundTint он будет работать только в API21 или более, но app:backgroundTint работает на всех уровнях API, которые делает ваше приложение.
** это один из дел с видом **
Попробуйте сделать следующий путь: он преобразует нижний цвет текста EditText, когда он используется как свойство фона.
Источник
Как изменить цвет линии в EditText
Я создаю EditText в моем файле макета XML
Но я хочу изменить цветовую линию в EditText с Holo на (например) красный. Как это можно сделать?
Это лучший инструмент, который вы можете использовать для всех видов, и БЕСПЛАТНО благодаря @ Jérôme Van Der Linden .
Генератор цветов Holo для Android позволяет вам легко создавать компоненты Android, такие как EditText или прядильщик, с вашими собственными цветами для вашего приложения Android. Он сгенерирует все необходимые девять патчей, а также соответствующие XML-элементы и стили, которые вы можете скопировать прямо в ваш проект.
ОБНОВЛЕНИЕ 1
Срок действия этого домена истек, но проект с открытым исходным кодом вы можете найти здесь
это изображение на заднем плане EditText

ОБНОВЛЕНИЕ 2
Для API 21 или выше, вы можете использовать android:backgroundTint
Обновление 3 Теперь у нас с поддержкой спины AppCompatEditText
Примечание: нам нужно использовать app: backgroundTint вместо android: backgroundTint
Мне не нравятся предыдущие ответы. Лучшее решение — использовать:
android:backgroundTint для EditText работ только по API21 + . Из-за этого мы должны использовать библиотеку поддержки и AppCompatEditText .
Примечание: мы должны использовать app:backgroundTint вместо android:backgroundTint
Версия для AndroidX
Вы также можете быстро изменить цвет подчеркивания EditText, подкрасив фон EditText следующим образом:
для API ниже 21, вы можете использовать атрибут темы в EditText приведенном ниже коде в файл стиля
использовать этот стиль в EditText качестве
Программно вы можете попробовать:
я думаю, что лучший способ по теме:
Чтобы изменить цвет подчеркивания Edittext:
Если вы хотите, чтобы все приложение разделяло этот стиль, вы можете сделать это следующим образом.
(1) перейти в файл styles.xml. Ваш AppTheme, который наследует родителя Theme.AppCompat.Light.DarkActionBar (в моем случае), будет базовым родителем всех файлов стилей в вашем приложении. Измените его имя на «AppBaseTheme». Создайте еще один стиль под названием AppTheme, который наследует только что отредактированный AppBaseTheme. Это будет выглядеть следующим образом:
Затем измените «colorAccent» на тот цвет, который вы хотите, чтобы ваш цвет линии EditText был.
Источник
Programmer Think
Where programmers share thinking
Android Custom EditText Cursor and Underline Colors
Posted by jmabbate on Sat, 29 Jun 2019 00:39:43 +0200
Recently, when I was writing some little Demo review basics, when I used EditText, I suddenly found that I hardly noticed the color of its cursor and underline before, so I spent a lot of time and read many blogs. Now I will summarize and share the harvest.
1. First impression: native EditText
We need to modify the native EditText, first of all, of course, we need to understand its true face. Create a new project in Android Studio that lets MainActivity inherit from AppCompatActivity (why do we do this, let’s talk about it later), and then place an EditText in the layout of MainActivity:
Operating the project, careful observation can see that the cursor and underline are pink. Now let’s go step by step and change its cursor color first. 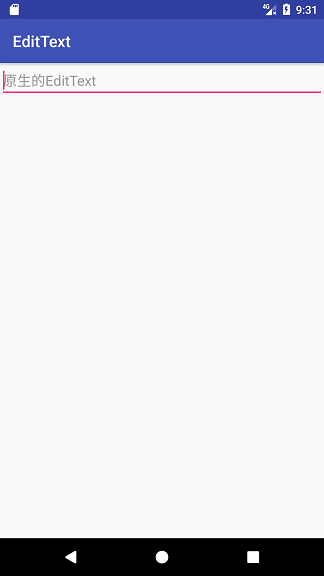
2. Custom cursor color
EditText has an attribute: android:textCursorDrawable, which is used to set the cursor style. In order to deepen our understanding, we will do a small experiment first: set textCursorDrawable to @null, which means removing the default style of the system, but we all remember that the attribute of the hidden cursor is android:cursorVisible, so what will the time scale look like? You can set different colors for text (android:textColor) and prompt text (android:textColorHint property), and when running, you will find that the color of the cursor is the same as that of the text.
After understanding the role of android:textCursorDrawable, we can create a cursor_color.xml file under the drawable resource folder, which reads as follows
The color of the cursor is light blue with a width of 2 dp. Place a new EditText under the native EditText:
The operation results are as follows: 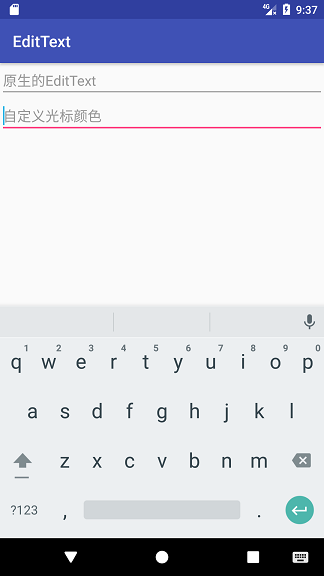
3. EditText after background cancellation
In Section 2, we set the attribute android:textCursorDrawable to «@null» and find that the cursor style will change to the same color as the text. What if we set the background of the entire EditText to «@null»? We can add an EditText and add the attribute android:background=»@null»:

As you can see, although the cursor’s style has not changed, the underline has disappeared, but in addition, EditText’s margin has disappeared. If the cursor is not blinking, it looks like a TextView at first glance.
This is how some custom EditText underscoring tutorials work on the Web. First remove the background, and then add a horizontal line below. This operation is not impossible, but in order to be beautiful, it is necessary to reset the spacing value.
4. Custom Subject Modification Underline
Remember when we created MainActivity, we inherited AppCompatActivity? Here’s the answer. This is done to use the Material Design style in the appcompat-v7 package. For example, we can create a new MyEditText style in the Styles.xml file:
Did you see? The colour Accent inside is the cockroach pink. In order to understand these three colors, I specially found a picture: 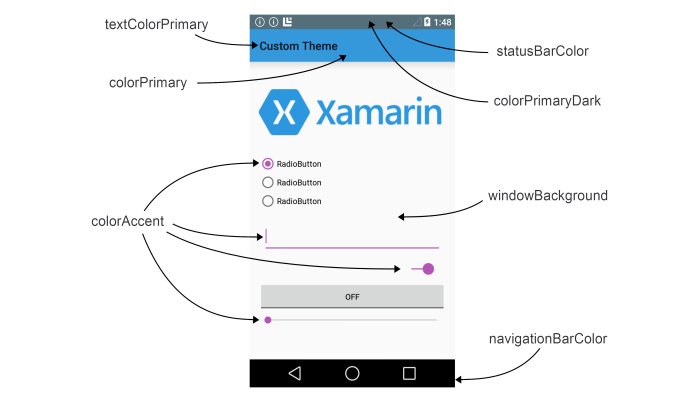
6. Customize underscores when inheriting Activity
Previous custom underlining operations are based on the premise of inheriting AppCompat Activity. If you change to Activity and then run on Android phones below 5.0, the effect is as follows: 
The Material Design style disappeared and the color of the cursor could be changed, but the color of the underline could not be changed. So we have to think of other ways.
EditText is an input box, which we can understand as follows: Underline is nothing more than adding a line to the lower border of the input box. This can be done with layer-list (layer) in Android. Create two new XML files: et_underline_unselected.xml and et_underline_selected.xml. The former is the background when EditText was selected, and the latter is the background when it was not selected:
et_underline_unselected.xml
I think of layer-list as a list of layers. Shape is an item in the list. Since we only need a horizontal line in the bottom border, we set it to a negative value except for the bottom margin of the list. There should be a little distance between the cursor and the underline, so set the inner margin below the shape to 4dp. Of course, the underline width is a little wider when selected.
Create a new Second Activity in the project, inherit from Activity, and then place two EditText s in the layout file. The background s are set to «@null» and the cursor is in our previous light blue.
Then set EditText’s listening events in the code
Note that all EditText s should be set to run first. The effect is as follows: 
The effect is that we implemented it, but then the code in Activity is too lengthy, so we can encapsulate the selected and unselected states into the state selector. Create a new et_underline_selector.xml file under the drawable folder:
android:state_focused indicates whether the control is focused. Then set android:background=»@drawable/et_underline_selector» in the layout file, and delete the focus listening code of Activity. Running, you can see the same effect.
7. Postscript
This is the end of the article, but I still have a lot to learn. Some of the knowledge in the article may be inadequate or wrong because of my personal understanding. Welcome to make corrections!
Because the code here is relatively simple, the project will not be uploaded, you start knocking, I believe there is no problem.
Источник


