- Android и кастомные шрифты или «Да здравствует API 26»
- Как было раньше. Краткий обзор
- view.xml
- CustomFontTextView.class
- Но все изменилось в API 26
- Change Toolbar Font-Family in Android.
- Customize toolbar font easily
- Change Font for TextView
- Change Font for Toolbar
- Add Custom Fonts to the resource folder
- Result
- Adobe Photoshop CC Advanced for Photography — John Academy
- Learn the advanced functions of Adobe Photoshop CC to create and enhance your images, photos, artwork, and other…
- Conclusion
- Using Custom and Downloadable Fonts in Android
- The Older way of using Fonts
- Using Custom Font in Android
- Downloadable Fonts
- Урок 5. Атрибут app:fontFamily. Использование Font-Awesome для отображения иконок
- Видео версия урока
- Работа с атрибутом fontFamily
- Добавление веса текста для первого TextView
- Добавление элементов, отображающих количество читателей и читаемых
- Добавление текстовой иконки местоположения
- Добавление папки font в проект
- Поиск иконки
Android и кастомные шрифты или «Да здравствует API 26»
Как было раньше. Краткий обзор
Если было много view где требовались нестандартные шрифты, то мы использовали что-то вроде такого:
view.xml
CustomFontTextView.class
И это я пропустил огромный кусок который отвечает за то, чтобы не писать каждый раз путь к шрифту, а указывать
Ну, или шли на гитхаб и в результате находили Calligraphy (7000 звезд!)
Ни для кого не секрет что этот подход содержал много минусов как в огромном количестве boilerplate кода, так и в том, чтобы сделать это эффективно и где-нибудь не утечь по памяти запрашивая каждый раз Typeface.
Но все изменилось в API 26
Похоже, гугл наконец-то сдался и решил отказаться от навязывания Roboto и сделал удобное подключение сторонних шрифтов, за что ему огромное спасибо.
Линк для тех, кто любит читать в оригинале.
Теперь подключение состоит всего из нескольких несложных шагов:
1. Создаем папку font в res
Resource type выбираем font

2. Перетаскиваем в новую папку все нужные нам в проекте шрифты
3. Создаем файл для семейства шрифтов.
Обратите внимание: я сразу добавил в пример то как должен выглядеть файл, если вы хотите поддерживать и более старые версии Андроида. (Начиная с 14). Если вам повезло и у вас таргет только на супер-новые девайсы, то ваш файл сократится в 2 раза
Ну а дальше остается только наслаждаться сборкой
Использование в TextView
Используем в стилях
И у вас больше не болит голова об эффективности 🙂
Источник
Change Toolbar Font-Family in Android.
Customize toolbar font easily


Nowadays In Android applications, we often have seen custom fonts throughout the application, as the custom font in detailing, the custom font in the toolbar, custom font everywhere in the application. Which makes UI more appropriate and appealing.
In this article, we will learn how we can customize the toolbar font, how to change the Toolbar font family with the help of a theme.
Change Font for TextView
Before directly jumping towards custom toolbar font, first, see how we can easily change the font family for TextView in Android.
We just need to add the font-family attribute in our TextView like the below code snippet.
Simply add an android:fontFamily attribute and it will do the magic. It’s so simple to change the font family for Textview
Change Font for Toolbar
Now, In Android, we often need to change the font-family for Toolbar as well to look more appealing UI for our end-users.
To do so we need to define the theme in our toolbar with app:theme attribute like the below code snippet.
Before that, we have to add the theme in our styles.xml file and we have to define font-family in that style like the below code snippet.
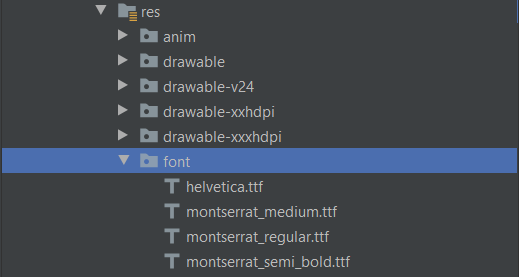
Add Custom Fonts to the resource folder
To add custom fonts we need to create a folder with the name “font” in the res directory like the below screenshot.
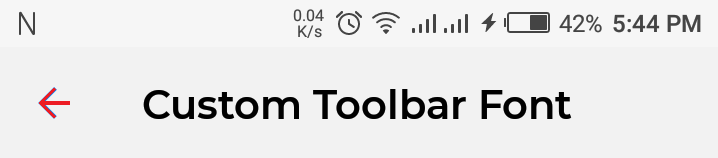
Result
Voila. We have achieved a custom font in our toolbar.
If you want to become a Professional Photographer then check it out this below link.
Adobe Photoshop CC Advanced for Photography — John Academy
Learn the advanced functions of Adobe Photoshop CC to create and enhance your images, photos, artwork, and other…
Conclusion
This article taught you how you can simply change your toolbar font with the help of a theme, also described how you can set the font for the Textview with just a single line.
I hope this article is helpful. If you think something is missing, have questions, or would like to offer any thoughts or suggestions, go ahead and leave a comment below. I’d appreciate the feedback.
I’ve written some other Android-related content, and if you liked what you read here, you’ll probably also enjoy these:
Источник
Using Custom and Downloadable Fonts in Android
At the Google I/O 2017, Android O or simple Android Oreo was launched and it came with a lot of cool features. One of the really interesting features for developers was the new way to apply fonts right in your XML files. Yeah, you heard it right. Now there is no need of writing some piece of code for using the fonts. Also, you can choose from any of the thousands of fonts on Google Fonts and use them in your app.
So, in this blog, you will understand how to use Custom and Downloadable Fonts in Android?
The Older way of using Fonts
Before we move forward to look for the new or the latest way of using the font, let’s revise the older way of using fonts. Before the release of Android O, fonts can be used in the following 2 ways :
- Using Typeface: One would typically need a custom view that extends the equivalent view were trying to apply a font to. In the custom view, one would create a Typeface and then call setTypeface (or a similar method, that, sets the typeface). One would also need to have the font file placed in the assets folder. The code in the custom view typically looks like:
- Calligraphy Library : You can use some existing libraries for various fonts used in Android. One of them is Calligraphy Library.
Using Custom Font in Android
To work with Custom Font, you need to install the latest version of Android Studio 3.x. This is important as some of the features are not supported on Android Studio 2.x — for example, the font resource directory. Once you are done with the installation of the latest version of Android Studio, create a project and add a text view in any of the activity(This is the text view on which we are going to apply custom font). Then follow the below steps :
- Add a font directory to your project: In the Android View, right click on the resfolder and go to New -> Android Resource Directory. Type fontas the name of the font and select fontas the resource type. Then click on Ok.
- Add the downloaded font to the font directory: Copy and Paste your font into res/font.I am using Pacifico font. You can get this font from FontSqirrel.
- Create a font-family XML file: You can create font families which contain a set of font files with their style and weight details. To create a new font family you need to create a new XML font resource. The benefit is that you can access it as a single unit instead of referencing individual font files for each style and weight. To create a font-family, right click on res/fontand choose New -> Font Resource File and give any name. In my case, I am using my_custom_font.xml.
Note: A really important thing to note is that we had to define attributes using both android and app namespaces. The app namespace is what ensures that the feature is backward compatible.
- Set the font in the XML: Now you can use the font-familyattribute to set the font in XML.
Below is the preview of the above code :
Downloadable Fonts
Now that we have seen how custom fonts work, let’s jump onto another novality — downloadable font . Android 8.0 (API level 26) and Android Support Library 26 introduce support for APIs to request fonts from a provider application instead of bundling files into APK or letting the APK download fonts. A font provider application retrieves fonts and caches them locally so that other apps can request and share fonts. How cool is that!
The feature is available on devices running Android API version 14 and higher through the Support Library 26.
Picture courtesy : Android Developer website

As you can see in the image above, apps using Downloadable Fonts make a FontRequest using the FontsContract API which retrieves the Typeface from the Font Provider. The Font Provider does not need to download fonts if it already exists in the Font Cache.
Benefits of downloadable fonts :
- Reduces the APK size
- Increase the app installation success rate
- Improves the overall system health as multiple APKs can share the same font through a provider. This saves users cellular data, phone memory, and disk space. In this model, the font is fetched over the network when needed.
In order to use the downloadable font in android studio, follow the below steps :
- If you want to use Android Studio to generate the required files, then you’ll need version 3.0+. Add the following (version 26+) to your module’s build.gradle:
- Select a text view in your app that you want to apply the font to and click on the fontFamily attribute under Attributes in the graphical layout

Select the “More Fonts…” at the bottom, which will open the dialog below.

- Make sure to have “ Create downloadable font” selected. This results in three files being downloaded — lato.xml, font_certs.xml and preloaded_fonts.xml.
This file contains the font attributes for loading a Typeface from the Google Fonts Provider Application.
The system uses these certificates to verify the font provider’s identity, to avoid getting fonts from an unknown source. If using the steps above, Android Studio should have automatically generated the string certificates for dev and prod in font_certs.xml below.
preloaded-fonts.xml
This file is referenced in the Android manifest which helps the framework pre-load fonts to avoid delays when the app is launched.
- Make sure this line is added to your app’s Manifest file, Android Studio should have done this automatically:
- Great, now you are ready to apply the fonts in XML!
All I had to do was set the font family in the app’s theme to get TextViews throughout the app to change to Lato, including parts that were bold or italicized. However, if you want to configure the weights, you can follow the same steps to get Lato Bold using Android Studio, and change the weight manually in lato_bold.xml that you can then apply in XML layouts:
That’s all about the custom and downloadable fonts in android. Hope you like the blog.
Источник
Урок 5. Атрибут app:fontFamily. Использование Font-Awesome для отображения иконок
Код начала урока:
Видео версия урока
В этом уроке нам необходимо привести внешний вид всех TextView на нашем макете в порядок, чтобы он соответствовал тому, что мы хотели сделать вначале.

Для этого нам необходимо:
- Применить стили, TextAppearance
- Добавить шрифт Awesome-font в проект.
Работа с атрибутом fontFamily
Помните, что в предыдущем уроке мы добавили с вами 3 стиля для текста:
В нашем приложении весь текст будет использовать стандартный Android шрифт. Круто, что мы уже добавили стили в наше приложение. Теперь нам достаточно добавить атрибут для указания шрифта в одном месте. Сделаем это, добавив атрибут sans-serif к нашему базовому стилю для текста Text .
Атрибут sans-serif указывается без префикса android , потому что он находится в пакете support library , позволяющей использовать виджеты и атрибуты новых версий Android на старых устройствах.
Этот атрибут указывает шрифт текста. В данном случае мы используем стандартный шрифт Roboto из AndroidSdk .
Наши изменения автоматически применятся к нашему layout , т.к. ссылки на стили остались те же самые.
В принципе, внешний вид не изменился, т.к. Android по умолчанию применяет этот шрифт. Мы сделали это в учебных целях.
Добавление веса текста для первого TextView
Теперь нам осталось изменить стиль для самого первого TextView . Видим, что он значительно больше по размеру текста и шрифт имеет больший вес. Вес шрифта можно задавать атрибутом «android:textStyle»= bold | italic | normal . Мы будем использовать значение bold .
Давайте создадим ещё один стиль TextView.Primary.Header . Из названия видим, что стиль наследуется от TextView.Primary и добавляет свои атрибуты. Аналогично поступим со стилем для этого текста, который назовём Text.Primary.Header .
Применим его в layout файле:
Посмотрим, что получилось:

То, что надо. Идём дальше.
Добавление элементов, отображающих количество читателей и читаемых
Нам необходимо добавить количество читателей и читаемых, как отображено на экране:

Вначале создадим для наших элементов отдельный стиль текста Text.Primary.Bold , в котором будем использовать атрибут android:textStyle = bold . А в стиле для элемента TextView.Primary.Bold будем просто включать в себя этот стиль для текста.
Затем нам необходимо определиться с вариантом добавления элементов на наш layout .
Есть два варианта для отображения текстов разных стилей(4 читателя), визуально которые кажутся одним TextView :
- Объединять элементы в один TextView . Изменять их стили в java коде, используя класс Spannable .
- Делать их разными TextView .
На начальном этапе использование Spannable повысит сложность, поэтому пока не будем использовать этот подход.
Мы создадим два новых TextView , которые расположим рядом с элементами following_text_view , followers_text_view .
Добавление текстовой иконки местоположения
Как вы уже поняли, иконку местоположения мы будем делать, используя TextView , применяя к нему шрифт, который поддерживает текстовые иконки.
Выглядит текстовая иконка, которую нам необходимо добавить, так:
Давайте пока вместо текста в TextView для этой иконки поставим букву i . Чуть ниже решим эту проблему.
После этих изменений наш layout выглядит следующим образом:

Теперь нам надо отобразить реальную иконку местоположения. Есть два варианта:
- Скачать готовую .png -картинку и использовать ImageView
- Использовать шрифт текста, который поддерживает иконки ( Font-Awesome , Ionicons и т.д.).
Второй вариант кажется намного более практичным (это вы увидите чуть позже). Давайте его и рассмотрим. Вариант с .png мы тоже рассмотрим, но не в этом уроке.
Добавление папки font в проект
Первое, что нам надо сделать это добавить в проект папку font , куда можно помещать новые шрифты, которые нам понадобятся. Для этого переходим в дерево проекта, нажимаем правой кнопкой по папке res , выбираем New->Android resource directory .

В появившемся окне необходимо ввести название папки и её тип. Вводим в поле Directory name значение font , в поле Resource type выбираем также значение font (если сперва выбрать тип, то поле с именем папки автоматически заполнится значением font ), поле Source set не меняем (должно быть значение main ). Выглядит это так.

Нажимаем OK . После этого в списке директорий должна появиться папка font .

Теперь нам осталось скачать файл шрифта Font-Awesome , который понадобится нам для отображения иконки местоположения. Для этого переходим на официальный сайт. Нажимаем на кнопку Download .

После этого выбираем вариант бесплатного скачивания и загружаем шрифт на компьютер.

Отлично, после этого открываем архив и копируем файл font-awesome-4.7.0 -> fonts->fontawesome-webfont.ttf в нашу директорию font в проекте. Только обязательно переименуйте его название (потому что Android Studio не разрешает использовать символ — в названии) на font_awesome
Это был последний шаг, теперь наш шрифт у нас в проекте. Выглядеть он должен следующим образом:

Поиск иконки
Возвращаемся на сайт за поиском необходимой нам иконки. Все иконки находятся здесь. Нужная нам иконка находится здесь:
Всё, что нам надо знать – это юникод-символ данной иконки. Давайте создадим текстовый ресурс в файле values/strings.xml .
Мы добавили ресурс fa_map_marker . Это и есть символ нашей иконки. Чтобы добавлять unicode символы необходимо ставить символ \u перед кодом.
Теперь давайте изменим стиль нашего TextView , который должен отображать нужный нам символ нужным шрифтом.
Создадим стиль TextIcon , который будет добавлять шрифт font_awesome .
Мы добавили стиль TextIcon , который наследуется от TextView.Secondary (потому что все иконки в нашем приложении будут такого же цвета и размера как TextSecondary ) и добавили свойство, в котором указали, что мы будем использовать font_awesome .
Теперь изменим атрибуты нашего TextView , который отвечает за отображение иконки местоположения. Давайте добавим стиль, который мы только что создали и ссылку на ресурс иконки.
Посмотрим результат на вкладке Preview :

Выглядит, как будто ничего не заработало. Но давайте теперь запустим приложение и посмотрим, что получилось.

Проблема с некоторыми шрифтами – они не отображаются в режиме Preview , однако на обычном устройстве с ними всё хорошо.
Единственное, что бросается в глаза – иконка расположена чуть выше текста Местоположение . Для того чтобы выровнять их давайте добавим свойство android:layout_alignBaseline=»@id/user_location_text_view» . Это свойство выравнивает элементы по линии текста. В нашем случае это и надо.
Видим, что теперь элементы выровнены:

Зачем столько проблем, если можно было использовать обычную .png картинку, не подключаю никаких шрифтов? Давайте перечислим преимущества font иконок перед .png :
- Вы можете менять размер, цвет font иконок, меняя атрибуты текста. В случае с .png вам надо использовать графический редактор и каждый раз изменять картинку.
- Текстовые иконки растягиваются в зависимости от плотности и разрешения экрана, не теряя при этом качества. Для .png нам надо создавать файлы для каждого разрешения экрана, что тоже занимает немало времени.
Источник


