- How to use the new Android coroutine viewModelScope in Clean Architecture
- Binding the ViewModel lifecycle to your Use Cases
- ViewModelScope
- Applying viewModelScope to clean architecture
- Domain — Functional Use Cases
- Either
- A “GetFriendsUseCase” in action
- Presentation layer
- The ViewModel
- Fragment
- Thanks
- Android Clean Architecture with Coroutines, Koin, and Retrofit.
- Presentation Layer:
- Core Layer:
- Data Layer:
- Android clean architecture coroutine
- About
- Архитектура и дизайн Android приложения (мой опыт)
- Disclaimer
- Проблема: зачем нам нужна архитектура?
- Цель архитектуры и дизайна
- Решение
- Пример
How to use the new Android coroutine viewModelScope in Clean Architecture
Binding the ViewModel lifecycle to your Use Cases

May 21, 2019 · 3 min read

Kotlin coroutines provide an API that enables you to write asynchronous code. With Kotlin coroutines, you can define a CoroutineScope which helps you to manage when your coroutines should run. Each asynchronous operation runs within a particular scope.
ViewModelScope
A ViewModelScope is defined for each ViewModel in your app. Any coroutine launched in this scope is automatically canceled if the ViewModel is cleared. Coroutines are useful here for when you have work that needs to be done only if the ViewModel is active. For example, if you are making a network call, you should scope the work to the ViewModel so that if the ViewModel is cleared, the work is canceled automatically to avoid consuming resources.
You can access the CoroutineScope of a ViewModel through the viewModelScope property of the ViewModel, as shown in the following example:
To have access to this extension, import the following dependency in your build.gradle file:
Applying viewModelScope to clean architecture
Domain — Functional Use Cases
A use case is an intention, in other words, something we want to do in our application, whose main responsibility is to orchestrate our domain logic and its connection with UI and Data layers .
Take a look at a UseCase abstraction which acts as a contract for all the use cases in my application:
By passing the CoroutineScope to the use case invocation we’re binding the ViewModel to the execution of the use case, hence, killing the activity will cancel any pending jobs avoiding memory leaks.
Either
Either is a way of representing one of two things, a success or a failure.
Either is referred as a disjoint function, which means that this structure is designed to hold either a Left or Right value but never both. It is a funcional programming monadic type not yet existent in the Kotlin Standard Library.
There is nothing in the semantics of the Either type that specifies one or the other sub type to represent an error or a success, respectively. In fact, Either is a general-purpose type for use whenever you need to deal with situations where the result can be of one of two possible types.
The Either implementation from Fernando Cejas is on point. The Generic Failure class I use is implemented here.
A “GetFriendsUseCase” in action
Pretty straight forward, uses a Repository to retrieve information and it either returns a List of users or a GetFriendsFailure in case something goes wrong.
Presentation layer
The ViewModel
When the fragment/activity calls loadData() it will make the use case execute and either handle a success or a failure, they all change the state to the appropriate sealed class instance so the observing view layer can change the UI accordingly.
Fragment
The Fragment triggers the ViewModel to execute the use case and change the UI to reflect the results.
The ViewModel and LiveData extensions can be found here
If your work isn’t tied to a particular screen and should continue even if the user navigates away, the view model scope isn’t what you should be using; you should be using something with a lifecycle that isn’t tied to the screen, this is pretty easy to do, just inject a coroutine scope that can live outside the lifecycle of the view model.
Thanks
I would love to know what do you think and if you do something in a different way. Also it would be awesome if you click the little clap icon and share the article so more people would benefit from it.
If you are interested in more tech related topics, please check my other articles, follow me on Twitter or check my GitHub projects.
Источник
Android Clean Architecture with Coroutines, Koin, and Retrofit.

Apr 24, 2020 · 6 min read
In this article, I will explain how to build an Android App using Clean Architecture. For that, I will focus on a specific use case: Get posts from the internet and display them in a recyclerView.
- Koin: As a dependency injection framework to provide object dependencies.
- Retrofit: For making network API calls.
- Kotlin coroutines: For making asynchronous calls.
I will use Kotlin to write the Application. If you are not familiar with clean architecture, please visit this link.
Here is the architecture of the project:

The Application will have three layers: presentation, core, and data.
The project looks like this in Android Studio:

Each lay e r will have a koin module where I will provide all object dependencies. Since we have three layers, I will create a presentationModule, coreModule, and a dataModule. I will initialize Koin with those modules in the App class.
Let’s start by adding dependencies. Add this to app/build.gradle.
In the Android Manifest.xml add internet Permissions:
Here is the content of the App class:
Presentation Layer:
This layer will follow the MVP pattern. I created an Activity in which I will display posts. The activity here represents the View in MVP. We will display posts in a recyclerView defined in the MainActivity. The Posts( PostItem) represent the Model in MVP. To show posts, I will need a Presenter. I set a contract between the MainActivity(View) and the Presenter. I called it PostContract.

I used composition to create the recyclerView adapter. I will not give all the details about recyclerView implementation since this is not the goal of this article. In this article, I will only talk about fetching posts using the Presenter and make them available for the view to display them. But, if you are curious about how I am showing them in the recycler view, please check the GitHub link of the project for more details. So, the package “list” defines the abstraction around a ListAdapter, and the post package is the actual implementation of that abstraction for PostListAdapter.
The MainActivity will be responsible for displaying posts. Here is the content activity_main.xml:
post_list is how recycler_view, which will contain the list of posts. We will also need to present a progress bar when fetching posts.
Here is the content of MainActivity.kt
As mentioned up, there is a contract between the PostPresenter and the MainActivity: PostContract. The MainActivity implements PostContract.View. I am injecting PostPresenter using Koin in line 3. After initializing the view in onCreate, the activity will ask the Presenter to get posts via the getPosts() method. Line 9, I attach the view(MainActivity) to PostPresenter, making the Presenter keep the reference to the MainActivity. Line 19, the setPost() method, will pass the list of posts to the PostAdapter to set posts in the recyclerView. The showProgres() method will show the ProgressBar and the hideProgress() method will hide the ProgressBar().
Here is the content of PostPresenter.kt
Line 16, I create a coroutine to get posts asynchronously using the method getPostAsync(). getPostAsync will use postInteractor to get posts. In case of success, postInteractor will return the list of Post that I will map to PostItems before passing them to the view. It is important to do the mapping because posts belong to the core layer; therefore, the view should not use them. The view can only receive Models defined in the contract. I will show the definition of PostContract in the domain(Core) layer.
If getPostAsync() returns an error, the message is still displayed in the view using the showMessage() method.
The presentationModule will provide dependencies in the presentation layer.
Core Layer:

This layer contains the business logic of the Application. This layer doesn’t depend on the Android platform. We will define the contract between the view and the Presenter here:
Post.kt defines a Post.
PostInteractor.kt defines the getPost use case.
PostInteractorImpl is the implementation of PostInteractor. PostInteractorImpl will need a PostRepository to get posts from the internet.
Here is the signature of the PostRepository.
getPost() returns a Result. Here I am using a sealed class Result for Success and Error.
Here is how I provide the PostInteractor in the coreModule class.
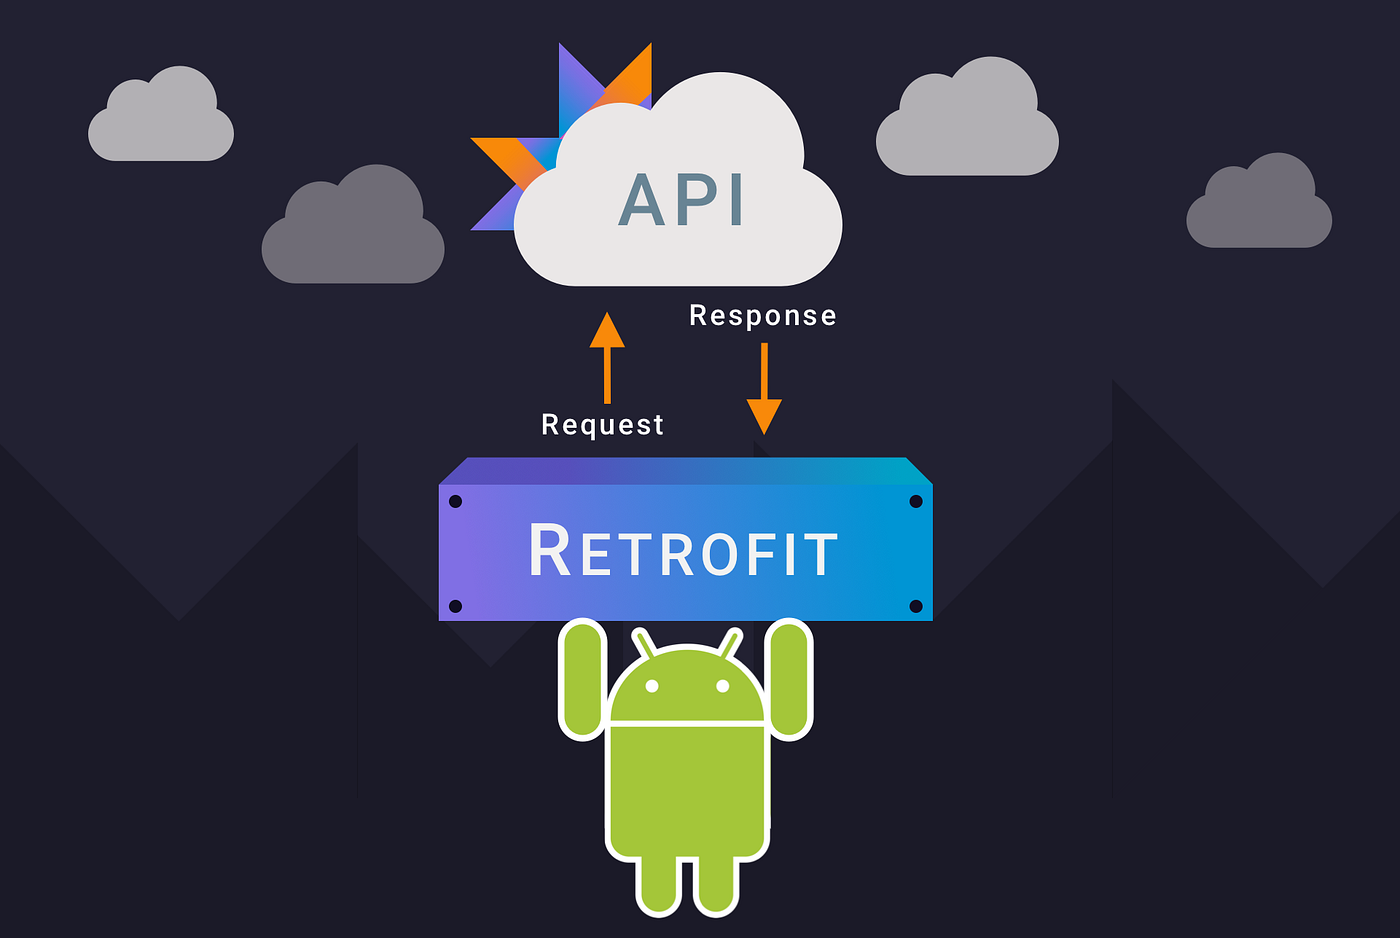
Data Layer:

This layer will be responsible for providing all the data needed by the domain(Core) layer.
Let’s say we are developing the App against a Stage environment but want to know also how it behaves on Prod. The class Environment will give us that flexibility. So, the Environment class represents that abstraction. So, if you have a Stage, Prod, and UAT environment, you will define three separate environments. The Environment class is pretty simple in our case here since it only takes one parameter, which is the base Url.
For this project, this is the environment object that will be provided by Koin:
We will create a ServiceFactory class that will provide a PostService. ServiceFactory uses retrofit to provide services. Here is the content of ServiceFactory:
Retrofit is a Type-safe HTTP client for Android. I use it in the ServiceFactory to make network calls. ServiceFactory takes as parameters:
- converterFactory : Can pass converter factory for Moshi, Gson, and more. Since I am going to use Moshi, the converterFactory is MoshiConverterFactory.
- callAdapterFactory : You can use Rx or Coroutines. In this case, we will use CoroutineCallAdapterFactory.
- Log Level: Let’s make this open to whoever provides ServiceFactory implementation to choose his Okhttp log level. I used HttpLoggingInterceptor.Level.BODY
- environment: The environment in which runs the App.
Koin will provide them.
NetworkServiceFactory is the implementation of ServiceFactory.
Here is an example of interceptor that can be pass to the ServiceFactory:
NetworkRequestHeader is a class defining headers to pass to each request.
When fetching posts, MoshiConverterFactory will convert the JSON response to a List of PostDAO. Here is the definition of PostDAO.
I left JSON annotations on purpose to show that PostDAO is a Moshi serializable object and also to emphasize that this object belongs to the data layer, and I will map it to a Post entity that has no dependencies on Moshi.
I created the mapToPost() extension function to map the PostDAO to Post entity.
Here is the signature of the PostService that will be provided by the NetworkServiceFactory. The getPostsAsync() method returns a Deferred because of CoroutineCallAdapterFactory.
ServiceProviderImpl needs ServiceFactory to provide PostService.
Here is the implementation of PostRepository:
Line 6, I apply the await() to get a list of PostDAO. Line 7, PostDAOs are mapped to Posts. Line 9, I return the Posts. If an error occurs, I return it in line 10.
Here is the content of the dataModule:
And here are the posts

If you liked the article, please clap it. Thanks !!
Источник
Android clean architecture coroutine
Kotlin Coroutines example with Android Architecture components and Clean Architecture
Simple app that shows how to architect an android app in a clean architecture with kotlin coroutines. It simply shows a list of photo that is fetched from unsplash api 
DataBinding Declaratively bind observable data to UI elements.
Lifecycle Create a UI that automatically responds to lifecycle events.
LiveData Build data objects that notify views when the underlying database changes.
ViewModel Store UI-related data that isn’t destroyed on app rotations. Easily schedule asynchronous tasks for optimal execution.
- Glide An image loading and caching library for Android focused on smooth scrolling.
Retrofit2 Type-safe HTTP client for Android and Java by Square, Inc.
OkHttp An HTTP+HTTP/2 client for Android and Java applications.
- Kotlin Coroutines Coroutines is a rich library for coroutines developed by JetBrains. It contains a number of high-level coroutine-enabled primitives that this guide covers, including launch, async and others.
- Koin A pragmatic lightweight dependency injection framework for Kotlin developers.
About
Example of Android app using Kotlin, Coroutines, CleanArchitecture, MVVM pattern, Retrofit
Источник
Архитектура и дизайн Android приложения (мой опыт)
Сегодня я хочу рассказать об архитектуре, которой я следую в своих Android приложениях. За основу я беру Clean Architecture, а в качестве инструментов использую Android Architecture Components (ViewModel, LiveData, LiveEvent) + Kotlin Coroutines. К статье прилагается код вымышленного примера, который доступен на GitHub.
Disclaimer
Проблема: зачем нам нужна архитектура?
Большинство проектов, в которых мне доводилось участвовать, имеют одну и ту же проблему: внутрь андроид окружения помещается логика приложения, что приводит к большому объему кода внутри Fragment и Activity. Таким образом код обрастает зависимостями, которые совсем не нужны, модульное тестирование становится практически невозможным, так же, как и повторное использование. Фрагменты со временем становятся God-объектами, даже мелкие изменения приводят к ошибкам, поддерживать проект становится дорого и эмоционально затратно.
Есть проекты, которые вообще не имеют никакой архитектуры (тут все понятно, к ним вопросов нет), есть проекты с претензией на архитектуру, но там все равно появляются точно такие же проблемы. Сейчас модно использовать Clean Architecture в Android. Часто видел, что Clean Architecture ограничивается созданием репозиториев и сценариев, которые вызывают эти репозитории и больше ничего не делают. Того хуже: такие сценарии возвращают модели из вызываемых репозиториев. И в такой архитектуре смысла нет вообще. И т.к. сценарии просто вызывают нужные репозитории, то часто логика ложится на ViewModel или, еще хуже, оседает во фрагментах и активностях. Все это потом превращается в кашу, не поддающуюся автоматическому тестированию.
Цель архитектуры и дизайна
Цель архитектуры – отделить нашу бизнес-логику от деталей. Под деталями я понимаю, например, внешние API (когда мы разрабатываем клиент для REST сервиса), Android – окружение (UI, сервисы) и т.д. В основе я использую Clean architecture, но со своими допущениями в реализации.
Цель дизайна – связать вместе UI, API, Бизнес-логику, модели так, чтобы все это поддавалось автоматическому тестированию, было слабо связанным, легко расширялось. В дизайне я использую Android Architecture Components.
Для меня архитектура должна удовлетворять следующим критериям:
- UI — максимально простой, и у него есть только три функции:
- Представлять данные пользователю. Данные приходят уже готовые для отображения. Это основная функция UI. Тут виджеты, анимации, фрагменты и т.д.
- Реагировать на события. Здесь отлично помогает ViewModel и LiveData.
- Отправлять команды от пользователя. Для этого я использую свой простой framework, основанный на командах. Об этом чуть позже.
- Бизнес-логика зависит только от абстракций. Это нам позволяет менять реализацию произвольных компонентов.
Решение
Принципиальная схема архитектуры представлена на рисунке ниже:

Мы движемся снизу вверх по слоям, и слой, который находится ниже, ничего не знает о слое сверху. А верхний слой ссылается только на слой, который находится на один уровень ниже. Т.е. слой API не может ссылаться на домен.
Слой домен содержит бизнес сущности со своей логикой. Обычно здесь находятся сущности, которые существуют и без приложения. Например, для банка здесь могут находиться сущности кредитов со сложной логикой расчета процентов и т.д.
Слой логики приложения содержит сценарии работы самого приложения. Именно здесь определяются все связи приложения, выстраивается его суть.
Слой api, android – это лишь конкретная реализация нашего приложения в Android – среде. В идеале этот слой можно менять на что угодно.
Причем, когда я приступаю к разработке приложения, я начинаю с самого нижнего слоя — домена. Потом появляется второй слой сценариев. На 2-ом слое все зависимости от внешних деталей реализуются через интерфейсы. Вы абстрагированы от деталей, можно сконцентрироваться только на логике приложения. Тут же уже можно начинать писать тесты. Это не TDD подход, но близко к этому. И только в самом конце появляется сам Android, API с реальными данными и т.д.
Теперь более развернутая схема дизайна Android-приложения.

Итак, слой логики является ключевым, он и есть приложение. Только слой логики может ссылаться на домен и взаимодействовать с ним. Также слой логики содержит интерфейсы, которые позволяют логике взаимодействовать с деталями приложения (api, android и т.д.). Это так называемый принцип инверсии зависимости, который позволяет логике не зависеть от деталей, а наоборот. Слой логики содержит в себе сценарии использования приложения (Use Cases), которые оперируют разными данными, взаимодействуют с доменом, репозиториями и т.д. В разработке мне нравится мыслить сценариями. На каждое действие пользователя или событие от системы запускается некоторый сценарий, который имеет входные и выходные параметры, а также всего лишь один метод – запустить сценарий.
Кто-то вводит дополнительное понятие интерактора, который может объединять несколько сценариев использования и накручивать дополнительную логику. Но я этого не делаю, я считаю, что каждый сценарий может расширять или включать любой другой сценарий, для этого не нужен интерактор. Если посмотреть на схемы UML, то там можно увидеть связи включения и расширения.
Общая схема работы приложения следующая:

- Создается android-окружение (активити, фрагменты, и т.д.).
- Создается ViewModel (одна или несколько).
- ViewModel создает необходимые сценарии, которые можно запустить из этой ViewModel. Сценарии лучше инжектить с помощью DI.
- Пользователь совершает действие.
- Каждый компонент UI связан с командой, которую он может запустить.
- Запускается сценарий с необходимыми параметрами, например, Login.execute(login,password).
- Сценарий также с помощью DI получает нужные репозитории, провайдеры. Сценарий делает запрос на получение необходимых данных (может быть несколько асинхронных запросов api, да что угодно). Репозиторий выполняет запросы и возвращает данные сценарию. Причем у репозитория есть свои модели данных, которые он использует для своей внутренней работы, например, репозиторий для REST будет содержать модели со всякими JSON конверторами. Но перед тем, как отдать результат в сценарий, репозиторий всегда преобразовывает данные в модели данных сценария. Таким образом, логика ничего не знает о внутреннем устройстве репозитория и не зависит от него. Получив все необходимые данные, сценарий может создать необходимые объекты из домена. Выполнить какую-то логику на домене. Когда сценарий закончит работу, он обязательно преобразует свой ответ в очередную модель представления. Сценарий прячет уровень домена, он отдает данные, которые сразу понятны слою представления. Сценарий использования также может содержать в себе служебные сценарии, например, обработка ошибок.
- Сценарий вернул данные или ошибку в команду. Теперь можно обновить состояние ViewModel, которая в свою очередь обновит UI. Я обычно это делаю с помощью LiveData (п.9 и 10).
Т.е. ключевую роль у нас занимает логика и ее модели данных. Мы увидели двойное преобразование: первое – это преобразование репозитория в модель данных сценария и второе – преобразование, когда сценарий отдает данные в окружение, как результат своей работы. Обычно результат работы сценария отдается во viewModel для отображения в UI. Сценарий должен отдать такие данные, с которыми viewModel и UI ничего больше не делает.
UI запускает выполнение сценария с помощью команды. В моих проектах я использую собственную реализацию команд, они не являются частью архитектурных компонент или еще чего-либо. В общем, их реализация несложная, в качестве более глубокого знакомства с идеей можете посмотреть реализацию команд в reactiveui.net для C#. Я, к сожалению, не могу выложить свой рабочий код, только упрощенную реализацию для примера.
Основная задача команды — это запускать некоторый сценарий, передав в него входные параметры, а после выполнения вернуть результат команды (данные или сообщение об ошибке). Обычно все команды выполняются асинхронно. Причем команда инкапсулирует метод background-вычислений. Я использую корутины, но их легко заменить на RX, и сделать это придется всего лишь в абстрактной связке command+use case. В качестве бонуса команда может сообщать свое состояние: выполняется ли она сейчас или нет и может ли она выполниться в принципе. Команды легко решают некоторые проблемы, например, проблему двойного вызова (когда пользователь кликнул несколько раз на кнопку, пока операция выполняется) или проблемы видимости и отмены выполнения.
Пример
Реализовать фичу: вход в приложение с помощью логина и пароля.
Окно должно содержать поля ввода логина и пароля и кнопку “Вход”. Логика работы следующая:
- Кнопка “Вход” должна быть неактивной, если логин и пароль содержат менее 4 символов.
- Кнопка “Вход” должна быть неактивной во время выполнения процедуры входа.
- Во время выполнения процедуры входа должен отображаться индикатор (лоадер).
- Если вход выполнен успешно, то должно отобразиться приветственное сообщение.
- Если логин и/или пароль неверные, то должна появиться надпись об ошибке над полем ввода логина.
- Если надпись об ошибке отображена на экране, то любой ввод символа в полях логин или пароль, убирают эту надпись до следующей попытки.
Эту задачу можно решить разными способами, например, поместить все в MainActivity.
Но я всегда слежу за выполнением моих двух главных правил:
- Бизнес-логика не зависит от деталей.
- UI максимально простой. Он занимается только своей задачей (представляет данные, которые ему переданы, а также транслирует команды от пользователя).
Так выглядит приложение:

MainActivity выглядит следующим образом:
Активити достаточно прост, правило UI выполняется. Я написал несколько простых расширений, типа bindVisibleWithCommandIsExecuting, чтобы связывать команды с элементами UI и не дублировать код.
Код этого примера с комментариями доступен на GitHub, если интересно, можете скачать и ознакомиться.
Источник


