- Использование Lint в Android Studio для проверки своего кода
- Содержание
- Способы запуска Lint.
- Запуск через меню в Android Studio
- Запуск через командную строку
- Запуск при сборке проекта.
- Настройка gradle сборки
- Настройка правил проверки lint
- Отключение проверки Lint с помощью анотаций в коде
- Выводы
- How Code Quality Is Measured: Android Code Review at Yalantis
- Goals and benefits of code reviews
- Important aspects of code analysis
- 1. Documentation clarity
- 2. Code styling
- 3. Architectural patterns
- 4. Simplicity
- 5. Error handling
- 6. Test coverage
- 7. Performance monitoring
- 8. Security
- Android code review tools
- Possible outcomes of a Yalantis code review
Использование Lint в Android Studio для проверки своего кода
Содержание
На практике в коде очень часто можно встретить очевидные ошибки, спустя какое-то время. Это может происходить из-за невнимательности при написании кода. Что бы свести такие ошибки к минимуму могут помочь статические анализаторы кода. Одним из таких анализаторов является Lint.
Lint — это статический анализатор кода, который сообщает о подозрительных или критических выражениях в коде. По факту это слово стало нарицательным и им называют анализаторы, которые сканируют код на наличие ошибок.
В Android Studio уже есть встроенные анализаторы кода, который дают подсказки “налету”.
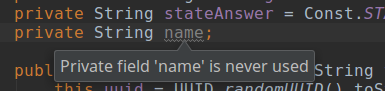
Однако подсказки подсвечивают ошибки достаточно ненавязчиво и поэтому их легко пропустить. Но можно запустить проверку несколькими способами.
Способы запуска Lint.
Запуск через меню в Android Studio
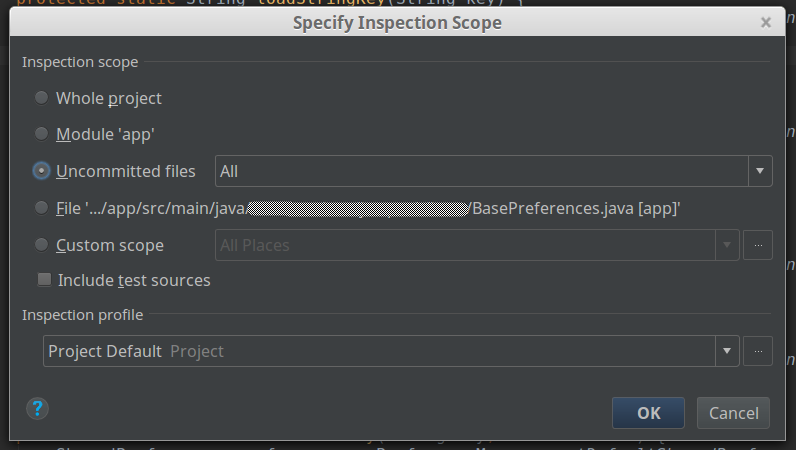
Самый простой и удобный способ запуска проверки — это через Android Studio. Для этого в меню необходимо выбрать пункты Analyze -> Inspect Code. В появившемся окне можно ограничить область сканирования кода. Можно проверить весь проект, определённый модуль или отдельный взятый класс. На мой взгляд самый полезных из пунктов — это проверка не закоммиченых файлов. Так же можно выбрать профиль с набором правил для проверки.
После выбора настроек можно начать проверку по нажатию на кнопку Ок. Когда проверка закончиться то появиться окно в котором все ошибки, и предупреждения будут выведены в специальном окне. Все замечания удобно собраны по типам с кратким описание причины и решением проблемы.

Запуск через командную строку
Так же проверку можно запустить через gradle выполнив в консоли команду:
После проверки сформируется отчёт в формате html, который можно посмотреть по следующему пути:
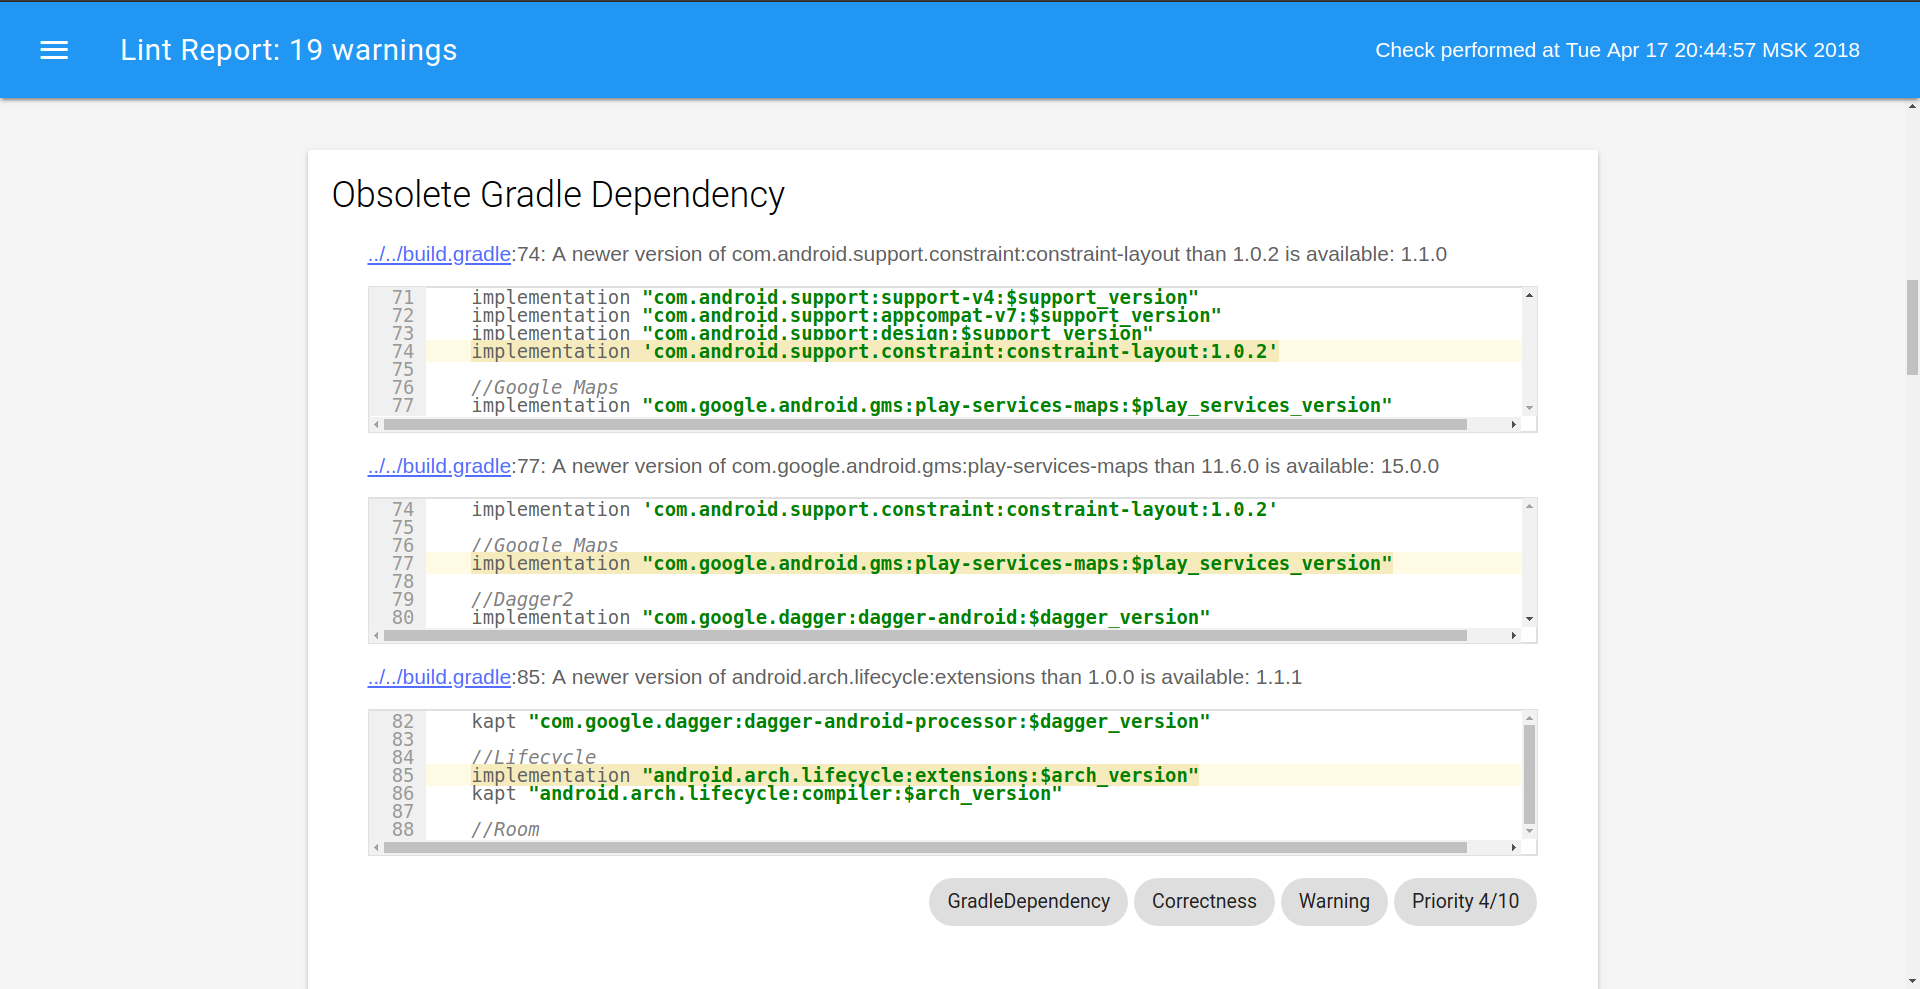
Этот способ менее удобный чем первый, так как отчёт формируется в отрыве от студии и для правки ошибок нужно постоянно переключаться между отчётом и IDE. Зато этот способ прекрасно подходит для случаев если проверку осуществляется на сервере, а в случае обнаружение ошибок, прикреплять файл с отчётом к письму.
Запуск при сборке проекта.
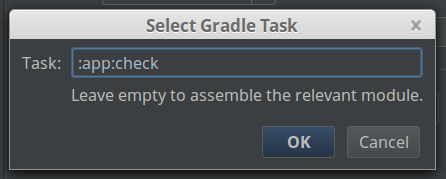
Можно автоматизировать запуск проверки lint, который будет осуществлять при каждой сборке проекта. Для этого необходимо зайти в настройки запуска проекта:
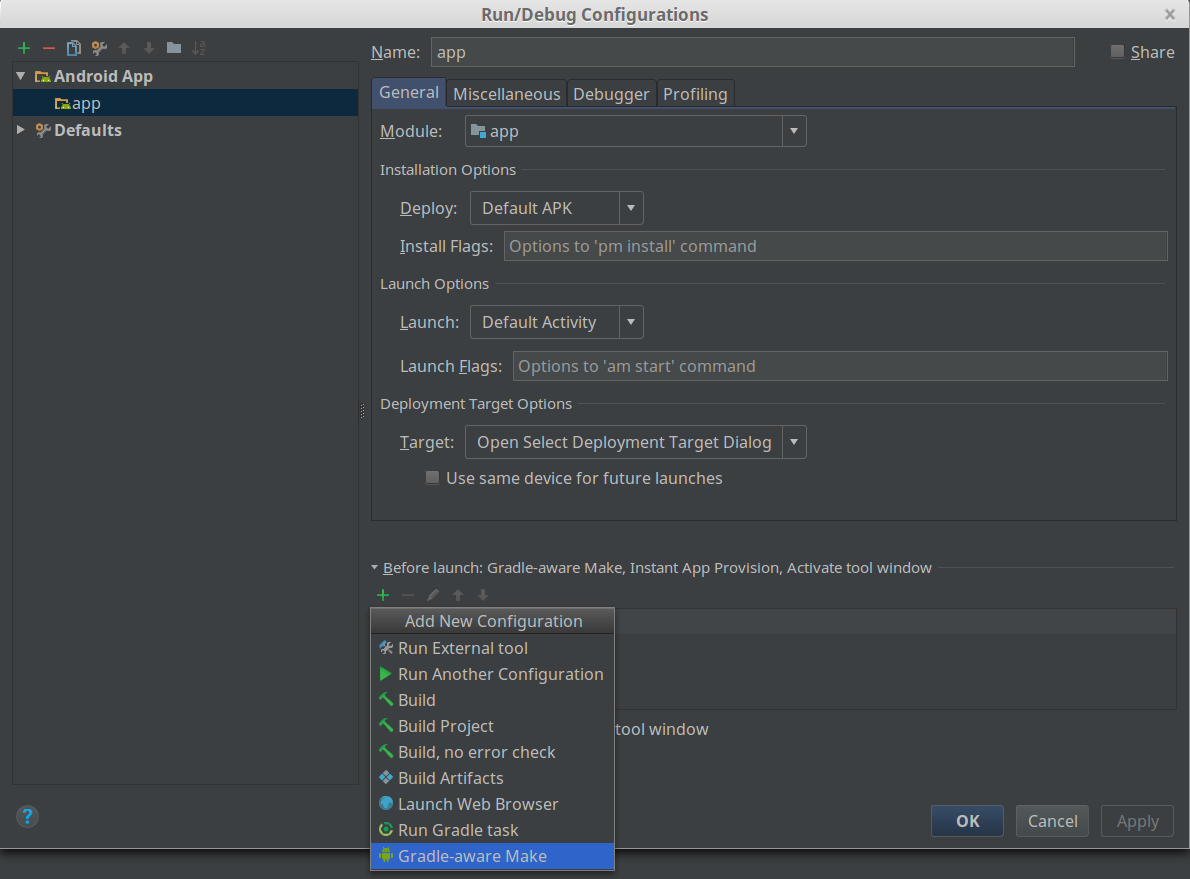
Добавить следующую строку:

Этот способ менее предпочтительный так как значительно замедлит скорость сборки и разработки.
Настройка gradle сборки
Так же lint проверку можно настроить в gradle файле.
- abortOnError: В случае обнаружение ошибки прекращается проверка.
- warningsAsErrors: определяет предупреждения как ошибки.
- lintConfig: путь к файлу проекта с настройками lint.
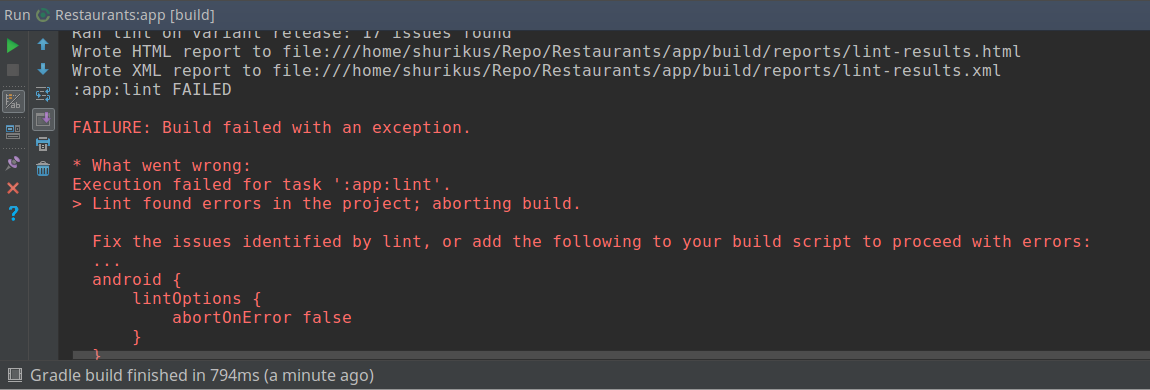
Если опция abortOnError включена, то при запуске сборки через gradle в случае обнаружении ошибки произойдёт исключение:
Настройка правил проверки lint
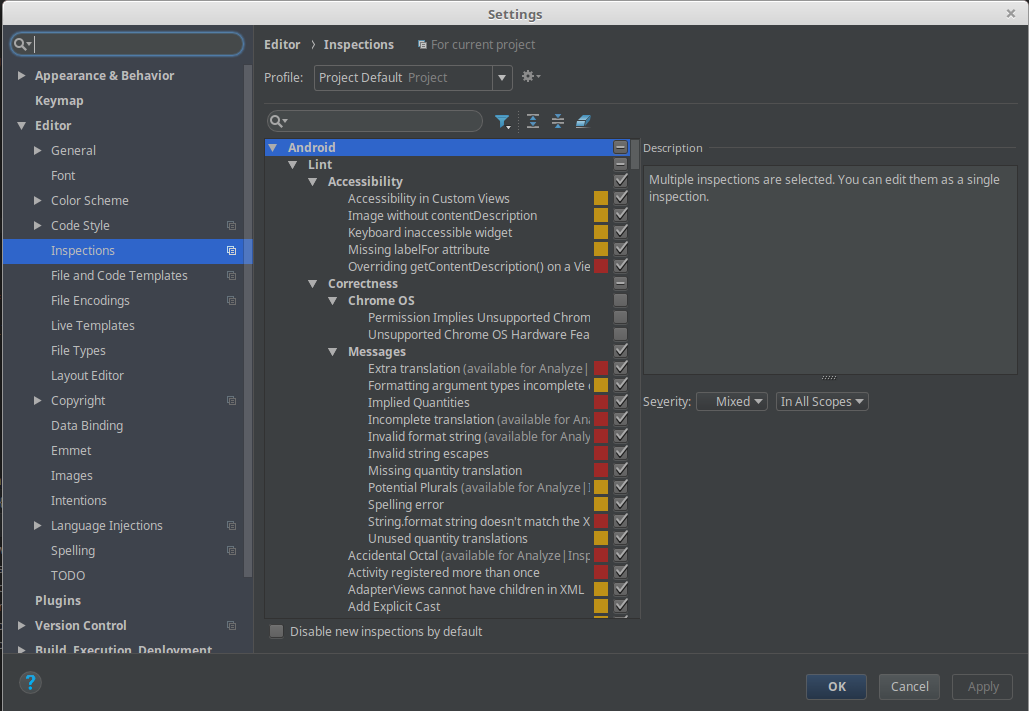
Отредактировать правила lint можно в настройках Android studio. Там же можно сделать отдельный конфигурационный профиль и использовать его.
Отключение проверки Lint с помощью анотаций в коде
Иногда бывают исключения, и может сложиться ситуация что необходимо отключить проверку какого-либо правила проверки для класса или метода. В Java коде это делается через аннотацию @SuppressLint(“NewApi”). В качестве параметра принимает строку названия проверки которую нужно исключить. Если нужно исключить все правила, то можно использовать следующую аннотацию:
Так же проверку можно обойти в xml файлах с помощью аттрибута tools:ignore=“NewApi,StringFormatInvalid”.
Выводы
В данной статье мы рассмотрели основные способы запуска проверки кода. Lint очень полезный инструмент для контроля за качеством кода, которым можно и нужно пользоваться.
Источник
How Code Quality Is Measured: Android Code Review at Yalantis


Programmers are the authors of great builds just as writers are the authors of bestselling novels. But behind the scenes, there are always many people who contribute to the process.
The best code – like the best products of any type – is the result of collaboration. All programmers, both senior-level software engineers and beginners, occasionally need somebody else to take a fresh look at their code and find issues in it. This is how we ensure code quality at Yalantis.
We regularly conduct code reviews of our projects since it greatly increases the code efficiency streamlines the native app development.
In this article, we show you why and how we do code reviews and give some useful tips on performing a code review .
Goals and benefits of code reviews
Code reviews achieve four main goals

We’ve written code review guidelines and tutorials for our Android team to make the code review process smooth and transparent. Our guidelines are based on Android code review best practices and techniques to improve code quality.
In 2019, Google introduced their own guides to code review for both developers and code reviewers. These guides influenced our code review process, and we strongly recommend you check them out.
Code review process at Yalantis involves line-by-line code analysis, a source code review checklist, and documentation for suggesting improvements. Let’s see how to do an Android code review.
Important aspects of code analysis
Below, we’ve listed the most important aspects a code reviewer should pay attention to.
1. Documentation clarity
At some point you may find yourself supporting an existing application or substituting a developer. Developers who didn’t initially work on a project need to clearly understand every single line of code. The clearer the documentation, the faster the app development and the fewer resources your organization will spend.
If code has changed, it’s important to check whether all related documentation (README, g3doc pages, etc.) have also been updated. If you delete or deprecate code, consider whether the corresponding documentation should also be deleted. Also, check documentation for logic errors.
2. Code styling
Code styling includes several important aspects:
Comments
Some comments in code might not make any sense. Or they may be written in a foreign language. Comments should be clear and useful, and most importantly explain what should be changed. Our company standard is to use English for all comments even though English is not our native language.
We use English for two reasons:
Developers for Android platform from other countries might use our source code in the future.
We’re an active contributor to open-source software that’s widely used by other companies around the world. Check out uCrop, our open-source image cropping library for Android that’s used by TripAdvisor and Pinterest, and see our other iOS and Android open-source projects.
Naming
Naming conventions make Android code more understandable. All naming conventions are specified in our Yalantis internal Android code guidelines.
If you don’t have conventions in your team, you can use naming conventions from the Android Open Source Project, which has a structured list of useful naming examples.
There are also some details you should pay attention to like file structure, syntax errors, use of brackets and white spaces, etc. Create your own style guide with code standards or use a well-known guide such as the Kotlin style guide from Android Developers or the Java Style Guide from Google. And of course, «Clean Code: A Handbook of Agile Software Craftsmanship» has an extensive set of recommendations on clean coding and code styling.
Here’s a snippet of code from our uCrop project to show how we name fields and methods and how we write comments:
3. Architectural patterns
An app architecture is a blueprint for the project. It defines the work assignments that must be carried out by the design and implementation teams. A software architecture dictates technical standards and how the app architecture should be built.
When we do code review for Android projects, we check if the architectural pattern is implemented correctly (i.е. if the business logic is decoupled from the view layer). We also check the purity and correctness of the connections between components.
For instance, we use the Model–View–ViewModel (MVVM) architectural pattern and Clean Architecture approach for Android app development. During a code review, we check that a developer has followed the principles of these architectural patterns.
4. Simplicity
At Yalantis, we follow the KISS principle (Keep It Short and Simple), according to which simplicity should be a key goal in design and unnecessary complexity should be avoided.
When conducting a code analysis, it’s crucial to make sure that code can be easily understood by other developers and that making changes won’t lead to the appearance of new bugs. Check that classes and functions aren’t overly complex and that there’s no superfluous functionality.
5. Error handling
Error handling is crucial for any software project. At Yalantis, we check if the code we’re reviewing considers all possible errors arising from user input, server responses, and database transactions.
Error handling isn’t only about logging detected errors. Quite often, error handling also involves informing the user about what exactly went wrong in the application and how the issue can be resolved.
Here’s a piece of code from a ViewModel that illustrates an API request that handles both the result and possible errors by calling proper methods in the corresponding View class:
6. Test coverage
Even though we rely heavily on our QA team for successful releases, we don’t pass code into production until we’ve written tests for the specific functionality we’re implementing. The test early principle helps us detect and fix bugs early in the project life cycle.
During Android code inspection, we see what percentage of code is actually covered by our unit tests. We pay most attention to unit testing business logic, but we run UI tests as well. According to the rules in Lars Vogel’s tutorial on developing Android unit and instrumentation tests:
70–80% of tests should be unit tests to ensure stability of your code base
20–30% of tests should be functional tests to ensure that the application really works
7. Performance monitoring
Even though mobile technology is rapidly developing, the processing power of the average Android device is still limited, memory is finite, and battery capacity continues to be one of the most precious resources. If we don’t monitor code performance, the product we’re developing may not pass muster when it launches on the market.
App performance depends not only on the reliability of Android source code but also on third-party SDKs, operating systems, devices, network constraints, data services, and APIs that support the mobile application.
To discover what causes specific performance problems, we need to take a look under the hood. We use Android Profiler to collect data about an app’s execution. We also use simulators with diagnostic capabilities to quickly pinpoint the root causes of failures when something goes wrong.

For example, if during Android source code review we discover that an app sends frequent requests to the server, we will do clever HTTP caching. If an app causes significant battery drain, we’ll make sure it doesn’t ask location services for unnecessary updates.
8. Security
The goal of a security code review of Android projects is to detect security vulnerabilities and find weaknesses. The source of these weaknesses can be insufficiently secure coding policies or flaws in the business logic, in internal structures, or in the system’s design.
For example, during our security checks we see if a program uses HTTPS/SSL for data transfer between the server and client, verify that data is encrypted, and check if the code itself is obfuscated.
Our security code review reveals security bugs and hidden backdoors.
Android code review tools
Code review is a good development practice, but it requires time and effort from the reviewer. And as an app becomes more complex and more developers start working on the project, more resources are required for code review.
Code review automation tools facilitate development by regularly checking code against requirements. Here’s a list of the most popular code review software:
Checkstyle is an open-source tool that helps developers check if their code complies with relevant style guides. It optimized for Google’s and Sun’s style guides. But it checks only Java code.
SonarQube is a powerful code analyzer that works with 27 programming languages, works seamlessly with build frameworks, and integrates with popular CI engines like Jenkins TeamCity. We use SonarQube for regular code checks in most of our projects.

Codacy is a defect tracking system that allows for automated code testing and review. Its static code analysis tool lets developers automatically identify and address security concerns, duplication, complexity, style violations, and drops in coverage in every commit and pull request, directly from their Git workflow. Codacy can easily be integrated with GitHub, Bitbucket, and Gitlab, and it analyzes 28 different programming languages.
Possible outcomes of a Yalantis code review
For each code review, we create an Android code review checklist and suggest code improvements that can be boiled down to five types:
Refactoring to make the code cleaner, more reliable, and more maintainable
Fixing the root causes of problems we’ve detected
Rewriting some parts of the code
Optimizing operations with a database or an API, or changing a library
Rewriting the project from scratch
Let us know if you have any questions about Android code review. We’re always happy to help and listen to your feedback.
Источник


