- Android Java Style Guide
- Follow a standard coding style in android, it will be easier for you and also for others to understand your code easily.
- #Naming
- Classes & Interfaces
- Methods
- Fields
- Post: Just Say mNo to Hungarian Notation
- Every day new Java code is written for Android apps and libraries which is plagued with an infectious disease…
- Variables & Parameters
- XML File Names
- XML Attribute
- Language
- Treat acronyms as words
- #Brace Style
- #Declarations
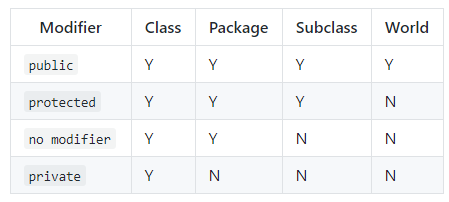
- Access Level Modifiers
- Fields & Variables
- #Formatting & Spacing
- #Other
- TODO comments
- Switch Statements
- Annotations
- Exceptions
- Don’t catch a generic exception
- Inspiring
- Android code style guide
Android Java Style Guide
Follow a standard coding style in android, it will be easier for you and also for others to understand your code easily.

Apr 23, 2018 · 6 min read
I encourage you to fork this guide and change the rules to fit your team’s style guide. Below, you may list some amendments to the style guide.

#Naming
Classes & Interfaces
Written in UpperCamelCase
Methods
Written in lowerCamelCase
Fields
Written in lowerCamelCase.
- Static final fields should be written in uppercase, with an underscore separating words
If you still using the Hungarian Notation in your filed naming convention take a look at this article by Jake Wharton who describe why better to say mNo to this prefix.
Post: Just Say mNo to Hungarian Notation
Every day new Java code is written for Android apps and libraries which is plagued with an infectious disease…
Variables & Parameters
Written in lowerCamelCase.
- Single character values to be avoided except for temporary looping variables.
XML File Names
XML Attribute
Language
Use English spelling.
Treat acronyms as words
Treat acronyms and abbreviations as words in naming variables, methods, and classes to make names more readable:
#Brace Style
Use standard brace style
- Conditional statements are always required to be enclosed with braces
#Declarations
Access Level Modifiers
- methods and variables access level should be explicitly defined for classes
Fields & Variables
Single declaration per line
#Formatting & Spacing
Code formatting is very important to make your code easily readable
U s e the charm keyboard shorts to format your code:
#Other
TODO comments
Use TODO comments for code that is temporary, a short-term solution, or good-enough but not perfect.
Switch Statements
Switch cases should almost always have a default case.
- To ‘catch’ an unexpected value
- To handle ‘default’ actions, where the cases are for special behavior.
- To show someone reading the code that you’ve covered that case.
Annotations
Use standard Java annotations. Android standard practices for the four predefined annotations in Java are:
Exceptions
Don’t ignore exceptions
Do not do this. While you may think your code will never encounter this error condition or that it is not important to handle it, ignoring exceptions as above creates mines in your code for someone else to trigger some day.
- if you are confident that ignoring the exception is appropriate then you may ignore it, but you must also comment why with a good reason:
- Dangerous throw a new RuntimeException
- Handle the error gracefully and substitute an appropriate value in the catch <> block.
- Throw a new exception that’s appropriate to your level of abstraction.
- Throw the exception up to the caller of your method.
Don’t catch a generic exception
It can also be tempting to be lazy when catching exceptions and do something like this:
Alternatives to catching generic Exception:
- Catch each exception separately as separate catch blocks after a single try. This can be awkward but is still preferable to catching all Exceptions.Beware repeating too much code in the catch blocks.
- Refactor your code to have more fine-grained error handling, with multiple try blocks. Split up the IO from the parsing, handle errors separately in each case.
- Rethrow the exception. Many times you don’t need to catch the exception at this level anyway, just let the method throw it.
Remember : exceptions are your friend! When the compiler complains you’re not catching an exception, don’t scowl. Smile: the compiler just made it easier for you to catch runtime problems in your code.
Loop variables should be declared in the for statement itself unless there is a compelling reason to do otherwise:
Inspiring
Feel free to submit any type of suggestions for improving the coding standard
Источник
Android code style guide
Android Style Guide
Projects should follow the Android Gradle project structure that is defined on the Android Gradle plugin user guide.
Class names are formatted using UpperCamelCase.
For classes that extend an Android component, the name of the class should end with the name of the component; for example: LoginActivity , LoginFragment , LoginService , LoginDialog .
Resource file names are formatted in lowercase_underscore .
Naming conventions for drawables:
| Asset Type | Prefix | Example |
|---|---|---|
| Button | btn_ | btn_send_pressed.9.png |
| Dialog | dialog_ | dialog_top.9.png |
| Divider | divider_ | divider_horizontal.9.png |
| Icon | ic_ | ic_star.png |
| Menu | menu_ | menu_submenu_bg.9.png |
| Notification | notification_ | notification_bg.9.png |
| Tabs | tab_ | tab_pressed.9.png |
| Asset Type | Prefix | Example |
|---|---|---|
| Icons | ic_ | ic_star.png |
| Launcher icons | ic_launcher | ic_launcher_calendar.png |
| Menu icons and Action Bar icons | ic_menu | ic_menu_archive.png |
| Status bar icons | ic_stat_notify | ic_stat_notify_msg.png |
| Tab icons | ic_tab | ic_tab_recent.png |
| Dialog icons | ic_dialog | ic_dialog_info.png |
Layout files should match the name of the Android components that they are intended for but moving the top level component name to the beginning. For example, if we are creating a layout for the LoginActivity , the name of the layout file should be activity_login.xml .
One exception is items that will be displayed in a ListView or RecyclerView . In this case, start with the prefix item_ .
| Component | Class Name | Layout Name |
|---|---|---|
| Activity | LoginActivity | activity_login.xml |
| Fragment | LoginFragment | fragment_login.xml |
| Dialog | LoginDialog | dialog_login.xml |
| Adapter row item | — | item_user.xml |
| Partial layout | — | partial_user_details.xml |
Sometimes these rules will not be possible to apply. For example, when creating layout files that are intended to be part of other layouts. In this case you should use the prefix partial_ .
Similar to layout files, menu files should match the name of the component. For example, if we are defining a menu file that is going to be used in the UserActivity , then the name of the file should be activity_user.xml
A good practice is to not include the word menu as part of the name because these files are already located in the menu directory.
Resource files in the values folder should be plural, e.g. strings.xml , styles.xml , colors.xml , dimens.xml , attrs.xml
Java language rules
Some of these are covered in the Java style guide, but are worth repeating here.
Don’t ignore exceptions
You must never do the following:
You may think this exception will never occur in your code, but if it does, debugging this is a complete nightmare. You should handle every exception in a sensible way.
The Android code style guidelines has more to say about this.
NEVER catch generic exception
You should never do this:
See the why and some alternatives in the Android code style guidelines
Don’t use finalizers
There are no guarantees as to when a finalizer will be called, or even that it will be called at all. Usually you can replace a finalizer with good exception handling. Once again, see the Android code style guidelines for more.
According to the Android code style guide, the standard practices for some of the predefined annotations in Java are:
@Override : The @Override annotation must be used whenever a method overrides the declaration or implementation from a super-class. For example, if you use the @inheritdocs Javadoc tag, and derive from a class (not an interface), you must also annotate that the method @Overrides the parent class’s method.
@SuppressWarnings : The @SuppressWarnings annotation should only be used under circumstances where it is impossible to eliminate a warning. If a warning passes this «impossible to eliminate» test, the @SuppressWarnings annotation must be used, so as to ensure that all warnings reflect actual problems in the code.
Code should also be refactored so that the code where the warning needs to be surpressed is isolated.
More information about annotation guidelines can be found here.
Order import statements
If you are using an IDE such as Android Studio, you don’t have to worry about this because your IDE is already obeying these rules. If not, have a look below.
The ordering of import statements is:
- Android imports
- Imports from third parties (com, junit, net, org)
- java and javax
- Same project imports
To exactly match the IDE settings, the imports should be:
- Alphabetically ordered within each grouping, with capital letters before lower case letters (e.g. Z before a).
- There should be a blank line between each major grouping (android, com, junit, net, org, java, javax).
Use the logging methods provided by the Log class to print out error messages or other information that may be useful for developers to identify issues:
- Log.v(String tag, String msg) (verbose)
- Log.d(String tag, String msg) (debug)
- Log.i(String tag, String msg) (information)
- Log.w(String tag, String msg) (warning)
- Log.e(String tag, String msg) (error)
As a general rule, we use the class name as tag and we define it as a static final field at the top of the file. For example:
VERBOSE and DEBUG logs must be disabled on release builds. It is also recommended to disable INFORMATION, WARNING and ERROR logs but you may want to keep them enabled if you think they may be useful to identify issues on release builds. If you decide to leave them enabled, you have to make sure that they are not leaking private information such as email addresses, user ids, etc.
Proguard can be used to strip out log statements.
Class member ordering
As per the Java style guide, There is no single correct solution for this but using a logical and consistent order will improve code learnability and readability. It is recommendable to use the following order:
- Constants
- Fields
- Constructors
- Override methods and callbacks (public or private)
- Public methods
- Private methods
- Inner classes or interfaces
If your class is extending an Android component such as an Activity or a Fragment, it is a good practice to order the override methods so that they match the component’s lifecycle. For example, if you have an Activity that implements onCreate() , onDestroy() , onPause() and onResume() , then the correct order is:
Parameter ordering in methods
When programming for Android, it is quite common to define methods that take a Context . If you are writing a method like this, then the Context must be the first parameter.
The opposite case are callback interfaces that should always be the last parameter.
String constants, naming, and values
Many elements of the Android SDK such as SharedPreferences , Bundle , or Intent use a key-value pair approach so it’s very likely that even for a small app you end up having to write a lot of String constants.
When using one of these components, you must define the keys as a static final fields and they should be prefixed as indicated below.
| Element | Field Name Prefix |
|---|---|
| SharedPreferences | PREF_ |
| Bundle | BUNDLE_ |
| Fragment Arguments | ARGUMENT_ |
| Intent Extra | EXTRA_ |
| Intent Action | ACTION_ |
Note that the arguments of a Fragment — Fragment.getArguments() — are also a Bundle. However, because this is a quite common use of Bundles, we define a different prefix for them.
Arguments in Fragments and Activities
When data is passed into an Activity or Fragment via an Intent or a Bundle , the keys for the different values must follow the rules described in the section above.
When an Activity or Fragment expects arguments, it should provide a public static method that facilitates the creation of the relevant Intent or Fragment .
In the case of Activities the method is usually called getStartIntent() :
For Fragments it is named newInstance() and handles the creation of the Fragment with the right arguments:
Note 1: These methods should go at the top of the class before onCreate() .
Note 2: If we provide the methods described above, the keys for extras and arguments should be private because there is not need for them to be exposed outside the class.
Line length limit
Code lines should not exceed 120 characters. If the line is longer than this limit there are usually two options to reduce its length:
- Extract a local variable or method (preferable).
- Apply line-wrapping to divide a single line into multiple ones.
There are two exceptions where it is possible to have lines longer than 100:
- Lines that are not possible to split, e.g. long URLs in comments.
- package and import statements.
There isn’t an exact formula that explains how to line-wrap and quite often different solutions are valid. However there are a few rules that can be applied to common cases.
Break at operators
When the line is broken at an operator, the break comes before the operator. For example:
Assignment Operator Exception
An exception to the break at operators rule is the assignment operator = , where the line break should happen after the operator.
Method chain case
When multiple methods are chained in the same line — for example when using Builders — every call to a method should go in its own line, breaking the line before the .
Long parameters case
When a method has many parameters or its parameters are very long, we should break the line after every comma ,
RxJava chains styling
Rx chains of operators require line-wrapping. Every operator must go in a new line and the line should be broken before the .
XML style rules
Use self closing tags
When an XML element doesn’t have any contents, you must use self closing tags.
This is bad :
Resource IDs and names are written in lowercase_underscore.
IDs should be prefixed with the name of the element in lowercase underscore. For example:
| Element | Prefix |
|---|---|
| TextView | text_ |
| ImageView | image_ |
| Button | button_ |
| Menu | menu_ |
Image view example:
String names start with a prefix that identifies the section they belong to. For example registration_email_hint or registration_name_hint . If a string doesn’t belong to any section, then you should follow the rules below:
| Prefix | Description |
|---|---|
| error_ | An error message |
| msg_ | A regular information message |
| title_ | A title, i.e. a dialog title |
| action_ | An action such as «Save» or «Create» |
Styles and Themes
Unlike the rest of resources, style names are written in UpperCamelCase.
As a general rule you should try to group similar attributes together. A good way of ordering the most common attributes is:
- View Id
- Layout width and layout height
- Other layout attributes, sorted alphabetically
- Remaining attributes, sorted alphabetically
- Style
Tests style rules
Test classes should match the name of the class the tests are targeting, followed by Test . For example, if we create a test class that contains tests for the DatabaseHelper , we should name it DatabaseHelperTest .
Test methods are annotated with @Test and should generally start with the name of the method that is being tested, followed by a precondition and/or expected behaviour.
- Template: @Test void methodNamePreconditionExpectedBehaviour()
- Example: @Test void signInWithEmptyEmailFails()
Precondition and/or expected behaviour may not always be required if the test is clear enough without them.
Sometimes a class may contain a large amount of methods, that at the same time require several tests for each method. In this case, it’s recommendable to split up the test class into multiple ones. For example, if the DataManager contains a lot of methods we may want to divide it into DataManagerSignInTest , DataManagerLoadUsersTest , etc. Generally you will be able to see what tests belong together because they have common test fixtures.
Every Espresso test class usually targets an Activity, therefore the name should match the name of the targeted Activity followed by Test , e.g. SignInActivityTest
When using the Espresso API it is a common practice to place chained methods in new lines.
Copyright 2015 Riaan Cornelius.
Licensed under the Apache License, Version 2.0 (the «License»); you may not use this file except in compliance with the License. You may obtain a copy of the License at
Unless required by applicable law or agreed to in writing, software distributed under the License is distributed on an «AS IS» BASIS, WITHOUT WARRANTIES OR CONDITIONS OF ANY KIND, either express or implied. See the License for the specific language governing permissions and limitations under the License.
Источник


