- Сборка Android под Mac OS X
- Вводная
- Решение
- InTheTechPit
- For the Developers! This is how I did stuff.
- Setup React-Native for iOS and Android on Mac with VS Code
- stkent / android_studio_shortcuts.md
- How to obtain SHA1 Keys for debug and release — Android Studio [Mac]
- Debug Key
- Release
- Method 1
- Method 2
- React Native Environment set up on Mac OS with Xcode and Android Studio
- Install Homebrew
- Install Node.js and npm
- Install watchman
- Install Java JRE and JDK
- Install React Native
- Set up Xcode
- Set up Android Studio
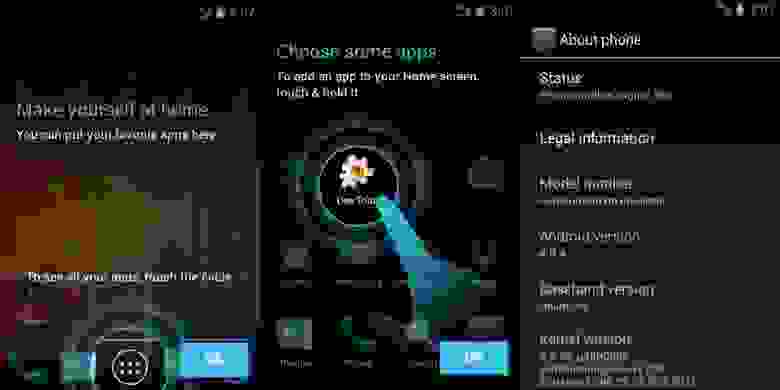
- Create First App
- Running your React Native Application in IOS
- Running your React Native Application in AVD
Сборка Android под Mac OS X
Вводная
Для одного из проектов потребовалось заняться доработками оригинального кода Android для создания прошивки под специфичную железку. Версия для сборки была выбрана уже относительно старая — AOSP 4.0.4, но на ней базируется стабильная ветка кода от производителя железки, поэтому условие необходимое. Кроме разработки под Android я занимаюсь разработкой iOS приложений, соответственно работаю под Mac OS X и использую Xcode как одну из сред для разработки.
Основной проблемой в моем случае явилось то, что старые версии AOSP ни кем не отслеживаются и новые правки в сборочную систему не вносятся. Поэтому если сборка master’а особой сложности не представляет, то сборка предыдущих версий Android под более свежие версии MacOS требует исправления ряда проблем.
В моем случае рабочее окружение выглядит так:
- AOSP 4.0.4 r1.1 (а так же 4.0.3 и 4.1.1)
- Mac OS X 10.7.5
- Xcode 4.6.3 и command line tools
- GNU Make 3.81
Все основные моменты и сложности сборки AOSP хорошо описаны в официальной документации. Там же указано что для сборки ветки 4.0.x необходимы MacOS 10.5 или 10.6 и рекомендован Xcode 3.14, а в разделе «Known issues» указано что ветка 4.0.x не совместима с MacOS 10.7.
MacOS и Xcode я использую для разработки и откатываться на предыдущие версии крайне не хотелось. К тому же был чисто спортивный интерес разобраться со сборкой без какого-то кардинального изменения окружения.
Решение
Непосредственно все первоначальные шаги для сборки описаны в документации и были выполнены в соответствии с ней: создан case-sensitive disk image, установлены необходимые утилиты, скачан код Android. Далее была запущена сборка с профилем full-eng.
Ниже я привожу тексты ошибок из консоли и методы исправления. В зависимости от версии AOSP и вашего окружения они могут проявляться все или частично. Большинство решений можно найти в интернете, я привожу лишь краткое описание необходимых действий. Кроме AOSP 4.0.4 также были проверены версии 4.0.3 и 4.1.1. Чем новее версия, тем меньше встречалось ошибок, но первые 2 имели место везде. Отдельно стоит заметить что при внесении описанных изменений, эмулятор собирается корректно и я не встретил проблем с запуском эмулятора указанных в том же официальном «Known issues».
Запуск сборки для решения проблем с компилятором осуществляется командой приведенной ниже. Здесь важная часть CC=«gcc» CXX=«g++», остальными могут быть стандартные параметры в любом порядке и сочетании.
По ходу сборки, не считая описанного в документации, возникали следующие проблемы:
Ошибка 1
Исправление
Применить патч https://bugs.webkit.org/show_bug.cgi?id=92264. Патч ложится с небольшой ошибкой, из-за расхождения контекста, нужно посмотреть rej и удалить пару старых строк, которые не смог убрат патч. Применять патч в директории external/webkit/.
Важно
Во время линковки, на финальной стадии сборки, могут появиться ошибки типа:
В зависимости от того добавляли ли вы изменения в CSSParser. Здесь проявляется некая мистика линковщика (для 4.1.1 версии со сборкой с этими исправлениями таких проблем нет). Для устранения проблемы нужно в CSSParser внести какие-нибудь изменения (считываемые компилятором, т.е. не комментарии). Я менял определение этой функции с cssyyparse(void*) на cssyyparse(WebCore::CSSParser*) или наоборот. Далее запустить пересборку — все пройдет гладко с этого места.
Ошибка 2
Исправление
Перенести определение в файл external/srec/portable/include/PortExport.h из ветки master в нашу.
Ошибка 3
Исправление
Добавить библиотеку LOCAL_SDL_LDLIBS += /usr/lib/dylib1.o в /development/tools/emulator/opengl/tests/translator_tests/ для GLES_V2/Android.mk и GLES_CM/Android.mk.
Ошибка 4
Разное определение функции strnlen в системе и в локальных файлах. К сожалению для этой ошибки лог не записал, но суть будет понятна при упоминании функции strnlen.
Исправление
Добавить условие для функции strnlen в external/elfutils/config-compat-darwin.h:
Ошибка 5
Выбор версии SDK по версии Mac OS для сборки эмулятора. Аналогично предыдущей ошибке без лога, но упоминание эмулятора qemu в логе укажет сюда.
Исправление
Заменить условие для версии Mac OS external/qemu/Makefile.android:
И добавить подключение библиотек для MacOS:
Ошибка 6
Если у вас операционная система стоит на диске с case-sensitive file system, то может проявиться такая ошибка:
Источник
InTheTechPit
For the Developers! This is how I did stuff.
Setup React-Native for iOS and Android on Mac with VS Code
The very first step to start development in React-Native is to install the right tools to setup the environment correctly. I’m working on MacOS Catalina and I already have Xcode 11 installed on my machine which is one of the pre-requisites to run the iOS App.
Install the following dependencies for React-Native:
The recommended way to install Node is using Homebrew from your Terminal:
Watchman: In react-native, Watchman watches the source code for any changes and rebuilds them.
Install XCode from App Store.
Cocoapods: This is the Dependency Manager for iOS & Mac projects.
This requires you to enter system password.
Install Visual Studio Code for Mac from here. You might face issues on Mac OS Catalina to run VS Code due to Notarization requirements. You can check out this post for more details.
Create the folder inside say your Documents folder on your Mac as below:
Open VS Code and open New Terminal and type the following command to create a new React-Native App:
Come back to the MyApp folder and run the below command to run your App in the iOS simulator:
This will install and launch the App in your iOS simulator. The first time might be very slow. It might be helpful to launch your simulator beforehand.
Running on Android:
Install the Android Studio from here, which will install the Android SDK and the required emulator. I’m using the Android 10 emulator for Pixel XL.
Open the MyApp folder in VS Code to make further changes.
Issues
Running the Android App causes issues while launching the Emulator. The error message is: React Native adb reverse ENOENT
Starting with macOS Catalina, your Mac uses zsh as the default login shell and interactive shell. You can make zsh the default in earlier versions of macOS as well.
1 – Open your .zshrc file:
2 – if .zshrc file doesn’t exist, you need to create one & open again(Step 1)
3 – Add this to your .zshrc file
4 – Save and close
5 – Compile your changes
& make sure to restart your terminal.
Run the command in the Terminal and you’ll see something like below if everything is fine:
Android Debug Bridge version 1.0.41
Installed as /Users/ /Library/Android/sdk/platform-tools/adb
You can also run the code in your VS Code Terminal and see the same output.
The path to Android SDK is available in the Configure button -> SDK Manager (at the bottom right) when you launch Android Studio.
Источник
stkent / android_studio_shortcuts.md
Android Studio Shortcuts (Mac)
- Two of the most useful shortcuts utilize the Fn (function) keys. It is therefore recommended that you enable the «Use all F1, F2, etc. keys as standard function keys» option [System Preferences > Keyboard].
- Be sure to enable the Mac OS X 10.5+ keymap in Android Studio [Preferences > Keymap].
- A fairly complete shortcut list can be found here.
⌘ = Command Key
⌥ = Option Key
⇧ = Shift Key
⌃ = Control Key
Learn these shortcuts right away.
| Description | Shortcut |
|---|---|
| Display list of available auto-fixes for code warning/error at cursor | Option-Enter |
| Go to the declaration of the variable/method/class at cursor | Command-B |
| Rename all copies of the variable/method/class at cursor | Shift-F6 |
| List all usages of the variable/method/class at cursor | Command-Option-F7 |
| Generate code (incl. getters, setters, constructors, method overrides) | Command-N |
| Search for and open any file by name (filters as you type) | Command-Shift-O |
| Find text in the current file (Enter = cycle through results, Esc. = cancel) | Command-F |
Frequently Useful Shortcuts:
Learn these shortcuts once you have the essential shortcuts nailed.
| Description | Shortcut |
|---|---|
| View javadoc of symbol at cursor in pop-up | F1 |
| View definition of method at cursor in pop-up | Command-Y |
| Skip back/forward through cursor position history | Command-[, Command-] |
| Search for and list any occurrences of text | Command-Shift-F |
| Go to next highlighted error in current file | F2 |
| Run | Control-R |
| Comment/Uncomment all selected lines (also works in xml files) | Command-/ |
| Show available parameters for current method (must be inside parentheses) | Command-P |
| Find and replace in current file | Command-R |
Shortcuts For Wizards:
Check these shortcuts out if you are bored. To use ‘navigate through open tabs’, you will have to change or disable the corresponding Mission Control shortcuts [System Preferences > Keyboard > Keyboard Shortcuts > Mission Control].
Источник
How to obtain SHA1 Keys for debug and release — Android Studio [Mac]


Debug Key
Click on the Gradle tab on the right hand side of the Android Studio window.
Go to the Project root folder -> Tasks -> android -> signingReport

UPDATE: (Newer versions) In case you don’t find an android folder here, go to :app instead of root, navigate to Tasks>android and you’ll find signingReport.

Double click on signingReport, this will build and post the SHA1 in the bottom view.

Release
Method 1
In Android Studio, go to Build menu -> Generate Signed Bundle / APK
Select your keystore and key alias.
Copy the key store path and the key alias.
Here, the path is /Users/technofreek/Documents/testkeystore
and the alias is key0.

Open terminal and type the command
keytool -list -v -keystore -alias
For this example, here’s the command
keytool -list -v -keystore /Users/technofreek/Documents/testkeystore -alias key0
This will print your SHA1

Method 2
If you have enabled App Signing for your app in your Google Play Developer Console, by uploading your signing certificate, then just go to your developer console and select your app.
Select Release Management -> App Signing, and you’ll see you release SHA1.
Источник
React Native Environment set up on Mac OS with Xcode and Android Studio

Aug 7, 2019 · 4 min read
Install Homebrew
Homebrew is a package manager for macOS as a whole, not just for a particular programming language. When it needs to install software from third-party web sites, we can get the real advantage of Homebrew with few lines of code.
Install Homebrew using bellow command in Terminal.
Install Node.js and npm
React need only webpack to bundle, compile, transpile the code. Then why do we need Node.js? 🤔
React Native comes with multiple built-in components and APIs to interact with both native IOS and Android platform. In some cases, we need to use native functionality that doesn’t provide by React Native.
Mos t of the Native modules are distributed as npm packages. Therefore, we need to require npm and to initialize the npm we need to have Node.js as recommended.
⚠️ Remember, Node.js is not compulsory since you can download the packages and add to your library.
Install Node.js using bellow command in Terminal and it automatically get npm installed on your computer.
Install watchman
React Native uses watchman to detect real time code changes and it automatically build and push the update to your device without manually refreshing.
Install Java JRE and JDK
If you don’t have a complete installation of Java, the build scripts for react-native tend to complain and fail . Downloading Android Studio is not enough solution since it comes bundled with its own JRE.
Install React Native
React Native allows the application to be written in Javascript and then the React Native Compiler will convert your Javascript code into native code for iOS and Android environments.
React Native command line interface can be install using npm as bellow.
Set up Xcode
Download Xcode via Mac App Store
- Open Xcode, Xcode > Preferences
- Goto the Locations tab
- Selecting the most recent version from the Command Line Tools dropdown
- Install cocoapods to MAC OS
CocoaPods manages library dependencies for your Xcode projects.
Set up Android Studio
Download Android Studio from here
- Open Android Studio
- Goto the Configure > SDK Manager
- Go to Appearance & Behavior → System Settings → Android SDK and check ✅ the box of latest version from Hide Obsolete Packages.
- Also check ✅ the boxes of below in Show package details,
- Android SDK Platform 28
- Intel x86 Atom_64 System Image or Google APIs Intel x86 Atom System Image
5. Click “Apply” to download and install the Android SDK and related build tools.
6. Set up environment variables to getting start with native code, Open terminal
and paste below lines there.
Then you can create new Android Virtual Device (AVD) to run the application.
- Open Android Studio
- Goto the Configure > AVD Manager
- Create Virtual Device > pick any Phone from the list and click “Next”,
Click “Next” then “Finish” to create your AVD. At this point you should be able to click on the green triangle button next to your AVD to launch it , then proceed to the next step.
Create First App
The very first step is to initialize the app from the place where we need to create app
If you want to start a new project with a specific React Native version,
If you want use typescript with React Native ,
Running your React Native Application in IOS
Running your React Native Application in AVD
The first time when you run this code you might get a build failed errors as,
🛑 Asking to add local.properties file
Create local.properties file inside android folder and add below code there.
🛑 Asking to add keystroke
Go to directory
paste below code in terminal
Press enter until it gets ,
Is CN=y, OU=n, O=yes, L=no, ST=x, C=Y correct?
and type Y as response to terminate the command.
Here we go…. 👌 If everything working properly you can see app is running on both IOS emulator and AVD without errors. 😃 😃 😃
Thanks for reading this article, if you found it helpful please leave a few claps… 👏 👏 👏
Источник


