- Using ADB on WiFi for Android Development
- Setting Up the ADB to Connect Over WiFi
- Wireless Debugging through ADB in Android using WiFi
- Step 1 : Connect your adb host computer and your android phone to same network
- STEP 2 : If you are connecting to a Wear OS device, turn off Bluetooth on the phone that’s paired with the device.
- STEP 3: Connect the device to the host computer with a USB cable.
- STEP 4: locate your SDK
- STEP 5 : Check whether your device is properly connected
- Step 6 : Set the target device to listen for a TCP/IP connection on port 5555
- STEP 7 : Find the IP address of the Android device.
- STEP 8 : Connect to the device by its IP address.
- STEP 9 : Remove the USB cable
- STEP 10 : Confirm that your host computer is connected to the target device
- You’re now good to go! 🎉
- Android Debug Bridge (ADB) Connect to Device over USB, WiFi
- What is Android Debug Bridge (ADB)?
- USB debugging and ADB Configuration-
- How to Connect to an Emulator
- How to Connect Android Device with ADB (Android Debug Bridge)
- How to Configuring ADB for Wi-Fi Support
- How to connect Android ADB over wifi without USB to control from your computer
- Android ADB over wifi without USB -Step By Step Tutorial
- Some things to remember while connecting ADB over wifi without USB
Using ADB on WiFi for Android Development

I used to struggle a lot when developing an Android application, mostly because the emulator is slow, and when using real device for development, the USB cable needed to connect my phone with my laptop is just as annoying as the slow emulator.
Luckily, ADB supported WiFi to connect the debug bridge between my phone and my laptop. Since then, I only used USB cable for setting up the ADB WiFi connection. Though most of the time I still enjoy using emulator because and the emulator has been made faster.
Setting Up the ADB to Connect Over WiFi
First, you have to connect your phone with your computer using aa USB cable. Make sure that the ADB detected your phone. If not, you might need to update the driver that connects your phone and your computer.
Second, open up a command prompt and navigate to your Android SDK location (on Windows you can find it inside your user folder if you install it on the default location e.g: C:\Users\YOUR-USERNAME\AppData\Local\Android\sdk\platform-tools). You probably want to add this path to your $PATH variable.
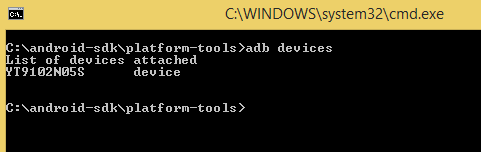
Type android devices -l to see list of the connected device. You should see your phone on the list.

Then type adb tcpip 5555 to run the ADB in TCP mode. The number after tcpip is the port you want to attach the ADB server on your phone. I use 5555 because it is easy to remember and no apps should be using that port.

You can now plug off the USB cable from your phone and computer, and then connect to your phone via WiFi by typing adb connect :5555 or any port you set the server to be running on, and try running adb devices -l again to check if the ADB TCP server is working correctly.

Everything should be set, if you press the Run or Debug button on Android Studio, you should see your device on the list of available devices to run your app on.
Say goodbye to USB cables and broken USB port on your phone.
Источник
Wireless Debugging through ADB in Android using WiFi

Jan 4, 2019 · 3 min read

In this article I am going to show you how you can debug your android app over WiFi.
Yes I know it is very hectic to debug your Android app with USB cable if your cable is broken or not functioning or you don’t have a cable and you have borrowed it from someone for few minutes.
It will require only few steps to get this done.
Step 1 : Connect your adb host computer and your android phone to same network
Make sure that your android phone and your host computer are connected on the same network then you will be able to debug your app.
STEP 2 : If you are connecting to a Wear OS device, turn off Bluetooth on the phone that’s paired with the device.
STEP 3: Connect the device to the host computer with a USB cable.
STEP 4: locate your SDK
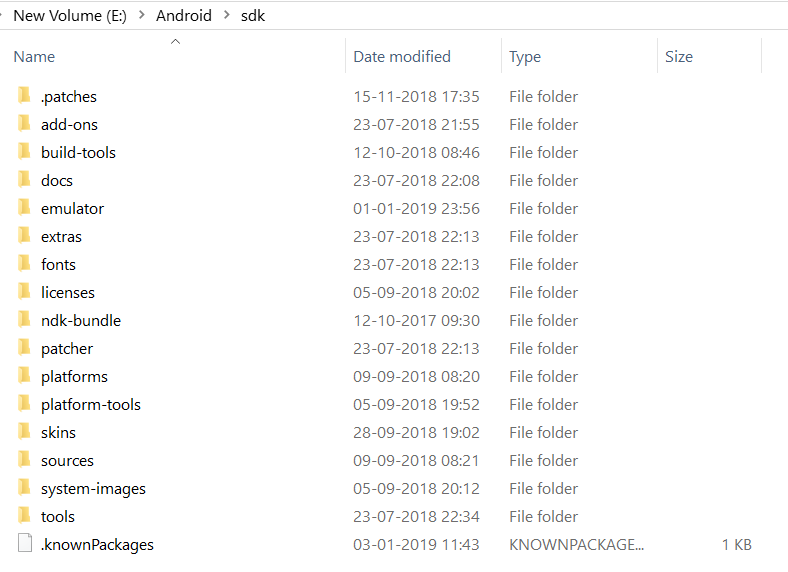
In the SDK you will find platform-tools

S e t this location as path on Command Prompt
On the platform-tools folder
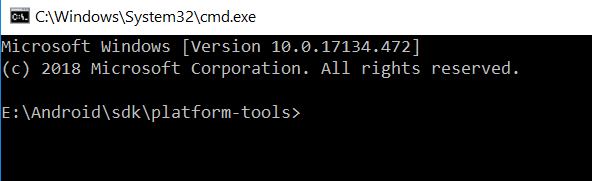
Select Open Command window here
STEP 5 : Check whether your device is properly connected
This will show all the devices connect through WiFi.
Step 6 : Set the target device to listen for a TCP/IP connection on port 5555

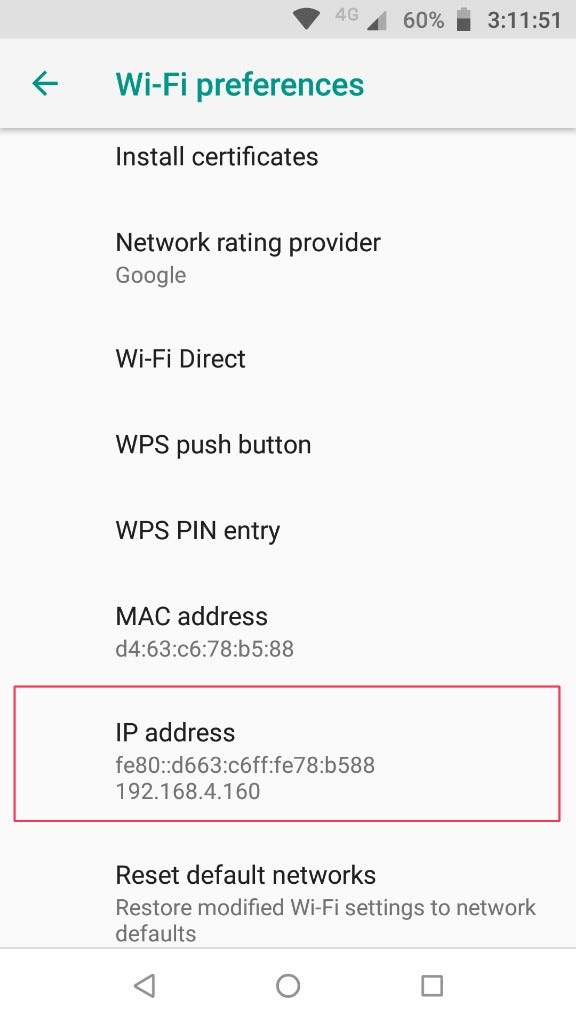
STEP 7 : Find the IP address of the Android device.
you can find the IP address at Settings > Wi-Fi Settings > Advanced > IP address.
STEP 8 : Connect to the device by its IP address.

STEP 9 : Remove the USB cable
Remove the USB cable and you should be connected to your device. If you don’t see it in adb devices then just reconnect using the previous steps command
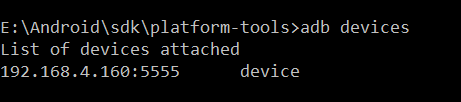
STEP 10 : Confirm that your host computer is connected to the target device
$ adb devices
List of devices attached
device_ip_address:5555 device
You’re now good to go! 🎉
If the adb connection is ever lost:
- Make sure that your host is still connected to the same Wi-Fi network your Android device is.
- Reconnect by executing the adb connect step again.
- Or if that doesn’t work, reset your adb host:
Then start over from the beginning.
Hope this helps you, if you have any query let me know in the comments section.
Источник
Android Debug Bridge (ADB) Connect to Device over USB, WiFi
Updated October 7, 2021
What is Android Debug Bridge (ADB)?
Android Debug Bridge (ADB) is a command-line tool that allows you to communicate with a device. It is used to bridge communication between an emulator instance (Android device) and the background running daemon process (server). It helps you perform different actions like installing or debugging a device and run various commands on a device by providing access to a Unix shell.
Using any real device for mobile automation Testing has always been a challenge for testers. But, Android offers a handful of solutions to connect a real device over USB (Universal Serial Bus), i.e., Android Debug Bridge (ADB).
In this tutorial, you will learn-
USB debugging and ADB Configuration-
APPIUM offers an advantage to execute test on real devices. But prior to run the test, we need to setup following pre-requisite.
- USB debugging should be enabled
- ADB configuration
- Desired capability setup as per the hardware changes.
Here we will see both, connecting to emulator as well as with real device for testing. See steps below for connecting to an emulator.
How to Connect to an Emulator
Pre-Requisite- SDK (Software Development Kit) should be installed on the machine. ADB in Android is packaged with Google’s Android SDK (Software Development Kit).
Steps to enable ADB from SDK Manager.
Step 1) Open Android SDK folder
Step 2) Double click on SDK Manager
Step 3) From the list of all packages select Tools and mark the checkbox for
- Android SDK Tools and
- Android SDK Platform-tools.

How to Connect Android Device with ADB (Android Debug Bridge)
Step 1) Enable USB Debugging on your device
Enable USB debugging option from ‘Developer Option’ in Android phone. Now, connect your Android device to the computer using USB cable.

Step 2) Go to the Android SDK folder
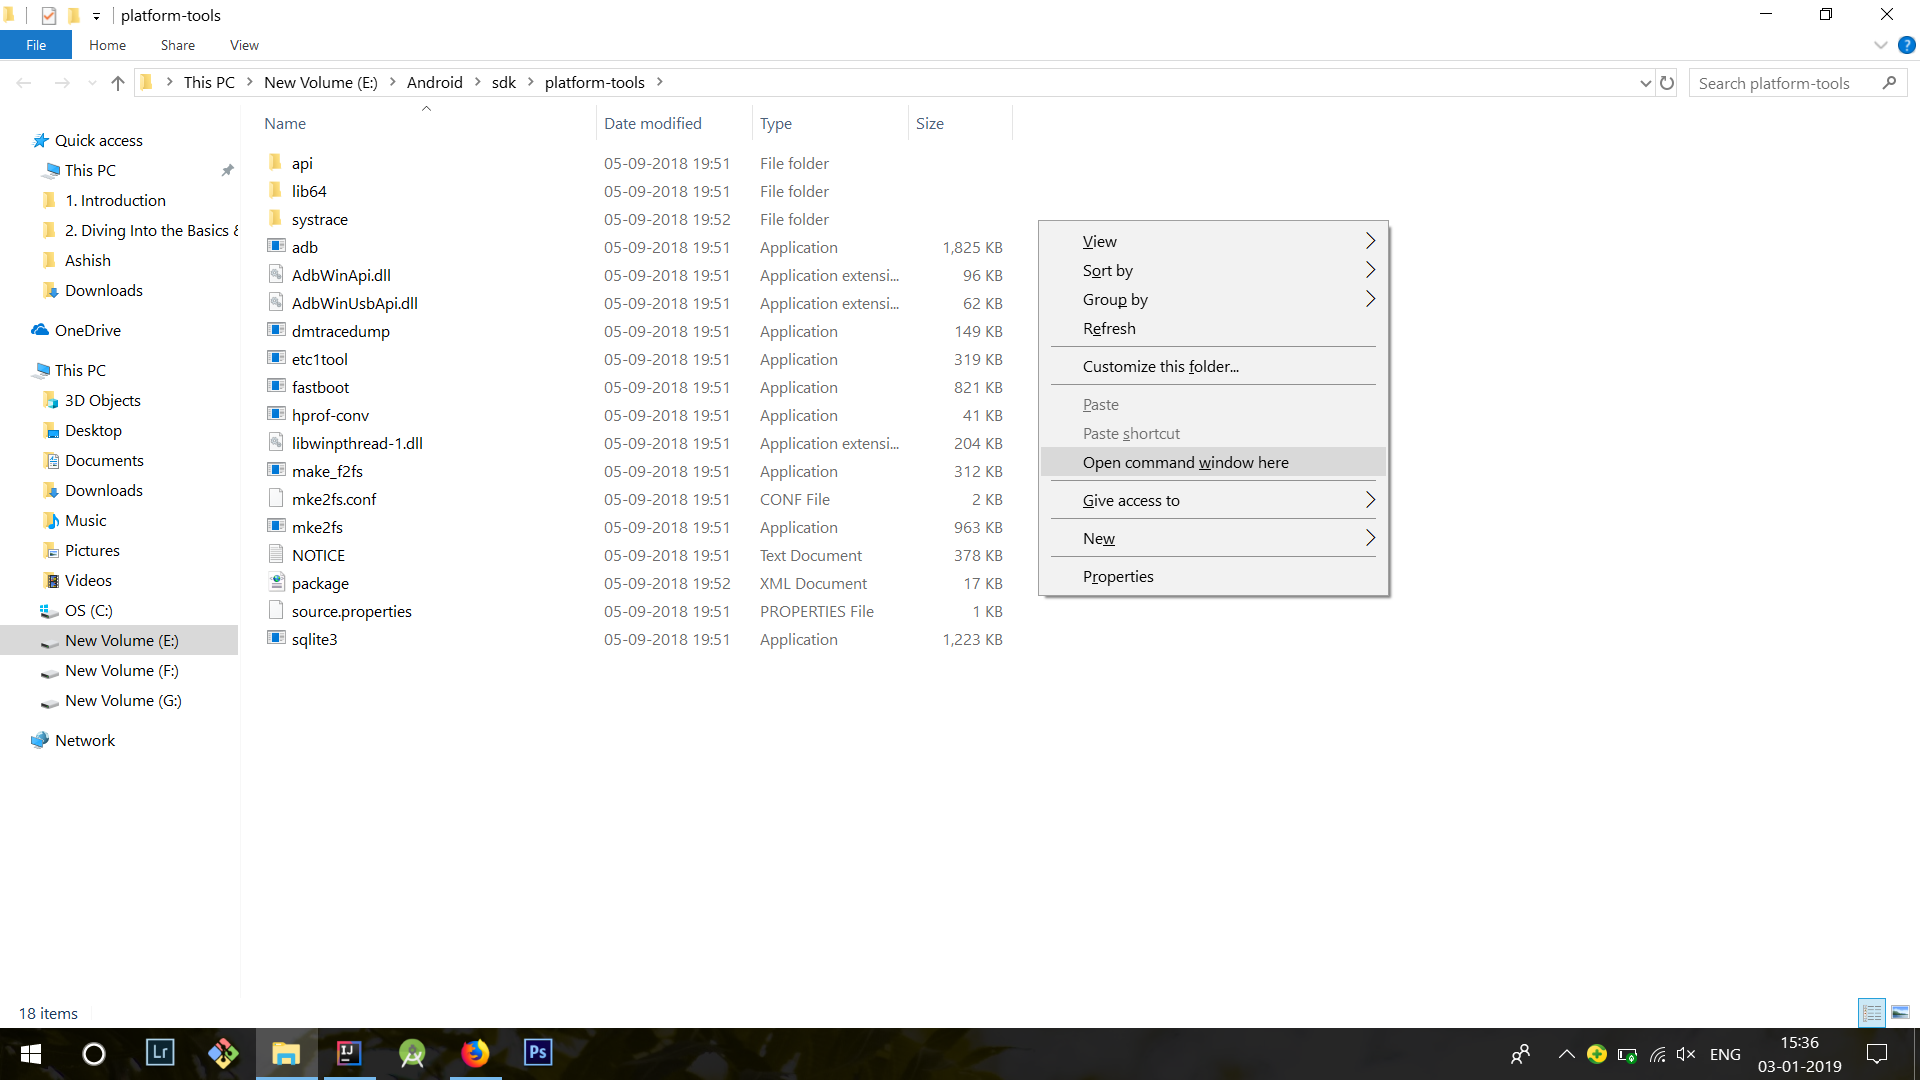
Open the local folder where Android SDK files has been saved ‘Android SDK >> Platform-tools’ eg: C:\android-sdk\platform-tools

Step 3) Open the Command window
Inside folder hold Shift + Right click menu >> Select ‘Open command window here’ option.
It will open the folder using command prompt.
Note– you can also open the folder path directly from the Run command in command prompt.

This command window will directly open the folder in command prompt window.

Step 4) Connect an external Android device
Now, prior to check the device, user have to connect an external Android device (mobile phone). To connect use the device USB cable connector to the system. Then in above command prompt type command-
It will display all list of all the connected devices.
But, prior to this we should check that ADB server. Check whether it is running as background process or not. Just open the command prompt from above mentioned procedure and write ‘adb’ and press enter. It should display all the adb’s process running.
When server starts, it always bind the local TCP port 5037. All ADB clients listen to 5037 TCP port to communicate with server request.
Now, the running ADB server can scan all connected emulator or device instances by scanning the port.
Always remember that ADB daemon runs on odd numbered port between the ranges of 5555 to 5558.
ADB daemon process runs with console connection that acquires even number port for connection.
For example: If single device connected then server automatically scan the device and get connected but if multiple device or emulator running the user need to give ADB connect to device USB command line instruction to connect.
The emulator instance connected on odd numbered port 5557 has the same console running over even numbered 5556 port ie. Each running devices has 1 odd and 1 even connected port.
Command to detect all connected device –
Command detecting a single device from multiple connected devices-
It will detect the adb connection for device -5554 and install the application.
So, this way user can set up a successful connection to access ADB USB connect instances using ADB commands.
How to Configuring ADB for Wi-Fi Support
Just like configuring ADB connect USB, user can also configure ADB over wi-fi.
Pre-requisite
- Both Android device and the host computer should be connected to same wireless network and
- Device Bluetooth option should disabled.
Steps to connect-
- Connect device using USB cable to the host computer. Confirm USB debugging is enabled in device.
- Set target device to connect TCP/IP on port 5555

- Now, disconnect the USB cable from the device.
- In Android device find the IP address from Settings >> wi-fi Setting >> Advanced >> IP Address.Use the same Android Debug Bridge IP address to connect the device via ADB connect device USB connection
Hence, the final configuration done and ‘adb’ successfully configured over wireless network.
NOTE- If any connection error occurred just reset or kill the adb host connection. For that use following command
Источник
How to connect Android ADB over wifi without USB to control from your computer
Do you want to know how to connect and control your Android phone from your computer using ADB over wifi without USB; here is the step by step tutorial to connect ADB via IP (Wirelessly)
Being the owner of an ADB Android device, you must be knowing, what is ADB or Android Debug Bridge! If you do not know what ADB is, and how to activate Android debugging to control your smartphone from your computer, you can read my article: How to install ADB on Windows 10,8, 7 and Linux. But, do you know, you can also control your Android device, through a Wi-Fi network, using Android ADB wifi debugging. Yes, you heard it right, you do not need to use your data cable, to get the advantages of using ADB. You can set up and use the ADB over wifi with just a few steps and commands.
Let’s find out, how to control your smartphone from your computer using ADB over Wi-Fi. The steps are really easy. The only things, which you need are your smartphone, a Wi-Fi network, pretty obvious, a computer or a laptop, which is as well obvious, and a data cable. Yes, you need a USB data cable for the 1 st time.
Android ADB over wifi without USB -Step By Step Tutorial
Step 1: Connect your smartphone to your computer using Wi-Fi. If you face any kind of problems, or your computer cannot detect the device, the solutions to all your issues are available in my previous article on ADB.
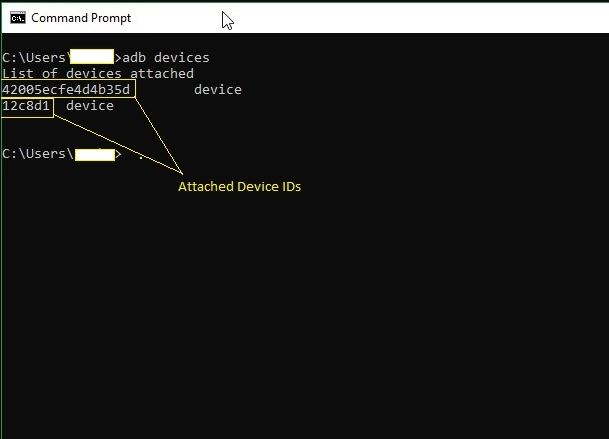
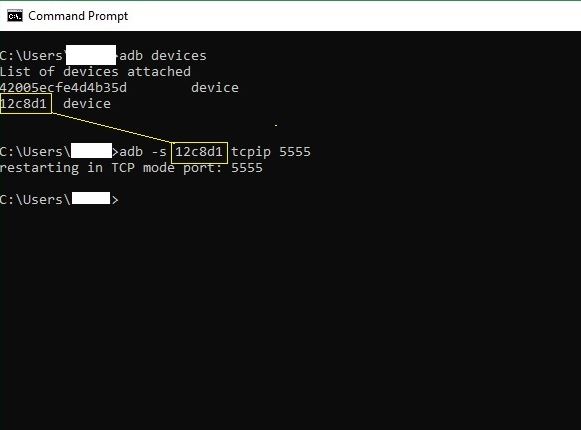
Step 2: After you connect, open ‘Command Prompt’ on Windows, or the ‘Terminal’ on Linux, and type ‘adb devices’. You will get a list of devices, connected to your computer. The alphanumeric codes represent your device.
Step 3: Now type ‘adb –s tcpip 5555’, if you are having multiple devices connected. If you are having a single device, just type ‘adb tcpip 5555’, and the ADB interface will understand, you are talking about the only connected device.
Just see the screenshot below to free yourself from any doubts.
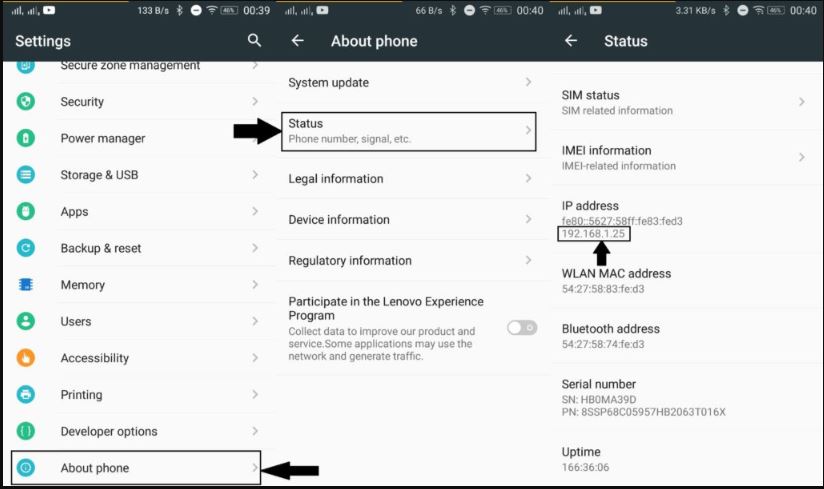
Step 4: Say goodbye to your data cable, and head to your ‘Device Settings’, and find the IP Address. Go to ‘Settings’>’About phone’>’Status’, to find the IP address.
Step 5: Go back to your Command-Line or Terminal, and type ‘adb connect :5555’.
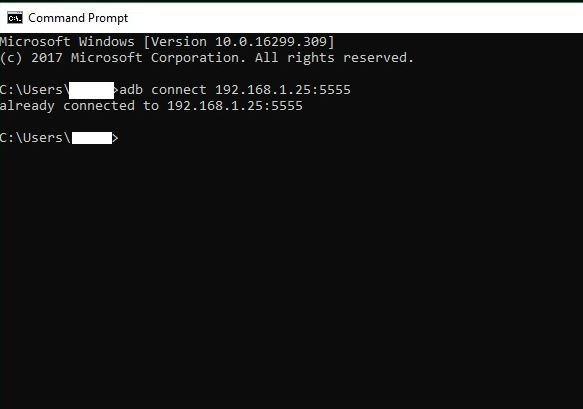
Step 6: Your Android device is now connected for ADB access over Wi-Fi. Now run any commands from your computer, and you will get the same results if you do it by connecting your smartphone to your computer with a data cable.
Some things to remember while connecting ADB over wifi without USB
But, the most important point is that both your computer and the smartphone should be on the same Wi-Fi network. If you change the Wi-Fi network, you will have to replace the ‘Device IP’ with the new IP address of your smartphone on the new Wi-Fi network, and you are good to go.
If you restart your computer or smartphone and want to connect your mobile, again through ADB, you will have to repeat the steps, as on turning off the smartphone, the service gets stopped, which need to be restarted.
Need more such cool tricks? Comment your ideas down below.
Источник


