- Android SDK: Creating Custom Views
- Step 1: Create an Android Project
- Step 2: Create a View Class
- Step 3: Create Attribute Resources
- Step 4: Add the View to the Layout
- Step 5: Retrieve the Attributes
- Step 6: Draw the View
- Step 7: Provide Get and Set Methods
- Step 8: Manipulate the View from the Activity
- Conclusion
- Реализация Custom View-компонента в Android
- Рисуем!
- Constructor
- onAttachedToWindow
- onMeasure
- onLayout
- onDraw
- View Update
- Animation
Android SDK: Creating Custom Views
The Android platform provides an extensive range of user interface items that are sufficient for the needs of most apps. However, there may be occasions on which you feel the need to implement a custom user interface for a project you are working on. In this tutorial we will work through the process of creating a custom View.
To create and use our custom View, we will extend the View class, define and specify some custom attributes, add the View to our layout XML, override the onDraw method to tailor the View appearance and manipulate it from our app’s main Activity.
Step 1: Create an Android Project
Create a new Android project in Eclipse. You can choose whatever settings you like as long as your app has a main Activity class and a layout file for it. We do not need any amendments to the Manifest file. In the source code download file the main Activity is named «LovelyActivity» and the layout file is «activity_lovely.xml» — alter the code to suit your own names if necessary. We will be creating and adding to a few additional files as we go along.
Step 2: Create a View Class
Our custom View can extend any of the existing Android View classes such as Button or TextView. However, we will create a direct subclass of View. Extending an existing class allows you to use the existing functionality and styling associated with that class, while providing processing to suit your own additional needs.
Create a new class in your application by selecting the app’s main package in Eclipse and choosing «File», «New», «Class». Enter a name of your choice and click «Finish». The tutorial code uses the class name «LovelyView» — you will need to alter it in all of the below code if you choose a different name. Make your new class extend View by adding to its opening declaration line:
Add the following import statements above this:
Step 3: Create Attribute Resources
In order to use our custom View as we would use a standard View (i.e. set its attributes in layout XML and refer to them in our Java code), we will declare attribute resources. In Eclipse, create a new file in your project «res/values» folder by selecting it and choosing «File», «New», «File». Enter «attrs.xml» as the file name and click «Finish».
In the attributes file we first need to indicate that we are listing resources, so add the following parent element:
Inside this element, we are going to declare three attributes for the View that will allow us to style it. Let’s keep things relatively simple — the View is going to display a circle with some text in the middle. The three attributes will be the circle color, the text String, and the text color. Add the following inside your resources element:
The declare-styleable element specifies the View name. Each attribute has a name and format. We will be able to specify these attributes in the layout XML when we add the custom View and also retrieve them in the View class. We will also be able to retrieve and set the attributes from our Java Activity class. The values provided for each attribute will need to be of the type listed here as format.
Step 4: Add the View to the Layout
Let’s add an instance of the custom View to our app’s main layout file. In order to specify the custom View and its attributes, we need to add an attribute to the parent layout element. In the source download, it is a RelativeLayout but you can use whichever type you prefer. Add the following attribute to your layout’s parent element:
Alter «your.package.name» to reflect the package your app is in. This specifies the namespace for our app, allowing us to use the attributes we defined within it. Now we can add an instance of the new View. Inside the layout, add it as follows:
Again, alter the package name to suit your own, and the class name if necessary. We will use the ID to refer to the View in our Activity code. Notice that the element lists standard View attributes alongside custom attributes. The custom attributes are preceded by «custom:» and use the names we specified in our attributes XML file. Note also that we have specified values of the types we indicated using the format attributes in the «attrs.xml» file. We will retrieve and interpret these values in our View class.
Step 5: Retrieve the Attributes
Now let’s turn back to the View class we created. Inside the class declaration, add some instance variables as follows:
We will use the first three of these to keep track of the current settings for color and text. The Paint object is for when we draw the View. After these variables, add a constructor method for your class:
As we are extending the View class, the first thing we do is call the superclass method. After the super call, let’s extend the method to setup the View. First instantiate the Paint object:
Now let’s retrieve the attribute values we set in XML:
This typed array will provide access to the attribute values. Notice that we use the resource name we specified in the «attrs.xml» file. Let’s now attempt to retrieve the attribute values, using a try block in case anything goes wrong:
We read the attributes into our instance variables. Notice that we use the names we listed for each in «attrs.xml» again. The colors are retrieved as integer values and the text label as a String.
That’s the constructor method complete — by the time it has executed, the class should have retrieved the selected View attributes we defined in the attribute resources file and set values for in the layout XML.
Step 6: Draw the View
Now we have our View attributes in the class, so we can go ahead and draw it. To do this, we need to override the onDraw method. Add its outline after your constructor method as follows:
Since we’re going to draw a circle, let’s get some information about the available space, inside the onDraw method:
Now we can calculate the circle radius:
Now let’s set some properties for painting with:
Now we will use the selected circle color as stored in our instance variable:
This means that the circle will be drawn with whatever color we listed in the layout XML. Let’s draw it now using these details:
Now let’s add the text. First set the color using the value retrieved from the layout XML:
Now set some more properties:
Finally we can draw the text, using the text string retrieved:
That’s onDraw complete.


Step 7: Provide Get and Set Methods
When you create a custom View with your own attributes, it is recommended that you also provide get and set methods for them in your View class. After the onDraw method, first add the get methods for the three customizable attributes:
Each method simply returns the value requested. Now add the set methods for the color attributes:
These methods accept int parameters representing the color to set. In both cases we update the instance variable in question, then prompt the View to be redrawn. This will make the onDraw method execute again, so that the new values affect the View displayed to the user. Now add the set method for the text:
This is the same as the other two set methods except for the String parameter. We will call on these methods in our Activity class next.
Step 8: Manipulate the View from the Activity
Now we have the basics of our custom View in place, let’s demonstrate using the methods within our Activity class. In the app’s main Activity class, add the following import statements:
Before the onCreate method, inside the class declaration, add an instance variable representing the instance of the custom View displayed:
Inside the onCreate method, after the existing code, retrieve this using its ID as included in the XML layout file:
To demonstrate setting the View attribute values from the Activity, we will add a simple button. Open your layout file and add it after the custom View element:
We specify a method to execute on user clicks — we will add this to the Activity class. First add the String to your «res/values/strings» XML file:


Now go back to the Activity class and add the method listed for clicks on the button:
Let’s use the set methods we defined to update the custom View appearance:
This is of course just to demonstrate how you can interact with a custom View within your Activity code. When the user clicks the button, the appearance of the custom View will change.


Conclusion
In general, it’s advisable to use existing Android View classes where possible. However, if you do feel that you need a level of customization beyond the default settings, creating your own custom Views is typically straightforward. What we have covered in this tutorial is really just the beginning when it comes to creating tailored Android user interfaces. See the official guide for information on adding interactivity and optimization to your customizations.
Источник
Реализация Custom View-компонента в Android
Каждый день мы пользуемся разными приложениями и несмотря на их различные цели, большинство из них очень похожи между собой с точки зрения дизайна. Исходя из этого, многие заказчики просят специфичные, индивидуальные макеты внешний вид, который не воплотило ещё ни одно приложение, чтобы сделать своё Android приложение уникальным и отличающимся от других.
Если какая-то специфичная особенность, из тех которые просит заказчик, требует особые функциональные возможности, которые невозможно сделать с помощью встроенных в Android View-компонентов, тогда нужно реализовывать собственный View-компонент (Custom View). Это не значит, что нужно всё взять и бросить, просто потребуется некоторое время на его реализацию, к тому же это довольно интересный и увлекательный процесс.
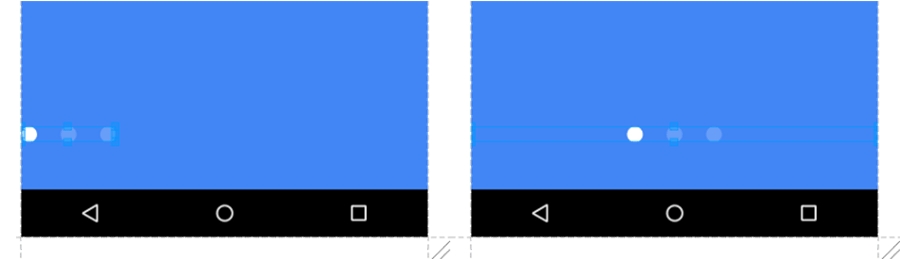
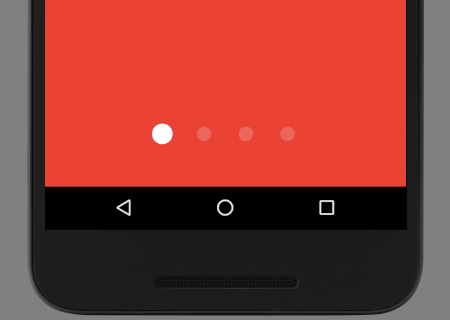
Я недавно попал в похожую ситуацию: мне нужно было создать индикатор страниц для Android ViewPager. В отличи от iOS, Android не предоставляет такой View-компонент, поэтому мне пришлось делать его самому.
Я потратил довольно много времени на его реализацию. К счастью, этот Custom View-компонент можно использовать и в других проектах, поэтому чтобы сэкономить личное время и время других разработчиков, я решил оформить всё это дело в виде библиотеки. Если вам нужен похожий функционал и не хватает времени на его реализацию собственными силами, можете взять его с этого GitHub репозитория.
Рисуем!
Так как в большинстве случаев разработка Custom View-комопонента занимает больше времени, чем работа с обычными View-компонентами, создавать их целесообразно только тогда, когда нет более простого способа реализовать специфичную особенность, или когда у вас есть ниже перечисленные проблемы, которые Custom View-компонент может решить:
- Производительность. Если у вас есть много View-компонентов в одном layout-файле и вы хотите оптимизировать это с помощью создания единственного Custom View-компонента;
- Большая иерархия View-компонентов, которая сложна в эксплуатации и поддержке;
- Полностью настраиваемый View-компонент, которому нужна ручная отрисовка;
Если вы ещё не пробовали разрабатывать Custom View, то эта статья — отличная возможность окунуться в эту тему. Здесь будет показана общая структура View-компонента, как реализовывать специфичные вещи, как избежать распространённые ошибки и даже как анимировать ваш View-компонент!
Первая вещь, которую нам нужно сделать, это погрузиться в жизненный цикл View. По какой-то причине Google не предоставляет официальную диаграмму жизненного цикла View-компонента, это довольно распространённое среди разработчиков непонимание, поэтому давайте рассмотрим её.
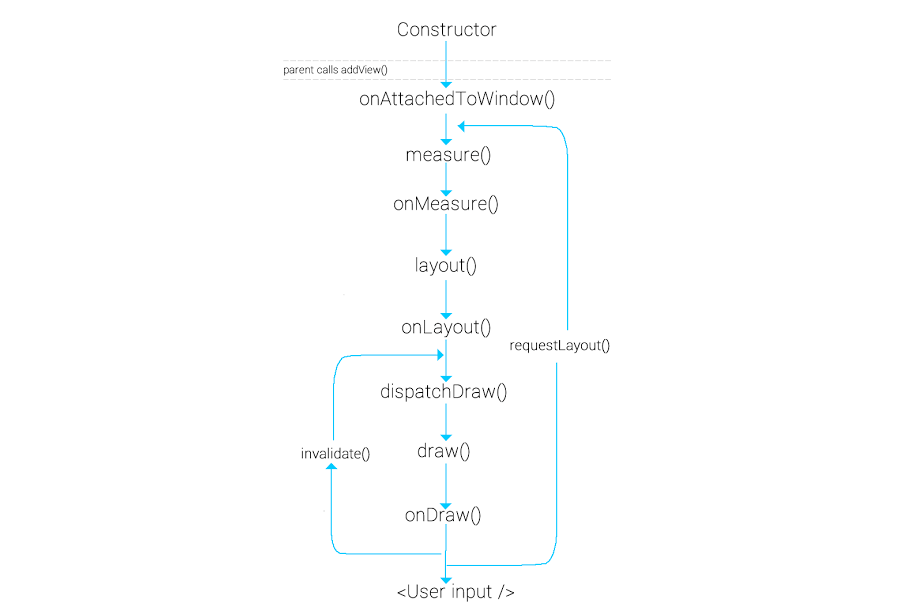
Constructor
Каждый View-компонент начинается с Constructor’а. И это даёт нам отличную возможность подготовить его, делая различные вычисления, устанавливая значения по умолчанию, ну или вообще всё что нам нужно.
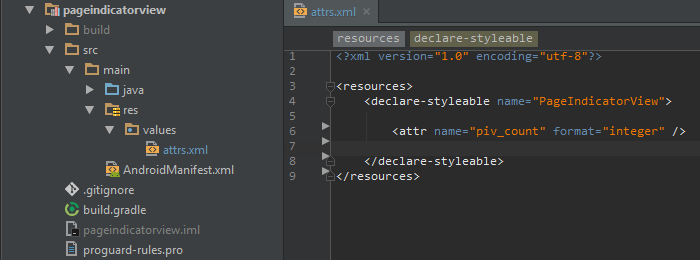
Но для того чтобы сделать наш View-компонент простым в использовании и установке, существует полезный интерфейс AttributeSet. Его довольно просто реализовать и определённо стоит потратить на это время, потому что он поможет вам (и вашей команде) в настройке вашего View-компонента с помощью некоторых статических параметров на последующих экранах. Во-первых, создайте новый файл и назовите его «attrs.xml». Этот файл может содержать все атрибуты для различных Custom View-компонентов. Как вы можете видеть в этом примере есть View-компонент названный PageIndicatorView и один атрибут piv_count.
Во-вторых, в конструкторе вашего View-компонента, вам нужно получить атрибуты и использовать их как показано ниже.
- При создании кастомных атрибутов, добавьте простой префикс к их имени, чтобы избежать конфликтов имён с другими View-компонентами. Обычно добавляют аббревиатуру от названия View-компонента, поэтому у нас префикс «piv_»;
- Если вы используете Android Studio, то Lint будет советовать вам использовать метод recycle() до тех пор пока вы сделаете это с вашими атрибутами. Причина заключается в том, что вы можете избавиться от неэффективно связанных данных, которые не будут использоваться снова;
onAttachedToWindow
После того как родительский View-компонент вызовет метод addView(View), этот View-компонент будет прикреплён к окну. На этой стадии наш View-компонент будет знать о других View-компонентах, которые его окружают. Если ваш View-компонент работает с View-компонентами пользователя, расположенными в том же самом «layout.xml» файле, то это хорошее место найти их по идентификатору (который вы можете установить с помощью атрибутов) и сохранить их в качестве глобальной ссылки (если нужно).
onMeasure
Этот метод означает, что наш Custom View-компонент находится на стадии определения собственного размера. Это очень важный метод, так как в большинстве случаев вам нужно определить специфичный размер для вашего View-компонента, чтобы поместиться на вашем макете.
При переопределении этого метода, всё что вам нужно сделать, это установить setMeasuredDimension(int width, int height).
При настройке размера Custom View-компонента вы должны обработать случай, когда у View-компонента может быть определённый размер, который пользователь (прим. переводчика: программист работающий с вашим View-компонентом) будет устанавливать в файле layout.xml или программно. Для вычисления этого свойства, нужно проделать несколько шагов:
- Рассчитать размер необходимый для содержимого вашего View-компонента (ширину и высоту);
- Получить MeasureSpec вашего View-компонента (ширину и высоту) для размера и режима;
- Проверить MeasureSpec режим, который пользователь устанавливает и регулирует (для ширины и высоты);
Посмотрите на значения MeasureSpec:
- MeasureSpec.EXACTLY означает, что пользователь жёстко задал значения размера, независимо от размера вашего View-компонента, вы должны установить определённую ширину и высоту;
- MeasureSpec.AT_MOST используется для создания вашего View-компонента в соответствии с размером родителя, поэтому он может быть настолько большим, насколько это возможно;
- MeasureSpec.UNSPECIFIED — на самом деле размер обёртки View-компонента. Таким образом, с этим параметром вы можете использовать желаемый размер, который вы расчитали выше.
Перед установкой окончательных значений в setMeasuredDimension, на всякий случай проверьте эти значения на отрицательность Это позволит избежать любых проблем в предпросмотре макета.
onLayout
Этот метод позволяет присваивать размер и позицию дочерним View-компонентам. У нас нет дочерних View-компонентов, поэтому нет смысла переопределять этот метод.
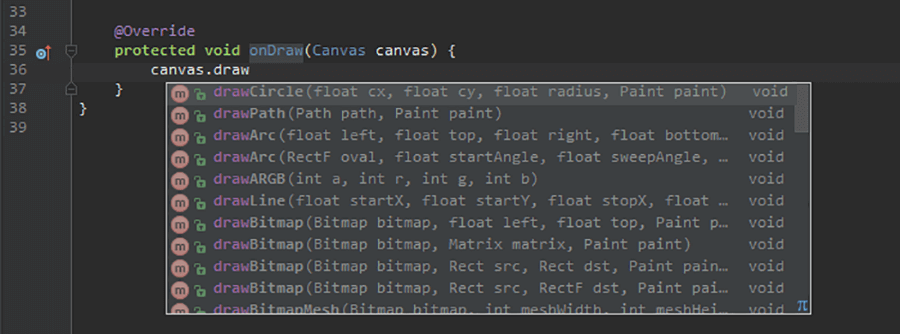
onDraw
Вот здесь происходит магия. Два объекта, Canvas и Paint, позволяют вам нарисовать всё что вам нужно. Экземпляр объекта Canvas приходит в качестве параметра для метода onDraw, и по существу отвечает за рисование различных фигур, в то время как объект Paint отвечает за цвет этой фигуры. Простыми словами, Canvas отвечает за рисование объекта, а Paint за его стилизацию. И используется он в основном везде, где будет линия, круг или прямоугольник.
Создавая Custom View-компонент, всегда учитывайте, что вызов onDraw занимает довольно много времени. При каких-то изменениях, сроллинге, свайпе вы будете перерисовывать. Поэтому Andorid Studio рекомендует избегать выделение объекта во время выполнения onDraw, вместо этого создайте его один раз и используйте в дальнейшем.
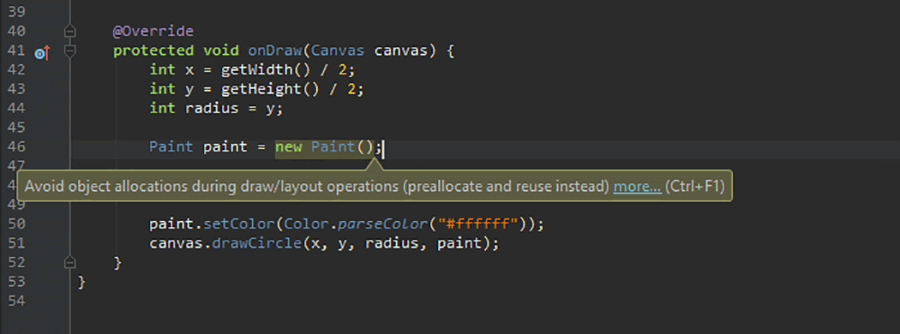
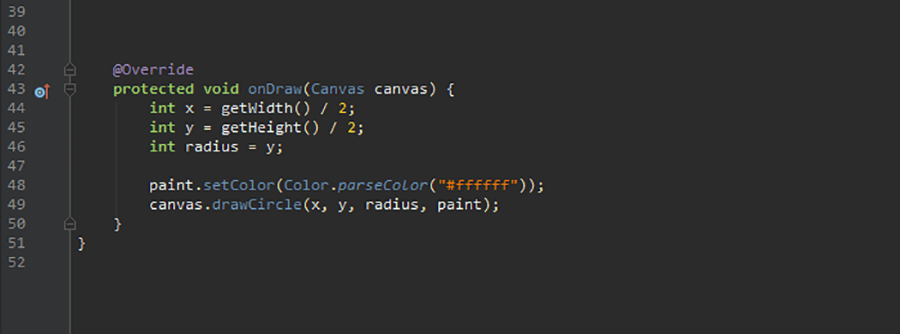
- При отрисовке, имейте в виду переиспользование объектов вместо создания новых. Не полагайтесь на вашу IDE, которая должна подсветить потенциальную проблему, а сделайте это самостоятельно, потому что IDE может не увидеть этого, если вы создаёте объекты внутри методов вызываемых в onDraw;
- Во время отрисовки, не задавайте размер прямо в коде. Обрабатывайте случай, когда у других разработчиков может быть тот же самый View-компонент, но с другим размером, поэтому делайте ваш View-компонент зависимым от того размера, который ему присвоен;
View Update
Из диаграммы жизненного цикла View-компонента, вы можете заметить что существует два метода, которые заставляют View-компонент перерисовываться. Методы invalidate() и requestLayout() могут помочь вам сделать ваш Custom View-компонент интерактивным, что собственно поможет изменять его внешний вид во время выполнения. Но почему их два?
Метод invalidate() используется когда просто нужно перерисовать View-компонент. Например, когда ваш View-компонент обновляет свой текст, цвет или обрабатывает прикосновение. Это значит, что View-компонент будет вызывать только метод onDraw, чтобы обновить своё состояние.
Метод requestLayout(), как вы можете заметить будет производить обновление View-компонента через его жизненный цикл, только из метода onMeasure(). А это означает, что сразу после обновления View-компонента вам нужно его измерить, чтобы отрисовать его в соответствии с новыми размерами.
Animation
Анимации в Custom View-компонентах, это по кадровый процесс. Это означает, что если вы например захотите сделать анимированным процесс изменения радиуса круга от маленького к большому, то вам нужно увеличивать его последовательно и после каждого шага вызывать метод invalidate для отрисовки.
Ваш лучший друг в анимации Custom View-компонентов — это ValueAnimator. Этот класс будет помогать вам анимировать любые значения от начала до конца и даже обеспечит поддержку Interpolator (если нужно).
Не забывайте вызывать метод Invalidate каждый раз, когда изменяется значение анимации.
Надеюсь, что эта статья поможет вам сделать свой первый Custom View-компонент. Если вы захотите получить больше информации по этой теме, то может посмотреть хорошее видео.
Источник


