- Assets Folder in Android Studio
- How the asset folder is different from the Resource Raw folder?
- But when to use which folder?
- How to Create Assets Folder in Android Studio?
- Folder and File Structure
- 1. Manifests folder
- 2. Java folder
- 3. Res folder
- 3.1. Drawable folder
- 3.2. Layout folder
- 3.3. Mipmap folder
- 3.4. Values folder
- 3.5. Other folders
- Gradle Scripts
- How To Create Different Folders For Adding Different Resolution Images In Android Studio
- How to Add/Create different folders for adding different resolution Images in Android Studio
Assets Folder in Android Studio
It can be noticed that unlike Eclipse ADT (App Development Tools), Android Studio doesn’t contain an Assets folder in which we usually use to keep the web files like HTML. Assets provide a way to add arbitrary files like text, XML, HTML, fonts, music, and video in the application. If one tries to add these files as “resources“, Android will treat them into its resource system and you will be unable to get the raw data. If one wants to access data untouched, Assets are one way to do it. But the question arises is why in the asset folder? We can do the same things by creating a Resource Raw Folder. So let discuss how the assets folder is different from the Resource Raw folder?
How the asset folder is different from the Resource Raw folder?
In Android one can store the raw asset file like JSON, Text, mp3, HTML, pdf, etc in two possible locations:
- assets
- res/raw folder

Both of them appears to be the same, as they can read the file and generate InputStream as below
But when to use which folder?
Below is some guidance that might be helpful to choose
1. Flexible File Name: (assets is better)
- assets: The developer can name the file name in any way, like having capital letters (fileName) or having space (file name).
- res/raw: In this case, the name of the file is restricted. File-based resource names must contain only lowercase a-z, 0-9, or underscore.
2. Store in subdirectory: (possible in assets)
- assets: If the developer wants to categories the files into subfolders, then he/she can do it in assets like below.

3. Compile-time checking: (possible in res/raw)
- assets: Here, the way to read it into InputStream is given below. If the filename doesn’t exist, then we need to catch it.
- res/raw folder: Here, the way to read it into InputStream is:
So putting a file in the res/raw folder will provide ensure the correct file-name during compile time check.
4. List filenames at runtime: (possible in assets)
- assets: If the developer wants to list all the files in the assets folder, he/she has used the list() function and provide the folder name or ” “ on the root folder as given below.
- res/raw: This is not possible in this folder. The developer has to know the filename during development, and not runtime.
So, in assets, one can read the filename during runtime, list them, and use them dynamically. In res/raw, one needs to code them ready, perhaps in the string resources file.
5. Filename accessible from XML: (possible in res/raw)
So if you need to access your file in any XML, put it in the res/raw folder. Let’s make a table to remember the whole scenario easily.
| Res/Raw Folder |
|---|
| Flexible File Name NO |
| Store in subdirectory NO |
| Compile-time checking YES |
| List filenames at runtime NO |
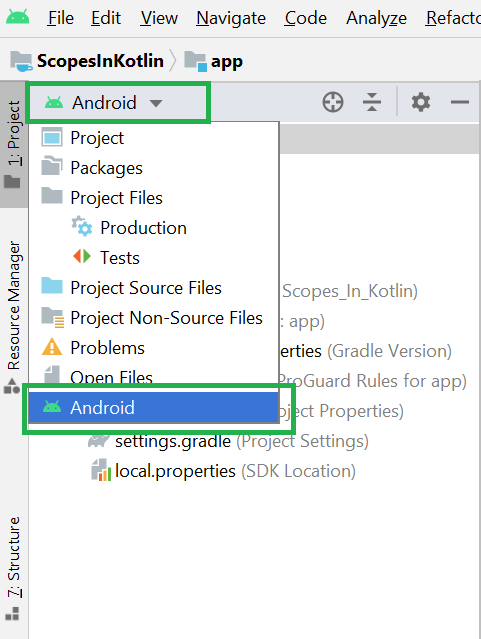
Filename accessible from XML How to Create Assets Folder in Android Studio?Now let’s discuss how to create an assets folder in the android studio. Below is the step-by-step process to create an assets folder in Android studio. Step 1: To create an asset folder in Android studio open your project in Android mode first as shown in the below image.
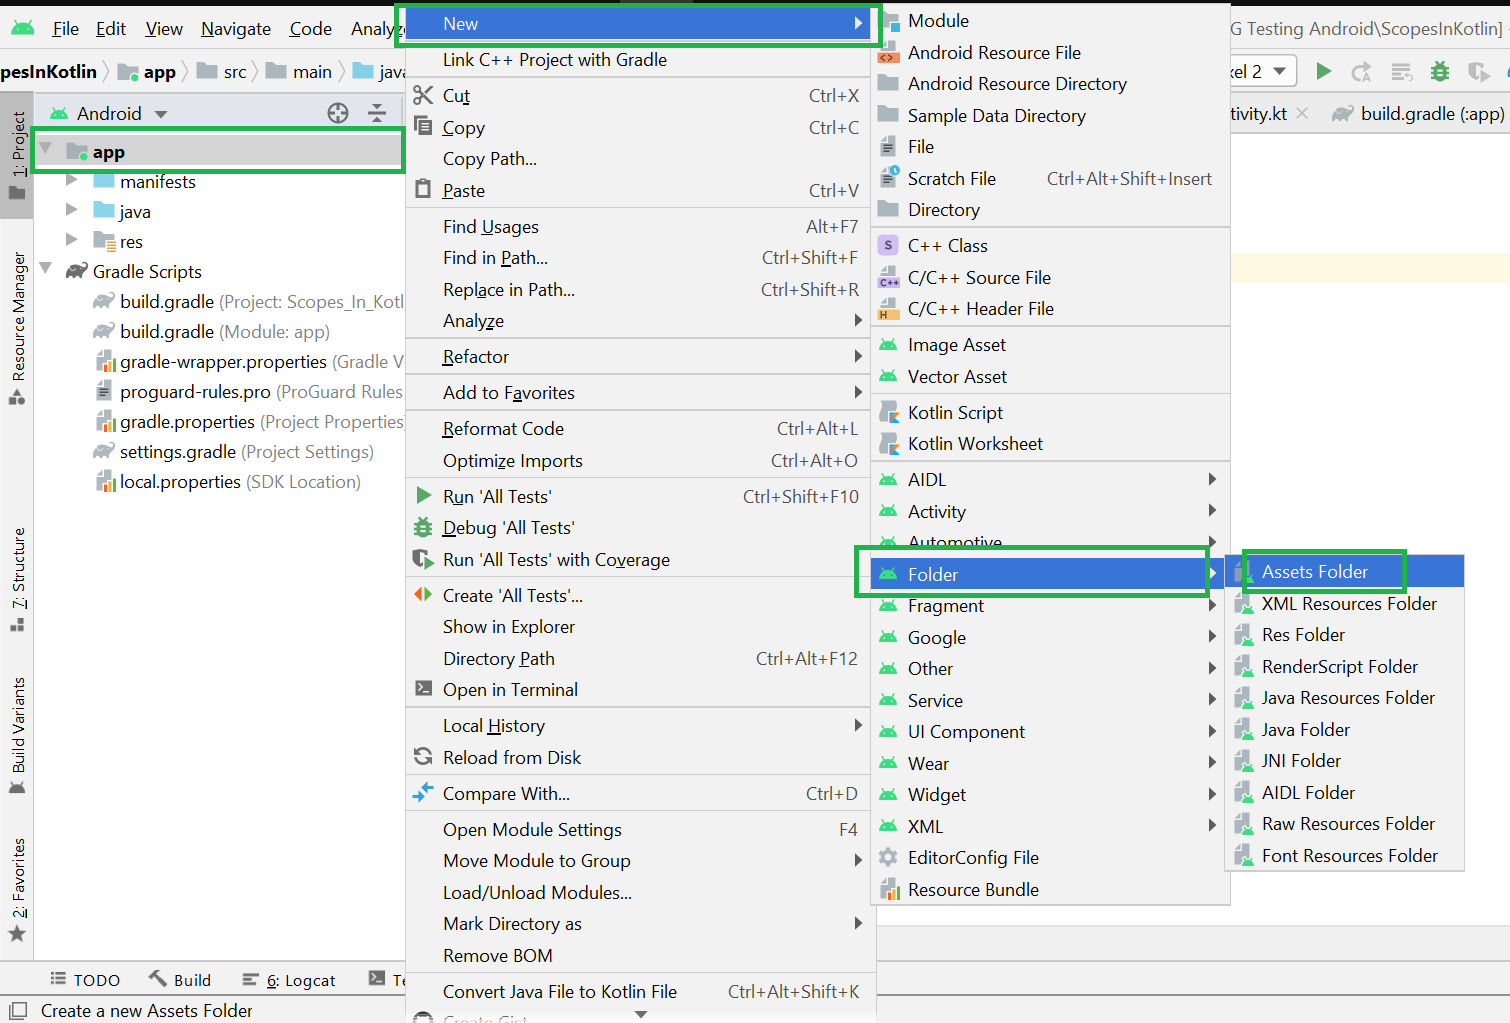
Step 2: Go to the app > right-click > New > Folder > Asset Folder and create the asset folder.
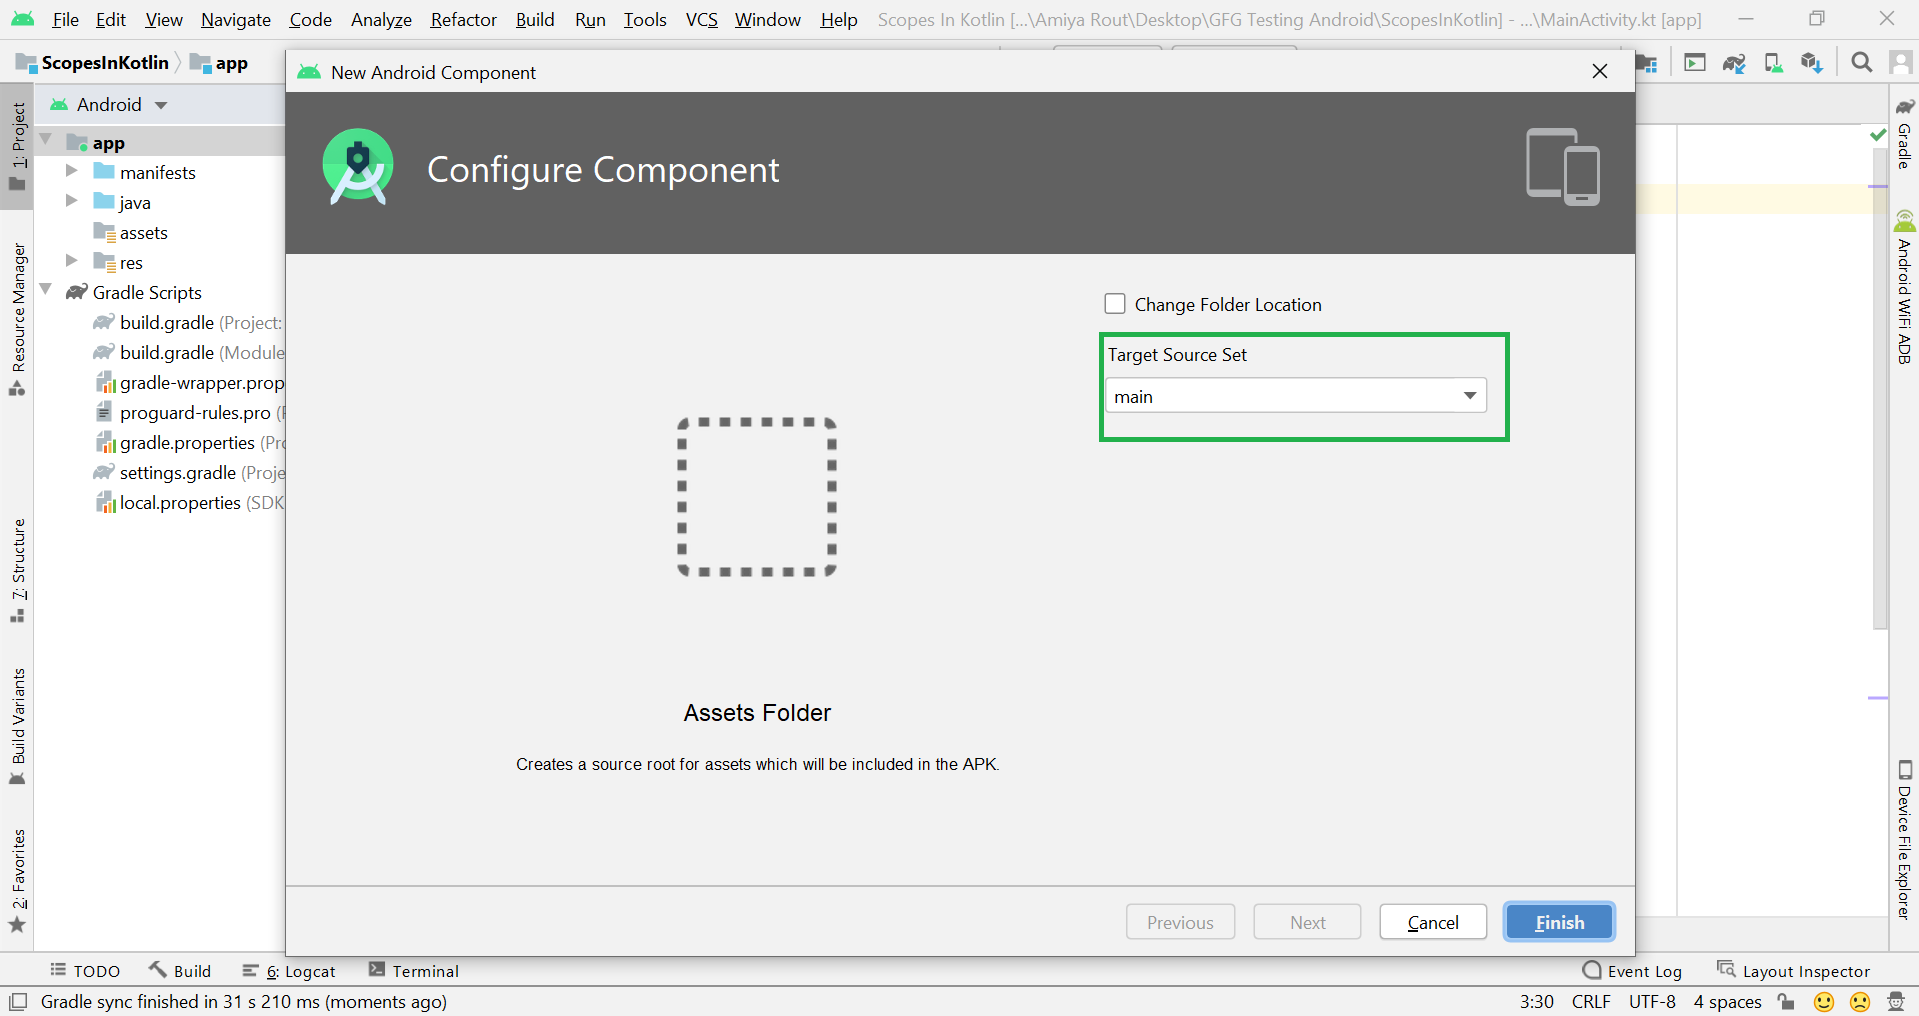
Step 3: Android Studio will open a dialog box. Keep all the settings default. Under the target source set, option main should be selected. and click on the finish button.
Step 4: Now open the app folder and you will find the assets folder by the name of “assets” as shown in the below image. Источник Folder and File StructureThe Project tool window has several views, including the Android view, the Project view, and the Packages view. Each view shows the same stuff, but each view organizes this stuff a bit differently. The button just at above the left pane (shown by the arrow) is used to open the selection box for choosing the preferred method of viewing the file hierarchy. Android and Project are the most useful views, though the Android view may hide certain folders from you. By default, Android Studio will set the view to Android . The Project tool window provides a simple tree interface with files and nested folders that you can toggle. When you create an application in Android Studio, you find that the project is divided into an App folder and Gradle scripts. The App folder contains three subfolders ( manifests , java and res ) that make up your application. They are divided so that it should be fairly easy to determine which resources go in which folder. If you expand all of the folders in the project explorer you will see a vast array of files and folders. Most of them are managed by Android Studio. We will focus on the key folders and file types that we will be using as Android developers. 1. Manifests folderThis is where you would put your manifest files. Most Android apps have single manifest file. But an app may have several manifest files due to application versioning, or for supporting specific hardware. A AndroidManifest.xml file is generated inside manifest folder by Android Studio when you create a project. This file contains the configuration parameters of the project such as permissions, services and additional libraries. A manifest file also provides information to the OS and Google Play store about your app. 2. Java folderLet’s take a look at what is in the java folder. This is the folder in your project where you will be storing all of the source code files written in Java programming language. A MainActivity.java is automatically created in this folder by Android Studio. All of your classes will be available here, and Android Studio will even bundle together the package path so that you can work with the files without having to drill down through the folders that make up your package. 3. Res folderIt contains folders that help you separate and sort the resources of your application. Resources basically mean all the needed files except the source code. For example, while developing an app, you need to include resource files such as the app-logo, photos, sounds, videos or animations. Each file type should be added to its own folder to comply with the Android development standards. When you use Android Studio to create a new application, some folders will be automatically generated for you. However, these folders are not the only ones you can use in your project. The following are the folders that can be used inside of the res folder: 3.1. Drawable folderThe drawable folder contains graphics that can be drawn to the screen. e.g. images files (png, jpg and gif), various XML (clip drawable, insert drawable, layer list, level list, scale drawable, shape draggable, state list, transition drawable), and predetermined frame animations can be placed here: Bitmap file Nine-Patch file Layer list State list Level list Transition drawable Inset drawable Clip drawable Scale drawable Shape drawable 3.2. Layout folderThe layout folder contains XML files used for your layouts. These file are used to set up the layout for your Activity and is used for basic alignment of your layouts, components, widgets, and similar resources that are used for the UI of your application. activity_main.xml is automatically created in this folder by Android Studio. Layout folder may have multiple layout folders to handle different devices. This can be helpful when working with layouts that need to be adjusted for devices with more or less screen space available. 3.3. Mipmap folderThe mipmap folder contains the launcher icon files for the app. A launcher icon is a graphic that represents your app to users. The mipmap folder was introduced in Android 4.3. 3.4. Values folderThe values folder contains XML files that contain simple values, such as strings, integers, and colors. The values folder is used to keep track of the values you will be using in your application. To create applications with an easier maintenance cycle, it is highly recommended to no longer hard-code values into your code. Instead, place values in XML files inside of the values folder. When you create a new project with Android Studio, the following XML files will be generated automatically:
3.5. Other foldersNot all folders may be shown for your resources but you can create other folders for other resources in your application. Following list describes each folder name as well as what should be stored in that folder. animator anim color menu raw xml font Gradle ScriptsApk files are built using the gradle build system, which is integrated in the Android Studio. When we start an app, the gradle build scripts are automatically created. If you have special requirements for your project, you can specify these requirements here. The gradle scripts folder contains the scripts used to build the app are: configuration files, properties files, and setting files. Источник How To Create Different Folders For Adding Different Resolution Images In Android StudioAndroid support a wide range of devices and if you want to create an application in android then your application must be compatible with the different mobile devices. For supporting the different screen sizes you must have different size images which you will save in various folders. Usually Android has four folder which covers almost every device:,drawable-ldpi, drawable-mdpi, drawable-hdpi,drawable-xhdpi. Background Images Dimensions for these different folders are as follows: ldpi = 240×320 pixels mdpi = 320×480 pixels hdpi = 480×800 pixels xhdpi = 720×1280 pixels How to Add/Create different folders for adding different resolution Images in Android StudioStep 1: First of all you must have different images for these folder with given resolution. You can get the images in different resolutions through 9-Patches or you can use any high end image editor tool like Adobe Photoshop.
Step 2: Once you have all the images with you, now it’s time to create the folders for images. Navigate to Project View in Android Studio
Step 3: Go to App folder src > main > res folder. Step 4: right click on res folder. select New and then click Directory.
Step 5: Enter the name of your directory for example: drawable-ldpi.
Step 6: Now you have”drawable-lpdi” folder inside res folder. You can create rest of the folder “drawable-mdpi”,”drawable-hdpi” and “drawable-xhdpi”. Step 7: You can paste the different resolution images inside respective different folders. Источник  Когда к мобильному устройству присоединены наушники  ОС Google Android развивается, и по всему видимому |