- ImageView
- Общая информация
- Метод setImageResource()
- Метод setImageBitmap()
- Метод setImageDrawable()
- Метод setImageURI()
- Другие методы
- Масштабирование через свойство Scale Type
- Атрибут android:adjustViewBounds=»true»
- Загрузка изображения из галереи
- Получить размеры ImageView — будьте осторожны
- Копирование изображений между ImageView
- Примеры
- Android ImageView ScaleType: A Visual Guide
- Scale Types
- CENTER
- CENTER_CROP
- CENTER_INSIDE
- FIT_CENTER
- FIT_END
- FIT_START
- FIT_XY
- MATRIX
- Adjust View Bounds
- If you enjoyed this post, you might also like:
- Mobile design and development services for every stage of your app
- Android crop to padding
- About
ImageView
Общая информация
Компонент ImageView предназначен для отображения изображений. Находится в разделе Widgets.
Для загрузки изображения в XML-файле используется атрибут android:src, в последнее время чаще используется атрибут app:srcCompat.
ImageView является базовым элементом-контейнером для использования графики. Можно загружать изображения из разных источников, например, из ресурсов программы, контент-провайдеров. В классе ImageView существует несколько методов для загрузки изображений:
- setImageResource(int resId) — загружает изображение по идентификатору ресурса
- setImageBitmap(Bitmap bitmap) — загружает растровое изображение
- setImageDrawable(Drawable drawable) — загружает готовое изображение
- setImageURI(Uri uri) — загружает изображение по его URI
Метод setImageResource()
Сначала нужно получить ссылку на ImageView, а затем используется идентификатор изображения из ресурсов:
Метод setImageBitmap()
Используется класс BitmapFactory для чтения ресурса изображения в объект Bitmap, а затем в ImageView указывается полученный Bitmap. Могут быть и другие варианты.
Метод setImageDrawable()
Если у вас есть готовое изображение, например, на SD-карте, то его можно использовать в качестве объекта Drawable.
Drawable можно получить и из ресурсов, хотя такой код выглядит избыточным, если можно сразу вызвать setImageResource().
Метод setImageURI()
Берётся URI файла изображения и используется в качестве источника изображения. Этот способ годится для работы с локальными изображениями.
Загружаем Drawable через URI.
Другие методы
Также вам часто придется использовать методы, связанные с размерами и масштабированием: setMaxHeight(), setMaxWidth(), getMinimunHeight(), getMinimunWidth(), getScaleType(), setScaleType().
Масштабирование через свойство Scale Type
Для масштабирования картинки в ImageView есть свойство Scale Type и соответствующий ему атрибут android:scaleType и перечисление ImageView.ScaleType.
- CENTER
- CENTER_CROP
- CENTER_INSIDE
- FIT_CENTER
- FIT_START
- FIT_END
- FIT_XY
- MATRIX
Чтобы увидеть разницу между разными режимами, желательно использовать большую картинку, превосходящую по ширине экрана устройства. Допустим, у нас есть простенькая разметка:
Для наглядности я задал красный цвет для фона ImageView.
Режим android:scaleType=»center» выводит картинку в центре без масштабирования. Если у вас будет картинка большего размера, то края могут быть обрезаны.

Режим android:scaleType=»centerCrop» также размещает картинку в центре, но учитывает ширину или высоту контейнера. Режим попытается сделать так, чтобы ширина (или высота) картинки совпала с шириной (или высотой) контейнера, а остальное обрезается.

Режим android:scaleType=»centerInside» масштабирует картинку, сохраняя пропорции. Можно увидеть задний фон контейнера, если его размеры отличаются от размера картинки.

Режим android:scaleType=»fitCenter» (по умолчанию) похож на предыдущий, но может не сохранять пропорции.
Если выбрать режим android:scaleType=»fitStart», то картинка прижимается к левому верхнему углу и таким образом заполняет верхнюю половину контейнера.

Значение android:scaleType=»fitEnd» сместит картинку в нижнюю часть контейнера.
Режим android:scaleType=»fitXY» растягивает/сжимает картинку, чтобы подогнать её к контейнеру. Может получиться вытянутая картинка, поэтому будьте осторожны.
Последний атрибут android:scaleType=»matrix» вывел картинку без изменений в левом верхнем углу с обрезанными краями.
Атрибут android:adjustViewBounds=»true»
При использовании атрибута scaleType=»fitCenter» из предыдущего примера Android вычисляет размеры самой картинки, игнорируя размеры ImageView. В этом случае ваша разметка может «поехать». Атрибут adjustViewBounds заставляет картинку подчиниться размеру компонента-контейнера. В некоторых случаях это может не сработать, например, если у ImageView установлен атрибут layout_width=»0dip». В таком случае поместите ImageView в RelativeLayout или FrameLayout и используйте значение 0dip для этих контейнеров.
Загрузка изображения из галереи
Предположим, у вас есть на экране компонент ImageView, и вы хотите загрузить в него какое-нибудь изображение из галереи по нажатию кнопки:
Намерение ACTION_PICK вызывает отображение галереи всех изображений, хранящихся на телефоне, позволяя выбрать одно изображение. При этом возвращается адрес URI, определяющий местоположение выбранного изображения. Для его получения используется метод getData(). Далее для преобразования URI-адреса в соответствующий экземпляр класса Bitmap используется специальный метод Media.getBitmap(). И у нас появляется возможность установить изображение в ImageView при помощи setImageBitmap().
На самом деле можно поступить ещё проще и использовать метод setImageURI.
Сравните с предыдущим примером — чувствуете разницу? Тем не менее, приходится часто наблюдать подобный избыточный код во многих проектах. Это связано с тем, что метод порой кэширует адрес и не происходит изменений. Рекомендуется использовать инструкцию setImageURI(null) для сброса кэша и повторный вызов метода с нужным Uri.
В последних версиях системных эмуляторов два примера не работают. Проверяйте на реальных устройствах.
Получить размеры ImageView — будьте осторожны
У элемента ImageView есть два метода getWidth() и getHeight(), позволяющие получить его ширину и высоту. Но если вы попробуете вызвать указанные методы сразу в методе onCreate(), то они возвратят нулевые значения. Можно добавить кнопку и вызвать данные методы через нажатие, тогда будут получены правильные результаты. Либо использовать другой метод активности, который наступает позже.
Копирование изображений между ImageView
Если вам надо скопировать изображение из одного ImageView в другой, то можно получить объект Drawable через метод getDrawable() и присвоить ему второму компоненту.
Примеры
В моих статьях можно найти примеры использования ImageView.
Источник
Android ImageView ScaleType: A Visual Guide
If you’re anything like me, you are really, really, ridiculously good looking. But you’re also probably a tad forgetful. So when it comes time to scale an image in an ImageView , you cannot for the life of you remember what all the different ScaleType s actually look like on the screen. So, you spend the next 10-15 minutes building and rebuilding your app with each and every scale type to see what they all look like. Then you inevitably forget the difference between two of them and start the whole process all over again. As the kids say, “I gotchu fam”.
Below are screenshots of all the different ScaleType s placed side-by-side. And below that are all the ScaleType definitions copy and pasted directly from the official Android docs. And even further below those is a helpful tip for those brave souls who make it to the end of this post 🙂
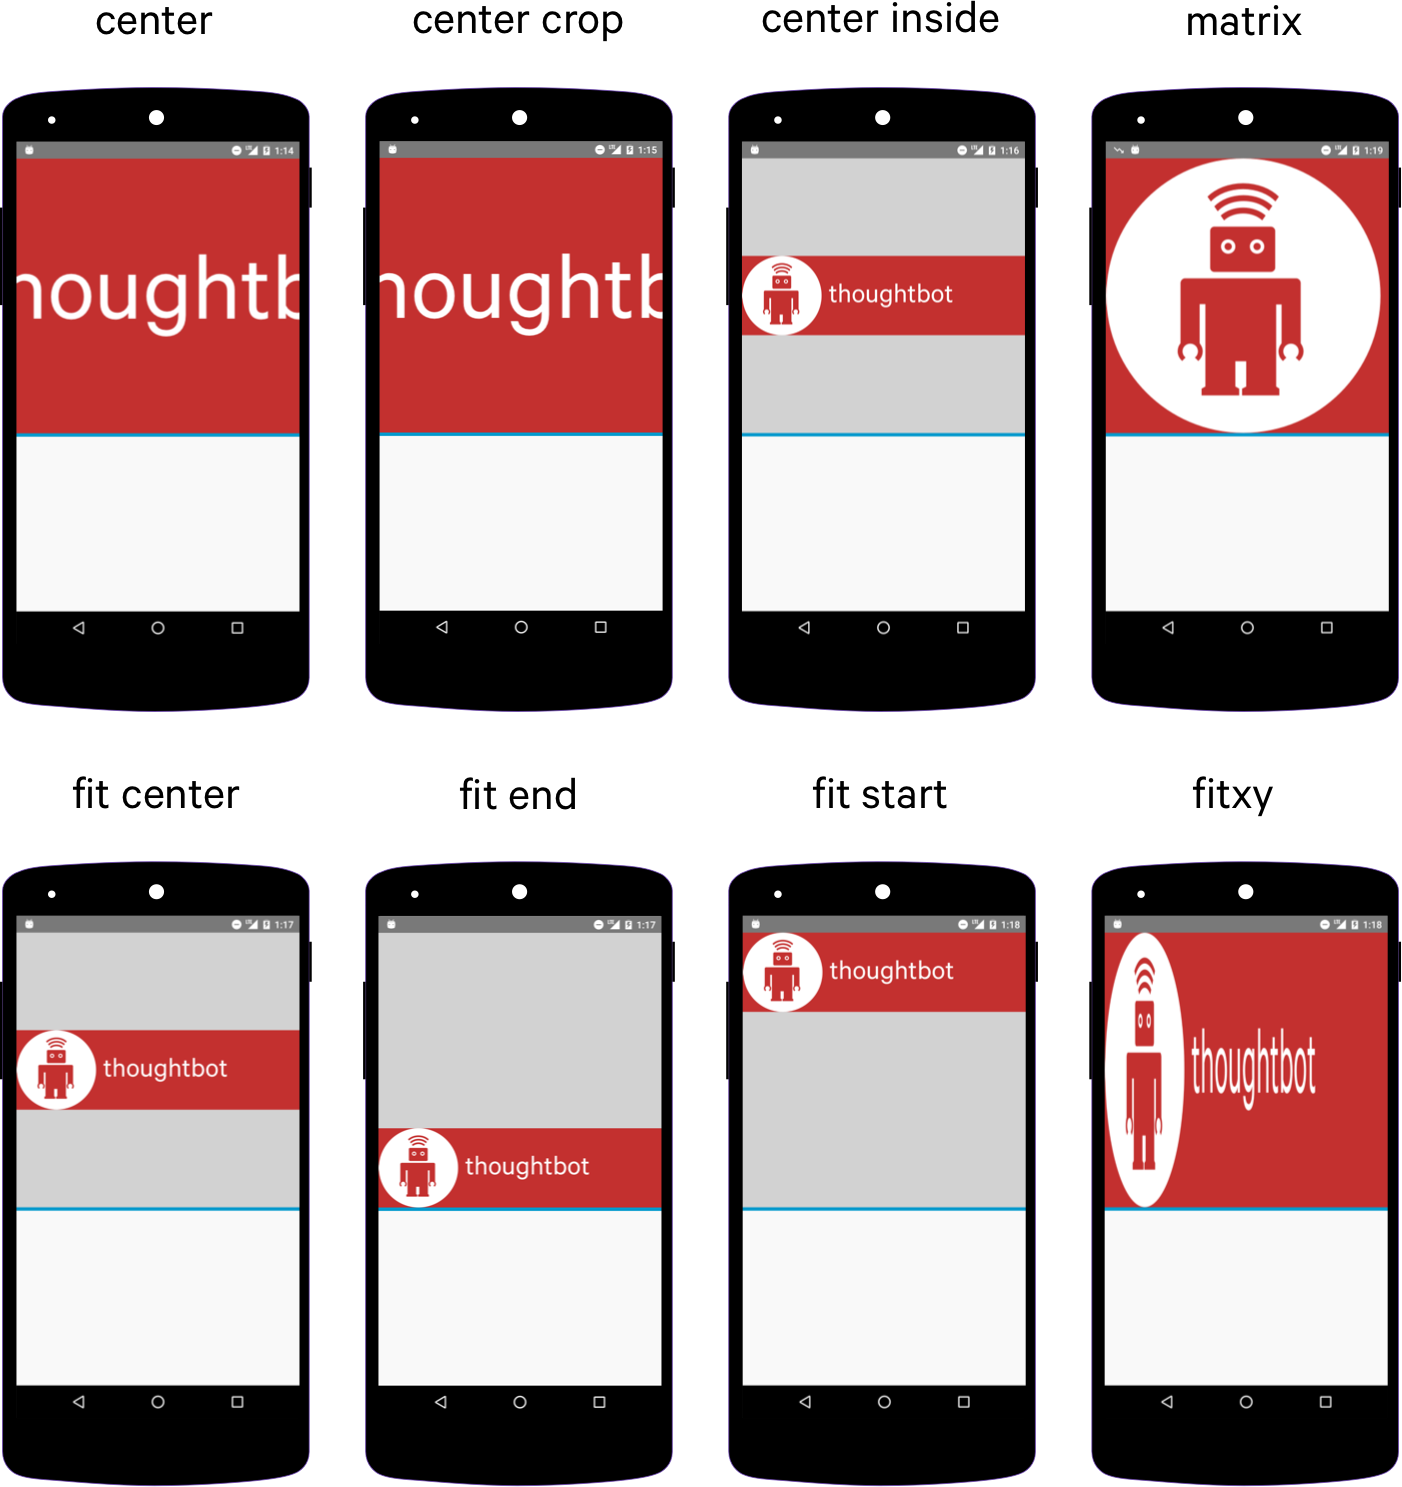
Scale Types
The full descriptions of each ScaleType from the official Android documentation.
CENTER
Center the image in the view, but perform no scaling.
CENTER_CROP
Scale the image uniformly (maintain the image’s aspect ratio) so that both dimensions (width and height) of the image will be equal to or larger than the corresponding dimension of the view (minus padding).
CENTER_INSIDE
Scale the image uniformly (maintain the image’s aspect ratio) so that both dimensions (width and height) of the image will be equal to or less than the corresponding dimension of the view (minus padding).
FIT_CENTER
Scale the image using Matrix.ScaleToFit.CENTER
Matrix.ScaleToFit.CENTER : Compute a scale that will maintain the original src aspect ratio, but will also ensure that src fits entirely inside dst. At least one axis (X or Y) will fit exactly. The result is centered inside dst.
FIT_END
Scale the image using Matrix.ScaleToFit.END
Matrix.ScaleToFit.END : Compute a scale that will maintain the original src aspect ratio, but will also ensure that src fits entirely inside dst. At least one axis (X or Y) will fit exactly. END aligns the result to the right and bottom edges of dst.
FIT_START
Scale the image using Matrix.ScaleToFit.START
Matrix.ScaleToFit.START : Compute a scale that will maintain the original src aspect ratio, but will also ensure that src fits entirely inside dst. At least one axis (X or Y) will fit exactly. START aligns the result to the left and top edges of dst.
FIT_XY
Scale the image using Matrix.ScaleToFit.FILL
Matrix.ScaleToFit.FILL : Scale in X and Y independently, so that src matches dst exactly. This may change the aspect ratio of the src.
MATRIX
Scale using the image matrix when drawing.
Adjust View Bounds
While not technically an ImageView.ScaleType this will come in handy. If you notice with CENTER_INSIDE , FIT_CENTER , FIT_END and FIT_START the actual bounds of the ImageView are much larger than the scaled image. To set the bounds of the ImageView to the height of the image inside, use android:adjustViewBounds=»true” in your XML. It looks like this:

If you enjoyed this post, you might also like:

Mobile design and development services for every stage of your app
We design and build iOS, Android, and cross-platform React Native apps for startups and established businesses.
© 2021 thoughtbot, inc. The design of a robot and thoughtbot are registered trademarks of thoughtbot, inc. Privacy Policy
Источник
Android crop to padding

Wanna help the project? Amazing!
Android Image Cropper
Powerful (Zoom, Rotation, Multi-Source); Customizable (Shape, Limits, Style); Optimized (Async, Sampling, Matrix); Simple image cropping library for Android.

Add to your project
Step 1. Add the JitPack repository to your root build.gradle
Step 2. Add the dependency
Step 3. Add permissions to manifest
Only need if you run on devices under OS10 (SDK 29)
Step 4. Set source compatibility version to Java 11
The library is up to date with the latest releases, if you are not using Java 11 yet please check the release page for previous working versions.
Go to app level build.gradle file
Add this line inside android in build.gradle
This expects Gradle 7.0+
Using the Library
There is 3 ways of using the library:
- Calling crop directly (Sample code: sample/crop_image )
- Using the CropView (Sample code: sample/crop_image_view )
- Extending the activity (Sample code: sample/extend_activity ) Your choice depends on how you want your layout to look.
Obs: The library has a public pick image contract, more on wiki.
Calling crop directly
- Register for activity result with CropImageContract
- Add CropImageView into your activity
Extend to make a custom activity
If you want to extend the CropImageActivity please be aware you will need to setup your CropImageView You can check a sample code in this project com.canhub.cropper.sample.extend_activity.app.SExtendActivity
- Add CropImageActivity into your AndroidManifest.xml
- Setup your CropImageView after call super.onCreate(savedInstanceState)
Custom dialog for image source pick
When calling crop directly the library will prompt a dialog for the user choose between gallery or camera (If you keep both enable). We use the Android default AlertDialog for this. If you wanna customised it with your app theme you need to override the method showImageSourceDialog(..) when extending the activity (above)
- Built-in CropImageActivity .
- Set cropping image as Bitmap, Resource or Android URI (Gallery, Camera, Dropbox, etc.).
- Image rotation/flipping during cropping.
- Auto zoom-in/out to relevant cropping area.
- Auto rotate bitmap by image Exif data.
- Set result image min/max limits in pixels.
- Set initial crop window size/location.
- Request cropped image resize to specific size.
- Bitmap memory optimization, OOM handling (should never occur)!
- API Level 14.
- More..
- Cropping window shape: Rectangular, Oval (square/circle by fixing aspect ratio), as well as rectangular modes which only allow vertical or horizontal cropping.
- Cropping window aspect ratio: Free, 1:1, 4:3, 16:9 or Custom.
- Guidelines appearance: Off / Always On / Show on Touch.
- Cropping window Border line, border corner and guidelines thickness and color.
- Cropping background color.
For more information, see the GitHub Wiki.
Forked from ArthurHub Originally forked from edmodo/cropper.
Copyright 2016, Arthur Teplitzki, 2013, Edmodo, Inc.
Licensed under the Apache License, Version 2.0 (the «License»); you may not use this work except in compliance with the License. You may obtain a copy of the License in the LICENSE file, or at:
Unless required by applicable law or agreed to in writing, software distributed under the License is distributed on an «AS IS» BASIS, WITHOUT WARRANTIES OR CONDITIONS OF ANY KIND, either express or implied. See the License for the specific language governing permissions and limitations under the License.
About
Image Cropping Library for Android, optimised for Camera / Gallery.
Источник


