- Как запустить android_server from IDA Pro?
- Русские Блоги
- Глава 6 Динамический анализ Android программы (5) (с помощью IDA Pro Dynamic Debugging APK)
- Каталог статьи
- Динамическая отладка APK с помощью IDA Pro
- Интеллектуальная рекомендация
- Многослойная презентацияViewController Jap
- Распечатать список с конца до головы
- Типы данных и переменные
- Python Daily Practice (4) -идиомы заполняют музыку
- SpiderLabs Blog
- Debugging Android Libraries using IDA
- Connect Android With IDA for LIB Debugging & Dynamic analysis
- Recommended Posts
- Archived
- Similar Content
- Debugging the XNU Kernel with IDA Pro
- Purpose
- Debugging OSX with VMware
- Quick Start
- Using the KDK
- Debugging a Development Kernel
- Assembly-Level Debugging + DWARF
- KEXT Debugging
- Debugging a Prelinked Kernelcache
- Extending the KDK
- Loading the Kernelcache
- Kernel ASLR + Rebasing
- Debugging the OSX Kernel Entry Point
- Limitation in VMware
- Workaround
- macOS11 Kernel Debugging
- KernelCollections
- Creating a macOS11 VM
Как запустить android_server from IDA Pro?
Требуется проанализировать so библиотеку андроид приложения. Ее лекго вытянуть из apk, найти интересующее мне место, где целевая переменная протерпевает некоторые изменения. Но хотелось бы в Иде посмотреть в отладчике как пошагово эта переменная формируется.
В IDA pro есть удаленные отладчики и в частности для отладки на андроид устройствах.
1ый способ. сразу при старте IDA pro загрузить apk, и далвик дебаггером запустить его на эмуляторе nox. Приложение успешно запускается на эмуляторе, отладчиком могу что-то пошагово выполнять, но как добраться до нужной мне so библиотеки? Тем более приложение постоянно создает/завершает новые параллельные процессы
2ой способ Способ заключается в узнавании смещения целевой библиотеки через подключение к андроид серверу. И потом уже дебажить в gdbserver задавая там нужное смещение. первоисточник тут forum.xda-developers.com/show. 0393&nocache=1 или тут в русской статье https://habrahabr.ru/post/232531/ , которая ссылается на первую ссылку как первоисточник.
Собственно проблема и мой вопрос, как запустить андроид сервер на андроид устройстве? В IDA Pro в папке IDA 6.8\dbgsrv\ есть два андроид сервера android_server и android_server_nonpie. Первый при запуске выдает
android_server: not executable: magic 7F45
Второй успешно запускается, делаю форвард порта, но IDA не может корректно подключиться: подключается, видит список запущенных процессов на андроиде и при попытке подключиться к выбранному процессу получает отлуп:
—————————
Warning
—————————
The debugger could not attach to the selected process. This can perhaps indicate the process was just terminated, or that you don’t have the necessary privileges.
—————————
OK
—————————
И отлуп скорее всего идет не со стороны android_server, который в консоли показывает, что к нему успешно подключились
==================================
[1] Accepting connection from 127.0.0.1.
и только после нажатия на кнопку OK на ворнинге (странно, почему ворнинг), показывает строчки:
[1] Closing connection from 127.0.0.1.
==================================
Источник
Русские Блоги
Глава 6 Динамический анализ Android программы (5) (с помощью IDA Pro Dynamic Debugging APK)
Каталог статьи
Динамическая отладка APK с помощью IDA Pro
- Требования: 6.6 и выше
- Вы можете отлаживать код DEX, вы также можете отлаживать нативный код, вы можете создать два IDA Pro экземпляров, и завершить совместную отладку два коды
- Пример:GitHub
- Open MethodProfiling с IDA Pro, выберите Classes.dex, ожидание предварительного анализа

- Нажмите на пункт меню «Debugger» -> «Параметры отладчика», чтобы открыть окно настройки отладчика. Для анализа процедуры, остановка у входа после запуска, вы можете проверить «Приостановить на процесс ввода точки»
- Нажмите кнопку «SET» Параметры Конкретные
- Установить полный путь к АБР, с информацией о работе компонента вы хотите начать
- После установки его, нажмите кнопку «OK» в двух диалогах.
- Нажмите на пункт меню «Debugger» -> «Параметры процесса», установите номер порта «8700», нажмите кнопку «OK»
- Нажмите на пункт меню «Debugger» -> «запустить процесс», или щелкните место на картинке ниже, запустите отладку
- В это время выполнения кода будет иметь риск оперативно. Нажмите кнопку «Да», и IDA Pro начнет метод профилирования в режиме отладки.
- Поскольку «Приостановить на Process точки входа» установлен, программа разбита на входе, иначе он всегда будет работать.
- Нажмите на пункт меню «View» -> «Open подвиды» -> «Экспорт», нажмите «Ctrl + F» поиск ключевых слов «OnClick», двойной щелчок [email protected]
- Нажмите «F2», чтобы установить точки останова на первой строке метода.
- Нажмите на кнопку «MethodProfililing» интерфейса программы на телефон или симулятор (имитатор, который не может использовать AS), программа будет прервана на Иде
- Нажмите на пункт меню «Debugger» -> «высаживать» -> «местные жители», откройте окно переменных
- «F7» и «F8» являются ярлыками, что «шаг записи» и «шаг»


Интеллектуальная рекомендация
Многослойная презентацияViewController Jap
. Недавно, проект использует многоэтажные прыжки [A presentViewController: B animated: YES] [B presentViewController: C animated: YES] . Проблема в том, где: как это идет прямо к? Я не нашел ме.
Распечатать список с конца до головы
В случае, когда таблица цепи не может изменять дисплей, данные хранения стека могут рассматриваться с рекурсивным методом. Разрешить модификацию структуры ссылки.
Типы данных и переменные
тип данных Компьютерная программа может обрабатывать различные значения. Однако компьютеры могут обрабатывать гораздо больше, чем числовые значения. Они также могут обрабатывать различные данные, таки.

Python Daily Practice (4) -идиомы заполняют музыку
оглавление 1. Одно место 2. Случайное расположение 3. Добавьте баллы для оценки 4. Получение файла 5. Установите уровень сложности. 6. Срок завершения 7. Выберите заполнение пропусков. 1. Одно место Н.
Источник
SpiderLabs Blog
Attracting more than a half-million annual readers, this is the security community’s go-to destination for technical breakdowns of the latest threats, critical vulnerability disclosures and cutting-edge research.
Debugging Android Libraries using IDA
During a recent test, Iencountered a native JNI library used by an Androidapplication. I needed to understand this library and what it did, so the firststep was to load the library in IDA to see what it looked like. It did not takelong until I realized I was looking at obfuscated code that was doing a lot ofmanipulation on the stack. Understanding the library through static analysisalone would take a long time, so the best way forward would be to combinestatic and dynamic analysis.
Having debugged a lotof iOS apps using GDB, I started looking at debugging Android apps with GDB.Until this point, DEX2JAR, Smali and some other tools had been sufficient formy Android reversing requirements.
Some research lead meto a discussion at xda-developers about Android debugging through the remotedebugging functionality in IDA.
Below is a descriptionof the steps I had to take before I could start debugging the library in question. In this case I used the Android emulator, but this should work justas well on a rooted device.
- Create anAndroid Virtual Device (AVD) for use in the emulator and make sure it works.
Start theemulator, and when the emulator is running, use the command «adb devices» tomake sure the Android Debug Bridge (adb) is working properly. You should seethe emulator listed if it works. It is also best if only one device isconnected, so if you see multiple devices, disconnect the extra ones.
Start theemulator again using the following command: «emulator –avd [AVD_NAME] –partition-size512». It is possible to use a partition size lower(or higher) than 512 although I did not test this.
Run thefollowing commands.
adb remount
adb push android_server /system/
adb shell
su (probably not needed for the emulator but is necessary if doing this on a rooted device)
cd /system
chmod 755 android_server
./android_server
The commands above will begin by mounting the system partitionas read-write, and then push the file android_server to the /system folder. This file can be found in the dbgsrv folder of IDA. Next, it willcreate a shell, make the android_server file executable andthen run it.
Minimizethe windows where android_server is running and open a new command prompt /terminal, and type this command: «adb forward tcp:23946 tcp:23946». This willallow connections to localhost:23946 and forward those to the emulator.
In my case, I wanted to debug specific functions in the library. Therefore, I used a custom library loader that loaded the library and then stopped execution. I then attached IDA to the running process, movedthe instruction pointer to the next instruction to get past the breakpoint, and thenjump directly into the function I wanted to debug. This part will be describedin detail in upcoming post.
To attach IDAto a running process, just load the library in IDA, go into the debuggeroptions and select the «Remote ARM Linux/Android debugger», go into «ProcessOptions» in the debugger menu, and set the hostname to localhost. If you usedthe same ports as above, you should not need to change anything else.
Go intothe debugger menu again, this time choose «Attach to process…» and you shouldsee a list of all running processes. Select the one you are interested in,attach and start debugging.
Depending on what isbeing analyzed, it is possible to do a memory dump from the process into IDAand save the IDB. This may be good for future analysis, and there is always arisk of a crash somewhere that can terminate the debug session.
Also, if you have thelibrary or file to be analyzed open in IDA before the debugger is attached, IDAshould identify the memory address shift (due to ASLR) and ask if you want torebase the file / library.
Источник
Connect Android With IDA for LIB Debugging & Dynamic analysis

By Un_Known ,
July 5, 2019 in Guides
Recommended Posts
Archived
This topic is now archived and is closed to further replies.
Similar Content
Hey everyone!
I recently got into arm7 Lib-hacking and its working pretty well ,but I’m pretty new so there are still many things where I’m pretty unsure so I have a few questions to ask and hope that someone can help me by answer them
So basically my process of hacking libs is like this :
=> I dump the game
=> find interesting Syntacs
=> copy the offset
=> copy a big hex-string
=> Search in Xa:Code app (Il2cpp) for the address (ex. h0A 70 10 . E1 )
=>edit the addrees and one below the address with a hex value i got out of the internet
edit ex. 0A701090r => h0000A0E3
E5000051r => h1EFF2FE1 (trying to set to False or 0)
List of hex values I use to edit
00 00 A0 E3 1E FF 2F E1 = False or number 0
01 00 A0 E3 1E FF 2F E1 = True or number 1
02 00 A0 E3 1E FF 2F E1 = Number 2
07 00 A0 E3 1E FF 2F E1 = Number 7
0A 00 A0 E3 1E FF 2F E1 = Number 10
0F 00 A0 E3 1E FF 2F E1 = Number 15
10 00 A0 E3 1E FF 2F E1 = Number 16
11 00 A0 E3 1E FF 2F E1 = Number 17
12 07 80 E3 1E FF 2F E1 = VALUE OF 12 Million or It can be used for health/ammo/armour/damage
DC 0F 00 E3 1E FF 2F E1 = VALUE 4060
DC OF OF E3 1E FF 2F E1 = VALUE 120000
01 00 A0 E3 1E FF 2F E1 = VALUE 1 Also = True used for bool
00 00 A0 E3 1E FF 2F E1 = Value 0 Also = False used for bool
01 0A A0 E3 1E FF 2F E1 = 1000
01 08 A0 E3 1E FF 2F E1 = 10000
01 02 A0 E3 1E FF 2F E1 = 10000000
C2 0A 64 60 00 00 00 02 = Speed Hack
01 04 A0 E3 1E FF 2F E1 = 1000000
0E 00 A0 E3 1E FF 2F E1 = Fire Rate
FF FF = Value of 65535 = Highest value 4 character hex code
true_edit = «20008052r»
false_edit = «00008052r»
end_bool = «C0035FD6r»
So my question here is ,am I doing anything wrong here? Do I need to edit 2 addresses like I do? is there a much efficient way to edit the hex values?
How can I search in arm64 hex strings .


View File Script Module TD
attention for this script requires 110 matices and 600 metamaterials
Root and non root have fun my friends
Link for games
⬇️⬇️⬇️⬇️⬇️⬇️⬇️⬇️
https://play.google.com/store/apps/details?id=com.gg.moduleTd
Submitter gguardian701 Submitted 08/06/2021 Category LUA scripts
Источник
Debugging the XNU Kernel with IDA Pro
Last updated on November 1, 2020 — v1.1
Purpose
IDA 7.3 introduces the Remote XNU Debugger. It is designed to communicate with the GDB stub included with popular virtualization tools, namely VMware Fusion (for OSX) and Corellium (for iOS). The debugger allows you to observe the Darwin kernel as it is running, while at the same time utilising the full power of IDA’s analysis capabilities. It works equally well on Mac, Windows, and Linux.
This writeup is intended to quickly get you familiar with debugger, as well as offer some hints to make the experience as smooth as possible.
Debugging OSX with VMware
Quick Start
To get started with debugging OSX, we will perform a simple experiment. This is the same experiment outlined in this great writeup by GeoSn0w, but we will be performing the equivalent in IDA — which we hope you’ll find is much simpler.
Begin with the following setup:
create an OSX virtual machine with VMware Fusion. in this example the VM is OSX 10.13.6, but the experiment should work with any recent OSX version.
open Terminal in the VM and enable some basic XNU debugging options:
shut down the VM and add the following line to the .vmx file:
power on the virtual machine, open Terminal, and run this command:
Let’s use IDA to modify this version string.
Launch IDA, and when prompted with the window IDA: Quick start, choose Go to start with an empty database. Then go to menu Debugger>Attach>Remote XNU Debugger and set the following options:
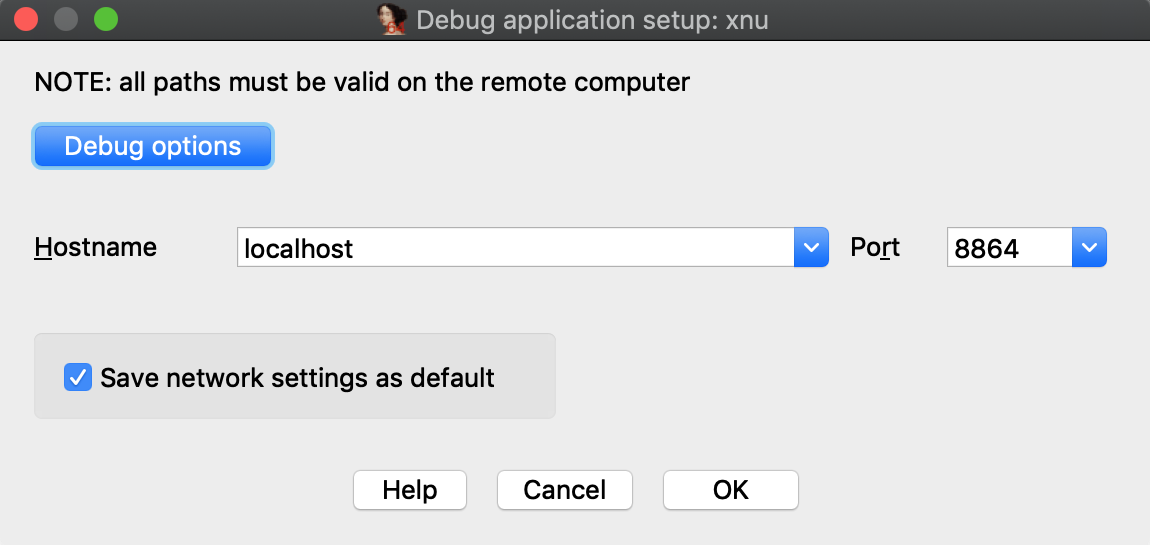
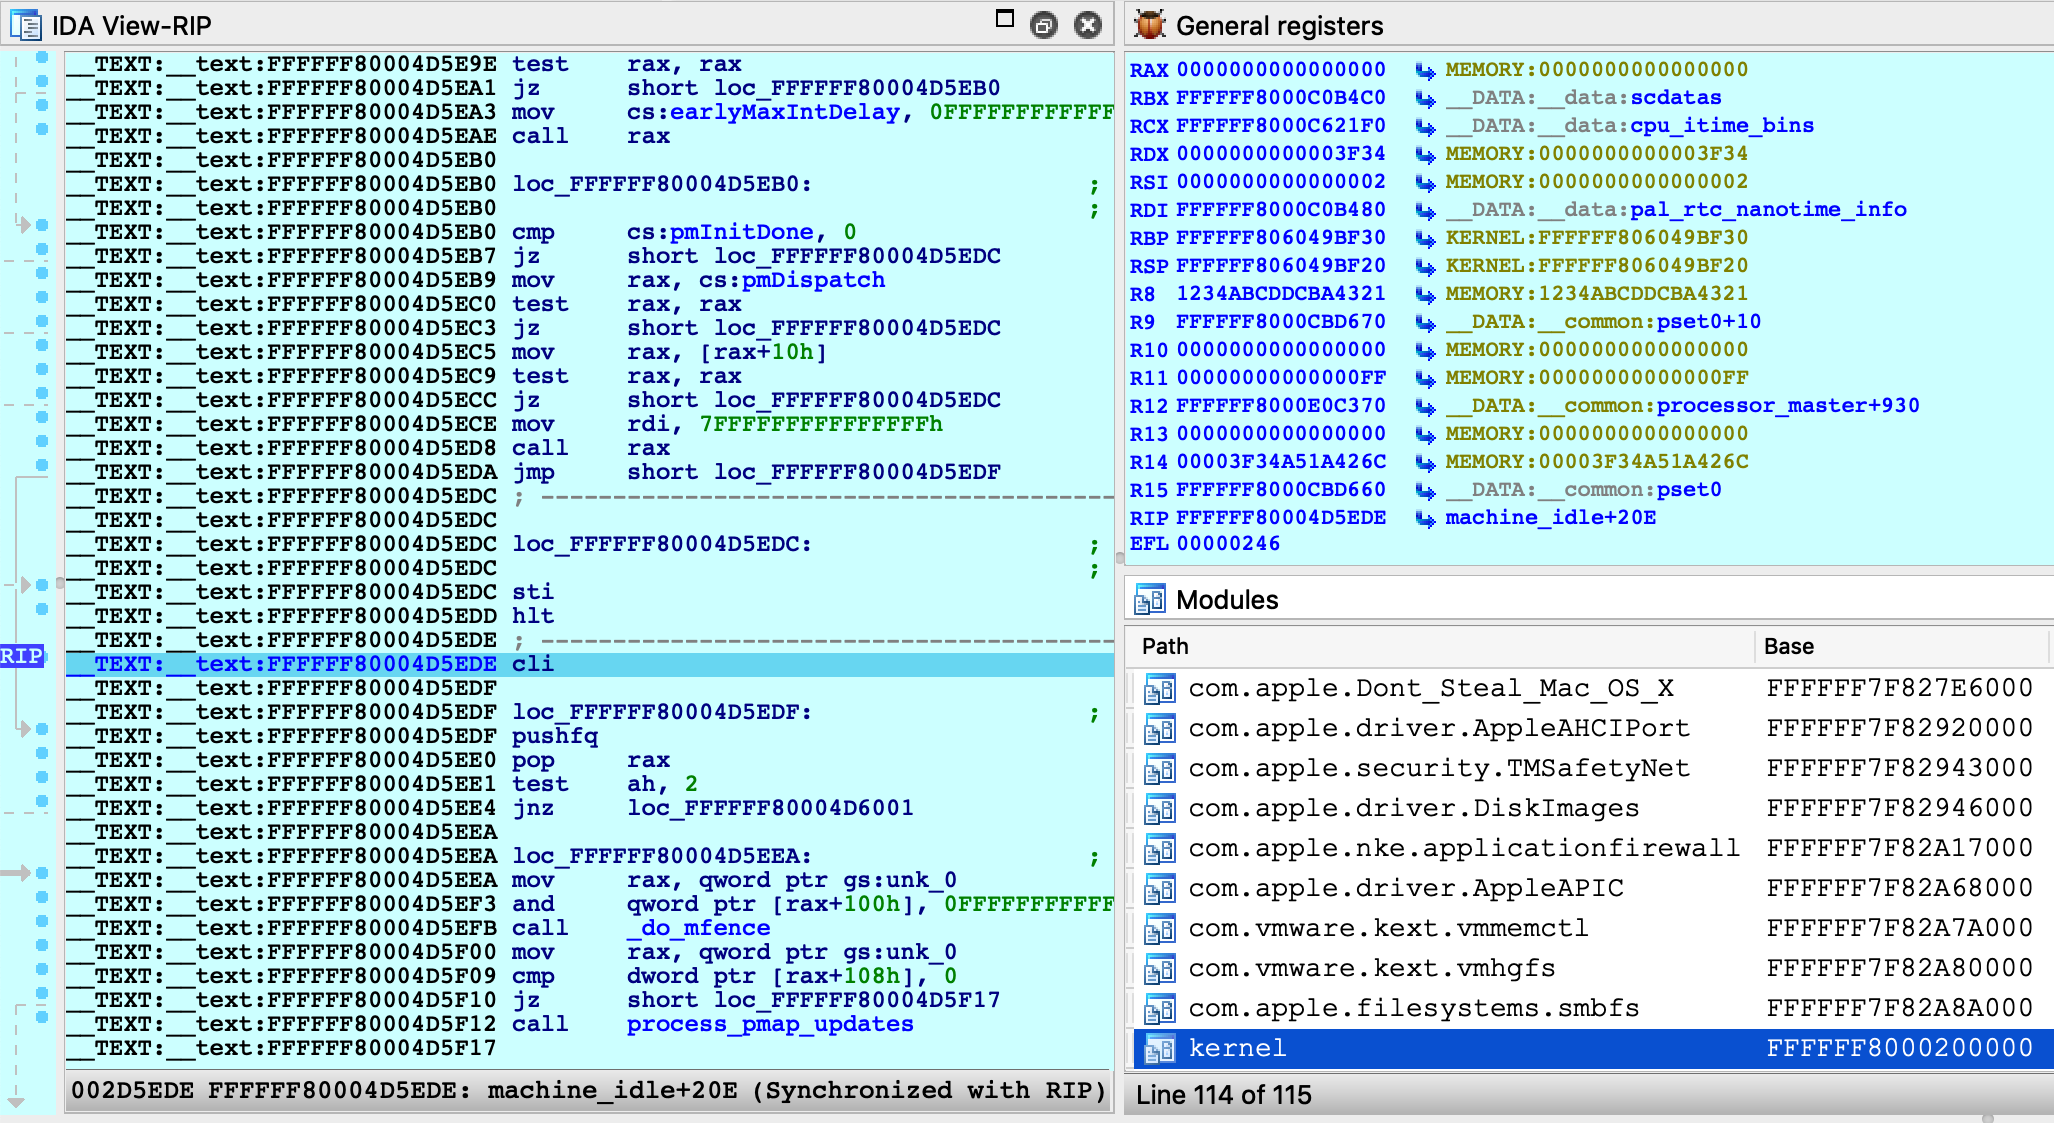
Click OK, then select , and wait for IDA to attach. This step might take a few seconds (later we’ll discuss how to speed things up). Once attached, the target is usually suspended in machine_idle:
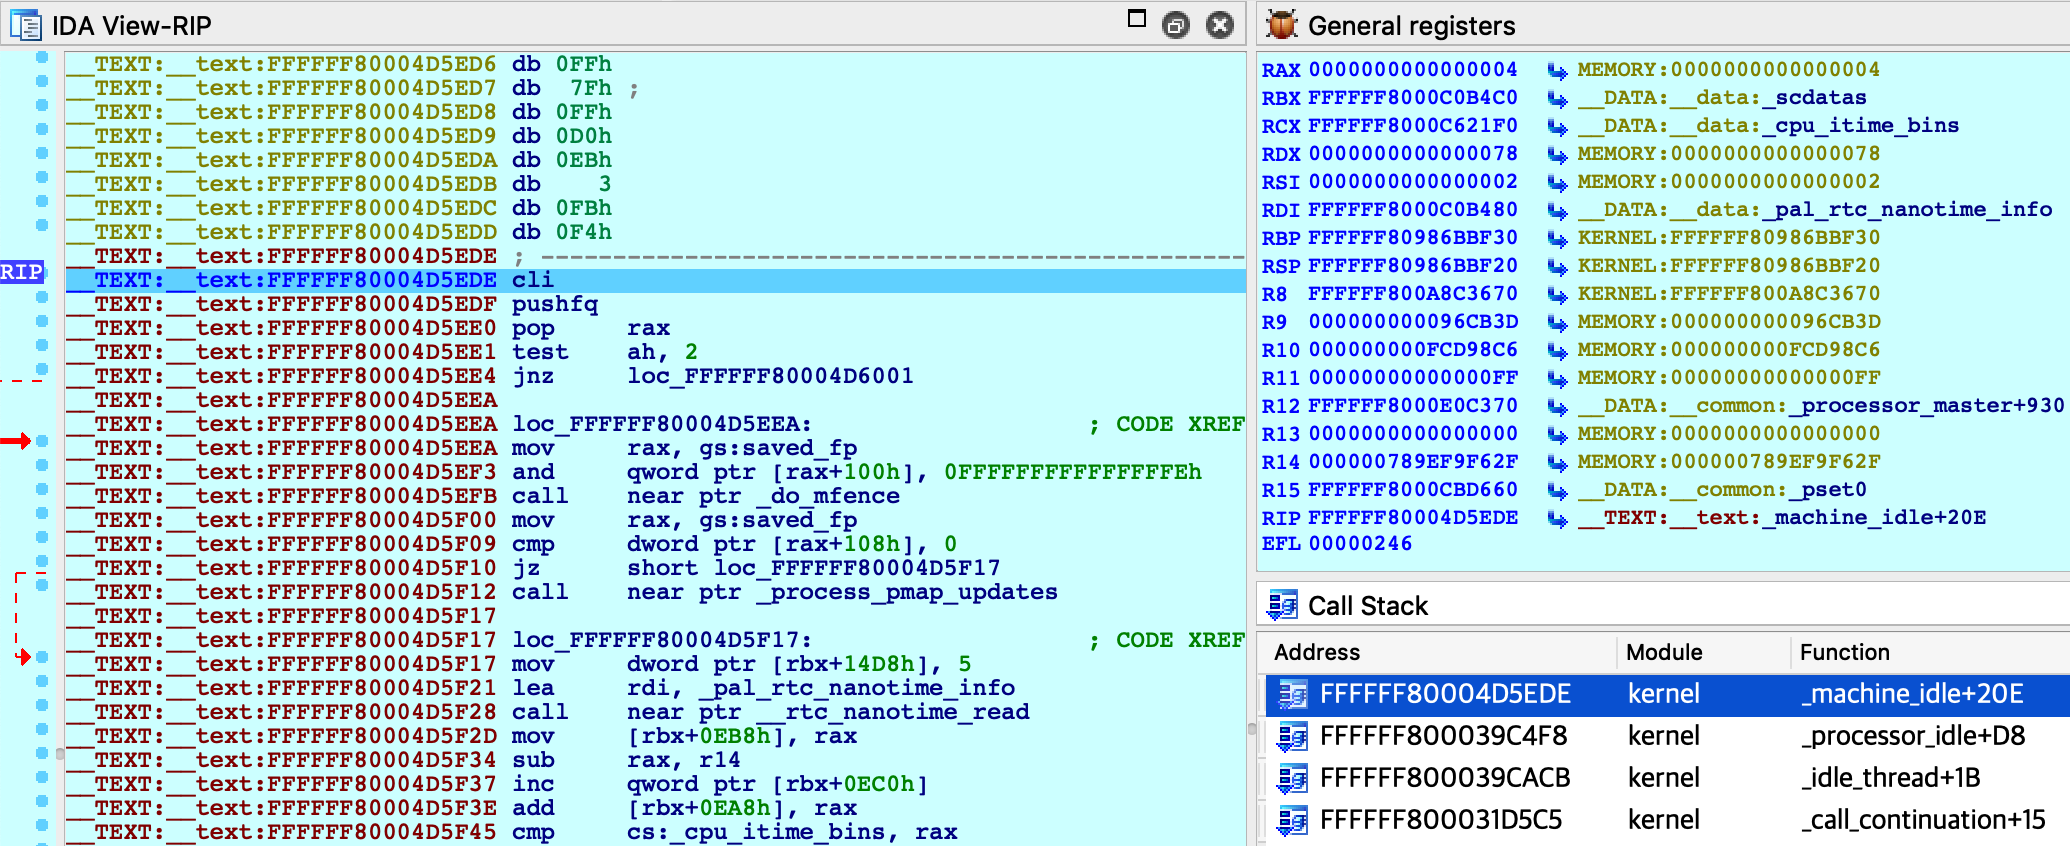
IDA should have printed the message FFFFFF8000200000: process kernel has started, meaning it successfully detected the kernel image in memory. Now let’s find the version string. Conveniently, the string appears in the kernel’s symbol table, so we can simply use shortcut G and enter the name _version to jump right to it:
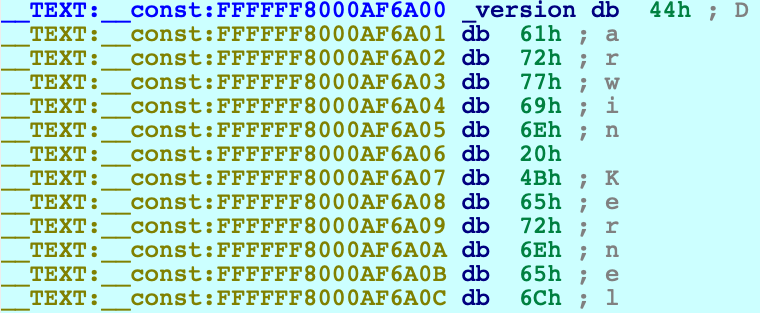
Use IDAPython to overwrite the bytes at this address:
Resume the process and allow the VM to run freely. Go back to Terminal in the VM and run the same command as before:
The output should look almost the same, except Darwin has been replaced with IDAPRO. So, we have modified kernel memory without breaking anything! You can continue to explore memory, set breakpoints, pause and resume the OS as you desire.
Using the KDK
If you have installed a Kernel Development Kit from Apple, you can set KDK_PATH in dbg_xnu.cfg to enable DWARF debugging:
Even if there is no KDK available for your OSX version, you can still utilise the KDK_PATH option in IDA to speed up debugging. For example, in the experiment above we could have done the following:
make your own KDK directory:
copy the kernelcache from your VM:
decompress the kernelcache:
set KDK_PATH in dbg_xnu.cfg:
Now whenever IDA needs to extract information from the kernel or kexts, it will parse the kernelcache file on disk instead of parsing the images in memory. This should be noticeably faster.
Debugging a Development Kernel
Our next goal is to use the KDK to create a rich database that can be used to debug XNU in greater detail. In this example we will debug the development kernel included in the Apple KDK. Let’s open this file in IDA:
Wait for IDA to load the DWARF info and complete the autoanalysis. This may take a few minutes, but we only need to do it once.
While we wait, we can prepare the virtual machine to use the development kernel instead of the release kernel that is shipped with OSX (Note: System Integrity Protection must now be disabled in the VM). Open Terminal in the VM and run the following commands:
copy the development kernel from the KDK:
reconstruct the kernelcache:
after rebooting, check that the development kernel was properly installed:
The VM is now ready for debugging.
Return to IDA and use Debugger>Select debugger to select Remote XNU Debugger. Then open Debugger>Process options and set the following fields:
Now go to Debugger>Debugger options>Set specific options and make sure the KDK path field is set:
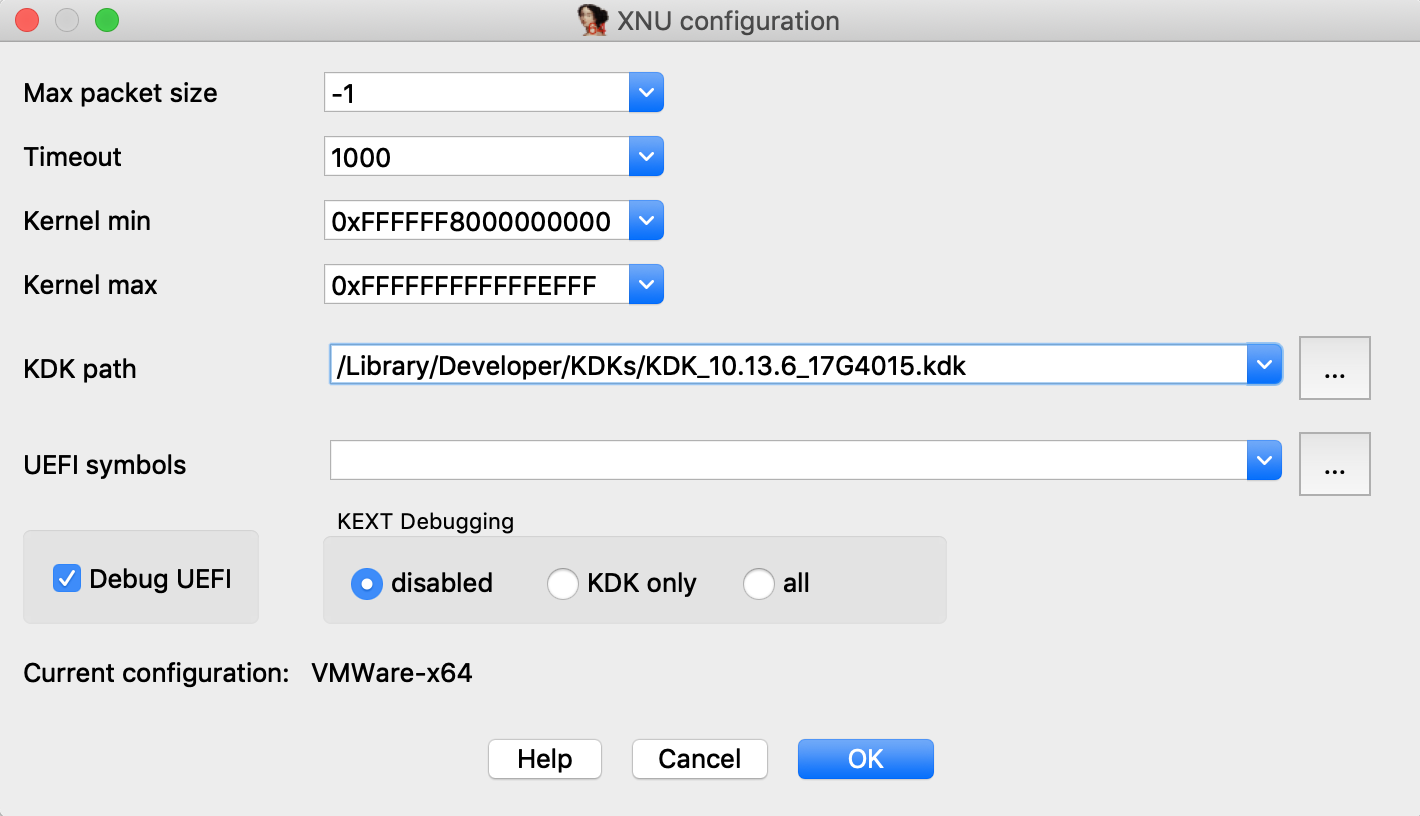
You can ignore the other options for now, and press OK.
Assembly-Level Debugging + DWARF
IDA supports source-level debugging for the XNU Kernel. However for demonstration purposes we will focus on assembly-level debugging, while taking advantage of source-level DWARF information like local variables. This is a bit more stable, and is still quite useful.
Before attaching the debugger, open Options>Source paths… and un-check the checkbox:

Then click Apply. This will prevent IDA from complaining when it can’t find a source file.
Finally, select Debugger>Attach to process>attach to the process started on target. After attaching, jump to function dofileread, and use F2 to set a breakpoint. Resume the debugger and and wait for the breakpoint to be hit (typically it will be hit right away, if not try simply running a terminal command in the guest). Once XNU hits our breakpoint, open Debugger>Debugger windows>Locals:
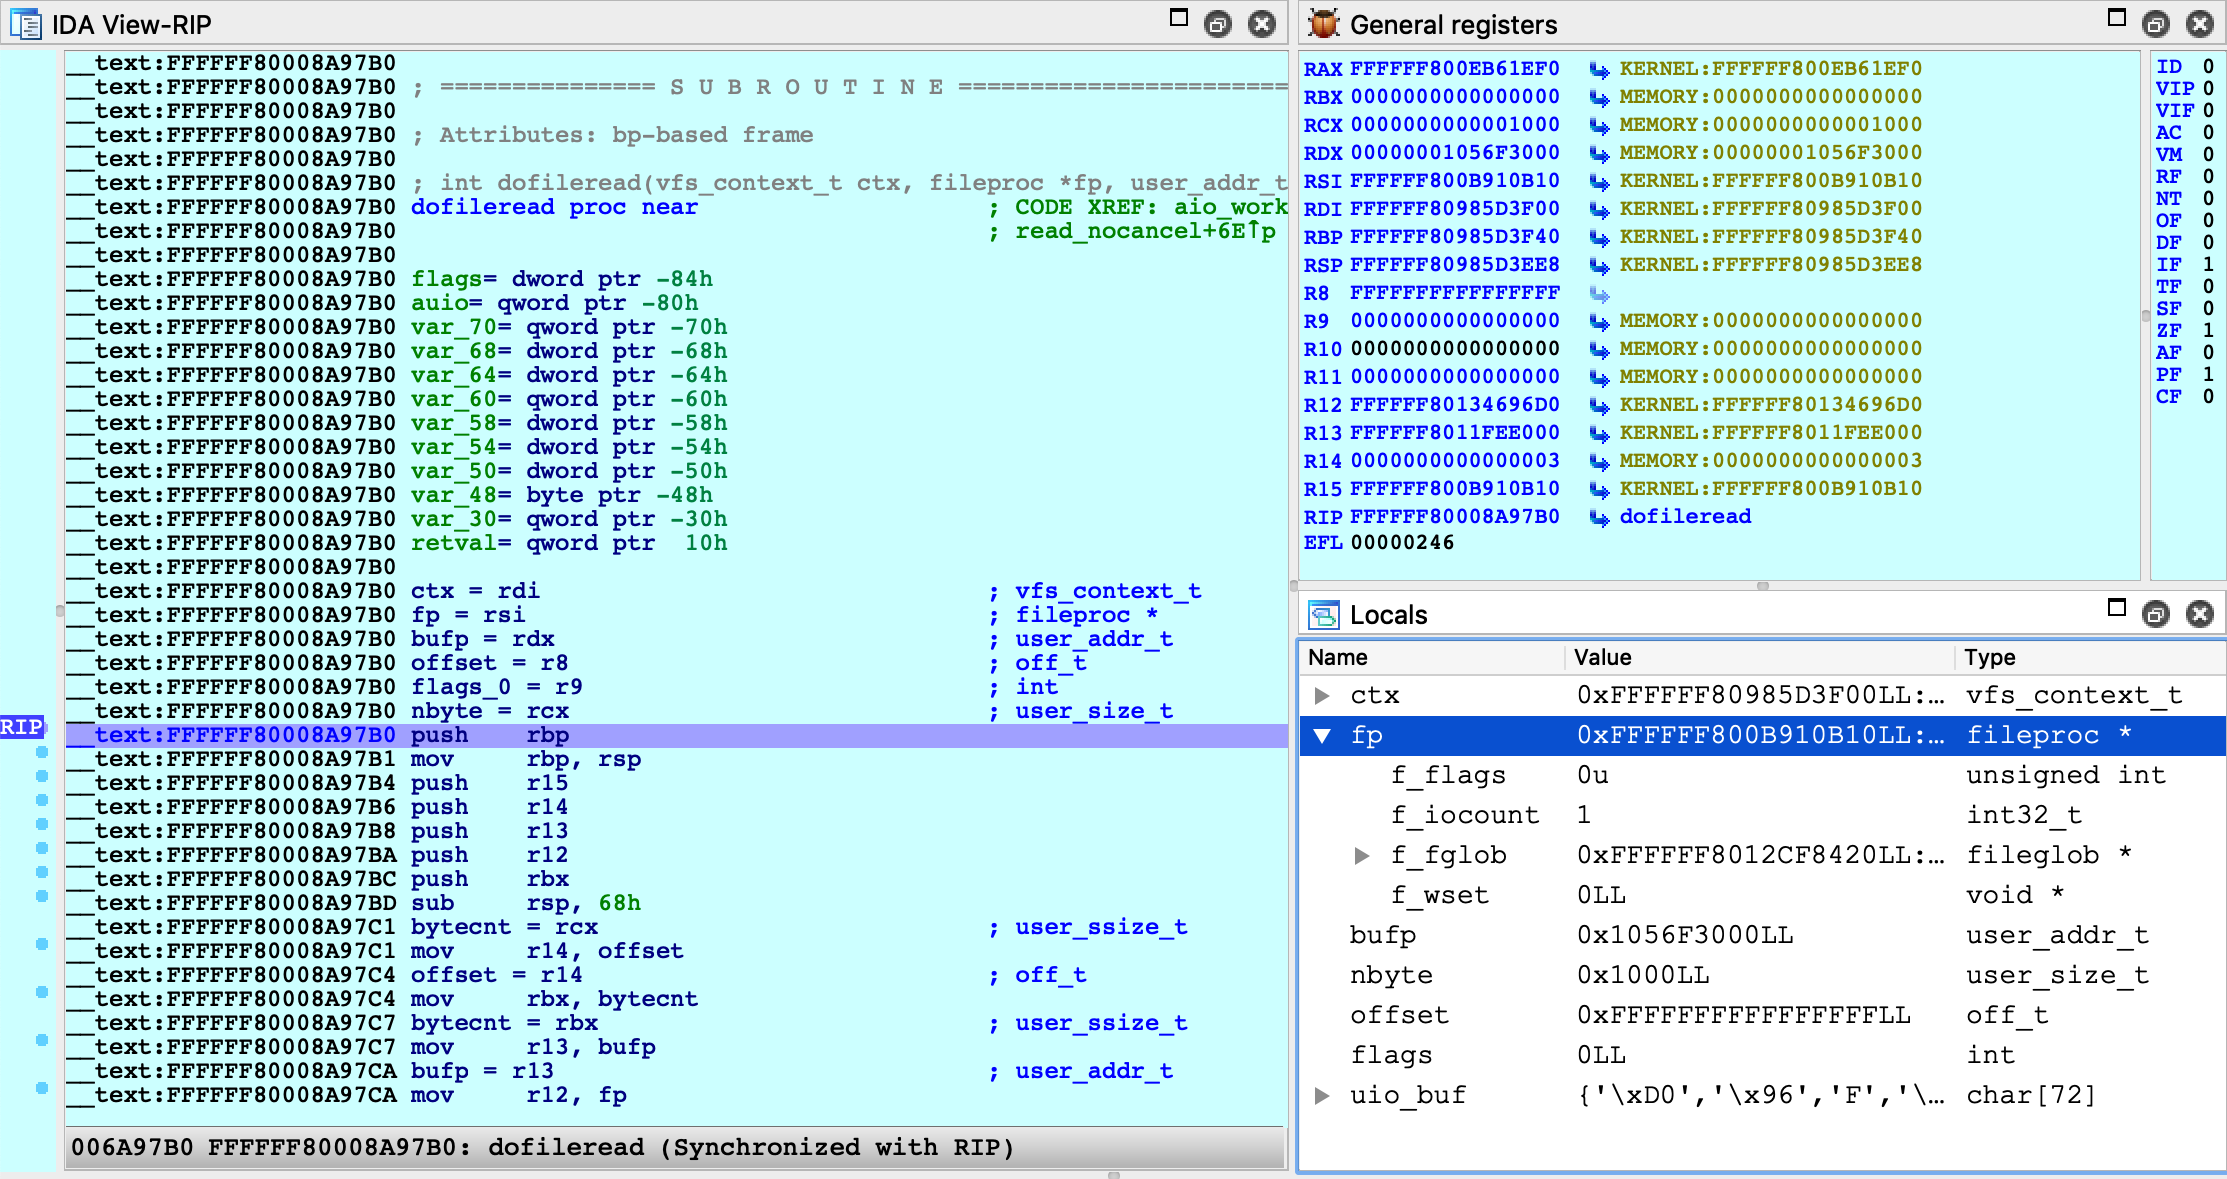
We can now perform detailed instruction-level debugging with the assistance of DWARF. You can continue to single step, set breakpoints, and inspect or modify local variables just like any other IDA debugger.
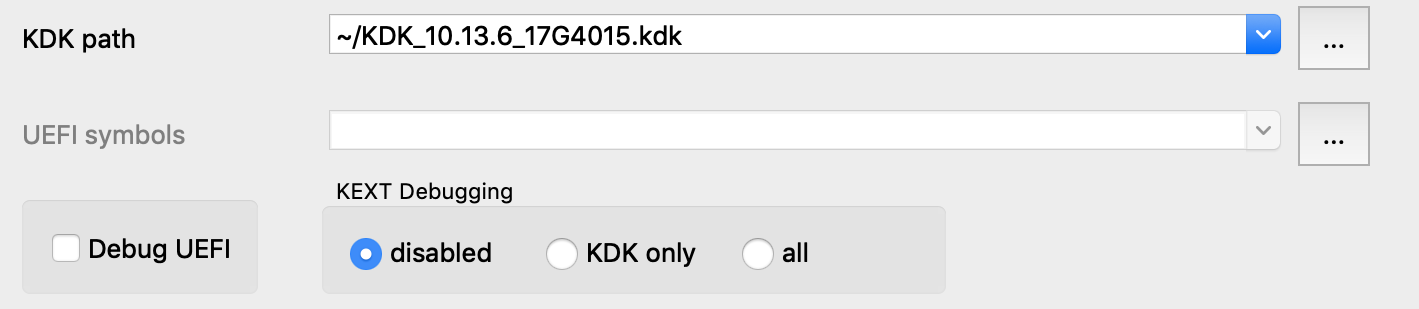
KEXT Debugging
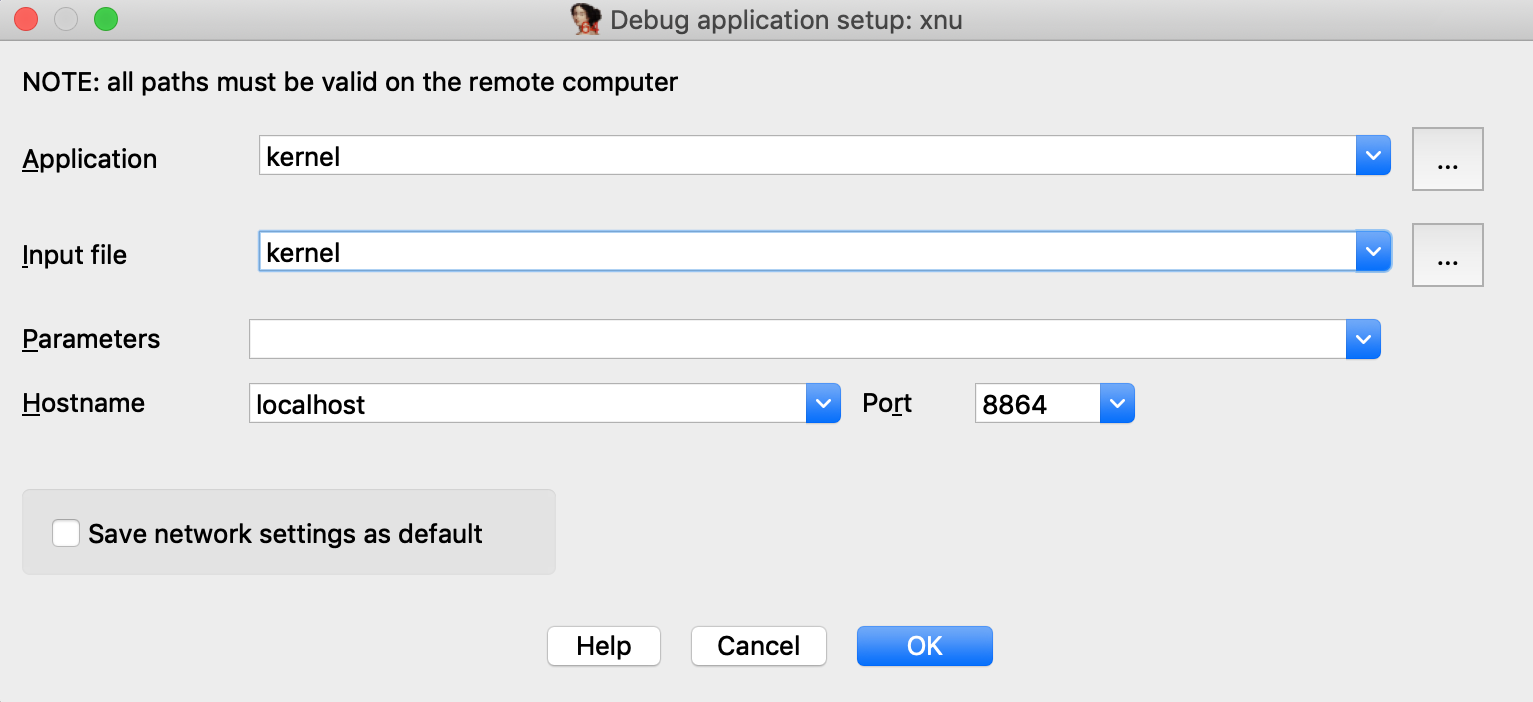
IDA also supports debugging kext binaries. To demonstrate this, we will debug IONetworkingFamily, a submodule of IOKit that is typically shipped with the KDK. Begin by opening the binary in IDA:
Select Remote XNU Debugger from the debugger menu. Then in Debugger>Process options, set:
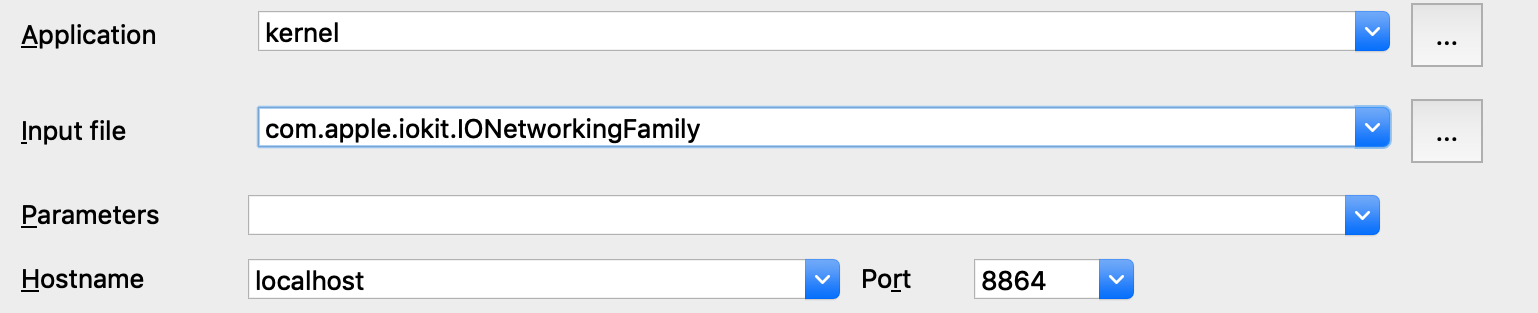
Note that we provide the bundle ID of the kext (com.apple.iokit.IONetworkingFamily) as the Input file field. This allows the debugger to easily identify the target kext at runtime.
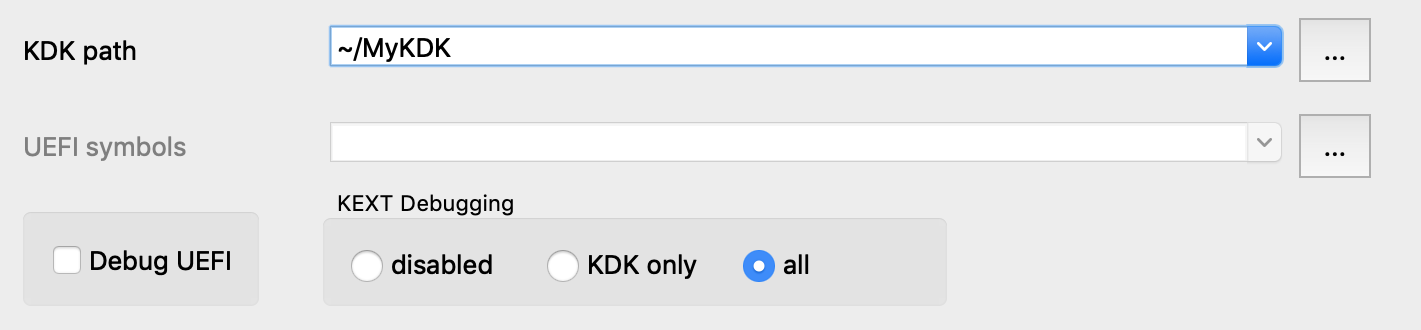
Also note that loading all kexts in kernel memory can be a slow operation, which is why it is disabled by default. Open Debugger>Debugger options>Set specific options and ensure the KDK path field is set, then set the KEXT Debugging option to KDK only:
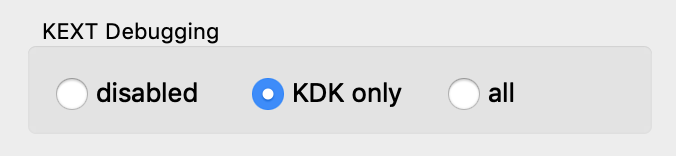
This tells the debugger to only load kexts that are present in the KDK. Since the KDK binaries are on the local filesystem, IDA can parse the kexts in a negligible amount of time — which is ideal since we’re really only interested in IONetworkingFamily.
Now power on your VM and allow it to boot up. Once it is running idle, attach the debugger. Immediately IDA should detect the kernel and all relevant kexts in memory, including IONetworkingFamily:

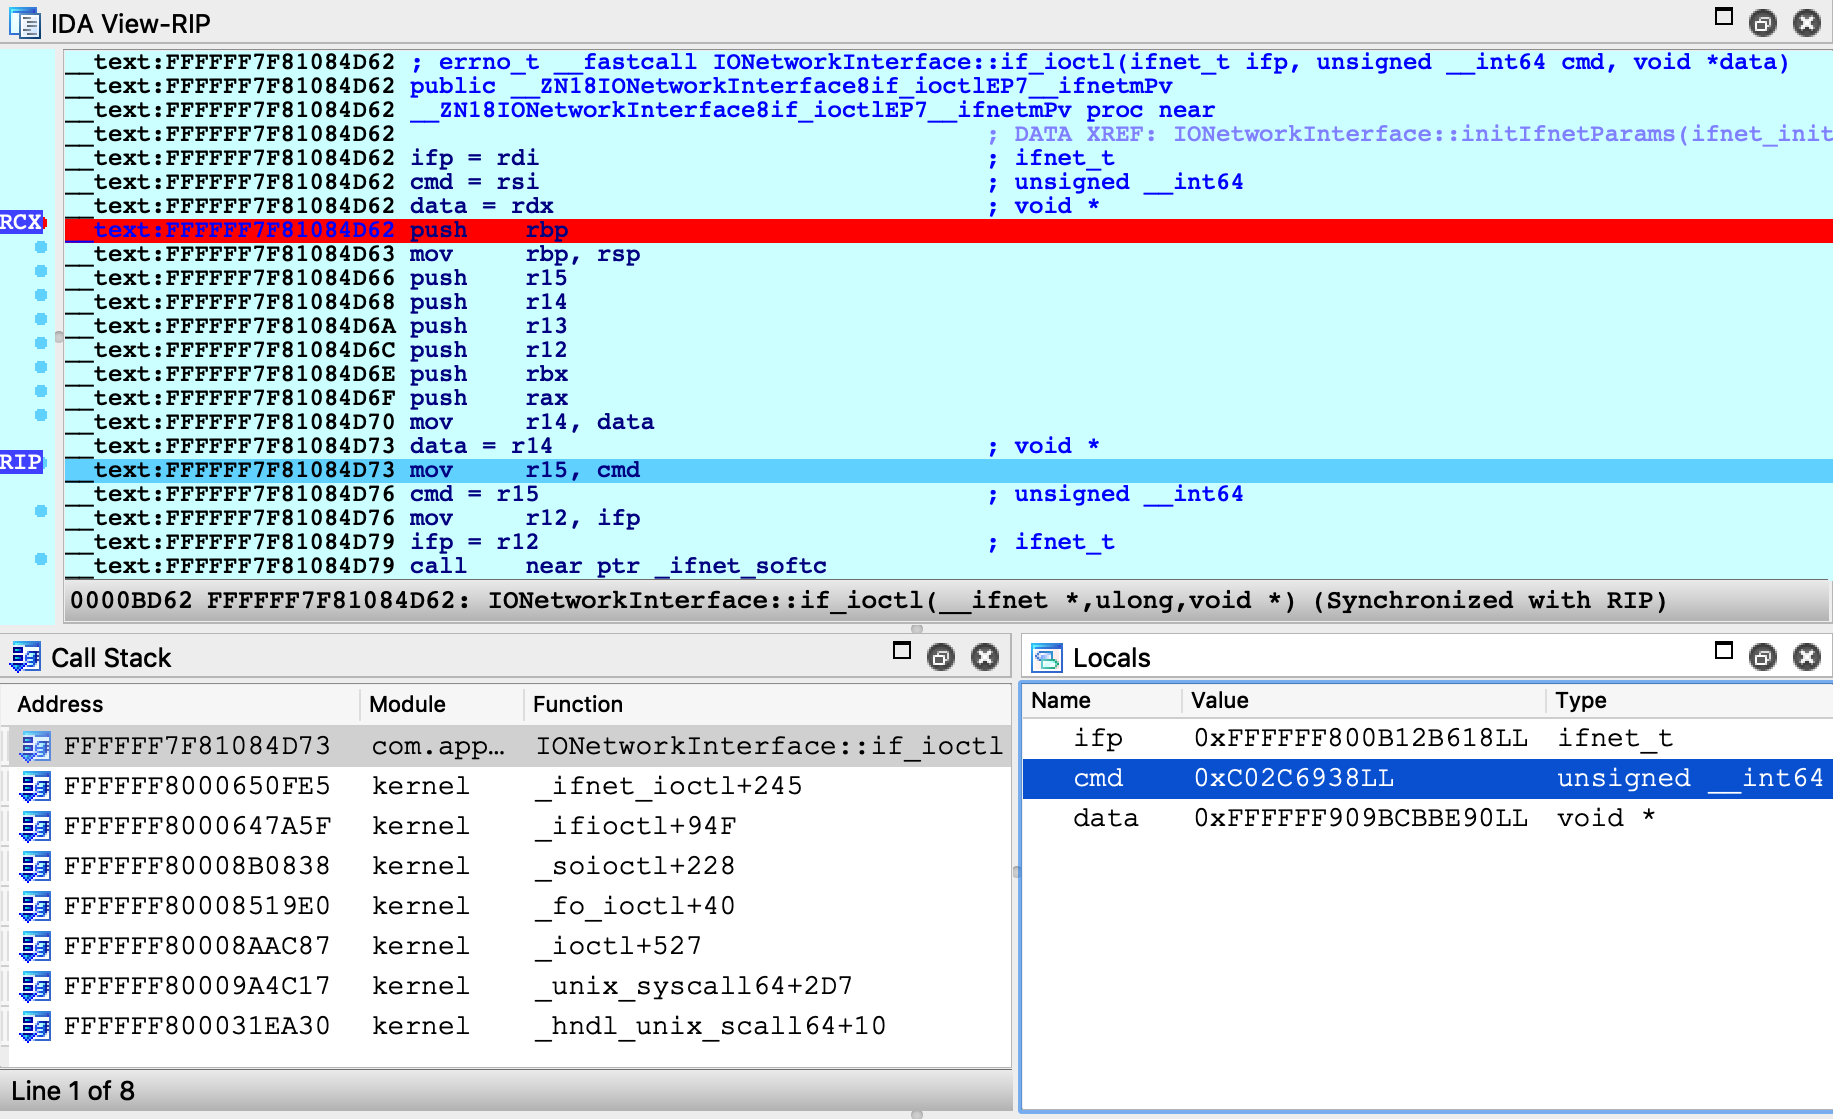
Double-click to bring up the debug names for this module, and search for IONetworkInterface::if_ioctl:
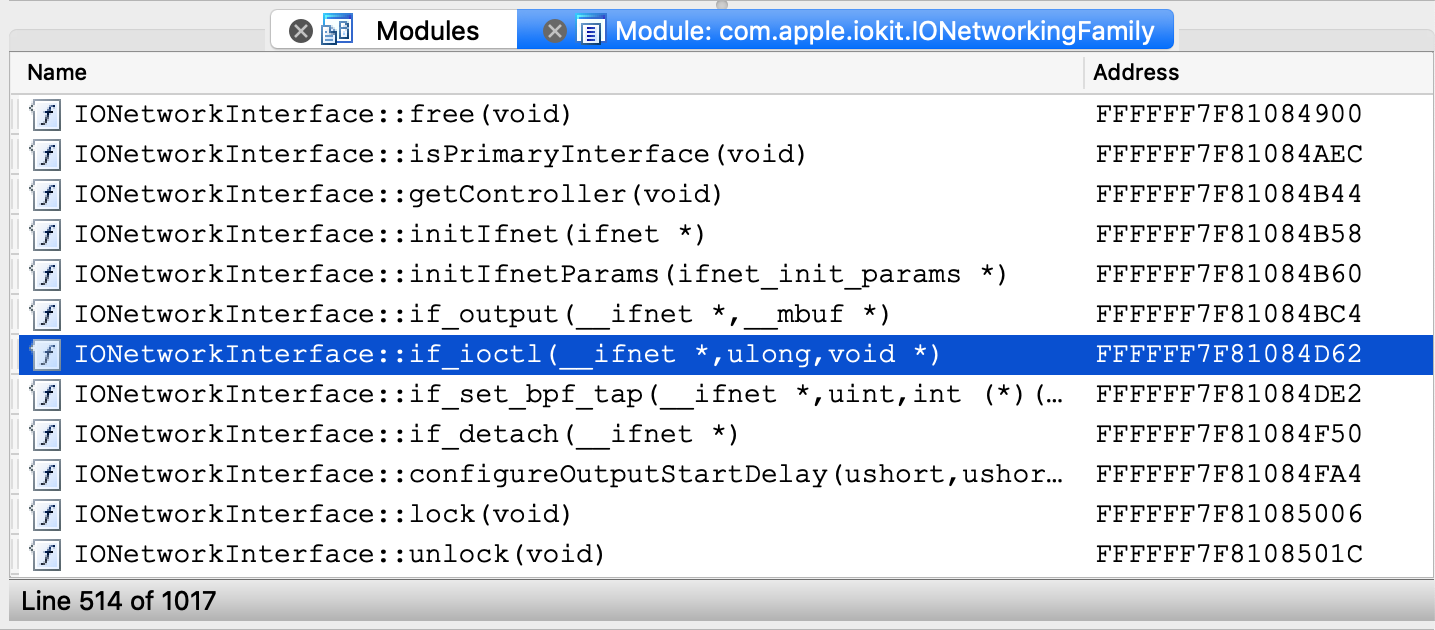
Now set a breakpoint at this function and resume the OS. Typically the breakpoint will be hit right away, but if it isn’t try performing an action that requires a network interface (for instance, performing a google search). Once execution breaks in the kext we can use the database to debug it in detail:
Debugging a Prelinked Kernelcache
For simplicity, all of the examples up until now have dealt with a subset of the kernel, but it is also possible to load a complete prelinked kernelcache in IDA and debug it. Naturally, we have some suggestions for this.
Extending the KDK
If you’re interested in debugging the entire prelinked kernel, the biggest concern is speed. IDA must create a detailed and accurate depiction of kernel memory, which could contain hundreds of kext modules. If we’re not careful, this can be slow.
Fortunately there is an easy solution. Try the following:
create a writable copy of Apple’s KDK:
copy the kernelcache from your VM to the new KDK:
decompress the kernelcache:
Now IDA can use both the KDK and the kernelcache to extract debugging information for almost any kext at runtime. This should be fast.
Loading the Kernelcache
When loading a kernelcache, IDA now offers more load options:

In this example we want to load everything, so choose the kernel + all kexts option and wait for IDA to load all the subfiles and finish the autoanalysis. This will take a while but there’s no way around it, it’s a lot of code.
IMPORTANT NOTE: Try to avoid saving the IDA database file in the KDK directory. It is important to keep irrelevant files out of the KDK since they might slow down IDA’s KDK parsing algorithm.
Now we might want to improve the static analysis by loading DWARF info from the KDK. In IDA 7.3 the dwarf plugin supports batch-loading all DWARF info from a KDK into a kernelcache database. Currently this feature must be invoked manually, so we have provided this script to make it easier.
Copy kdk_utils.py to the plugins directory of your IDA installation. This plugin will create a new menu Edit>Other>KDK utils, with two new menu actions:
Load KDK: This action will automatically detect all matching DWARF files in a given KDK, then apply the DWARF info to the subfiles in the database (including the kernel itself).
Load DWARF for a prelinked KEXT: This action is useful if you have DWARF info for a prelinked kext that is not included in Apple’s KDK. For a given DWARF file, the action will find a matching kext in the database and apply the DWARF info to this subfile.
Try opening Edit>Other>KDK utils>Load KDK and provide the KDK path:

Wait for IDA to scan the KDK for matching DWARF files and load them. This operation can also take a while, but it’s worth it for all the extra structures, prototypes, and names that are added to the database. In the end we have a very detailed database that we are ready to use for debugging.
Now open Debugger>Process options and set the following options:
Then open Debugger>Debugger options>Set specific options and set the following fields:
Note that we set the KEXT Debugging option to all. This tells the debugger to detect every kext that has been loaded into memory and add it to the Modules list, including any non-prelinked kexts (there are likely only a handful of them, so it doesn’t hurt).
Finally, power on the VM and attach to it with Debugger>Attach to process>attach to the process started on target. IDA should be able to quickly generate modules for the kernel and all loaded kexts:
You are now free to explore the entire running kernel! Try performing any of the previous demos in this writeup. They should work about the same, but now they are all possible with one single database.
Kernel ASLR + Rebasing
It is worth noting that rebasing has been heavily improved in IDA 7.3. Even large databases like the one we just created can now be rebased in just a few seconds. Previous IDA versions would take quite a bit longer. Thus, IDA should be able to quickly handle kernel ASLR, even when working with prelinked kernelcaches.
Debugging the OSX Kernel Entry Point
In this example we demonstrate how to gain control of the OS as early as possible. This task requires very specific steps, and we document them here. Before we begin, we must make an important note about a limitation in VMware’s GDB stub.
Limitation in VMware
Currently VMware’s 64-bit GDB stub does not allow us to debug the kernel entry point in physical memory. According to VMware’s support team, the correct approach is to use the 32-bit stub to debug the first few instructions of the kernel, then switch to a separate debugger connected to the 64-bit stub once the kernel switches to 64-bit addressing.
Since IDA’s XNU debugger does not support 32-bit debugging, this approach is not really feasible (and it’s not very practical anyway).
Workaround
Rather than add support for the 32-bit stub just to handle a few instructions, the official approach in IDA is to break at the first function executed in virtual memory (i386_init). This allows us to gain control of the OS while it is still in the early stages of initialization, which should be enough for most use cases.
Here’s how you can do it:
Disable ALSR for the kernel. Open Terminal in the VM and run the following command:
Then power off the VM.
Add this line to the .vmx file:
This ensures that hardware breakpoints are enabled in the GDB stub. For most versions of VMware, TRUE is the default value, but it’s better to be safe.
Also add this line to the .vmx file:
This will tell VMware to suspend the OS before it boots.
Power on the VM. It will remain suspended until we attach the debugger.
Load a kernel binary in IDA, and set the following XNU debugger options:
Note that we un-checked the Debug UEFI option. This option is explained in detail in the UEFI Debugging section, but for now just ensure it is disabled. This will prevent IDA from doing any unnecessary work.
Attach the debugger. The VM will be suspended in the firmware before the boot sequence has begun:

Now jump to the function _i386_init and set a hardware breakpoint at this location:
We must use a hardware breakpoint because the kernel has not been loaded and the address is not yet valid. This is why steps 1 and 2 were important. It ensures the stub can set a breakpoint at a deterministic address, without trying to write to memory.
Resume the OS, and wait for our breakpoint to be hit:

IDA should detect that execution has reached the kernel and load the kernel module on-the-fly. You can now continue to debug the kernel normally.
macOS11 Kernel Debugging
VMware Fusion 12 now supports macOS11 Big Sur, including support for the built-in gdb server.
There have been a lot of changes to the XNU kernel architecture in macOS11, so it might be interesting to use IDA to discover these changes and discuss how they affect our analysis.
NOTE: full support for macOS11 kernel debugging requires IDA 7.5 SP3
KernelCollections
The most notable change in macOS11 is the kernelcache format. In previous macOS versions a kernelcache was just the mach kernel binary, prelinked with some extra segments containing embedded KEXTs.
In macOS11, Apple introduced an entirely new file format (MH_FILESET) specifically designed to be a generic container for the mach kernel and KEXTs. So a macOS11 kernelcache is a non-executable file that simply advertises a list of subfiles contained within it, via the LC_FILESET_ENTRY load commands.
Such files are now called «KernelCollections», and they are found in the /System/Library/KernelCollections/ directory of your macOS11 installation.
Let’s try loading one of them in IDA:
This cache contains the essential modules that macOS11 needs to boot, including the mach kernel itself (com.apple.kernel):

Also present is another KernelCollection that contains many important system KEXTs:
And yet another one is used to manage third-party KEXTs, located at:
For a detailed explanation of the various «flavors» of KernelCollections, see the doc for the kmutil command:
It seems that all of these KernelCollections will somehow be utilized by a running instance of macOS11. Is this obvious when debugging the kernel in IDA? Let’s try it out.
Creating a macOS11 VM
To start debugging macOS11, we’ll need to set up a macOS11 virtual machine with System Integrity Protection disabled and kernel debugging options enabled:
To do this you will need to boot the VM in recovery mode. As of this writing, macOS11 is still in beta and booting a macOS11 VM in recovery mode is very unstable. According to this thread VMware is working on fixing it, but for now you will likely have to research the latest workaround (it changes almost every beta version).
macOS11 has also broken the debug registers, which VMware Fusion uses to set breakpoints in the guest OS. To work around this you must enable software breakpoints in the vmx file:
According to this, VMware is aware of the issue and they are working resolve it. The workaround will do for now.
Also don’t forget to enable the gdb stub in the vmx file:
Источник


