- Беспроводная отладка Android 11
- Android Debug Bridge (ADB) Connect to Device over USB, WiFi
- What is Android Debug Bridge (ADB)?
- USB debugging and ADB Configuration-
- How to Connect to an Emulator
- How to Connect Android Device with ADB (Android Debug Bridge)
- How to Configuring ADB for Wi-Fi Support
- Android Remote Debugger — удаленная отладка Android приложений
- Android Remote Debugger
- Работа с отладчиком
- Logging
- Database
- Network
- Описание разделов отладки
- Logging
- Network
- Database
- SharedPreferences
- Как подключить Android Remote Debugger
- Set Up Device for Development
- Enable Debugging on the Device
- Android 9.0+
- Android 8.0 and Android 8.1
- Android 7.1 and lower
- Verify that USB debugging is enabled
- Android 9.0+
- Android 8.0 and Android 8.1
- Android 7.1 and lower
- Connect the device to the computer
- Alternate connection via Wifi
- Connecting over WiFi
- Troubleshooting
- Install USB Drivers
- Download the USB Drivers
- Installing the USB Driver
- Summary
Беспроводная отладка Android 11
Режим дебага по WiFi теперь доступен, начиная с версии ОС Android 11. Давайте разберемся, как подключить устройство по Wi-Fi и смотреть логи в Logcat.

Нам необходимо убедиться, что у нас имеется все необходимое для соединения, а именно:
- установлен компонент Android SDK Platform-Tools версии не ниже 30.0.0 (April 2020), но естественно необходимо поставить последнюю версию, в которой разработчики пофиксили существующие на данный момент баги;
- включенрежим разработчика на вашем устройстве;
- на устройстве версия ОС Android 11.
Переходим в режим разработчика на нашем устройстве и активируем «Отладку по Wi-Fi».
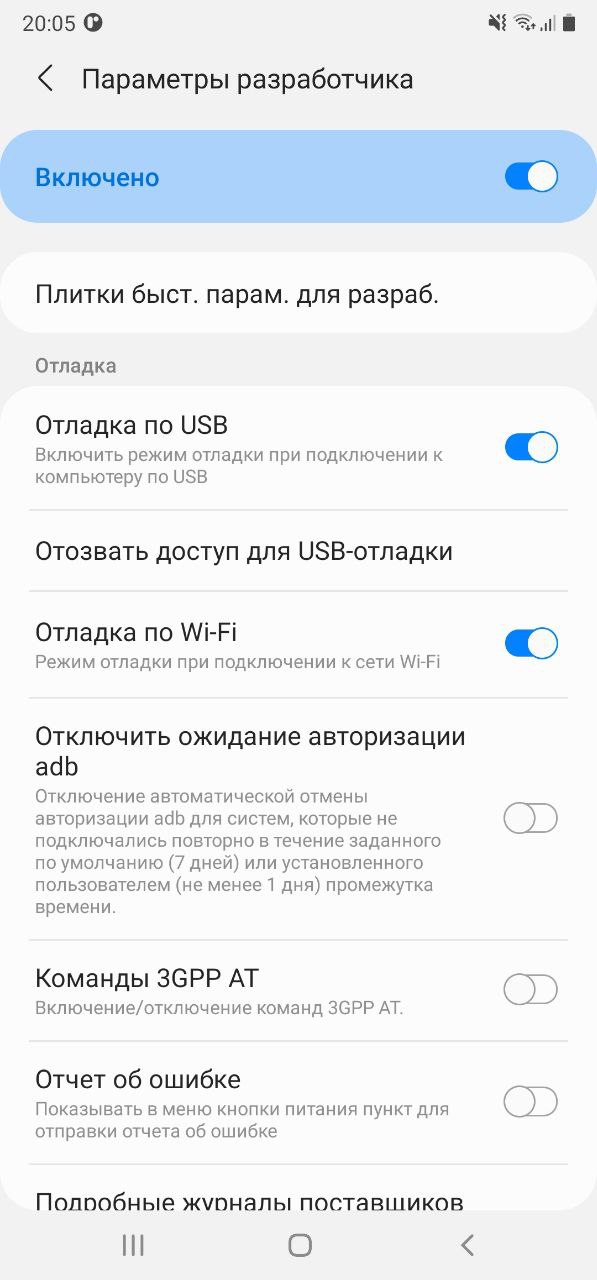
Далее необходимо выбрать раздел «Подключить устройство с помощью кода подключения».
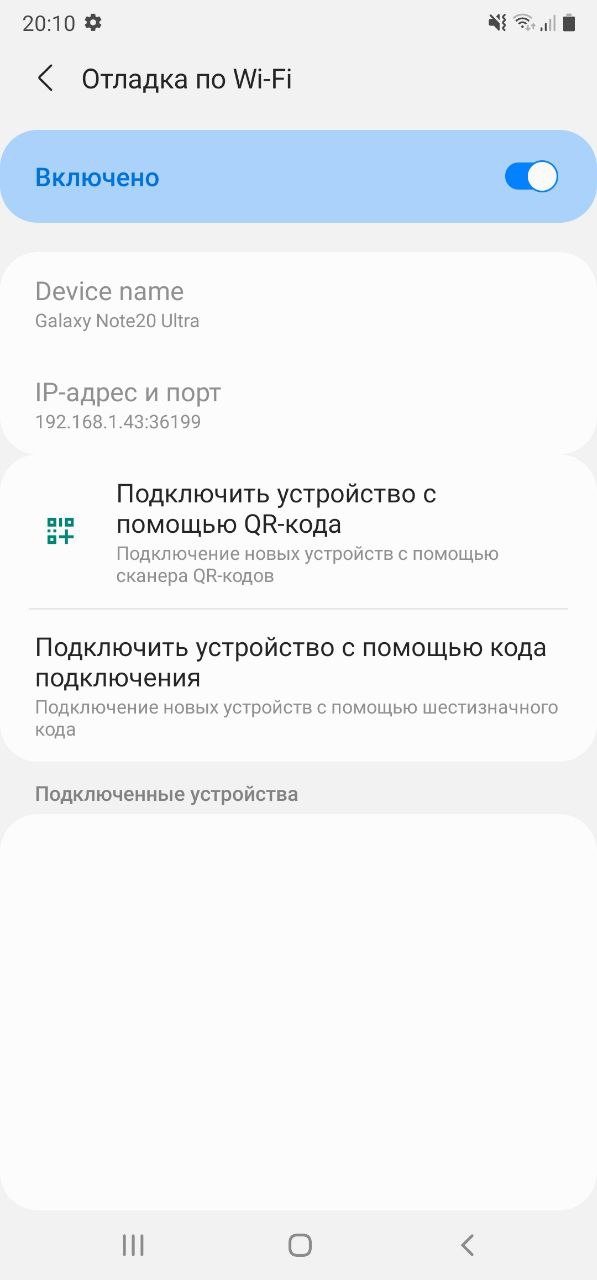
В боттомшите отобразится сам код подключения к устройству и IP-адрес и порт.

Откроем Android Studio, перейдем во вкладку Terminal, далее введем и выполним команду adb pair ipaddr:port где ipaddr и port — данные из боттомшита «Подключение к устройству». Следующим шагом — вводим код подключения и получим push на устройство об успешном подключении.
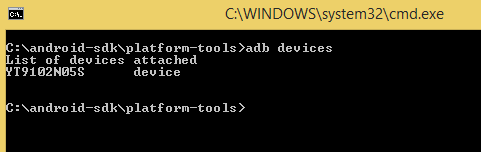
Перейдем на вкладку Logcat и все, что нам осталось — выбрать наше устройстве из списка подключенных устройств, в конкретном примере это Samsung SM-N985F.
Источник
Android Debug Bridge (ADB) Connect to Device over USB, WiFi
Updated October 7, 2021
What is Android Debug Bridge (ADB)?
Android Debug Bridge (ADB) is a command-line tool that allows you to communicate with a device. It is used to bridge communication between an emulator instance (Android device) and the background running daemon process (server). It helps you perform different actions like installing or debugging a device and run various commands on a device by providing access to a Unix shell.
Using any real device for mobile automation Testing has always been a challenge for testers. But, Android offers a handful of solutions to connect a real device over USB (Universal Serial Bus), i.e., Android Debug Bridge (ADB).
In this tutorial, you will learn-
USB debugging and ADB Configuration-
APPIUM offers an advantage to execute test on real devices. But prior to run the test, we need to setup following pre-requisite.
- USB debugging should be enabled
- ADB configuration
- Desired capability setup as per the hardware changes.
Here we will see both, connecting to emulator as well as with real device for testing. See steps below for connecting to an emulator.
How to Connect to an Emulator
Pre-Requisite- SDK (Software Development Kit) should be installed on the machine. ADB in Android is packaged with Google’s Android SDK (Software Development Kit).
Steps to enable ADB from SDK Manager.
Step 1) Open Android SDK folder
Step 2) Double click on SDK Manager
Step 3) From the list of all packages select Tools and mark the checkbox for
- Android SDK Tools and
- Android SDK Platform-tools.

How to Connect Android Device with ADB (Android Debug Bridge)
Step 1) Enable USB Debugging on your device
Enable USB debugging option from ‘Developer Option’ in Android phone. Now, connect your Android device to the computer using USB cable.

Step 2) Go to the Android SDK folder
Open the local folder where Android SDK files has been saved ‘Android SDK >> Platform-tools’ eg: C:\android-sdk\platform-tools

Step 3) Open the Command window
Inside folder hold Shift + Right click menu >> Select ‘Open command window here’ option.
It will open the folder using command prompt.
Note– you can also open the folder path directly from the Run command in command prompt.

This command window will directly open the folder in command prompt window.

Step 4) Connect an external Android device
Now, prior to check the device, user have to connect an external Android device (mobile phone). To connect use the device USB cable connector to the system. Then in above command prompt type command-
It will display all list of all the connected devices.
But, prior to this we should check that ADB server. Check whether it is running as background process or not. Just open the command prompt from above mentioned procedure and write ‘adb’ and press enter. It should display all the adb’s process running.
When server starts, it always bind the local TCP port 5037. All ADB clients listen to 5037 TCP port to communicate with server request.
Now, the running ADB server can scan all connected emulator or device instances by scanning the port.
Always remember that ADB daemon runs on odd numbered port between the ranges of 5555 to 5558.
ADB daemon process runs with console connection that acquires even number port for connection.
For example: If single device connected then server automatically scan the device and get connected but if multiple device or emulator running the user need to give ADB connect to device USB command line instruction to connect.
The emulator instance connected on odd numbered port 5557 has the same console running over even numbered 5556 port ie. Each running devices has 1 odd and 1 even connected port.
Command to detect all connected device –
Command detecting a single device from multiple connected devices-
It will detect the adb connection for device -5554 and install the application.
So, this way user can set up a successful connection to access ADB USB connect instances using ADB commands.
How to Configuring ADB for Wi-Fi Support
Just like configuring ADB connect USB, user can also configure ADB over wi-fi.
Pre-requisite
- Both Android device and the host computer should be connected to same wireless network and
- Device Bluetooth option should disabled.
Steps to connect-
- Connect device using USB cable to the host computer. Confirm USB debugging is enabled in device.
- Set target device to connect TCP/IP on port 5555

- Now, disconnect the USB cable from the device.
- In Android device find the IP address from Settings >> wi-fi Setting >> Advanced >> IP Address.Use the same Android Debug Bridge IP address to connect the device via ADB connect device USB connection
Hence, the final configuration done and ‘adb’ successfully configured over wireless network.
NOTE- If any connection error occurred just reset or kill the adb host connection. For that use following command
Источник
Android Remote Debugger — удаленная отладка Android приложений
Отладка является важным этапом разработки программного обеспечения. Поиск и исправление ошибок позволяют разрабатывать качественные продукты.
В этой статье я хочу поговорить об отладке именно Android приложений. Android Studio предоставляет нам различные инструменты профилирования, такие как:
- logcat – инструмент для просмотра логов приложения, в том числе и исключений при краше. Его можно использовать как в Android Studio, так и в терминале, через adb;
- Android profiler – мощный инструмент, который позволяет просматривать все сетевые запросы, загрузку процессора, памяти и батареи.
Также существует множество сторонних решений, позволяющих просматривать сетевой трафик, базы данных, shared preferences и др.
У всех этих инструментов есть преимущества и недостатки. К их минусам можно отнести следующее:
- множество зависимостей различных инструментов;
- сложность использования – как правило, все инструменты ориентированы на разработчиков и неудобны другим участникам команды, например, тестировщикам, аналитикам или back-end разработчикам. Обычно последним приходится дергать android-разработчиков, чтобы просмотреть какие-либо логи;
- обязательное подключение телефона к компьютеру, например, через usb-кабель.
На данный момент я не нашел ни одного решения, которое объединяло бы различные инструменты отладки и устраняло бы вышеуказанные проблемы. Поэтому я разработал собственное решение.
Android Remote Debugger
Мое решение является очень простым в использовании, так как позволяет отлаживать приложение прямо в браузере, без подключения Android устройства к компьютеру. Данное решение включает в себя четыре раздела для отладки:
- Logging — просмотр логов приложения, включая краши;
- Database — просмотр и редактирование записей в базе данных;
- Network — просмотр всех сетевых запросов и ответов в удобном формате;
- SharedPreferences – просмотр и редактирование данных SharedPreferences.
Работа с отладчиком
Для работы с отладчиком нужно сделать следующее:
- подключить и проинициализировать библиотеку;
- запустить приложение;
- вы получите уведомление в панели уведомлений, типа http://xxx.xxx.x.xxx:8080 . Просто откройте браузер на любом компьютере, подключенный к той же сети (Wi-Fi или LAN) что и Ваше Android устройство и перейдите по указанной ссылке;
- Вам будет предложено четыре раздела. Выберите нужный и начните работать с данными подключенного приложения.
Ниже представлены скриншоты некоторых разделов:
Logging
Database
Network
Описание разделов отладки
Для инициализации библиотеки необходимо вызвать AndroidRemoteDebugger.init(applicationContext) в коде приложения. Также можно указать дополнительные параметры с помощью AndroidRemoteDebugger.Builder :
При инициализации библиотеки в Вашем приложении запускается локальный сервер. В качестве веб-сервера используется NanoHTTPD. Затем Вы получаете уведомление об успешном или неуспешном запуске. Сервер может не запуститься, если Вы, к примеру, уже запустили сервер в другом приложении с портом 8080. И в уведомлении Вам будет предложено повторить попытку запуска с текущим портом или повторить запуск с другим портом. Порт Вы также можете указать заранее в AndroidRemoteDebugger.Builder .
Logging
Данный раздел позволяет просматривать логи приложения. При необходимости можно выполнять фильтрацию сообщений по приоритету, по тегам и по подстрокам. Для удобства у всех сообщений установлен свой цвет текста, в зависимости от приоритета. Все логи также можно скачать.
Для логирования сообщений нужно вызвать статический метод AndroidRemoteDebugger.Log . Данный метод имеет множество разных перегрузок. Вызывать их можно в любом месте вашего приложения. При их вызове сообщение сразу сохраняется в базе данных, а в разделе Logging каждую секунду отправляется запрос на сервер на получение новых логов. На данный момент все логи очищаются при следующем запуске приложения.
Пример вызова: AndroidRemoteDebugger.Log.d(«tag», «message») .
Также очень удобно использовать данный метод логирования совместно с библиотекой Timber (автором которой является Jake Wharton), пример:
Network
Раздел Network позволяет просматривать все сетевые запросы и ответы в компактном и расширенном виде. В компактном виде не отображаются тело и заголовки запросов. В расширенном виде вы видите всю информацию. Принцип получения данных в этом разделе практически аналогичен разделу Logging. При необходимости можно выполнить фильтрацию по HTTP коду ответа или по подстрокам. Можно также показывать только те запросы, в которых произошла ошибка. Как и в разделе Logging, все логи можно скачать.
Для работы этого раздела необходимо использовать библиотеку OkHttp3 и добавить интерцептор NetLoggingInterceptor. Для получения достоверных данных рекомендуется добавить его последним, после других интерцепторов.
Database
Данный раздел позволяет просматривать базы данных. Ничего дополнительного для его работы делать не нужно. Необходимо только выбрать базу данных и таблицу. Данные будут показываться страницами по 15 записей. Можно выполнить поиск данных, удалить записи, редактировать их. Можно также выполнить любой sql-запрос.
SharedPreferences
Данный раздел позволяет просматривать все файлы SharedPreferences. Можно выбрать любой файл и просмотреть, удалить, изменить или добавить запись. Также есть возможность удалить сам файл SharedPreferences со всеми данными. Кроме того, можно выполнить поиск по подстрокам.
Как подключить Android Remote Debugger
Добавьте в корневой build.gradle следующий репозиторий:
Добавьте в build.gradle вашего модуля следующую зависимость:
Android Remote Debugger:
- позволяет выполнять удаленную отладку через браузер;
- включает в себя сразу несколько инструментов отладки;
- ориентирован не только на разработчиков;
- для работы не требует подключения Android устройства к компьютеру;
- прост в использовании.
Источник
Set Up Device for Development
This article explains how to setup an Android device and connect it to a computer so that the device may be used to run and debug Xamarin.Android applications.
After testing on an Android emulator, you will want to see and test your apps running on an Android device. You will need to enable debugging and connect the device to the computer.
Each of these steps will be covered in more detail in the sections below.
Enable Debugging on the Device
A device must be enabled for debugging in order to test an Android application. Developer options on Android have been hidden by default since version 4.2, and enabling them can vary based on the Android version.
Android 9.0+
For Android 9.0 and higher, debugging is enabled by following these steps:
- Go to the Settings screen.
- Select About Phone .
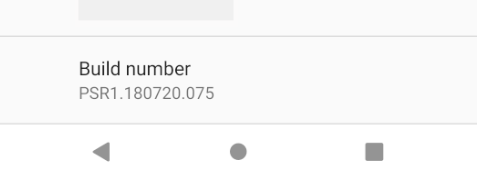
- Tap Build Number 7 times until You are now a developer! is visible.
Android 8.0 and Android 8.1
- Go to the Settings screen.
- Select System.
- Select About Phone
- Tap Build Number 7 times until You are now a developer! is visible.
Android 7.1 and lower
- Go to the Settings screen.
- Select About Phone.
- Tap Build Number 7 times until You are now a developer! is visible.
Verify that USB debugging is enabled
After enabling developer mode on your device, you must ensure that USB debugging is enabled on the device. This also varies based on the Android version.
Android 9.0+
Navigate to Settings > System > Advanced > Developer Options and enable USB Debugging.
Android 8.0 and Android 8.1
Navigate to Settings > System > Developer Options and enable USB Debugging.
Android 7.1 and lower
Navigate to Settings > Developer Options and enable USB Debugging.
Once the Developer Options tab is available under Settings > System, open it to reveal developer settings:
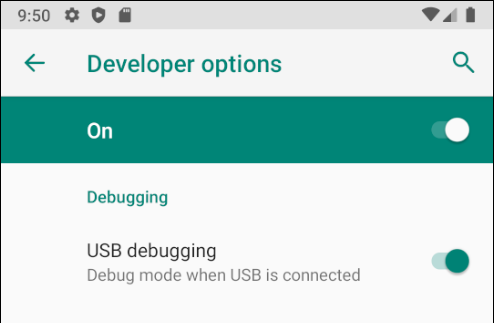
This is the place to enable developer options such as USB debugging and stay awake mode.
Connect the device to the computer
The final step is to connect the device to the computer. The easiest and most reliable way is to do so over USB.
You will receive a prompt to trust the computer on your device if you have not used it for debugging before. You can also check Always allow from this computer to prevent requiring this prompt each time you connect the device.

Alternate connection via Wifi
It is possible to connect an Android device to a computer without using a USB cable, over WiFi. This technique requires more effort but could be useful when the device is too far from the computer to remain constantly plugged-in via cable.
Connecting over WiFi
By default, the Android Debug Bridge (ADB) is configured to communicate with an Android device via USB. It is possible to reconfigure it to use TCP/IP instead of USB. To do this, both the device and the computer must be on the same WiFi network. To setup your environment to debug over WiFi complete the following steps from the command line:
Determine the IP address of your Android device. One way to find out the IP address is to look under Settings > Network & internet > Wi-Fi, then tap on the WiFi network that the device is connected to, and then tap on Advanced. This will open a dropdown showing information about the network connection, similar to what is seen in the screenshot below:
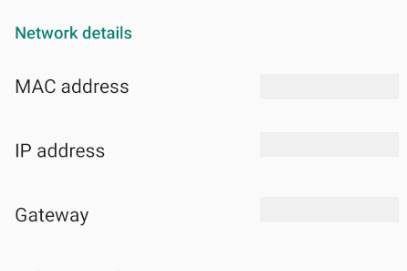
On some versions of Android the IP address won’t be listed there but can be found instead under Settings > About phone > Status.
Connect your Android device to your computer via USB.
Next, restart ADB so that it using TCP on port 5555. From a command prompt, type the following command:
After this command is issued, your computer will not be able to listen to devices that are connected via USB.
Disconnect the USB cable connecting your device to your computer.
Configure ADB so that it will connect to your Android device on the port that was specified in step 1 above:
Once this command finishes the Android device is connected to the computer via WiFi.
When you’re finished debugging via WiFi, it’s possible to reset ADB back to USB mode with the following command:
It’s possible to request ADB to list the devices that are connected to the computer. Regardless of how the devices are connected, you can issue the following command at the command prompt to see what is connected:
Troubleshooting
In some cases you might find that your device cannot connect to the computer. In this case you may want to verify that USB drivers are installed.
Install USB Drivers
This step is not necessary for macOS; just connect the device to the Mac with a USB cable.
It may be necessary to install some extra drivers before a Windows computer will recognize an Android device connected by USB.
These are the steps to set up a Google Nexus device and are provided as a reference. Steps for your specific device may vary, but will follow a similar pattern. Search the internet for your device if you have trouble.
Run the android.bat application in the [Android SDK install path]\tools directory. By default, the Xamarin.Android installer will put the Android SDK in following location on a Windows computer:
Download the USB Drivers
Google Nexus devices (with the exception of the Galaxy Nexus) require the Google USB Driver. The driver for the Galaxy Nexus is distributed by Samsung. All other Android devices should use the USB driver from their respective manufacturer.
Install the Google USB Driver package by starting the Android SDK Manager, and expanding the Extras folder, as can be seen in the follow screenshot:
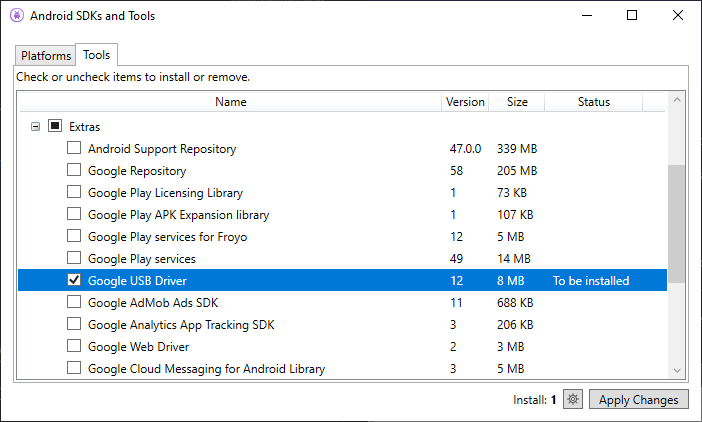
Check the Google USB Driver box, and click the Apply Changes button. The driver files are downloaded to the following location:
[Android SDK install path]\extras\google\usb\_driver
The default path for a Xamarin.Android installation is:
Installing the USB Driver
After the USB drivers are downloaded, it is necessary to install them. To install the drivers on Windows 7:
Connect your device to the computer with a USB cable.
Right-click on the Computer from your desktop or Windows Explorer, and select Manage .
Select Devices in the left pane.
Locate and expand Other Devices in the right pane.
Right-click the device name and select Update Driver Software . This will launch the Hardware Update Wizard.
Select Browse my computer for driver software and click Next .
Click Browse and locate the USB driver folder (the Google USB driver is located in [Android SDK install path]\extras\google\usb_driver).
Click Next to install the driver.
Summary
This article discussed how to configure an Android device for development by enabling debugging on the device. It also covered how to connect the device to a computer using either USB or WiFi.
Источник


