- Navigating with Deep Links
- Deep thoughts on deep links… with Navigation component
- Introduction
- Donut Deep Linking
- Implicit
- Explicit
- Summary
- For More Information
- Jetpack Compose Navigation
- 1. Introduction
- What you’ll need
- Navigating with Compose
- What you’ll do
- What you’ll learn
- 2. Setup
- 3. Migrate to Navigation
- Add the Navigation dependency
- Set up the NavController
- Prepare routes for destinations
- Overview
- Preparation
- Fully integrate navigation bar state changes
- Migrate RallyScreen to Navigation
- Enable clicks on OverviewScreen
- 4. Navigating with arguments
- Navigate to SingleAccountBody
- 5. Enable deep link support
- Add the intent filter
- React to the deep link
- Test the deep link using adb
- 6. Extract finished NavHost
- 7. Testing Navigation in Compose
- Prepare the test class
- Write your first test
- Navigating in tests
- Test via UI and test rule
- Test via UI and navController
- Test via navController
- 8. Congratulations
- What’s next?
- Reference docs
Navigating with Deep Links
Deep thoughts on deep links… with Navigation component

This is the fourth in a series of articles about the Navigation component API and tool. These articles are based on content that is also explained in video form, as part of the MAD Skills series, so feel free to consume this material in whichever way you prefer (though the code tends to be easier to copy from text than from a video, which is why we offer this version as well).
If you prefer your content in video form, here it is:
Introduction
This episode is on Deep Links, the facility provided by Navigation component for helping the user get to deeper parts of your application from UI outside the application.
Sometimes you want to make it easy for the user to get to a specific part inside the flow of your application, without having to click-click-click from the start screen to get there. For example, maybe you want to surface ongoing conversations in a chat app, or the user’s cart in a shopping application. You can use deep links to do this, surfacing these links outside of the application, in shortcuts and notifications, that allow the user to click from those other locations and get to those deeper parts of your app.
Navigation component simplifies creating these deep links. To show how they work, we’re going to take another look at the Donut Tracker app that I used in previous episodes. The finished code for the app is on GitHub; feel free to download and open it up in Android Studio to follow along.
Since the code is done, I’ll walk you through the steps I went through to make it all work.
Donut Deep Linking
In Donut Tracker, there are a couple of actions that are useful to get to quickly. For example, if I have a really good donut in the wild, I’d like to be able to add that information into the list without having to launch the app first and then click on the FloatingActionButton to bring up the data-entry dialog. Also, if I’ve just added or edited information about a donut, I’d like to post a notification so that I can quickly get back to editing that recent entry.
I added deep links for both of these actions: one for adding a new donut and another for returning to an ongoing edit. The “add” action uses an “implicit” deep link. Implicit is what we call a link that takes you to a static location inside your hierarchy, one that does not change over time. In my app, the implicit deep link will always take you to the form that allows you to add a new donut to the list.
The “continue editing” action uses an “explicit” deep link. Explicit is what we call a link that takes you to dynamic content inside your application.
Implicit
Let’s start with an implicit deep link to add a new donut.
First, I needed to create the deep link, which I did in the navigation editor. Clicking on the dialog destination shows the properties of that destination on the right:
I clicked on the + next to Deep Links. This brought up a dialog in which I entered a URI (Universal Resource Identifier). In this case, I wanted a URI that is specific to the app (not a general web address that might be picked up by the browser app), so I used “myapp” as an identifier that is specific to our app:
Next, I edited the application manifest to inform the application that I wanted a shortcut for the deep link:
In that meta-data block, I told the activity that there is information about the deep link in the navigation graph. I also referenced a new file in the xml resource directory with information about an app shortcut for this activity.
I then created the xml folder and a new shortcuts.xml file in that new directory. In the shortcuts file, I entered information about the app shortcut, including the URI we saw above:
The important part here is that data item, which uses the same URI string as I entered into the deep link dialog in the navigation tool earlier. This is the connecting glue which causes navigation to happen from the app shortcut to the dialog destination.
And that’s all I needed for an implicit deep link: I told it the destination to navigate to, created the shortcut to do that navigation, and I was done. If you run the app, you can see the shortcut by long-pressing on the app icon. Clicking that shortcut will take you to the form to create a new donut item.
That was implicit deep links. Now let’s create an explicit deep link, which will be created dynamically based on the state of the app.
Explicit
If you’re like me, then donuts are really important to you. When I’m entering information about a new donut find, I probably want to take my time with it. So I’ll start the entry with some information, but I may want to come back later and enter more when I’ve really had a chance to appreciate the experience.
This can be done with notifications: when I enter information about a donut, the app creates a notification that makes it easier to get back to that ongoing entry. There’s not a lot of code necessary to do this; I just needed to create a notification with a PendingIntent to get to the right place in the application.
Most of this happens in DonutEntryDialogFragment , in the onClick() listener for the Done button. We’ve seen this click listener code in a previous episode; this is where we add new or updated data to the ViewModel. I just needed to add an extra step here to create the notification. The parts in bold are the code I had to add to deal with the notification.
First, the code creates arg with the donut id to use. This will be used to tell the destination dialog which donut to retrieve that the user will continue editing.
The code then creates pendingIntent for the deep link using an API in NavigationController . The destination is set to be this dialog fragment. The call also sets the argument which holds the ID and create the intent.
Then the code calls Notifer.postNotification() , a utility class/method I created for handling the details of creating and posting the notification.
First, the code creates the notification builder. Note that it needed a channelId to construct the builder, which is created as necessary in the init() function of Notifier (see the code for those details; it’s standard stuff).
I then supplied the necessary data for the notification, set the intent , and built it. Before posting, existing notifications are canceled (I only wanted to be able to edit the latest donut).
Finally, the new notification is posted and… it’s done. Now every new editing operation (whether for a new donut or an existing donut) will surface a notification that the user can click on to get back to that editing action.
Summary
In this episode, I created both an implicit deep link , which takes the user to a static location in the app where they can enter information about a new donut, and an explicit deep link, which allows the user to continue editing an existing donut where they left off.
This Donut Tracker app is getting better and better. Not as good as a donut, of course… but then nothing is.
That’s it for this time. Go grab a donut — you’ve earned it.
For More Information
For more details on Navigation component, check out the guide Get started with the Navigation component on developer.android.com.
To see the finished Donut Tracker app (which contains the code outlined above, but also the code covered in future episodes), check out the GitHub sample.
Finally, to see other content in the MAD Skills series, check out the video playlist in the Android Developers channel on YouTube.
Источник
Jetpack Compose Navigation
1. Introduction
Last Updated: 2021-03-17
What you’ll need
- The latest Android Studio Arctic Fox
- Knowledge of Kotlin
- Basic understanding of Compose (such as the @Composable annotation)
- Consider taking the Jetpack Compose basics codelab before this codelab
Navigating with Compose
Navigation is a Jetpack library that enables navigating from one destination within your app to another, along specific routes. The Navigation library also provides a specific artifact to enable consistent and idiomatic navigation within screens built with Jetpack Compose. This artifact ( navigation-compose ) is the focal point of this codelab.
What you’ll do
You’re going to use the Rally Material study as the base for this codelab. You’ll migrate the existing navigation code to use the Jetpack Navigation component to navigate between screens in Jetpack Compose.
What you’ll learn
- Basics of using Jetpack Navigation with Jetpack Compose
- Navigating between composables
- Navigating with required and optional arguments
- Navigating using deep links
- Integrating a TabBar into your navigation hierarchy
- Testing navigation
2. Setup
You can follow along this codelab on your machine.
To follow along on your own, clone the starting point for the codelab.
Alternatively, you can download two zip files:
Now that you’ve downloaded the code, open the NavigationCodelab project in Android Studio. You’re now ready to get started.
The compose-codelabs repo contains starter code for all codelabs in the pathway.
For this codelab, use the NavigationCodelab project.
 NavigationCodelab — Project that contains the start and finished code for this codelab
 NavigationCodelab — Project that contains the start and finished code for this codelab
The project is built in multiple git branches:
- main – the starter code for this project, you will make changes to this to complete the codelab
- end – contains the solution to this codelab
3. Migrate to Navigation
Rally is an existing app which initially doesn’t use Navigation. The migration follows several steps:
- Add the Navigation dependency
- Set up the NavController and NavHost
- Prepare routes for destinations
- Replace the original destination mechanism with navigation routes
Add the Navigation dependency
Open the app’s build file, found at app/build.gradle . In the dependencies section, add the navigation-compose dependency.
Now, sync the project and you’re ready to start using Navigation in Compose.
Set up the NavController
The NavController is the central component when using Navigation in Compose; it keeps track of back stack entries, moves the stack forward, enables back stack manipulation, and navigating between screen states. Because NavController is central to navigation it has to be created first in order to navigate to destinations.
Within Compose you’re working with a NavHostController , which is a subclass of NavController . Obtain a NavController by using the rememberNavController() function; this creates and remembers a NavController which survives configuration changes (using rememberSavable ). The NavController is associated with a single NavHost composable. The NavHost links the NavController with a navigation graph where composable destinations are specified.
For this codelab, obtain and store your NavController within RallyApp . It is the root composable for the entire application. You can find it in RallyActivity.kt .
Prepare routes for destinations
Overview
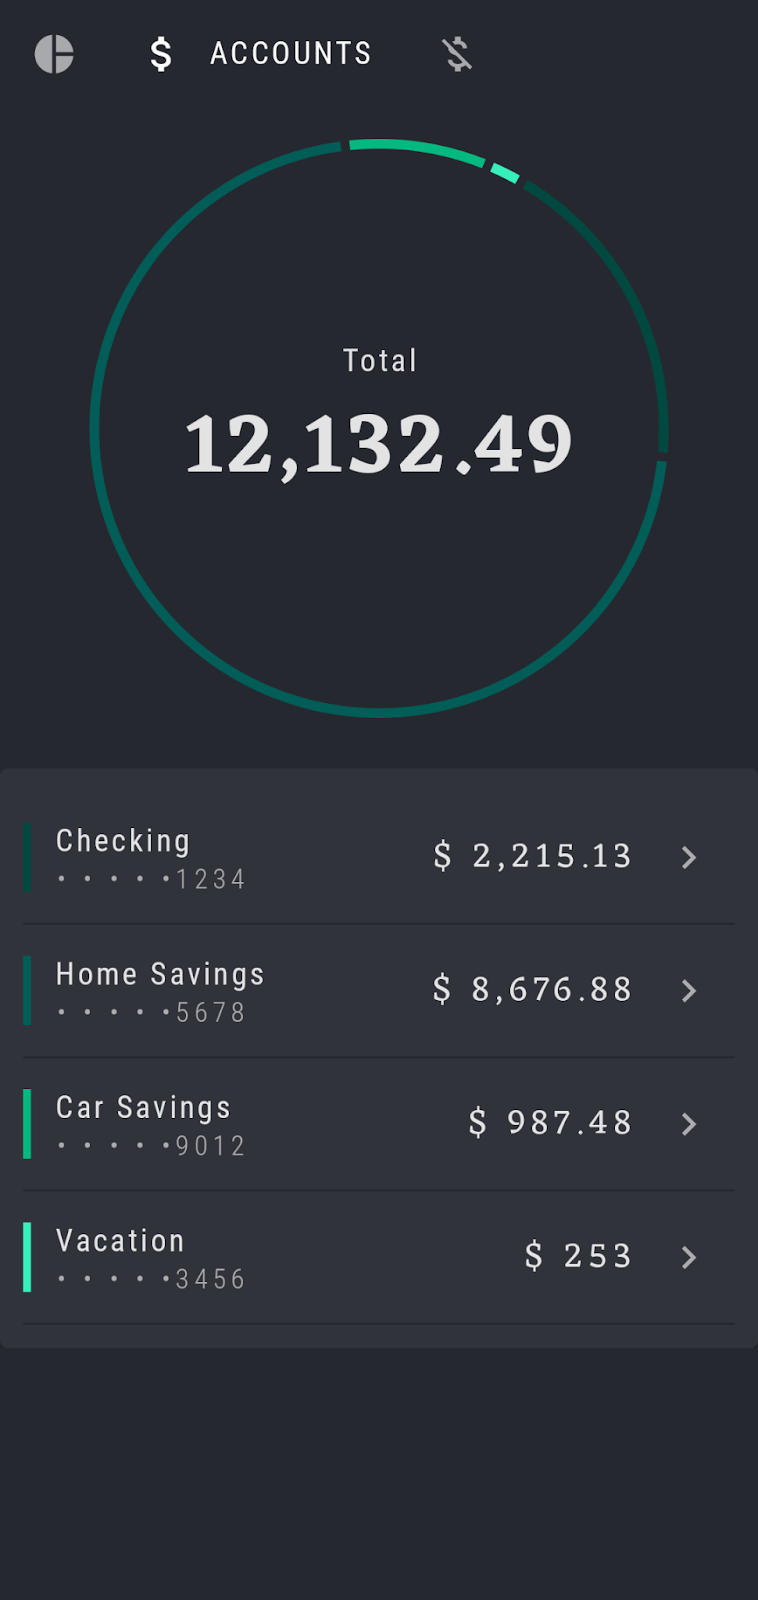
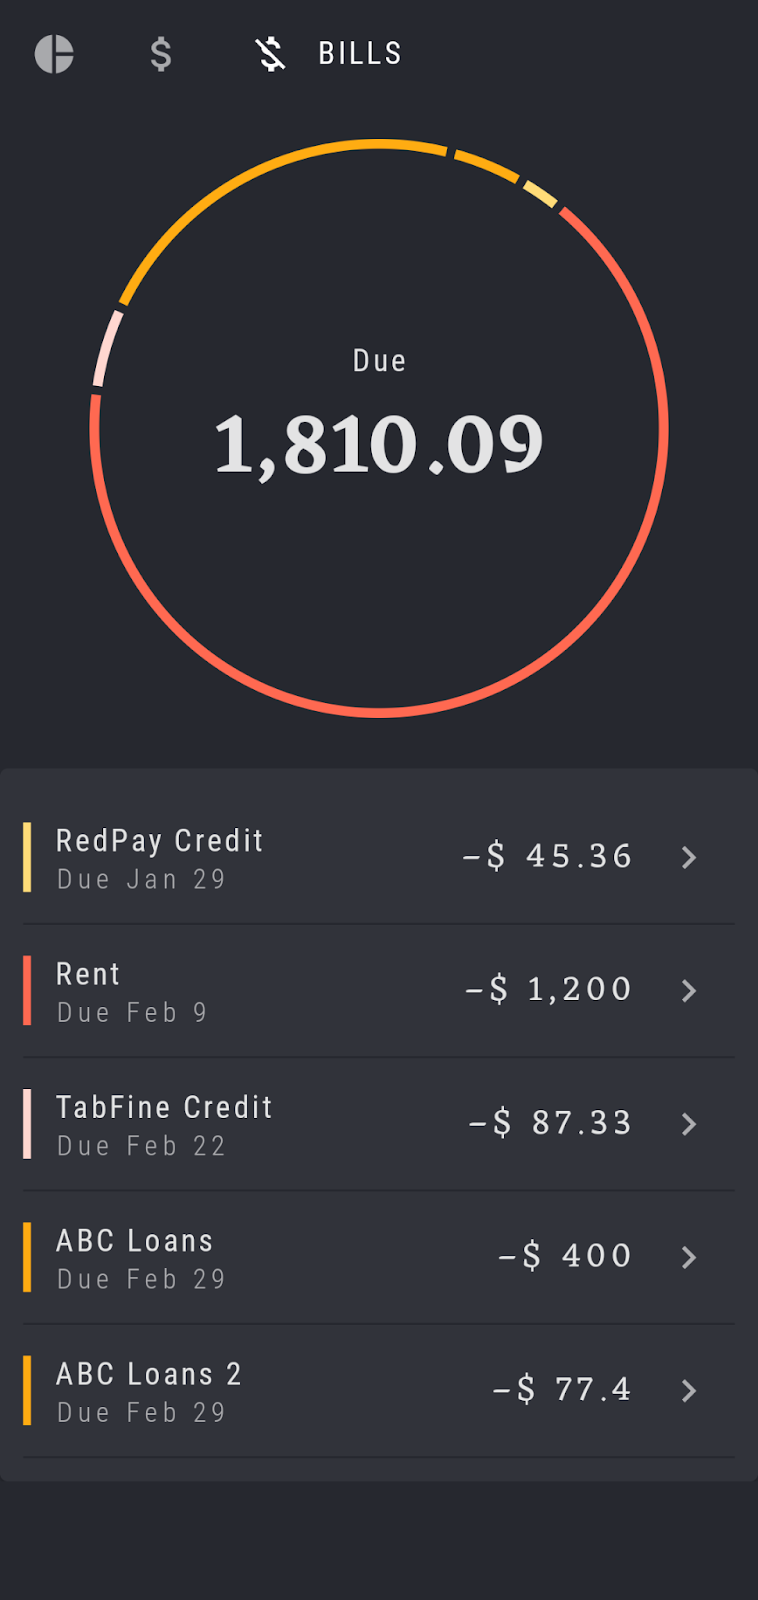
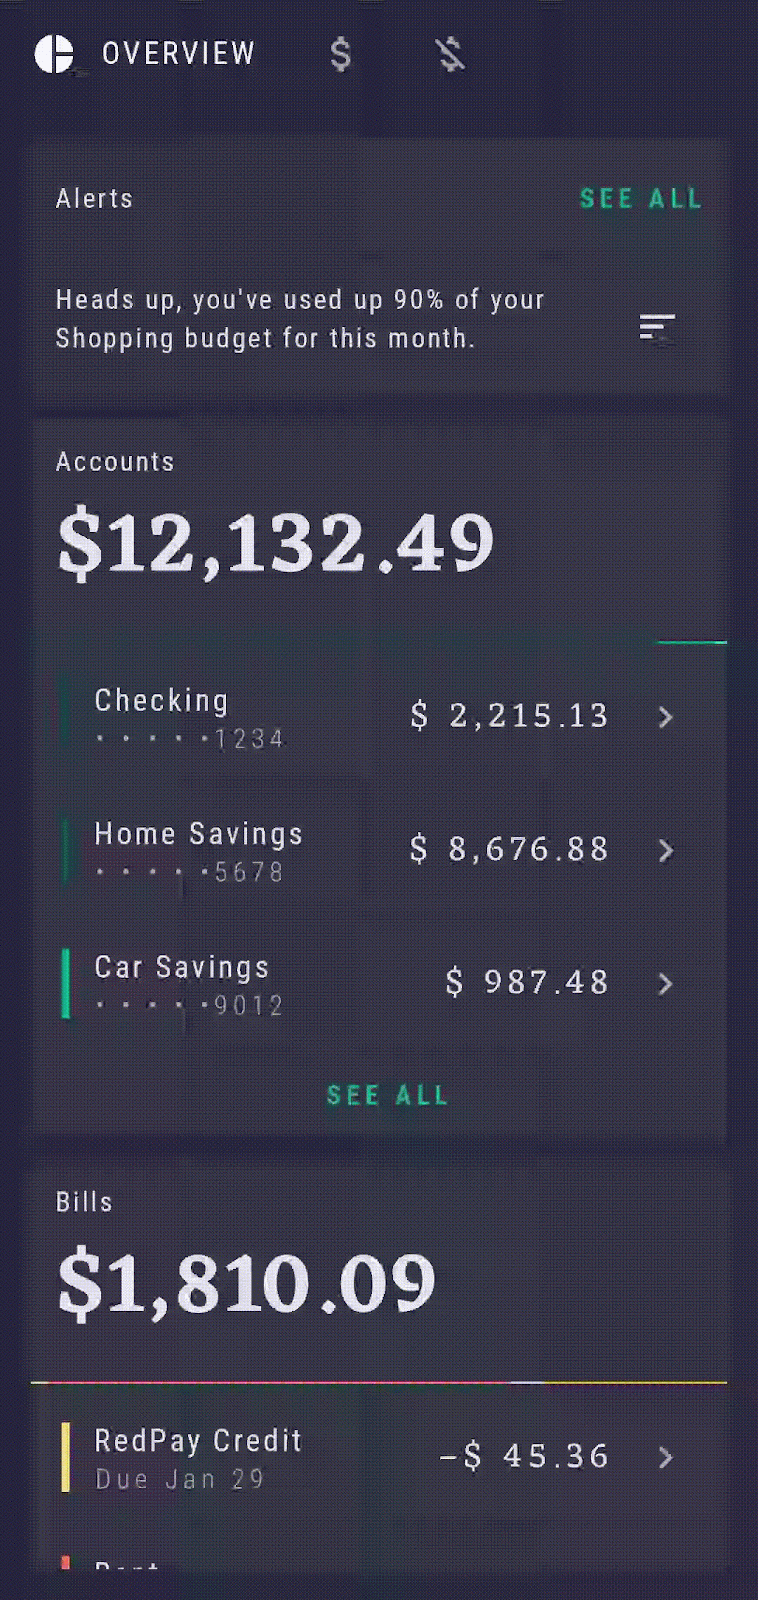
Rally App has three screens:
- Overview — Overview of all financial transactions and alerts
- Accounts — Insights into existing accounts
- Bills — Scheduled expenses
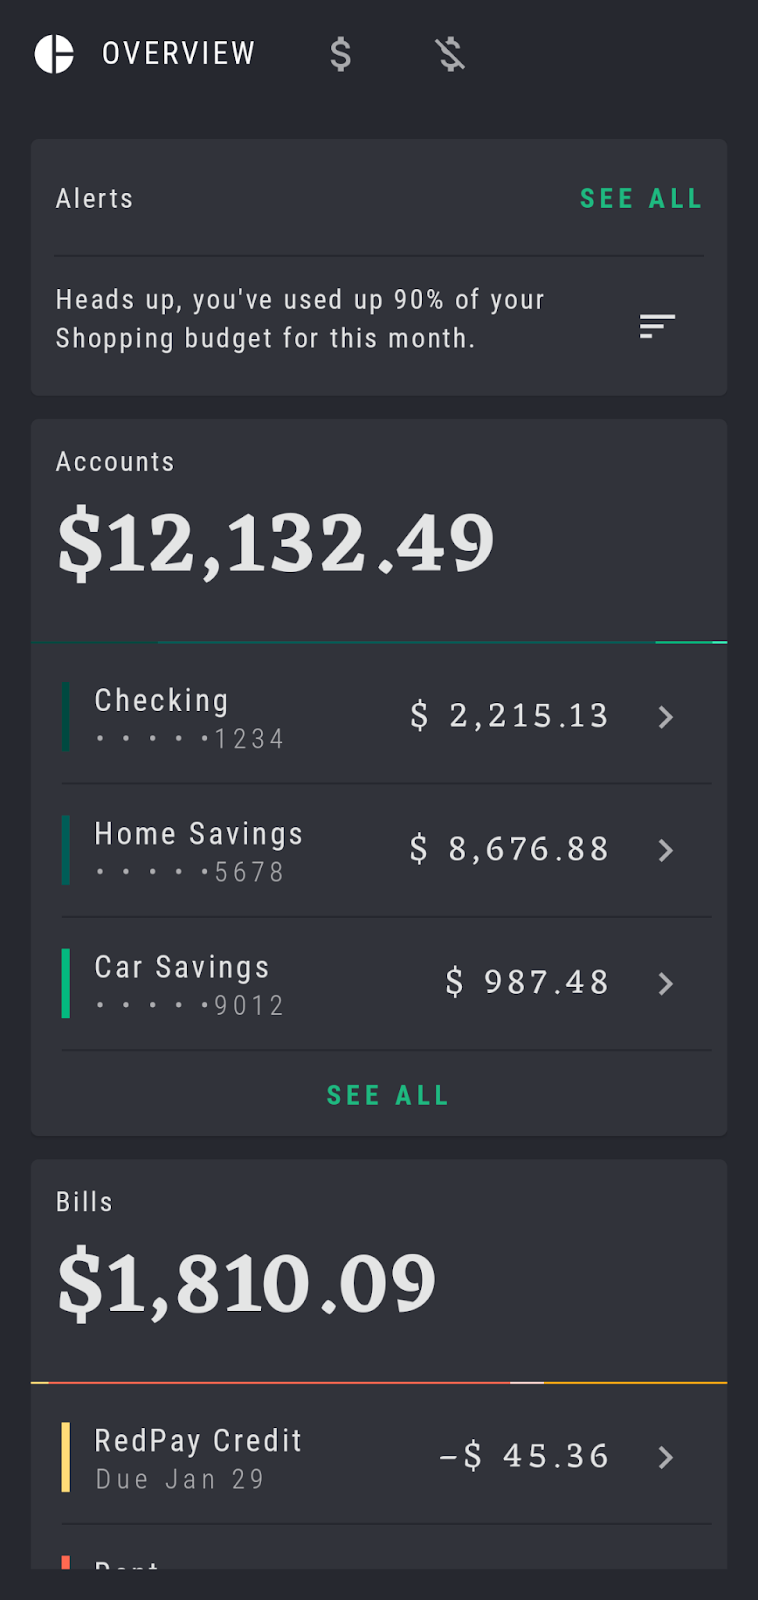
All three screens are built using composables. Take a look at RallyScreen.kt . The three screens are declared in this file. You will later map these screens to navigation destinations, with Overview as the start destination. You will also move the composables away from RallyScreen and into a NavHost . For now, you can leave RallyScreen untouched.
When using Navigation within Compose, routes are represented as strings. You can think of these strings as being similar to URLs or deep links. In this codelab we’ll use the name property of each RallyScreen item as the route, for example, RallyScreen.Overview.name .
Preparation
Go back to the RallyApp composable in RallyActivity.kt and replace Box containing the screen’s contents with a newly created NavHost . Pass in the navController we created in the previous step. The NavHost also needs a startDestination . Set it to RallyScreen.Overview.name . Also, create a Modifier to pass the padding into the NavHost .
Now we can define our nav graph. The destinations that the NavHost can navigate to are ready to accept destinations. We do this using a NavGraphBuilder , which is provided to the last parameter of NavHost; a lambda for defining your graph. As this parameter expects a function you can declare destinations in a trailing lambda. The Navigation Compose artifact provides the NavGraphBuilder.composable extension function. Use it to define navigation destinations in your graph.
For now, we’ll temporarily set a Text with the screen’s name as content of the composable. In the following step we’ll use the existing composables.
Now remove the currentScreen.content call from the Scaffold and run the app; you will see the name of your start destination and the tabs above.
You should end up with a NavHost similar to this one:
The NavHost now can replace the Box within Scaffold . Pass the Modifier into NavHost to keep the innerPadding intact.
At this point the top bar is not yet wired up, so clicking on the tabs won’t change the displayed composable. In the next step you’ll take care of this.
Fully integrate navigation bar state changes
In this step you’ll wire up the RallyTabRow and will get to delete the current manual navigation code. After you have finished this step, the navigation component will completely take care of routing.
Note: To make your code testable, we recommend not passing around the navController. In this codelab, you will be providing callbacks to enable navigating from a single point of responsibility.
Still in RallyActivity , you’ll find that the RallyTabRow composable has a callback when a tab has been clicked, called onTabSelected . Update the selection code to use navController for navigating to the selected screen.
This is all that’s necessary to navigate to a screen via the TabRow using navigation:
With this change, currentScreen will no longer be updated. This means that expanding and collapsing of selected items won’t work. To re-enable this behavior, the currentScreen property needs to be updated as well. Luckily Navigation holds on to the back stack for you and can provide you with the current back stack entry as a State . With this State you can react to changes to the back stack. You can even query the current back stack entry for its route.
To finish migrating the TabRow screen selection to Navigation, update currentScreen to use the navigation backstack like this.
At this point, when you run the app you’re able to switch between screens using the tabs but all that’s shown is the screen’s name. Before the screen can be displayed, RallyScreen needs to be migrated to navigation.
Migrate RallyScreen to Navigation
After you have completed this step, the composable will be completely decoupled from RallyScreen enum and moved into the NavHost . RallyScreen will only exist to provide an icon and title for the screen.
Open RallyScreen.kt. Move each screen’s implementation of body into the corresponding composables within your NavHost in RallyApp .
At this point you can safely remove the content function and body parameter and its usages from RallyScreen which will leave you with this code:
Run the app again. You’ll see the original three screens and can navigate between them through the TabRow.
Note: With the above changes, back navigation is now supported through the Navigation Component. Switching between the screens and then pressing the back button will result in popping the stack and bringing you to the previous destination.
Enable clicks on OverviewScreen
In this codelab, click events on OverviewBody were initially ignored. This means that the «SEE ALL» button was clickable, but did not go anywhere.
OverviewBody can accept several functions as callbacks to click events. Let’s implement onClickSeeAllAccounts and onClickSeeAllBills to navigate to relevant destinations.
To enable navigation when the «see all» button is clicked, use the navController and navigate to either the Accounts or Bills screen. Open RallyActivity.kt , find OverviewBody within NavHost and add the navigation calls.
Now it has become possible to easily change the behavior of click events for OverviewBody . Keeping the navController at the top level of your navigation hierarchy and not passing it directly into OverviewBody makes it easy to preview or test OverviewBody in isolation, without having to rely on an actual navController being present when doing so.
4. Navigating with arguments
Let’s add some new functionality to Rally! We’ll add an Accounts screen which shows details of an individual account when a row is clicked.
A navigation argument makes the route dynamic. Navigation arguments are a very powerful tool to make routing behavior dynamic by passing one or more arguments into a route and adjusting argument types or default values.
Note: A named argument is provided inside routes in curly braces like this
In RallyActivity add a new destination to the graph by adding a new composable to the existing NavHost with the argument Accounts/
The body of each composable destination receives a parameter (which we haven’t used so far) of the current NavBackStackEntry which models the route and arguments of the current destination. We can use arguments to retrieve the argument i.e. the name of the selected account, and look this up in UserData and pass it into the SingleAccountBody composable.
You also could provide a default value to use if the argument has not been provided. We’ll skip that because it’s not necessary here.
Your code should now look like this:
Navigate to SingleAccountBody
Now that the composable is set up with the argument, you can navigate to it, using the navController like this: navController.navigate(«$
Add this function to the onAccountClick parameter of OverviewBody ‘s declaration in NavHost and to onAccountClick of AccountsBody .
To keep things reusable you could create a private helper function like below.
When you run the app at this point, you’re able to click on each account and will be taken into a screen, displaying data for the given account.
5. Enable deep link support
In addition to arguments you can also use deep links to expose destinations in your app to third party apps. In this section you’ll add a new deep link to the route created in the previous section, enabling deep links from outside your app to individual accounts directly by name.
Add the intent filter
To start, add the deep link to the AndroidManifest.xml . You need to create a new intent filter for RallyActivity with the action VIEW and categories BROWSABLE and DEFAULT .
Then, using the data tag, add a scheme , host and pathPrefix .
This codelab will use rally://accounts/
You don’t need to declare the «name» argument in the AndroidManifest. It will be parsed as an argument by Navigation.
React to the deep link
Now you can react to the incoming intent from within RallyActivity .
The composable you created earlier to accept arguments can also accept the newly created deep link.
Add a list of deepLinks using the navDeepLink function. Pass the uriPattern and provide the matching uri for the intent-filter above. Pass the created deep link into the composable, using the deepLinks parameter.
Test the deep link using adb
Now your app is ready to handle deep links. To test that it behaves correctly, install a current version of Rally on an emulator or device, open a command line and execute the following command:
This will take you directly into the checking account and works for all account names in the app.
6. Extract finished NavHost
Now your NavHost is complete. You can extract it from the RallyApp composable to its own function and call it RallyNavHost . This is the one and only composable you should work directly with the navController . By not creating the navController within RallyNavHost , you can still use it to make tab selection, which is part of the higher structure, within RallyApp .
Also, make sure to replace the original call site with RallyNavHost(navController) to keep things working as intended.
7. Testing Navigation in Compose
Note: This codelab does not teach the Compose testing basics. To learn these, visit the Compose Testing docs or codelab. To learn more about advanced testing of navigation code, such as using the TestNavHostController , visit the Test Navigation guide.
From the beginning of this codelab we made sure not to pass the navController directly into any composables, but instead you passed callbacks as parameters. This means that all your composables are individually testable. But you also can test the entire NavHost , and that’s what this step is all about. To test individual Composable functions, make sure to check out the Testing in Jetpack Compose codelab.
Prepare the test class
Your NavHost can be tested in isolation from the Activity itself.
As this test still will run on an Android device you’ll need to create your test file in the androidTest directory under /app/src/androidTest/java/com/example/compose/rally .
Do this and name it RallyNavHostTest .
And then, to use the compose testing APIs, create the compose test rule like below.
Now you’re set to write an actual test.
Write your first test
Create a test function, which has to be public and annotated with @Test . In that function, you have to set the content that you want to test. Do this, using composeTestRule ‘s setContent . It takes a Composable parameter and enables you to write Compose code, as if you were in a regular app. Set up the RallyNavHost like you did in RallyActivity .
If you copied above code, the fail() call will ensure that your test fails until there is an actual assertion made. It serves as a reminder to finish implementing the test.
Note: To check that your NavHost is working correctly, the hierarchy will have to be composed first. This means that your assertions will have to be written outside of the setContent function.
You can verify that the correct screen is displayed using content description. In this codelab, content descriptions for «Accounts Screen» and «Overview Screen» are provided for you to use for test verification. Create a lateinit property in the test class itself, so you can use it in future tests as well.
For an easy start, check that the OverviewScreen is displayed.
Remove the fail() call, run the test again, and it passes. Rightfully so.
In each of the following tests, RallyNavHost will be set up the same way. So you can extract this into a function annotated with @Before to keep your code clean.
Navigating in tests
You can test your navigation implementation in multiple ways, by performing clicks on the UI elements that should lead to a new destination or by calling navigate with the corresponding route name.
Test via UI and test rule
As you want to test your app’s implementation, clicks on the UI are preferable. Write a test to click on the «All Accounts» button that leads to the «Accounts Screen» and verify that the right screen is displayed.
Test via UI and navController
You also can use the navController to check your assertions. To do this perform a click on the UI and then, compare the current route to the one you expect, using backstackEntry.value?.destination?.route .
Test via navController
A third option is to call navController.navigate directly — there’s one caveat here. Calls to navController.navigate need to be made on the UI thread. You can achieve this by using Coroutines with the Main thread dispatcher. And since the call needs to happen before you can make an assertion about a new state, it needs to be wrapped in a runBlocking call.
With this you can navigate around the app and assert that the route takes you where you expect it to.
To learn more about testing in Compose, check out the codelab linked in the «What’s next?» section of the following step.
8. Congratulations
Congratulations, you’ve successfully completed this codelab!
You added Navigation to the Rally app and now know the key concepts of using navigation in Jetpack Compose. You learned how to create a nav graph of composable destinations, add arguments to routes, add deep links, and test your implementation in multiple ways.
What’s next?
Check out some of these codelabs.
Reference docs
Except as otherwise noted, the content of this page is licensed under the Creative Commons Attribution 4.0 License, and code samples are licensed under the Apache 2.0 License. For details, see the Google Developers Site Policies. Java is a registered trademark of Oracle and/or its affiliates.
Источник


