- Android — Data Backup
- Example
- Test your BackupAgent
- Install your application on a suitable Android system image.
- Ensure data backup is enabled
- Performing backup
- Uninstall and reinstall your application
- Auto Backup for Apps
- In this document
- Overview
- Automatically Excluded Data Files
- Configuring Data Backup
- Including or Excluding Data
- Backup Configuration Syntax
- Prohibiting Data Backups
- Testing Backup Configuration
- Enabling Backup Logging
- Testing Backup
- Testing Restore
- Troubleshooting Backups
- Known Issues
- Резервирование пользовательских данных в Android
Android — Data Backup
Android allows you to backup your application data to remote «cloud» storage, in order to provide a restore point for the application data and settings. You can only backup your application data. In order to access the other applications data, you need to root your phone.
In order to make a data backup application, you need to register your application with google backup service. This has been explained in the example. After registering , you have to specify its key in the AndroidManifest.XML
Android provides BackUpAgentHelper class to handle all the operations of data backup. In order to use this class , you have to extend your class with it. Its syntax is given below −
The persistent data that you want to backup is in either of the two forms. Either it could be SharedPrefrences or it could be File. Android supports both types of backup in the respective classes of SharedPreferencesBackupHelper and FileBackupHelper.
In order to use SharedPerefernceBackupHelper, you need to instantiate its object with the name of your sharedPerefernces File. Its syntax is given below −
The last thing you need to do is to call addHelper method by specifying the backup key string , and the helper object. Its syntax is given below −
The addHelper method will automatically add a helper to a given data subset to the agent’s configuration.
Apart from these methods, there are other methods defined in the BackupAgentHelper class. They are defined below −
| Sr.No | Method & description | ||||||||||||||
|---|---|---|---|---|---|---|---|---|---|---|---|---|---|---|---|
| 1 |
| Sr.No | Method & description | |||||||||||
|---|---|---|---|---|---|---|---|---|---|---|---|---|
| 1 |
| Steps | Description |
|---|---|
| 1 | You will use Android studio to create an Android application and name it as Backup under a package com.example.backup. |
| 2 | Register your application with Google backup service. |
| 3 | Modify the AndroidManifest to add respective necessary key and other components |
| 4 | Create backup agent class with the name you specify at AndroidManifest.XML |
| 5 | Run the application and verify the results |
Register you android application with google backup service. In order to do that , visit this link. You must agree to the terms of service, and then enter the application package name. It is shown below −
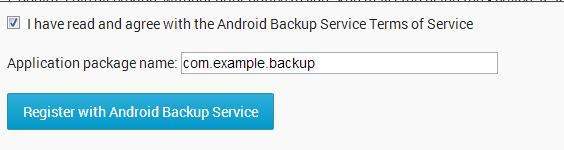
Then click on Register with android backup service. It would give you your key, along with your AndroidManifest code to copy. Just copy the key. It is shown below −

Once you copy the key , you need to write it in your AndroidManifest.XML file. Its code is given below −
Here is the code of BackUpAgentHelper class. The name of the class should be the same as you specified in the backupAgent tag under application in AndroidManifest.XML
Test your BackupAgent
Once you’ve implemented your backup agent, you can test the backup and restore functionality with the following procedure, using bmgr.
Install your application on a suitable Android system image.
If using the emulator, create and use an AVD with Android 2.2 (API Level 8).
If using a device, the device must be running Android 2.2 or greater and have Google Play built in.
Ensure data backup is enabled
If using the emulator, you can enable backup with the following command from your SDK tools/ path −
If using a device, open the system Settings, select Privacy, then enable Back up my data and Automatic restore.
Performing backup
For testing purposes, you can also make a request with the following bmgr command −
Initiate a backup operation by typing the following command.
This forces the Backup Manager to perform all backup requests that are in its queue.
Uninstall and reinstall your application
Uninstall the application with the following command −
Then reinstall the application and verify the results.
Источник
Auto Backup for Apps
In this document
Users often invest significant time and effort creating data and setting preferences within apps. Preserving that data for users if they replace a broken device or upgrade to a new one is an important part of ensuring a great user experience. Devices running the Android M Preview system help ensure a good experience for users in these circumstances by automatically backing up app data to Google Drive. The app data is automatically restored if a user changes or upgrades a device.
Automatic backups are enabled for all apps installed on devices running the Android M Preview. No additional app code is required. The system provides users with the ability to opt out of automatic data backups. You can also choose to limit what data from your app is backed up.
This document describes the new system behavior and how to specify what data is backed up for your app.
Overview
The automatic backup feature preserves the data your app creates on a user device by uploading it to the user’s Google Drive account and encrypting it. There is no charge to you or the user for data storage and the saved data does not count towards the user’s personal Drive quota. During the M Preview period, users can store up to 25MB per Android app.
Automatic backups occur every 24 hours, when the device is idle, charging, and connected to a Wi-Fi network. When these conditions are met, the Backup Manager service uploads all available backup data to the cloud. When the user transitions to a new device, or uninstalls and reinstalls the backed up app, a restore operation copies the backed up data into the newly installed app’s data directory.
Note: If your app uses the legacy Android Backup service, this new behavior does not apply and the existing backup behavior works as usual.
Automatically Excluded Data Files
Not all app data should be backed up, such as temporary files and caches, so the automatic backup service excludes certain data files by default:
- Files in the directories referred to by the getCacheDir() and getCodeCacheDir() methods.
- Files located on external storage, unless they reside in the directory referred to by the getExternalFilesDir() method.
- Files located in the directory referred to by the getNoBackupFilesDir() method.
Configuring Data Backup
The data created by any app installed on an M Preview device is backed up, except for the automatically excluded files listed in the previous section. You can further limit and configure what data gets backed up from your app using settings in your app manifest.
Including or Excluding Data
Depending on what data your app needs and how you save it, you may need to set specific rules for including or excluding certain files or directories. The automatic backup service supports setting these backup rules through use of an XML configuration file and the app manifest. In the app manifest, you can specify a backup scheme configuration file as shown in the following example:
In this example code, the android:fullBackupContent attribute specifies an XML file, located in the res/xml/ directory of your app development project, named mybackupscheme.xml . This configuration file includes rules for what files are backed up. The following example code shows a configuration file that excludes a specific file from backups:
This example backup configuration only excludes a specific database file from being backed up. All other files are backed up.
Backup Configuration Syntax
The backup service configuration allows you to specify what files to include or exclude from backup. The syntax for the data backup configuration xml file is as follows:
The following elements and attributes allow you to specify the files to include and exclude from backup:
- . Use this element if you want to specify a set of resources to back up, instead of having the system back up all data in your app by default. When you specify an tag, the system backs up only the resources specified with this element.
- . Use this element to specify a set of resources to exclude from backup. The system backs up all data in your app, except for resources specified with this element.
- domain. The type of resource you want to include or exclude from backup. The valid values you can specify for this attribute include:
-
- root . Specifies that the resource is in the app’s root directory.
- file . Corresponds to a resource in the directory returned by the getFilesDir() method.
- database . Corresponds to a database returned by the getDatabasePath() method or by using the SQLiteOpenHelper class.
- sharedpref . Corresponds to a SharedPreferences object returned by the getSharedPreferences() method.
- external . Specifies that the resource is in external storage, and corresponds to a file in the directory returned by the getExternalFilesDir() method.
- path . The file path to a resource that you want to include or exclude from backup.
Prohibiting Data Backups
You can choose to prevent automatic backups of any of your app data by setting the android:allowBackup attribute to false in the app element of your manifest. This setting is illustrated in the following example code:
Testing Backup Configuration
Once you have created a backup configuration, you should test it to make sure your app saves data and can be restored properly.
Enabling Backup Logging
To help determine how the backup feature is parsing your XML file, enable logging before performing a test backup:
Testing Backup
To manually run a backup, first you must initialize the Backup Manager by calling the following command:
Next, you manually backup your application using the following command, specifying the package name for your app as the
Testing Restore
To manually initiate a restore after your app data is backed up, call the following command, specifying the package name for your app as the
Warning: This action stops your app and wipes its data before performing the restore operation.
You initiate the restore process for your app by uninstalling and reinstalling your app. The app data is automatically restored from the cloud once the app installation is complete.
Troubleshooting Backups
If you run into issues, you can clear the backup data and associated metadata by turning backup off and on in the Settings > Backup, factory resetting the device, or by calling this command:
The
Known Issues
The following are known issues with the automatic backup service:
- Google Cloud Messaging — For apps that use Google Cloud Messaging for push notifications, there is a known issue where backing up the registration ID returned by Google Cloud Messaging registration can break push notifications for the restored app. It is important to query the API for a new registration ID after being installed on a new device, which is not be the case if the old registration ID was backed up. To avoid this, exclude the registration id from the set of backed up files.
Источник
Резервирование пользовательских данных в Android

Нижеизложенный материал не претендует на оригинальность или новизну решаемой проблемы, но может быть крайне полезен новичкам и тем, кто как и я, заботится о сохранности своих данных на устройствах под управлением Android. Далее в статье я ставлю перед собой задачи по обеспечению надежного резервирования данных при помощи облачных сервисов хранения данных и решаю их. Все еще интересно? Тогда добро пожаловать под хабркат.
Прежде чем начать скажу о том что я не отношусь к той категории сограждан которые маниакально заботятся о приватности своих данных. Это вовсе не значит что у меня сеанс работы в ОС без авторизации, кругом открытые шары, стандартные пароли на учетные записи или открытые беспроводные сети дома и на работе. Это лишь значит что я не шифрую свои файлы, пользуюсь публичной почтой и сервисами облачного хранения данных и сплю крепким и здоровым сном не думая о том что работники датацентра или владельцы сервисов могут, если захотят, смотреть мои данные. Лично я считаю что приватность, как таковая — давно умерла, но это тема выходит за рамки этого поста.
Зато я, надеюсь как и многих из вас, забочусь о безопасности данных со стороны резервирования. Уважаемый %username% спросит — Так при чем же тут Android? А Android тут при том что за последние несколько лет эта ОС плотно поселилась в моей повседневной жизни, полностью вытеснив от туда iOS и WM. В добавок к этому в последнее время, как грибов после дождя, развилось много сервисов предоставляющих, как бесплатно так и за дензнаки, энное количество гигабайт на “надежных” серверах где то там в глобальной сети. Я считаю что эти “надежные” сервисы — всяко надежнее моего домашнего ПК, флешек и дисков, и уж в разы удобнее в плане доступности. Грех не воспользоваться этим аттракционом неслыханной щедрости.
В последнее время у меня накопилось большое количество разного рода информации, потерять которую было бы крайне неприятно. Я говорю в первую очередь о фотографиях своего ребенка и жены, фотографий любимого котэ, каких то моих проектах по работе, и разного рода приятной мелочи на вроде прогресса в играх.
Я заставлял себя делать бекапы на своих устройствах. Составил даже что то вроде календарного плана. Делать это регулярно получилось с разным успехом, на это банально не хватало времени. В результате в голове зрела мысль о том как весь этот процесс автоматизировать.
И вот как то выдался выходной и я решил «прошерстить» Google Play на наличие приложений которые бы могли помочь мне сохранить свои данные, сесть и все настроить.
И так, для того, что бы я был спокоен, мне надо:
- Резервирование по расписанию с минимальным моим участием а лучше вообще без меня.
- Резервирование в облако (предпочтительно в несколько)
- Реплицирование резервных копий данных на hdd домашней рабочей станции и на hdd ноутбуков (вдруг «немцы нападут» и интернет выключат) и все тоже без моего участия
- Синхронизация из любого места где есть доступ к интернет.
Пожалуй, этого бы было достаточно на первое время. В результате в голове сложился план действий, представленный на картинке ниже.

В Android как бы есть выстроенный механизм резервирования, но он не работает. Точнее сказать — я не смог его «приготовить» так, что бы он выполнил требования, описанные выше. Контакты и все что связано а Gmail резервируются штатно как и положено, их не трогаем.
У меня (как у многих из вас) есть учетные записи в нескольких облачных сервисах, в которых при условии бесплатного использования доступно разное количество «халявных» гигабайт. Мне этих “халявных” гигабайт будет более чем достаточно, если вдруг не хватит — прикуплю еще.
Dropbox в основном используется для работы и обмена информации с друзьями.
- SkyDrive достался в нагрузку с учеткой от outlook.com и новой windows 8, не используется. Google Drive — родной для Android сервис, храню в нем разного рода документы по привычке после Google Docs, нравится.
- BOX, с халявными 50 гигабайтами до последнего времени вообще не использовался.
- Еще есть всякого рода Ubuntu One, Sugarsync и пара-тройка других менее популярных их аналогов которые я рассматривал чисто в ознакомительных целях.
По запросу «Data Sync» Google Play вывалил на «меня вагон и маленькую тележку» разного качества приложений, которые вместе с «раем на земле» обещали мне обеспечить и сохранность моих данных. Какие то делали это за деньги, а какие то совершенно безвозмездно. Какие давно не обновлялись, другие имели мягко говоря — спартанский интерфейс. В результате я купил пару полных версий приложений и занялся их полевыми испытаниями.
Мне бы не хотелось делать сравнительный обзор этих приложений. Скажу лишь что для своих нужд я приспособил приложение с говорящим названием «FolderSync» (есть платная и бесплатная версия). Ниже несколько скриншотов интерфейса, как говорится, один раз настроил и забыл.
Логика работы приложения строится на создании пары папок (Folderpairs), локальной и удаленной. Локальная папка это ЛЮБАЯ локальная папка на вашем устройстве, включая, если надо, вложенные папки. Удаленная папка, как следует из названия, это папка на одном из сервисов облачного хранения данных или вашем ftp, smb или webdav сервере. В настройках каждой folderpairs можно указать направление синхронизации, задать расписание, способ разрешения конфликтов, правила использования беспроводных сетей и кучу других параметров. На скриншотах ниже настройка той самой folderpair.
Я не о особо бережно забочусь о резервировании установленных приложений, всех их данных или прошивки (для себя не вижу смысла). Но эта задача также легко решается путем создания folderpair для папки, в которой хранят свои бекапы TitaniumBackup (который как бы и сам умеет закачивать в облако, только не в любое) или ROM Manager. К слову говоря, DataSync умеет бекапить и приложения, если у вас есть root.
Мне кажется, что настройка списков синхронизации удобнее сделана в DataSync Beta, правда она еще довольно сырая, но быстро развивается. В этой версии приложения можно задать несколько папок в рамках одного списка. Очень удобно (есть стабильные версии Data Sync, но мне они не подошли, Beta имеет более широкий функционал, будем за ней наблюдать).
После того как мы настроили должным образом нужные нам folderpair все что нам остается это оставить телефон или планшет на ночь заряжаться или, придя на работу, подключить его к компьютеру. Понятное дело, что надо не забыть включить wifi. Это может сделать вручную, а можно использовать такие утилиты, как Llama.
Программа синхронизации подключится через беспроводную сеть к интернет и проведет синхронизацию. Первый раз это займет время, которое напрямую зависит от объема данных и ширины канала доступа в интернет. Зато последующие синхронизации занимают считанные секунды. FolderSync помнит о датах изменения файлов их количестве в папке и контрольные суммы. В общем все по-взрослому. Синхронизацию любой folderpair можно запустить принудительно вручную в любое время.
В дальнейшем, ваши файлы синхронизируются согласно представленной выше схеме. Попадая в облако файл реплицируется на рабочий ПК, который как правило не выключается, с помощью шатного клиента для облачного сервиса. Затем они локально синхронизируются между папками, которые находятся на разных hdd при помощи стандартного и бесплатного SyncToy от Microsoft или rsync (как вам удобнее), или аналогичной утилиты. В течении дня, по мере подключения к интернет, резервируемые данные реплицируются на домашний компьютер и ноутбуки с помощью тех же родных клиентов облачных сервисов.
В сухом остатке имеем физически разнесенные и высокодоступные копии данных и крепкий, здоровый сон. Всего вам доброго.
Источник


