- [Driver][04.12.2014]SAMSUNG ♣USB Drivers♣ for Mobile Phones -LATEST VERSION-
- Breadcrumb
- SamHaLeKe
- x86-Dark
- billbaio
- andyro78
- fenerbuuh
- kolki
- warren2006
- Shoulon
- SamHaLeKe
- dokala
- f.lix.droid
- daphr
- SamHaLeKe
- spyteris
- Getting Started
- 1. System Requirements
- 2. Downloading Samsung SDKs
- Downloading SDKs from Samsung Developers:
- 3. Getting started with Android Studio
- Creating an Android Studio project
- Adding a Samsung library to Android Studio
- Running the App
- Running a sample app
- Download Android USB Drivers for popular OEMs
- Purpose of Android USB drivers
- Download Android USB drivers for popular OEMs
- How to install Android USB drivers
- Manually install the driver for an unsupported device
[Driver][04.12.2014]SAMSUNG ♣USB Drivers♣ for Mobile Phones -LATEST VERSION-
Breadcrumb

SamHaLeKe
Senior Member
[Driver][04.12.2014]SAMSUNG ♣USB Drivers♣ for Mobile Phones -LATEST VERSION-
Are you tired downloading/installing the full Samsung Kies install package just to get the new drivers?
Here are Samsung’s latest USB drivers: December 2014!
Don’t forget to hit the Thanks button

SAMSUNG USB Drivers for Mobile Phones (x86 & x64) v1.5.51.0
Drivers are for Galaxy S, SII, SIII , SIV and ALL other SAMSUNG Android Phones
1.uninstall previous drivers (control panel)
2.reboot
3.install new drivers
4.reboot!!
5.plug in your device and have fun!
SAMSUNG Android ADB Interface Driver v2.9.510.0
x86-Dark
Senior Member
Thanks for sharing it mate!
billbaio
New member
thanks for sharing
I appreciate the help. Thank you.
andyro78
Member

fenerbuuh
Senior Member
kolki
Member
warren2006
New member
Shoulon
Senior Member
SamHaLeKe
Senior Member
New version released!
1.3.2250.0 (dated 8 march 2011)
dokala
Member
f.lix.droid
Member
daphr
Member
SamHaLeKe
Senior Member
maybe? Dude, It’s just a self extracting zip, with original files from Samsung.
That’s what you will have with Norton, false positives! It’s clean.
and please, don’t type ‘drivers’
it ARE just drivers
Sent from my GT-I9000 using XDA App
spyteris
Member
Trouble installing drivers for Windows 7 64bit
Hi, I have downloaded, installed, rebooted, etc about 6 times for different driver install files, including this newest one posted. I’ve tried both 32 and 64bit, and they cannot finish installing for some reason — saying it failed each time.
What is going to be a fail-proof way to get these installed on a Windows 7 Ultimate, 64bit OS??
(also tried plugging in my phone, double-clicking the Unknown Device on the USB hub, and updating Device Driver manually from the dir SAMSUNG/USB Drivers)
Источник
Getting Started
This guide teaches developers how to set up their workstations in order to use Samsung Mobile SDKs in their apps. It covers basic topics such as how to download and install the SDK.
This section covers:
- System Requirements.
- Downloading Samsung Mobile SDKs.
- Getting started with Android Studio.
1. System Requirements
To develop apps for Samsung mobile devices, you must first set up your Android development environment. If your development environment is already configured, you can skip this section.
- Verify that your development system meets the requirements specified by the Android System Requirements.
- Set up your Java environment:
To develop Android apps in Java, you need the following:
- Java Development Kit (JDK) — this provides the tools required to build a Java app.
- Java Runtime Environment (JRE) — this lets you run Java apps on your computer.
To set up these components: 1. Go to Java SE Downloads. 2. Click Java Download to display the download page for the latest version of JDK, which includes JRE. 3. Click the download package for your operating system: Windows, Mac OS X, or Linux. 4. Install the JDK package. For details about the installation, see the Java Platform Installation.
- Download Android Studio:
- Go to Android Studio.
- If the browser has detected your operating system, click Download Android Studio. Otherwise, click Download Options and select a different platform: Windows, Mac OS X, or Linux.
- Unzip and install the bundle. It includes essential components and the Studio IDE.
- Launch Android Studio.
- If you get a notice of Platform and Plugin Updates, click update to exit Studio and launch the SDK Manager. Then install the suggested packages.
2. Downloading Samsung SDKs
Downloading SDKs from Samsung Developers:
- Go to Mobile page
- Select the SDK you want to download
- Go to the Resources page for the SDK
- Click the download button
- Read the license agreement, select I agree to this SDK License Agreement and click Download
- Unzip the downloaded SDK to a folder of your choice. The SDKs typically provide the following folders
- Docs: Programming guides and API references
- Libs: Java and C libraries to use in your app
- Samples: Sample apps showing example source code
- Tools: Additional tools that may be needed to use the SDK
- Extras: Additional support resources
3. Getting started with Android Studio
This section describes how to create your first project in Android Studio and run an app.
Creating an Android Studio project
- Launch Android Studio.
- Create a new project by clicking File > New Project
- Fill out the fields:
- Application name: your app name
- Company domain: the qualifier for your app package name.
- Package name: this is the combination of the company domain and application name, which must be unique across all packages in the Android environment. Android generates this from the application name and company domain values.
- Project Location: the directory where your app is stored. You can use the default or specify another location, if desired.
- Click Next
- Select the type of device you want to target, for example, Phone and Tablet
- Select the Minimum SDK level you need to support the SDKs you’re using. In this example, select API 21. Click Next
- Use the default Empty Activity type and click Next. For more about activities, see Android Activities.
- Use the default Activity Name and Layout Name and click Finish For more about creating a project in Android Studio, see Creating Projects.
Adding a Samsung library to Android Studio
To use a Samsung SDK in your app, you add the library files that are bundled with the SDK to your Android Studio project.
- Open your project in Android Studio.
- Use a file browser to navigate to the folder containing the Samsung SDK
- Open the add-on SDK folder, then open:
- Docs > API Reference > index.html: to see what libraries and API methods are provided by the SDK
- Libs folder: to copy the libraries you want to use in your app
- In your Android Studio project, top-left drop-down menu, change the Android view to Project
- Right-click your app’s libs directory and select Paste
- In the Copy dialog, click OK to paste the copied files into your project
- The libraries now appear in your project under the libs folder
- Right-click the libraries and select Add As Library.
- Select the module to add the library to. If your app contains several modules, ensure that you add the library to the appropriate module. Click OK. Your project now includes the SDK you downloaded.
Running the App
Android Studio provides two ways to compile and test your app: — On an Android Virtual Device (AVD) — On a physical Samsung device To run your app:
- Plug your Samsung mobile device into your computer using a USB cable
- If you are using a Windows computer, go to Samsung Android USB Driver for Windows, then download and install the USB driver onto your computer
- Enable developer options on your device by going to Settings > About device > Software info and tapping Build number seven times. (Devices with Android 4.1 or older already have developer options displayed by default.)
- Turn on USB debugging by tapping Settings > Developer options > USB debugging
If My Knox is installed, USB debugging is grayed out; try using another device.
- In Android Studio, with your project open, click Run > Run ‘app’ (or press Shift + F10)
- Select the device you want run the app on, under either Connected Devices or Available Emulators
Running a sample app
The sample apps are in the Samples folder of the SDK you downloaded. To run a sample app:
- Open Android Studio
- In the top navigation menu, select File > Open
- Navigate to the sample app directory in the SDK you downloaded
- Click OK to import the file to your project
Источник
Download Android USB Drivers for popular OEMs
So you’ve got an Android device and want to dive deep into the world of modding? Be it rooting or installing a custom ROM like LineageOS, most of the aftermarket modding requires you to connect your Android smartphone to a computer using a USB cable so you can use tools like the Android Debug Bridge (ADB) and Fastboot to interact with the device. For an Android power user, you may also want to reinstall the factory firmware on your phone, which means you have to deal with the OEM-specific flashing utilities.
However, none of these tinkering jobs are possible if your PC can’t see the target device in the first place. As in the case of Windows, the operating system may require an additional piece of software known as the “driver” in order to properly recognize all the different connection modes exposed by the Android device. Below you can find a list of official OEM-provided Android USB driver packages and a generic driver installation guide. If you don’t see the maker of your device listed or you see a misplaced link, send a message to Skanda HazarikaВ (SkandaHВ on the forums) with the device details.

Table of Contents:
Purpose of Android USB drivers
The USB interface of an Android device is a pretty complex object. Depending on the configuration, it may expose the standard Android USB debugging interface, the fastboot interface, and various other SoC-specific diagnostic interfaces to the computer. Simultaneously maintaining more than one interface is supported as well, e.g. you can interact with your device with ADB while configuring the internal modem parameters.
Keep in mind the aforementioned scenarios are a bit different from connecting the device through the plain old Media Transfer Protocol (MTP) or Picture Transfer Protocol (PTP) mode. MTP enables the end-user to browse the internal memory on the device from a PC as if it’s an external storage drive. Microsoft ships a generic MTP/PTP driver with every edition of Windows since Windows XP, so you don’t need an external driver for that.
Download Android USB drivers for popular OEMs
Most Android OEMs offer official driver packages for their devices. Besides the ADB and Fastboot interfaces, these drivers also support proprietary flashing protocols designed by the corresponding device maker. For example, if you want to flash a Samsung Galaxy device, you must install the Samsung USB driver package beforehand.
Note that Microsoft has been shipping a generic ADB driver with Windows for a while, so installing the OEM driver just for the sake of USB debugging might not sound worthwhile anymore. Windows can also check and install the missing drivers on the fly through Windows Update. However, Microsoft-recommended drivers are not always the best choice for complex USB interfaces, so do check out the official driver pack whenever possible.

The inbox Android USB debugging driver of Windows in action
Get the appropriate driver for your device from the index below:
| OEM | Android USB Driver |
|---|---|
| Acer | Download Link |
| Alcatel | Download Link |
| ASUS | Download Link |
| Blackberry | Download Link |
| Dell | Download Link |
| Fujitsu | Download Link |
| Download Link | |
| HTC | Download Link |
| Huawei | Download Link |
| Intel | Download Link |
| Kyocera | Download Link |
| Lenovo |
|
| LG | Download Link |
| Motorola | Download Link |
| MediaTek | Download Link |
| NVIDIA | Download Link |
| Samsung | Download Link |
| Sharp | Download Link |
| Sony | Download Link |
| Toshiba | Download Link |
| Vivo/iQOO | Download Link |
| Xiaomi | Download Link |
| ZTE | Download Link |
How to install Android USB drivers
Now that you’ve downloaded the suitable driver package for your device, it’s time for you to install it. Some OEMs offer standard installer executables, which means you can easily install the whole driver suite by double-clicking on the setup file and following the wizard.

However, Google and a few other vendors prefer to stick with the bare INF and associated binary files which are packed inside a zip or rar archive. Such packages need to be installed using Device Manager, but you have to extract the contents of the archive beforehand.
- Right-click on the Start button and select the Device Manager entry. You can also call the Microsoft Management Console snap-in named devmgmt.msc directly from Run to open Device Manager.

Device Manager under Windows 10
- Connect the Android device to your PC. Depending on the selected configuration, you may see one or more unknown devices popping up.

- (Optional) Right-click on the unknown device entry, select Properties, move to the Details tab, and finally select Hardware Ids from the dropdown menu. Now open your favorite search engine, paste the hardware identifier in the search box, and go through the search results. This is a crude way to determine the probable interface your device is currently exposing.

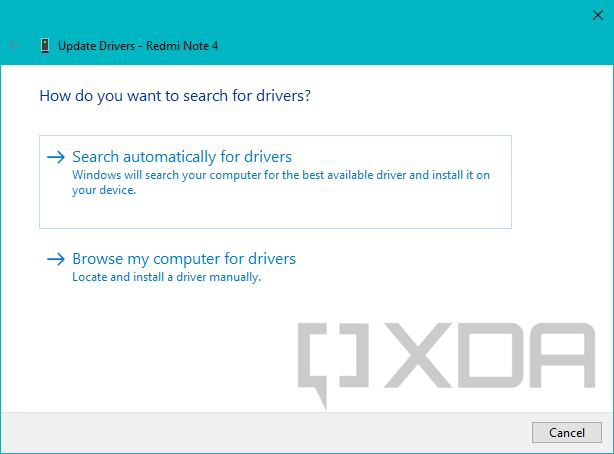
- Right-click on the unknown device entry and select Update drivers. Now select Browse my computer for drivers/driver software and point the wizard to the folder where you extracted the driver package.

- If everything goes right, you should see a confirmation page like the following.

Manually install the driver for an unsupported device
On some occasions, the OEM drivers aren’t enough. Perhaps you’ve stumbled upon a no-name generic tablet, or the flash mode interface of your shiny new phone has yet to get an official driver from its maker. In that case, you can forcibly install an existing driver package for a similar USB interface through Device Manager.
- Open Device Manager and locate the unknown device entry.
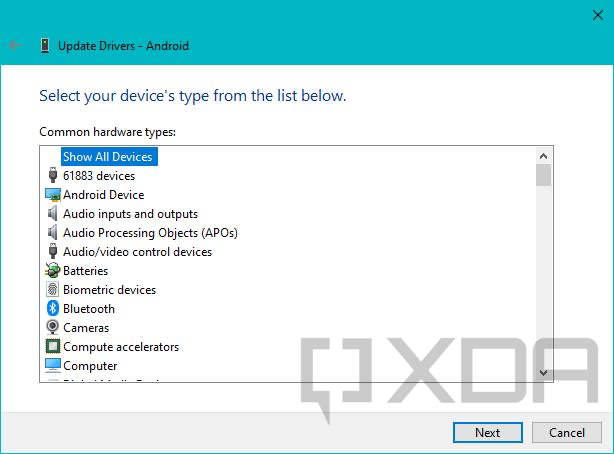
- Right-click on it and select Update drivers. Select Browse my computer for driver software and then choose the option named Let me pick from a list of available drivers on my computer.

- Now select Show All Devices and click Next. On the next screen, click on the Have Disk… button.

- At this point, you need to browse to the location where the extracted driver for a similar device is located. Pick the INF file from the list of files and select Open.

- Now carefully choose the driver model. For example, if you’re trying to install the Fastboot mode driver for a device, select the Android Bootloader Interface from Google’s driver set. Windows might show a warning related to compatibility, but you can ignore it and continue the installation process anyway.


This method lets you force-install a signed driver without breaking its digital signature, so you don’t need to turn off driver signature enforcement on a 64-bit Windows instance.
You’ve now got the correct USB driver installed on your computer and your Android device is ready to receive instructions. Now it’s time to put it all together and run your first ADB command!
Источник


