- Android and iOS development with C++ in Visual Studio
- Install Visual Studio for Android and iOS development
- Create a new Android application using project templates
- Build an OpenGLES Application on Android and iOS
- Build and run the app on Android
- Build and run the app on iOS
- Visual Studio to target all mobile platforms
- Write cross-platform C++ code with the full power of Visual Studio IDE
- Debug C++ code with the world-class Visual Studio debugger
- Java debugging and language support for Android
- Editing Java code
- Debugging Java code
- Build Xamarin Android Native Applications
- Try out Visual Studio 2017 for mobile development with C++
- Установка в Windows
- Обзор
- Установка
- Параметр Configuration
- Диспетчер Android SDK
- Подсистема Windows 11 для Android (предварительная версия)
- Эмулятор Android
- Устройство Android
- Создание приложения
Android and iOS development with C++ in Visual Studio
April 18th, 2017
When it comes to building mobile applications, many developers write most or a part of the apps in C++. Why? Those who are building computationally intensive apps such as games and physics simulations choose C++ for its unparalleled performance, and the others choose C++ for its cross-platform nature and the ability to leverage existing C/C++ libraries in their mobile applications. Whether you’re targeting Universal Windows Platform (UWP), Android, or iOS, Visual Studio enables building cross-platform C++ mobile applications with full editing and debugging capabilities all in one single IDE.
In this blog post, we will focus on how to build Android and iOS apps with C++ in Visual Studio. First we will talk a look at how to acquire the tools for Android and iOS development, then we will create a few C++ mobile apps using the built-in templates. Next we will use the Visual Studio IDE to write C++ and Java code, then we will use the world-class Visual Studio debugger to catch issues in C++ and Java code. Finally, we will talk about how the C++ mobile solution can be used in conjunction with Xamarin.
Install Visual Studio for Android and iOS development
First, download Visual Studio 2017 and launch the Visual Studio installer.
To build Android or iOS applications, choose the “Mobile development with C++” workload under the “Mobile & Gaming” category.

Android development: By default, this workload includes the core Visual Studio editor, the C++ debugger, GCC and Clang compilers, Android SDKs and NDKs, Android build tools, Java SDK, and C++ Android development tools. You could choose to install the Google Android Emulator in the Optional Component list if you don’t have an Android device for testing. This should give you everything you need to start building Android applications.
iOS development: if you’re also targeting iOS, check “C++ iOS development tools” in the Optional Component list and you would be good to go.
Create a new Android application using project templates
If you plan to start with targeting Android first and worry about other platforms later, the VS built-in Android project templates including Native-Activity Application, Static Library, Dynamic Shared Library, could be a great starting point. If you’d rather start with a cross-platform solution to target multiple mobile platforms, jump to the next section Build an OpenGLES Application on Android and iOS where we’ll talk about building an app that targets both platforms with shared C++ code.
You can find the Android templates under Visual C++ -> Cross Platform -> Android node.
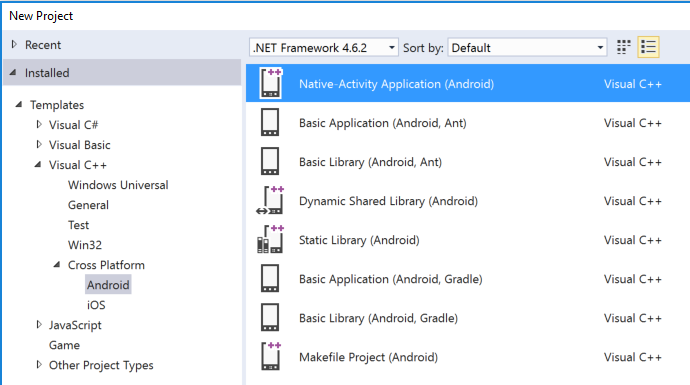
Here we’re going to create a new Native Activity Application (Android), which is popular for creating games and graphical-intensive apps. Once the project is created, in the Solution Platforms dropdown, choose the right architecture that matches the Android emulator or device that you’re using, and then press F5 to run the app.
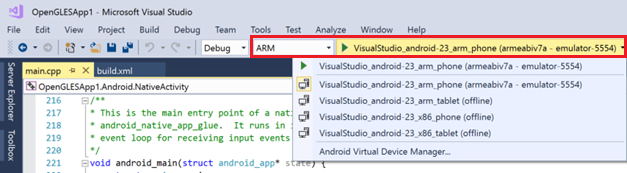
By default, Visual Studio uses the Clang toolchain to compile for Android. The app should build and run successfully, and you should see the app changing colors in the background. This article Create an Android Native Activity App discusses the Native Activity project in more details.
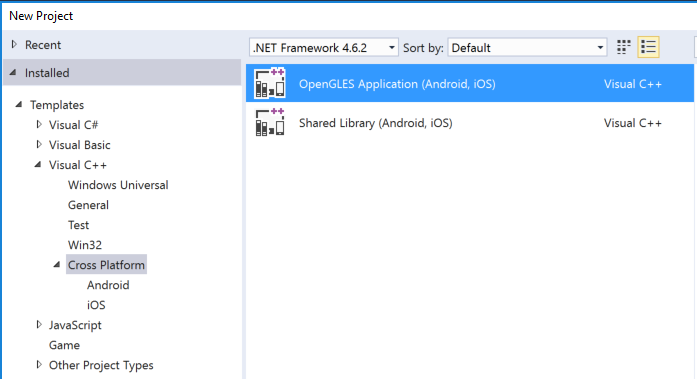
Build an OpenGLES Application on Android and iOS
The OpenGL ES Application project template under Visual C++->Cross Platform node is a good starting point for a mobile app targeting both Android and iOS. OpenGL ES (OpenGL for Embedded Systems or GLES) is a 2D and 3D graphics API that is supported on many mobile devices. This template creates a simple iOS app and an Android Native Activity app which has C++ code in common that uses OpenGL ES to display the same animated rotating cube on each platform.
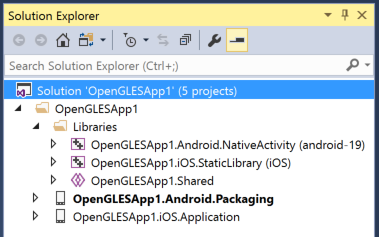
The created OpenGL ES Application solution includes three library projects in the Libraries folder, one for each platform and the other one for shared C++ code, and two application projects for Android and iOS respectively.
Now let’s run this app on both Android and iOS.
Build and run the app on Android
The solution created by the template sets the Android app as the default project. Just like run the Android Native Activity app we discussed earlier, in the Solution Platforms dropdown, select the right architecture that matches the Android emulator or device that you’re using, and then press F5 to run the app. The OpenGL ES app should build and run successfully and you will see a colored 3D spinning cube.
Build and run the app on iOS
The iOS project created in the solution can be edited in Visual Studio, but because of licensing restrictions, it must be built and deployed from a Mac. Visual Studio communicates with a remote agent running on the Mac to transfer project files and execute build, deployment, and debugging commands. You can setup your Mac by following instructions Install And Configure Tools to Build using iOS.
Once the remote agent is running on the Mac and Visual Studio is paired to it, we can build and run the iOS app. In the Solution Platforms dropdown in Visual Studio, choose the right architecture for the iOS simulator (x86) or the iOS device. In Solution Explorer, open the context menu for the OpenGLESApp1.iOS.Application project and choose Build. Then choose iOS Simulator on the toolbar to run the app in the iOS Simulator on your Mac. You should see the same colored 3D spinning cube in the iOS Simulator.

This article Build an OpenGL ES Application on Android and iOS includes more details about the OpenGLES project.
Visual Studio to target all mobile platforms
If you’re building an app to target multiple mobile platforms (Android, iOS, UWP) and wish to share the common code in C++, you can achieve this by having one single Visual Studio solution and leverage the same code-authoring and debugging experience all in the same IDE. With Visual Studio, you can easily share and re-use your existing C++ libraries through the shared project component to target multiple platforms. The following screenshot shows a single solution with 4 projects, one for each mobile platform and one shared project for common C++ code.

Write cross-platform C++ code with the full power of Visual Studio IDE
With Visual Studio, you can write cross-platform C++ code using the same powerful IntelliSense and code navigation features, making code writing much more efficient. These editing capabilities not only light up in the common code, but are context-aware of the target platform when you write platform-specific code.
Member list and Quick Info, as shown in the following screenshot, are just two examples of the IntelliSense features Visual Studio offers. Member list shows you a list of valid members from a type or namespace. Typing in “->” following an object instance in the C++ code will display a list of members, and you can insert the selected member into your code by pressing TAB, or by typing a space or a period. Quick Info displays the complete declaration for any identifier in your code. IntelliSense is implemented based on the Clang toolchain when targeting the Android platform. In the following screenshot, Visual Studio is showing a list of the available Android-specific functions when the Android Native Activity project is active.
Auto-complete, squiggles, reference highlighting, syntax colorization, code snippets are some of the other useful productivity features to be of great assistance in code writing and editing.
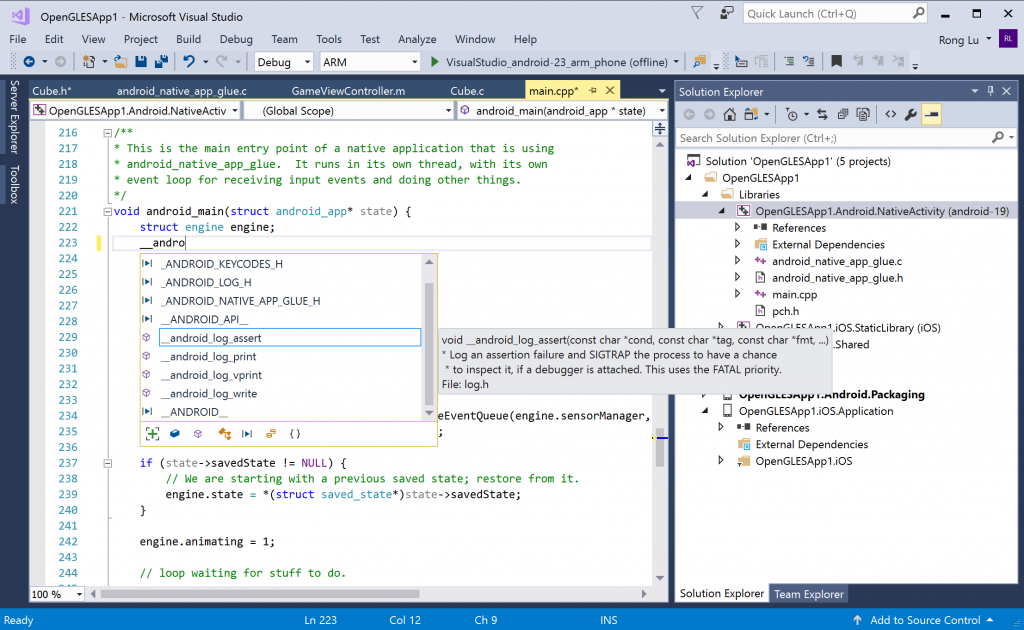
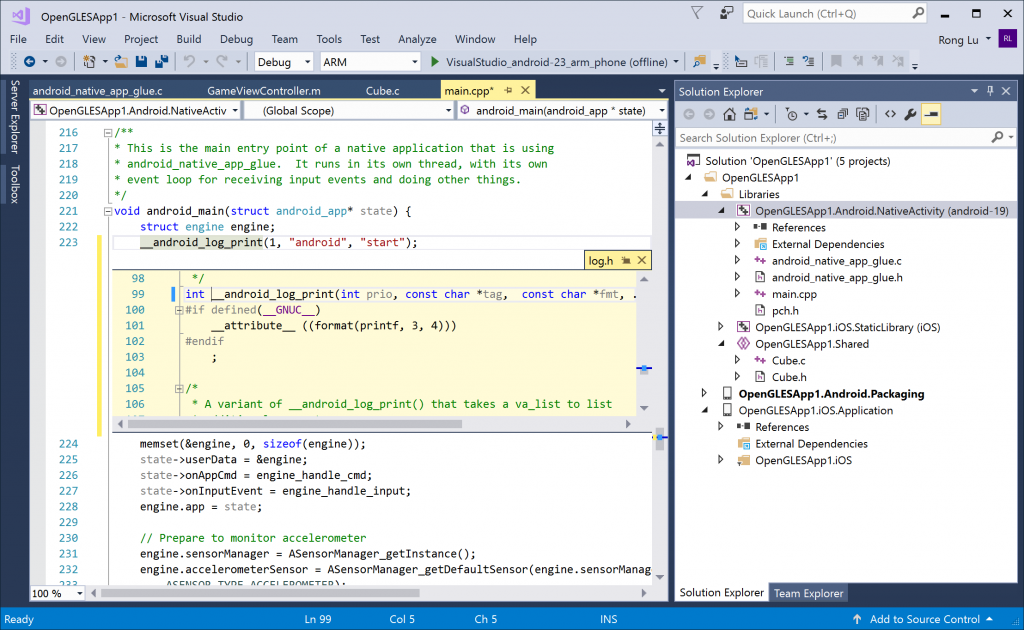
Navigating in large codebases and jumping between multiple code files can be a tiring task. Visual Studio offers many great code navigation features, including Go To Definition, Go To Line/Symbols/Members/Types, Find All References, View Call Hierarchy, Object Browser, and many more, to boost your productivity.
The Peek Definition feature, as shown in the following screenshot, brings the definition to the current code file, allows viewing and editing code without switching away from the code that you’re writing. You can find Peek Definition by opening the context menu on right click or shortcut Alt+F12 for a method that you want to explore. In the example in the screenshot, Visual Studio brings in the definition of __android_log_print method that is defined in the Android SDK log.h file as an embedded window into the current cpp file, making reading and writing Android code more efficiently.
Debug C++ code with the world-class Visual Studio debugger
Troubleshooting issues in the code can be time-consuming. Use the Visual Studio debugger to help find and fix issues faster. Set breakpoints in your Android C++ code and press F5 to launch the debugger. When the breakpoint is hit, you can watch the value of variables and complex expressions in the Autos and Watch windows as well as in the data tips on mouse hover, view the call stack in the Call Stack window, and step in and step out of the functions easily. In the example in the screenshot below, the Autos window is showing value changed in the Android sensorManager and accelerometerSensor types.
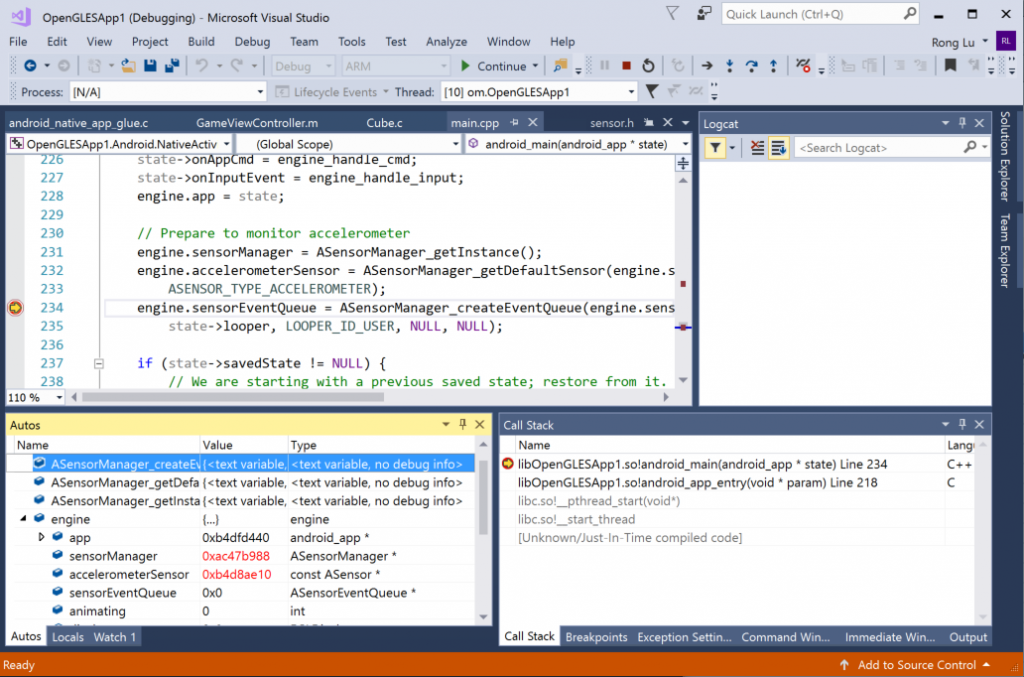
The Android debugging experience in Visual Studio also supports for debugging pre-built Android application via other IDE(s), other basic debugger capabilities (tracepoints, conditional breakpoints) and advanced features such as debugger visualizations (Natvis Support) and attaching to a running Android application as well.
You can find more information about the C++ debugger in this blog post C++ Debugging and Diagnostics.
Java debugging and language support for Android
Whether you’re writing Java or C++ code in your Android apps, Visual Studio has it covered. Visual Studio includes a Java Debugger that enables debugging Java source files in your Android projects, and with the Visual Studio Java Language Service for Android extension, you can also take advantage of the IntelliSense and browsing capabilities for Java files in the Visual Studio IDE.
Editing Java code
First, install the Visual Studio Java Language Service for Android extension. It provides colorization (both syntactic and semantic), error and warning squiggles as well as code outlining and semantic highlighting in your Java files. You will also get IntelliSense assistance, such as Member List, Parameter Help, Quick Info, making writing Java code more efficient. In the following screenshot, Visual Studio provides a member list for the android.util.Log class.

Another handy feature for larger codebases or for navigating 3rd party libraries for which you have the source code available is Go to definition (F12) which will take you to the symbol definition location if available.
Debugging Java code
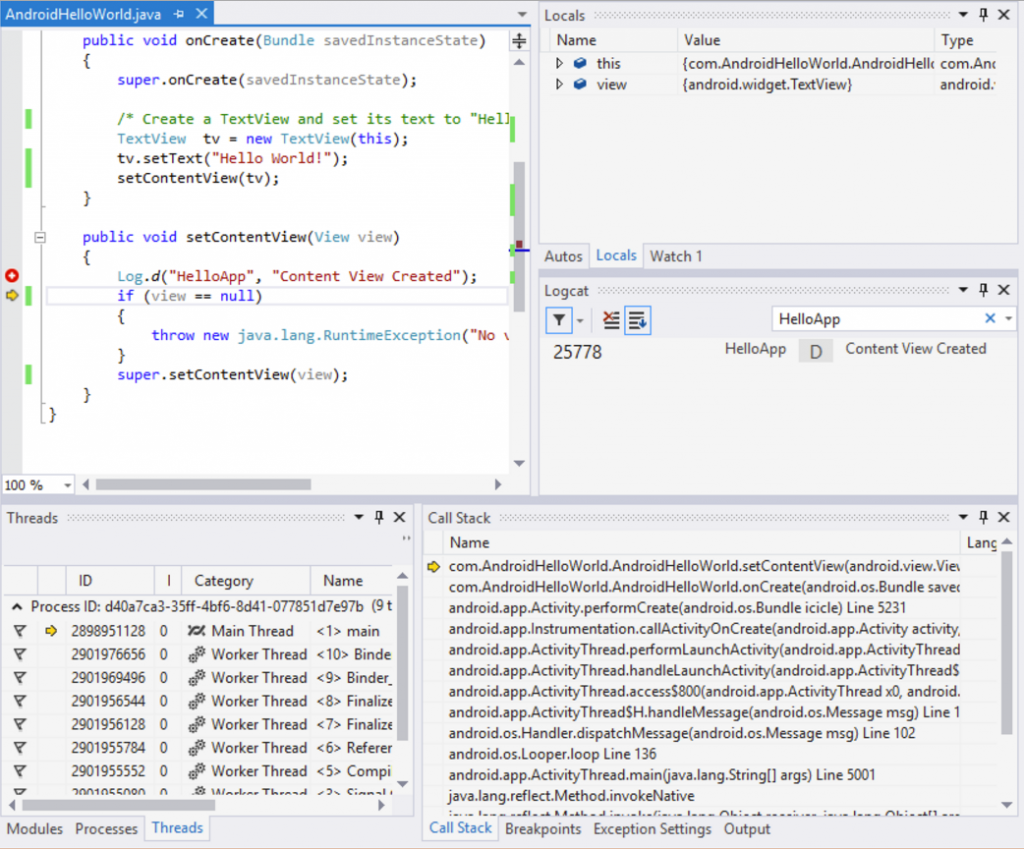
To turn on Java debugging for your Android projects in your next debugging session, in the Debug Target toolbar, change Debug Type dropdown to “Java Only” as shown in the following screenshot.

Now you can set line breakpoints, including conditions or hit counts for the breakpoints, anywhere in the Java code. When a breakpoint is hit, you can view variables in the Locals and Autos window, see call stack in the Call Stack window, and check log output in the Logcat window.
Build Xamarin Android Native Applications
Xamarin is a popular cross-platform solution for creating rich native apps using C# across mobile platforms while maximizing code reuse. With Xamarin, you could create apps with native user interfaces and get native performance on each mobile platform. If you want to leverage Xamarin for writing user interfaces in C# while re-using your existing C/C++ libraries, Visual Studio fully supports building and debugging Xamarin Android apps that reference C++ code. This blog post Developing Xamarin Android Native Applications describes this scenario in more details.
Referencing C++ libraries in Xamarin iOS apps can be achieved by following this blog post Calling C/C++ libraries from Xamarin code.
Try out Visual Studio 2017 for mobile development with C++
Download Visual Studio 2017, try it out and share your feedback. For problems, let us know via the Report a Problem option in the upper right corner of the VS title bar. Track your feedback on the developer community portal. For suggestions, let us know through UserVoice.
Источник
Установка в Windows
В этом руководстве описаны действия по установке Xamarin.Android для Visual Studio в Windows, а также содержатся сведения о настройке Xamarin.Android для создания первого приложения Xamarin.Android.
Обзор
В этом руководстве рассматриваются следующие темы:
Настройка пользовательских расположений для пакета Java Development Kit, пакета SDK для Android и пакета NDK для Android.
Запуск диспетчера пакетов SDK для Android для скачивания и установки дополнительных компонентов пакета SDK для Android.
Подготовка устройства или эмулятора Android для отладки и тестирования.
Создание первого проекта приложения Xamarin.Android.
После выполнения действий в этом руководстве ваша рабочая установка Xamarin.Android будет интегрирована в Visual Studio, и вы будете готовы приступить к созданию первого приложения Xamarin.Android.
Установка
Подробные сведения об установке Xamarin для использования с Visual Studio в Windows см. в руководстве Установка в Windows.
Параметр Configuration
Для создания приложений в Xamarin.Android используется пакет Java Development Kit (JDK) и пакет SDK для Android. Во время установки установщик Visual Studio помещает эти средства в расположения по умолчанию и настраивает среду разработки с соответствующей конфигурацией путей. чтобы просмотреть и изменить эти расположения, щелкните сервис параметры > Xamarin > Android Параметры:
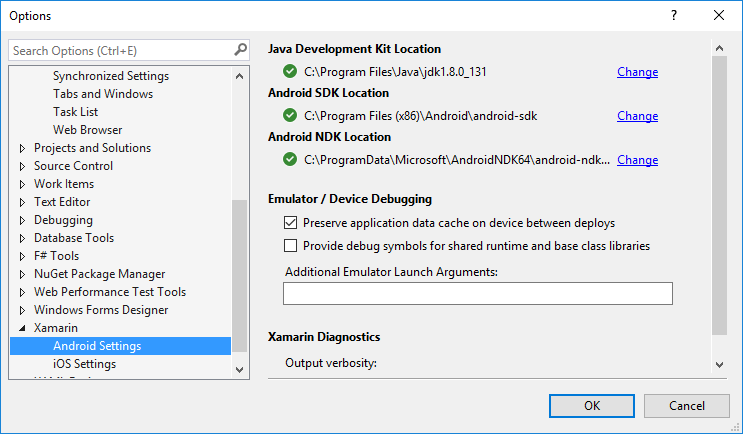
В большинстве случаев эти расположения по умолчанию будут работать без дальнейших изменений. Однако в Visual Studio можно настроить пользовательские расположения для этих средств (например, если пакеты Java JDK, SDK для Android или NDK установлены в другом месте). Нажмите кнопку Изменить рядом с путем, который требуется изменить, а затем перейдите в новое расположение.
Xamarin.Android использует пакеты JDK 11, который необходим для API уровня 31 или выше, и JDK 8, который необходим при разработке для API уровней от 24 до 30 (JDK 8 также поддерживает уровни API ниже 24).
Xamarin.Android не поддерживает пакет JDK 9.
Диспетчер Android SDK
Android использует несколько параметров уровня API Android для определения совместимости приложения в разных версиях Android (дополнительные сведения об уровнях API Android см. в статье Общие сведения об уровнях API Android). В зависимости от того, с какими уровнями API Android вы будете работать, может потребоваться скачать и установить дополнительные компоненты пакета SDK для Android. Кроме того, может потребоваться установить дополнительные средства и образы эмулятора из пакета SDK для Android. Для этого следует использовать диспетчер пакетов SDK для Android. Чтобы запустить диспетчер пакет SDK для Android , щелкните инструменты Android пакет SDK для Android Manager.
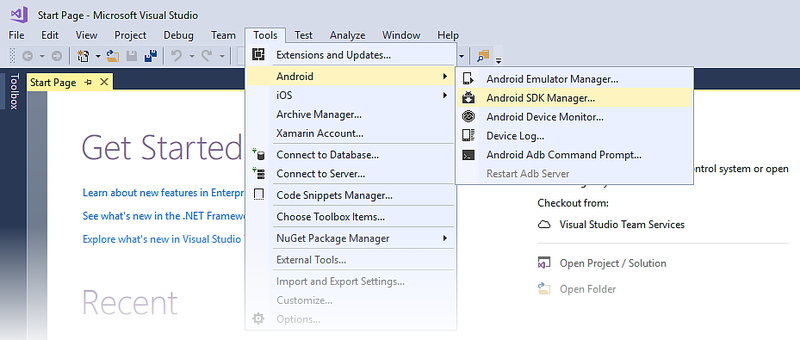
Диспетчер пакетов SDK для Android установлен в Visual Studio по умолчанию:
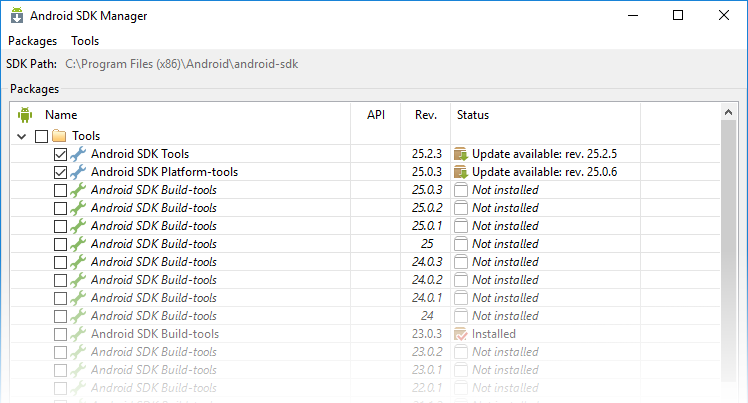
С помощью диспетчера пакетов SDK для Android Google можно устанавливать пакеты инструментов SDK для Android до версии 25.2.3. Однако если необходимо использовать более позднюю версию пакета инструментов SDK для Android, нужно установить подключаемый модуль диспетчера пакетов SDK для Android Xamarin для Visual Studio (доступен в Visual Studio Marketplace). Это необходимо, так как автономный диспетчер пакетов SDK Google был объявлен нерекомендуемым в версии 25.2.3 пакета инструментов SDK для Android.
Дополнительные сведения об использовании диспетчера пакетов SDK для Android Xamarin см. в статье Установка пакета SDK для Android.
Подсистема Windows 11 для Android (предварительная версия)
Windows 11 теперь включает подсистему для запуска приложений Android. Благодаря ей вы можете быстро отладить приложения Android непосредственно из Visual Studio без использования другого устройства или эмулятора. Чтобы получить полные инструкции и узнать требования для включения этой функции, см. Руководство по Windows 11.
После подключения к ADB компьютер будет отображаться в меню «Запуск/Отладка» наряду с настроенными эмуляторами или устройствами.
Известные ограничения и проблемы:
- Сервисы Google Play не поддерживаются.
- Нахождение в точке останова во время отладки превысит время ожидания и приведет к сбою приложения.
Эмулятор Android
Android Emulator — это удобный инструмент для разработки и тестирования приложений Xamarin.Android. Физическое устройство, например планшет, не всегда доступно во время разработки, или разработчик хочет выполнять тесты на интеграцию на компьютере до фиксации кода.
Эмуляция устройства Android на компьютере включает в себя следующие компоненты:
- Google Android Emulator — это эмулятор на основе QEMU , который создает виртуальное устройство, работающее на рабочей станции разработчика.
- образ Emulator — образ эмулятора — это шаблон или спецификация оборудования и операционной системы, которая должна быть виртуализирована. Например, один образ эмулятора определяет требования к оборудованию для Android 7.0 с установленными службами Google Play на Nexus 5X. Другой образ эмулятора может определять планшет с диагональю 10″ под управлением Android 6.0.
- Виртуальное устройство Android (AvD) — это эмуляторное устройство Android, созданное из образа эмулятора. При запуске и тестировании приложений Android Xamarin.Android запустит эмулятор Android, запускающий определенное виртуальное устройство Android, установит пакет приложений для Android и запустит приложение.
Можно значительно повысить производительность при разработке на компьютерах с процессором x86, если использовать особые образы эмуляторов, оптимизированные для архитектуры x86, и одну из двух технологий виртуализации:
- Microsoft Hyper-V — доступно на компьютерах с обновлением Windows 10 апрель 2018 или более поздней версии.
- Hardware Accelerated Execution Manager Intel (HAXM) — доступно на компьютерах x86 под управлением OS X, macOS или более ранних версий Windows.
Дополнительные сведения об Android Emulator, Hyper-V и HAXM см. в разделе Аппаратное ускорение для производительной работы эмулятора.
В версиях Windows до Windows 10 с обновлением за апрель 2018 г. HAXM не совместим с Hyper-V. В этом случае необходимо отключить Hyper-V или использовать более медленные образы эмулятора без оптимизации для x86.
Устройство Android
Если у вас есть физическое устройство Android для тестирования, настройте его для использования в разработке. Сведения о настройке устройства Android для разработки, его подключении к компьютеру для запуска и отладки приложений Xamarin.Android см. в статье Настройка устройства для разработки.
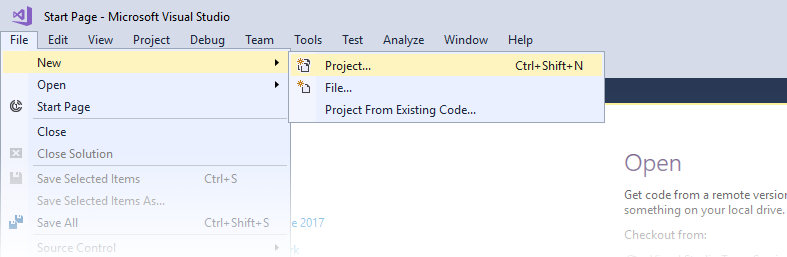
Создание приложения
Теперь, когда вы установили Xamarin.Android, можно запустить Visual Studio для создания проекта. щелкните файл создать > Project , чтобы начать создание приложения:
В диалоговом окне Новый проект в разделе Шаблоны выберите Android и на правой панели щелкните Приложение Android. Введите имя приложения (на снимке экрана ниже приложение называется MyApp), а затем нажмите кнопку ОК:
Источник


