- Set Up Device for Development
- Enable Debugging on the Device
- Android 9.0+
- Android 8.0 and Android 8.1
- Android 7.1 and lower
- Verify that USB debugging is enabled
- Android 9.0+
- Android 8.0 and Android 8.1
- Android 7.1 and lower
- Connect the device to the computer
- Alternate connection via Wifi
- Connecting over WiFi
- Troubleshooting
- Install USB Drivers
- Download the USB Drivers
- Installing the USB Driver
- Summary
- Tutorial: Create your first Android application
- Create a new Android project
- Create a project
- Configure project JDK
- Explore the project structure
- Edit the UI layout
- Open the UI designer
- Add image to the UI layout
- Add text to the UI layout
- Add style to text
- Make the application interactive
- Build and run the application
- Configure Android virtual device
- Run the application
Set Up Device for Development
This article explains how to setup an Android device and connect it to a computer so that the device may be used to run and debug Xamarin.Android applications.
After testing on an Android emulator, you will want to see and test your apps running on an Android device. You will need to enable debugging and connect the device to the computer.
Each of these steps will be covered in more detail in the sections below.
Enable Debugging on the Device
A device must be enabled for debugging in order to test an Android application. Developer options on Android have been hidden by default since version 4.2, and enabling them can vary based on the Android version.
Android 9.0+
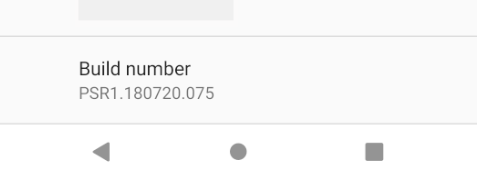
For Android 9.0 and higher, debugging is enabled by following these steps:
- Go to the Settings screen.
- Select About Phone .
- Tap Build Number 7 times until You are now a developer! is visible.
Android 8.0 and Android 8.1
- Go to the Settings screen.
- Select System.
- Select About Phone
- Tap Build Number 7 times until You are now a developer! is visible.
Android 7.1 and lower
- Go to the Settings screen.
- Select About Phone.
- Tap Build Number 7 times until You are now a developer! is visible.
Verify that USB debugging is enabled
After enabling developer mode on your device, you must ensure that USB debugging is enabled on the device. This also varies based on the Android version.
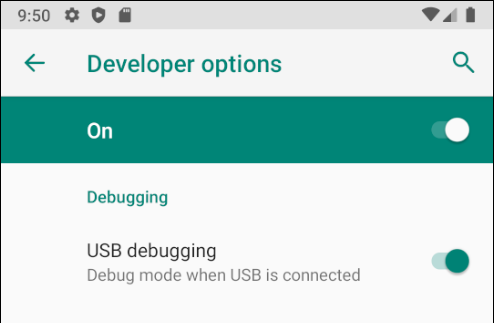
Android 9.0+
Navigate to Settings > System > Advanced > Developer Options and enable USB Debugging.
Android 8.0 and Android 8.1
Navigate to Settings > System > Developer Options and enable USB Debugging.
Android 7.1 and lower
Navigate to Settings > Developer Options and enable USB Debugging.
Once the Developer Options tab is available under Settings > System, open it to reveal developer settings:
This is the place to enable developer options such as USB debugging and stay awake mode.
Connect the device to the computer
The final step is to connect the device to the computer. The easiest and most reliable way is to do so over USB.
You will receive a prompt to trust the computer on your device if you have not used it for debugging before. You can also check Always allow from this computer to prevent requiring this prompt each time you connect the device.

Alternate connection via Wifi
It is possible to connect an Android device to a computer without using a USB cable, over WiFi. This technique requires more effort but could be useful when the device is too far from the computer to remain constantly plugged-in via cable.
Connecting over WiFi
By default, the Android Debug Bridge (ADB) is configured to communicate with an Android device via USB. It is possible to reconfigure it to use TCP/IP instead of USB. To do this, both the device and the computer must be on the same WiFi network. To setup your environment to debug over WiFi complete the following steps from the command line:
Determine the IP address of your Android device. One way to find out the IP address is to look under Settings > Network & internet > Wi-Fi, then tap on the WiFi network that the device is connected to, and then tap on Advanced. This will open a dropdown showing information about the network connection, similar to what is seen in the screenshot below:
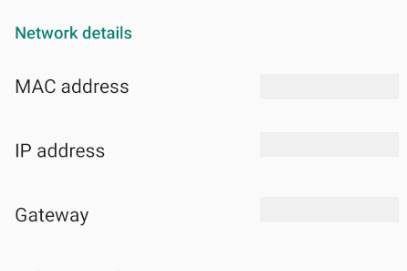
On some versions of Android the IP address won’t be listed there but can be found instead under Settings > About phone > Status.
Connect your Android device to your computer via USB.
Next, restart ADB so that it using TCP on port 5555. From a command prompt, type the following command:
After this command is issued, your computer will not be able to listen to devices that are connected via USB.
Disconnect the USB cable connecting your device to your computer.
Configure ADB so that it will connect to your Android device on the port that was specified in step 1 above:
Once this command finishes the Android device is connected to the computer via WiFi.
When you’re finished debugging via WiFi, it’s possible to reset ADB back to USB mode with the following command:
It’s possible to request ADB to list the devices that are connected to the computer. Regardless of how the devices are connected, you can issue the following command at the command prompt to see what is connected:
Troubleshooting
In some cases you might find that your device cannot connect to the computer. In this case you may want to verify that USB drivers are installed.
Install USB Drivers
This step is not necessary for macOS; just connect the device to the Mac with a USB cable.
It may be necessary to install some extra drivers before a Windows computer will recognize an Android device connected by USB.
These are the steps to set up a Google Nexus device and are provided as a reference. Steps for your specific device may vary, but will follow a similar pattern. Search the internet for your device if you have trouble.
Run the android.bat application in the [Android SDK install path]\tools directory. By default, the Xamarin.Android installer will put the Android SDK in following location on a Windows computer:
Download the USB Drivers
Google Nexus devices (with the exception of the Galaxy Nexus) require the Google USB Driver. The driver for the Galaxy Nexus is distributed by Samsung. All other Android devices should use the USB driver from their respective manufacturer.
Install the Google USB Driver package by starting the Android SDK Manager, and expanding the Extras folder, as can be seen in the follow screenshot:
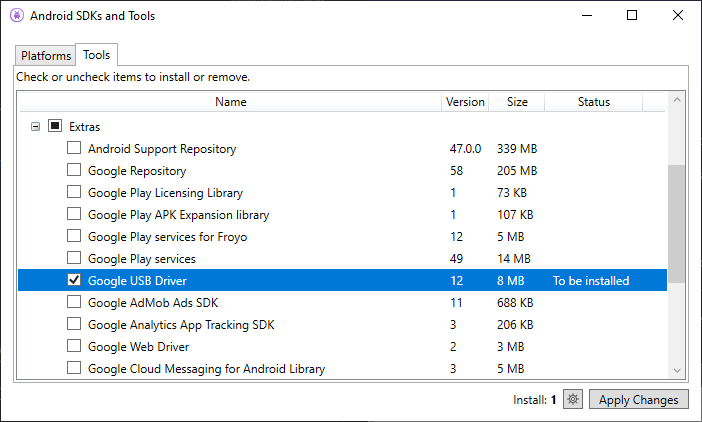
Check the Google USB Driver box, and click the Apply Changes button. The driver files are downloaded to the following location:
[Android SDK install path]\extras\google\usb\_driver
The default path for a Xamarin.Android installation is:
Installing the USB Driver
After the USB drivers are downloaded, it is necessary to install them. To install the drivers on Windows 7:
Connect your device to the computer with a USB cable.
Right-click on the Computer from your desktop or Windows Explorer, and select Manage .
Select Devices in the left pane.
Locate and expand Other Devices in the right pane.
Right-click the device name and select Update Driver Software . This will launch the Hardware Update Wizard.
Select Browse my computer for driver software and click Next .
Click Browse and locate the USB driver folder (the Google USB driver is located in [Android SDK install path]\extras\google\usb_driver).
Click Next to install the driver.
Summary
This article discussed how to configure an Android device for development by enabling debugging on the device. It also covered how to connect the device to a computer using either USB or WiFi.
Источник
Tutorial: Create your first Android application
In this tutorial, we will create a simple yet fully-functional Android application that counts how many times you tap a droid image. After that, we will run it on an Android virtual device.
This tutorial covers a simple scenario to help you get started with Android development in IntelliJ IDEA. For comprehensive how-to guides and reference documentation, visit the Android Studio user guide.
Create a new Android project
Create a project
Launch IntelliJ IDEA. On the Welcome screen, click New Project . If you already have a project open, from the main menu select File | New | Project .
In the New Project wizard, select Android on the left.
If you don’t have the Android SDK configured, IntelliJ IDEA will detect this and prompt you to download it:

Select the components you want to install. If you haven’t installed the Android SDK tools before, all the required components will be preselected.
Optionally, modify the location for the Android SDK, and click Next :

Review the installation settings and click Finish to start the download:

When all components have been downloaded and installed, click Finish :

Select Empty Activity as the project template:

On the last step, type HelloDroid as the project name and select Java as the language:

Configure project JDK
Now that we have created our first project, let’s make sure it uses the correct JDK.
From the main menu, choose File | Project Structure and go to Platform Settings | SDKs . Select the Android SDK and make sure that the correct Java version is selected in the Java SDK field.

We recommend that you use Java SE 11 or Java SE 8 for Android development in IntelliJ IDEA. If you don’t have the correct JDK installed, in the Project Structure dialog, click the Add New SDK button on the toolbar and select Download JDK :

In the Settings/Preferences dialog ( Ctrl+Alt+S ), go to Build, Execution, Deployment | Build Tools | Gradle and select the correct Java version (8.x or 11.x).

Explore the project structure
For Android projects, there’s a dedicated view in the IntelliJ IDEA Project tool window: click Project in the top-left corner and select Android .

This view doesn’t reflect the actual hierarchy of files on your disk — it is organized by modules and file types to ease navigation between source files of your project. Note that it hides project files and directories that you don’t commonly use (to see them, choose the Project view):

The app folder consists of the following subfolders:
manifests : contains the AndroidManifest.xml file, which holds general information about the application processed by the Android operating system. Among other things, it declares the package name that serves as a unique identifier for your application and the minimum version of the Android SDK required for the device where the application will run. It also declares the entry points of the application, along with permissions the application requires. For details, see App Manifest Overview.
java : contains the Java source code files grouped by packages, including JUnit tests.
res : contains all non-code resources, such as XML layout files, UI strings, images, and so on.
The Gradle Scripts folder contains all the project’s build-related configuration files.
Edit the UI layout
At this stage, the user interface of our sample HelloDroid application is based on a very simple layout defined in the activity_main.xml file located in the res/layout folder.
Let us modify the auto-generated user interface and see how the application layout is rendered without running it on any physical or virtual device.
Open the UI designer
In the Android project view, go to the app/res/layout and double-click the activity_main.xml file to open it. Note that since IntelliJ IDEA downloads the components required to render layout files, opening it may take a few seconds.
If the UI designer fails to open, and you get the Design editor is unavailable until after a successful project sync error, press Ctrl+Shift+A , search for the Sync Project with Gradle Files action, and wait for the sync to finish.
By default, IntelliJ IDEA provides a graphical view of the layout file, but you can also switch to the source code view, or view the text and the graphical representation side by side — use the icons in the top-right corner of the UI Designer pane:

This pane shows a rectangular canvas that is synchronized with the layout definition and with the Component Tree , so any changes to the canvas are reflected there accordingly.
Normally, layout files have a layout manager as their root element (for example, LinearLayout , FrameLayout , ConstraintLayout , and so on). In our example, the root element in activity_main.xml is ConstraintLayout that is responsible for positioning the elements of the application interface. For the purpose of this tutorial, we are not going to modify it, but you can learn more about designing interfaces from Build a Responsive UI with ConstraintLayout.
To eliminate distraction and only see how your layout is represented, click the Select Design Surface icon in the top-left corner and choose Design :

Now let’s delete the existing text element. To do this, right-click the text label and choose Delete from the context menu.
Now the UI layout looks like the following, and we are ready to start designing the layout of our application:

Add image to the UI layout
Now let’s add a droid image to our layout.
In the Android project view, expand the app/res folder and drag the image you want to use into the drawable folder. For this tutorial, we’ve downloaded a Hello Droid image from the Internet and saved it with the dimensions 50×50 px.
Return to the activity_main.xml file opened in the Designer pane, from the Palette choose the ImageView element, and drag it to the canvas to the position where you want the image to appear.
In the Pick a Resource dialog that opens, choose the resource file you’ve added and click OK :

Next, we need to modify the default id of the imageView element to be able to reference it later.
Select it in the Component Tree and in the Attributes pane on the right, enter the new identifier in the id field: droidImage . Press Enter ; in the dialog that opens, confirm that you want to update all references to the image element id:

Add text to the UI layout
Now let’s add some text to our layout.
In the Palette pane, pick the TextView element and drag it to the canvas below the image.
The widget displays some default text: TextView . To change it and link it to a string, we need to create a new text resource.
Select the textView element in the Component Tree on the left. In the Attributes pane on the right, click the Pick a Resource icon next to the text attribute:

In the dialog that opens, click the Add resource to the module icon in the top left corner and choose String Value .
In the New String Value dialog, enter the resource name ( welcome_text ) and the resource value ( Hello! I’m a droid. ):

Click OK to save the value and then click OK in the Pick a Resource dialog.
Now let’s modify the textView element id the same way we did with imageView .
Select textView in the Component Tree on the left, and in the Attributes pane set the id to a new value: clickCounter .
Add style to text
Now let’s add some style to the text to make it look more appealing.
Pad the text a bit: locate the padding attribute, and set all values to 10dp :

Change the font color: locate the textColor attribute, and click the Pick a Resource icon next to it.
In the dialog that opens, click the Add resource to the module icon in the top left corner and choose Color Value .
Enter the resource name ( text_color ) and the value ( #9C27B0 ):

Change the font size: locate the TextSize property and click the Pick a Resource icon next to it.
In the dialog that opens, click the Add resource to the module icon in the top left corner and choose Dimension Value .
Enter the resource name ( text_size ) and the value ( 24sp ):

As a result, your user interface now looks like the following:

To check what your application UI looks like in landscape orientation, click the Orientation for Preview icon on the Designer toolbar and choose Landscape :

To preview what your layout looks like on different devices, select another device from the device list:

Make the application interactive
Although our sample application is fully functional at this point, it does not support any form of interaction yet. Let’s modify it to support tap events.
In the Android project view, locate the MainActivity file under app\java\com.example.hellodroid and double-click to open it.
MainActivity is not a very meaningful class name, so let’s rename it.
Right-click this file in the Android project view and choose Refactor | Rename from the context menu or press Shift+F6 . In the dialog that opens, change the class name HelloDroidActivity and click Refactor :

All references to this class will be updated automatically, and your application’s source code will look as follows:

Replace the code in HelloDroid.java with the following:
Note that the identifiers we’ve used in the source code correspond to those we’ve set in our layout definition file, otherwise our code would not work.
Build and run the application
Now let’s build our application and run it on a virtual device.
Configure Android virtual device
First of all, to be able to run our application, we need to configure a virtual device.
In the main IntelliJ IDEA toolbar, click the devices list and choose AVD Manager :

On the first step of the wizard, click Create Virtual Device :

On the next step, we need to select the hardware that our virtual device will emulate.
Let’s select Phone on the left, and choose Pixel 2 as the target device:

Choose the system image you want to mimic on the virtual device, that is the OS version, the Android API level, the application binary interface (ABI), and the target SDK version:

Click the Download link next to the system image you want to mimic on the virtual device. For this tutorial, we’ve chosen to download the R system image.
In the License Agreement dialog that opens, read the license agreement and accept it, then click Next and wait for the download to finish. When the system image has been downloaded, select it and click Next in the System Image step of the wizard.
On the last step, you can modify your virtual device name and select the startup size and orientation of the screen. Choose the portrait layout and click Finish :

The newly configured device appears in the Android Virtual Device Manager .
Run the application
On the main IntelliJ IDEA toolbar, make sure the automatically created Run configuration and the virtual device we’ve just configured are selected and click :

The Android emulator will launch after the build has successfully finished, with our application started:

Click the droid image and see how the application processes the tap events, counts them and returns the corresponding message:

For information on how to run the app on a hardware device, refer to Android Studio: Run apps on a hardware device.
Источник


