- Android Building Multi-Language Supported App
- 1. How String Localization Works
- Don’ts:
- 2. Creating New Project
- 3. Testing The Other Languages
- 4. Android Localization Language ISO Codes
- 5. Translation Services
- Android Locale – Get Locale Name And Country Code
- Android Building Multi-Language Supported App
- 1. How String Localization Works
- Don’ts:
- 2. Creating New Project
- 3. Testing The Other Languages
- 4. Android Localization Language ISO Codes
- 5. Translation Services
Android Building Multi-Language Supported App
Android is one of the few popular mobile operating systems having millions of users over 190 countries and growing day by day. So when you are aiming your app to be globally successful, it is always a good idea to make the app localized.
While localizing, you should consider using appropriate text, audio, currency, numbers and graphics depending upon the region or country. But this tutorial only covers localizing strings i.e supporting multiple languages. Localizing with Resources explains about other things should be considered when localizing your app.
In this article we are going to build a Multi-Language supported app that supports French, Deutsch (German), Hindi and Japanese.
VIDEO DEMO
1. How String Localization Works
By default android considers English as primary language and loads the string resources from res ⇒ values ⇒ strings.xml. When you want to add support for another language, you need to create a values folder by appending an Hyphen and the ISO language code. For example if you want to add support for French, you should create a values folder named values-fr and keep a strings.xml file in it with all the strings translated into French language.
In brief the localization works as follows
1. When user changes the device language through Settings ⇒ Language & Input, android OS itself checks for appropriate language resources in the app. (Let’s say user is selecting French)
2. If the app supports selected language, android looks for it’s string resources in values-(ISO language Code) folder in the project. (For french it loads the string values from values-fr/string.xml)
3. If the supported language strings.xml misses any string value, android always loads the missing strings from default strings.xml file i.e values/strings.xml
So it is mandatory that the default stings.xml file should contains all the string values that app uses. Other wise the app will crash with Force Close error.
While you are supporting multiple languages, you should consider below as a best practice while defining the strings. Always declare the string in strings.xml only.
When referring it in xml, use @strings notation.
When defining the string through java code, use R.string
Don’ts:
Never hard code the string in xml or in java code which make the translation difficult.
So let’s create a new project and try with an example.
2. Creating New Project
1. Create a new project in Eclipse by going to File ⇒ New ⇒ Android Application Project and fill the required information.
2. Add following colors in colors.xml located under values. If you don’t see colors.xml, create a new file and add the below colors.
3. Under drawable folder create three files named bg_button_rounded.xml,bg_form_rounded.xml, bg_gradient.xml with following contents. These files are not related to language support, but just to give nice gradients background and rounded corners to buttons, input boxes.
bg_button_rounded.xml
bg_form_rounded.xml
bg_gradient.xml
4. Open strings.xml located under values folder and add following strings. These are default English language strings.
5. Now under res folder create three folders named values-de, values-fr, values-hi, values-ja and a strings.xml file in each of the folders.
Your project should look like this once you created the required files/folders.

Now translate the strings into respected languages and place them in appropriate strings.xml files.
Deutsch values-de/strings.xml
Hindi values-hi/strings.xml
Japanese values-ja/strings.xml
6. Open your main activity layout file (in my case activity_main.xml) and add the following content to create a simple layout. This layout contains a title and a login form.
7. Open your MainActivity.java and make sure that it has following code. This code will be added automatically when you create new project.
Now if you run the project you should see the app in English (assuming that your device is set to English language)

3. Testing The Other Languages
In order to see the app in other languages follow below steps or check the above demo video.
1. On the device go to Settings ⇒ Language & Input
2. Select the Language and choose the language that you supported in the app.


4. Android Localization Language ISO Codes
Below table give you ISO languages codes for all the languages that android supports.
| Language | Locale | values/strings.xml |
| German | de | values-de/strings.xml |
| Chinese | zh | values-zh/strings.xml |
| Czech | cs | values-cs/strings.xml |
| Dutch | nl | values-nl/strings.xml |
| French | fr | values-fr/strings.xml |
| Italian | it | values-it/strings.xml |
| Japanese | ja | values-ja/strings.xml |
| Korean | ko | values-ko/strings.xml |
| Polish | pl | values-pl/strings.xml |
| Russian | ru | values-ru/strings.xml |
| Spanish | es | values-es/strings.xml |
| Arabic | ar | values-ar/strings.xml |
| Bulgarian | bg | values-bg/strings.xml |
| Catalan | ca | values-ca/strings.xml |
| Croatian | hr | values-hr/strings.xml |
| Danish | da | values-da/strings.xml |
| Finnish | fi | values-fi/strings.xml |
| Greek | el | values-el/strings.xml |
| Hebrew | iw | values-iw/strings.xml |
| Hindi | hi | values-hi/strings.xml |
| Hungarian | hu | values-hu/strings.xml |
| Indonesian | in | values-in/strings.xml |
| Latvian | lv | values-lv/strings.xml |
| Lithuanian | lt | values-lt/strings.xml |
| Norwegian | nb | values-nb/strings.xml |
| Portuguese | pt | values-pt/strings.xml |
| Romanian | ro | values-ro/strings.xml |
| Serbian | sr | values-sr/strings.xml |
| Slovak | sk | values-sk/strings.xml |
| Slovenian | sl | values-sl/strings.xml |
| Swedish | sv | values-sv/strings.xml |
| Tagalog | tl | values-tl/strings.xml |
| Thai | th | values-th/strings.xml |
| Turkish | tr | values-tr/strings.xml |
| Ukrainian | uk | values-uk/strings.xml |
| Vietnamese | vi | values-vi/strings.xml |
5. Translation Services
Right now I used Google Translate service to translate the strings into other languages. But if you want more accurate and meaningful translation always go for professional services like Professional translations through Google Play
Finally Localization Checklist gives you list of things to be verified before the app goes live when localization considered.
Hi there! I am Founder at androidhive and programming enthusiast. My skills includes Android, iOS, PHP, Ruby on Rails and lot more. If you have any idea that you would want me to develop? Let’s talk: [email protected]
Источник
Android Locale – Get Locale Name And Country Code
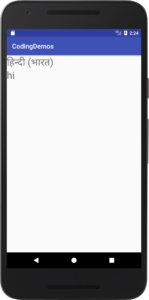
Hi and welcome to another tutorial from Codingdemos, today you will learn about Android locale API and how you can use it inside your app to get default locale and country code.
By the end of this tutorial, you will have an app that looks like this. (Large preview)
In this tutorial we will be using the following:
- – Android studio version 3.0.1
– Android emulator Nexus 5X with API 26
– Minimum SDK API 16
1- Open up Android Studio and open any project that you have in your computer.
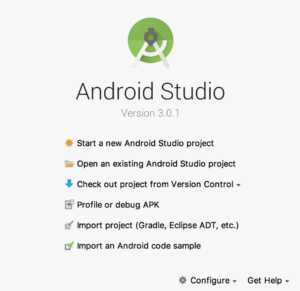
Create new Android Studio project or open existing project. (Large preview)
2- Open up activity_main.xml file, inside this file you will add 2 Android TextView to show language name and code and make sure to set the text size for these 2 TextView to 30sp.
3- The full code for activity_main.xml file will look like this:
4- Next open up MainActivity.java file, here you need to reference those 2 Android TextView which you have added them inside activity_main.xml file.
5- Now you will get to work with Android Locale API, add the following code below Android TextView code.
Here you use ConfigurationCompat which is a helper class to be able to have access to the configuration in backward compatibility, then you get the list of Android locale by using getLocales and finally you will use Resources to be able to access the system configuration of the Android device.
6- After initializing Locale, you will now be able to get the language name and code from Android device. Add the following code below Locale initialization.
Here you have initialized languageName textview with Locale properties.
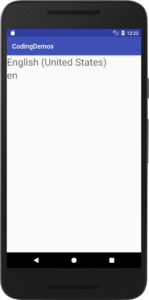
You will use locale.getDisplayName() to get the language name that is currently being used in your Android device.
7- Build and run the app to see the output.
Using Android Locale to get language name. (Large preview)
8- Now initialize languageCode with Android Locale properties, so add the following code below languageName.
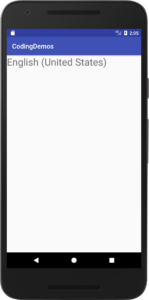
Here you use locale.getLanguage() to get the Android Locale country code of the language that is currently being used in your Android device.
9- Build and run the app to see the progress.
Getting Android Locale country code. (Large preview)
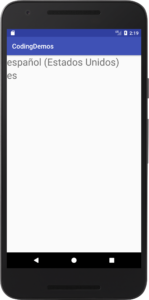
10- When you change the language of your Android device it will apply to the app as well, for example if you change your device language to Spanish you will get the following output.
11- The full code for MainActivity.java file will look like this.
12- I hope you find this tutorial helpful and if you have any question please post them in the comment below.
Источник
Android Building Multi-Language Supported App
Android is one of the few popular mobile operating systems having millions of users over 190 countries and growing day by day. So when you are aiming your app to be globally successful, it is always a good idea to make the app localized.
While localizing, you should consider using appropriate text, audio, currency, numbers and graphics depending upon the region or country. But this tutorial only covers localizing strings i.e supporting multiple languages. Localizing with Resources explains about other things should be considered when localizing your app.
In this article we are going to build a Multi-Language supported app that supports French, Deutsch (German), Hindi and Japanese.
VIDEO DEMO
1. How String Localization Works
By default android considers English as primary language and loads the string resources from res ⇒ values ⇒ strings.xml. When you want to add support for another language, you need to create a values folder by appending an Hyphen and the ISO language code. For example if you want to add support for French, you should create a values folder named values-fr and keep a strings.xml file in it with all the strings translated into French language.
In brief the localization works as follows
1. When user changes the device language through Settings ⇒ Language & Input, android OS itself checks for appropriate language resources in the app. (Let’s say user is selecting French)
2. If the app supports selected language, android looks for it’s string resources in values-(ISO language Code) folder in the project. (For french it loads the string values from values-fr/string.xml)
3. If the supported language strings.xml misses any string value, android always loads the missing strings from default strings.xml file i.e values/strings.xml
So it is mandatory that the default stings.xml file should contains all the string values that app uses. Other wise the app will crash with Force Close error.
While you are supporting multiple languages, you should consider below as a best practice while defining the strings. Always declare the string in strings.xml only.
When referring it in xml, use @strings notation.
When defining the string through java code, use R.string
Don’ts:
Never hard code the string in xml or in java code which make the translation difficult.
So let’s create a new project and try with an example.
2. Creating New Project
1. Create a new project in Eclipse by going to File ⇒ New ⇒ Android Application Project and fill the required information.
2. Add following colors in colors.xml located under values. If you don’t see colors.xml, create a new file and add the below colors.
3. Under drawable folder create three files named bg_button_rounded.xml,bg_form_rounded.xml, bg_gradient.xml with following contents. These files are not related to language support, but just to give nice gradients background and rounded corners to buttons, input boxes.
bg_button_rounded.xml
bg_form_rounded.xml
bg_gradient.xml
4. Open strings.xml located under values folder and add following strings. These are default English language strings.
5. Now under res folder create three folders named values-de, values-fr, values-hi, values-ja and a strings.xml file in each of the folders.
Your project should look like this once you created the required files/folders.
Now translate the strings into respected languages and place them in appropriate strings.xml files.
Deutsch values-de/strings.xml
Hindi values-hi/strings.xml
Japanese values-ja/strings.xml
6. Open your main activity layout file (in my case activity_main.xml) and add the following content to create a simple layout. This layout contains a title and a login form.
7. Open your MainActivity.java and make sure that it has following code. This code will be added automatically when you create new project.
Now if you run the project you should see the app in English (assuming that your device is set to English language)
3. Testing The Other Languages
In order to see the app in other languages follow below steps or check the above demo video.
1. On the device go to Settings ⇒ Language & Input
2. Select the Language and choose the language that you supported in the app.
4. Android Localization Language ISO Codes
Below table give you ISO languages codes for all the languages that android supports.
| Language | Locale | values/strings.xml |
| German | de | values-de/strings.xml |
| Chinese | zh | values-zh/strings.xml |
| Czech | cs | values-cs/strings.xml |
| Dutch | nl | values-nl/strings.xml |
| French | fr | values-fr/strings.xml |
| Italian | it | values-it/strings.xml |
| Japanese | ja | values-ja/strings.xml |
| Korean | ko | values-ko/strings.xml |
| Polish | pl | values-pl/strings.xml |
| Russian | ru | values-ru/strings.xml |
| Spanish | es | values-es/strings.xml |
| Arabic | ar | values-ar/strings.xml |
| Bulgarian | bg | values-bg/strings.xml |
| Catalan | ca | values-ca/strings.xml |
| Croatian | hr | values-hr/strings.xml |
| Danish | da | values-da/strings.xml |
| Finnish | fi | values-fi/strings.xml |
| Greek | el | values-el/strings.xml |
| Hebrew | iw | values-iw/strings.xml |
| Hindi | hi | values-hi/strings.xml |
| Hungarian | hu | values-hu/strings.xml |
| Indonesian | in | values-in/strings.xml |
| Latvian | lv | values-lv/strings.xml |
| Lithuanian | lt | values-lt/strings.xml |
| Norwegian | nb | values-nb/strings.xml |
| Portuguese | pt | values-pt/strings.xml |
| Romanian | ro | values-ro/strings.xml |
| Serbian | sr | values-sr/strings.xml |
| Slovak | sk | values-sk/strings.xml |
| Slovenian | sl | values-sl/strings.xml |
| Swedish | sv | values-sv/strings.xml |
| Tagalog | tl | values-tl/strings.xml |
| Thai | th | values-th/strings.xml |
| Turkish | tr | values-tr/strings.xml |
| Ukrainian | uk | values-uk/strings.xml |
| Vietnamese | vi | values-vi/strings.xml |
5. Translation Services
Right now I used Google Translate service to translate the strings into other languages. But if you want more accurate and meaningful translation always go for professional services like Professional translations through Google Play
Finally Localization Checklist gives you list of things to be verified before the app goes live when localization considered.
Hi there! I am Founder at androidhive and programming enthusiast. My skills includes Android, iOS, PHP, Ruby on Rails and lot more. If you have any idea that you would want me to develop? Let’s talk: [email protected]
Источник


