- Полный список
- Обработчики
- Операции
- dismiss
- cancel
- Управление из Activity
- dismissDialog
- removeDialog
- Диалоговые окна в Android. Часть 1
- Creating Dialogs
- Showing a Dialog
- Dismissing a Dialog
- Using dismiss listeners
- Creating an AlertDialog
- Adding buttons
- Adding a list
- Adding checkboxes and radio buttons
- Creating a ProgressDialog
- Showing a progress bar
- Creating a Custom Dialog
Полный список
— рассматриваем обработчики событий диалога
— программно закрываем и показываем диалог
Мы закрываем диалог нажатием на кнопку, на пункт списка или кнопкой Назад. Давайте рассмотрим, какие есть программные способы закрытия. Также узнаем, какие обработчики диалога можно использовать, чтобы отследить закрытие.
Project name: P0661_AlertDialogOperations
Build Target: Android 2.3.3
Application name: AlertDialogOperations
Package name: ru.startandroid.develop.p0661alertdialogoperations
Create Activity: MainActivity
В strings.xml пропишем тексты:
Код в основном должен быть понятен по прошлым урокам. Создаем диалог, настраиваем заголовок, сообщение и одну кнопку без обработчика (нам он сейчас не нужен). Далее для диалога указываем три обработчика: отображения, отмены и закрытия диалога. Все они пишут о себе в лог.
onclick – обработчик кнопки из main.xml. Здесь мы просто запускаем диалог.
Обработчики
Давайте смотреть, когда и какие обработчики событий диалога будут срабатывать. Все сохраним и запустим. Жмем кнопку Диалог, появляется диалог.
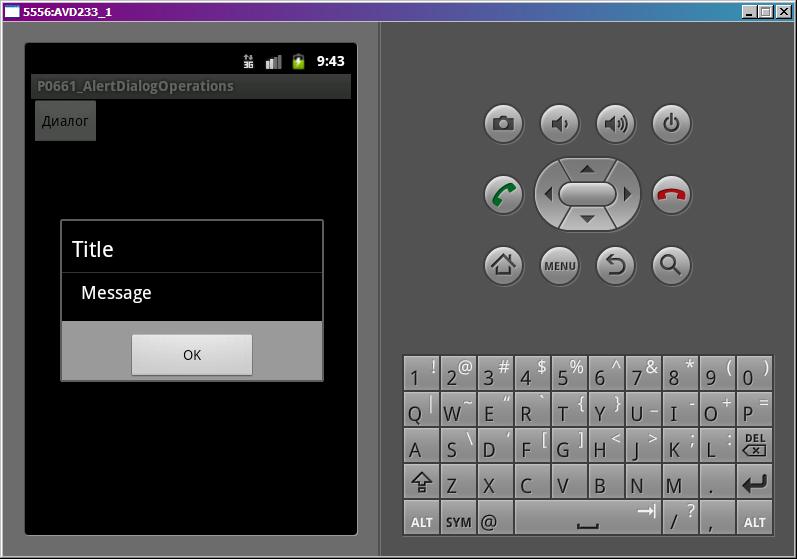
Диалог создался и сработал обработчик отображения диалога. Нажмем кнопку ОК. Диалог закрылся, а лог показал следующее:
Сработал обработчик закрытия диалога.
Теперь еще раз запустим диалог кнопкой Диалог. В логе видим:
Метод onCreateDialog не отработал, т.к. диалог уже создан. Это мы подробно рассматривали в прошлых уроках. Сработал обработчик отображения.
Для закрытия диалога нажмем кнопку Back (Назад) на эмуляторе. В логе появились следующие строки:
Перед обработчиком закрытия (Dismiss) сработал обработчик отмены (Cancel), т.к. диалог был отменен.
Операции
Разберем программные методы управления диалогом. Для этого немного изменим код MainActivity.java. Добавим два пустых пока метода method1 и method2, и перепишем onclick:
Handler мы пока не проходили, его понимать необязательно. Сейчас просто надо принять, что вся эта конструкция в onclick покажет диалог, затем через 2 секунды выполнит метод method1 и еще через 2 секунды выполнит метод method2. Т.е. получится такая последовательность:
отображение диалога
2 сек
выполнение method1
2 сек
выполнение method2
dismiss
Мы будем работать с method1 и method2. Начнем с метода dismiss – он закрывает диалог. Перепишем метод method1:
method2 пока не трогаем. Запустим приложение и нажмем кнопку Диалог. Диалог появился, повисел две секунды и закрылся. Это нам обеспечил dismiss, вызванный через 2 секунды после отображения диалога. Смотрим лог:
Все верно. Диалог создался, отобразился и закрылся. Обратите внимание на время записей в логе. Между Show и Dismiss должно быть примерно 2 секунды.
cancel
Теперь используем метод cancel. Перепишем method1:
Все сохраним, запустим приложение и вызовем диалог. Снова диалог появился и закрылся через две секунды. Сработал метод cancel. Логи:
Create
Show
Cancel
Dismiss
Все так же, как при закрытии диалога кнопкой Back.
Снова перепишем method1, используя метод hide:
Запустим приложение, вызовем диалог. Он отобразился и закрылся. Смотрим лог:
На этот раз обработчик закрытия не сработал. Диалог просто скрылся. Зачем это нужно, я не знаю, но метод такой есть, поэтому я рассказал о нем.
Управление из Activity
Мы работали напрямую с объектом Dialog и вызывали его методы. Есть еще другой способ. Сначала немного теории о механизме взаимодействия Activity и диалога. Когда мы первый раз выполняем метод showDialog, мы передаем туда ID. Это ID далее передается в onCreateDialog. В итоге onCreateDialog возвращает созданный диалог, и Activity для себя увязывает его с ID. И если мы захотим обратиться к этому диалогу, нам нужен будет только ID, Activity сама по нему определит, какой диалог нам нужен.
Когда мы, например, следующие разы вызываем showDialog, мы передаем туда ID, но диалог не создается. Activity по ID находит ранее созданный диалог и показывает его. У Activity также есть методы по закрытию диалога – это dismissDialog и removeDialog. Первый просто закрывает диалог, а второй закрывает и заставляет Activity забыть про него. Т.е. когда мы в след.раз захотим показать этот диалог, Activity будет заново создавать его, а не брать уже готовый. Проверим это.
dismissDialog
Все сохраним и запустим. Вызовем диалог и ждем. Диалог отобразился, через 2 секунды закрылся, и еще через 2 снова открылся. Смотрим лог:
Когда диалог отобразился второй раз, не сработал метод его создания, т.к. Activity использовало созданный при первом вызове объект.
removeDialog
Перепишем метод method1:
Будем не только закрывать диалог, но и «забывать» его. method2 оставляем без изменений, он будет показывать диалог.
Запустим приложение, запустим диалог и ждем. Диалог открылся, закрылся и открылся снова. Смотрим лог:
Create
Show
Dismiss
Create
Show
Но на этот раз при втором показе он снова создавался, т.к. Activity его забыло благодаря методу removeDialog.
У объекта Dialog есть еще метод show. Чем он отличается от метода Activity showDialog? show просто покажет созданный диалог, а showDialog, начинает проверять был ли уже создан диалог, создает его, если необходимо, и вызывает для него метод onPrepareDialog.
На следующем уроке:
— работаем с ProgressDialog
Присоединяйтесь к нам в Telegram:
— в канале StartAndroid публикуются ссылки на новые статьи с сайта startandroid.ru и интересные материалы с хабра, medium.com и т.п.
— в чатах решаем возникающие вопросы и проблемы по различным темам: Android, Kotlin, RxJava, Dagger, Тестирование
— ну и если просто хочется поговорить с коллегами по разработке, то есть чат Флудильня
— новый чат Performance для обсуждения проблем производительности и для ваших пожеланий по содержанию курса по этой теме
Источник
Диалоговые окна в Android. Часть 1
Dialog
Dialog — это класс, принадлежащий Android SDK и помогающий нам, простым смертным программистам, работать с диалоговыми окнами в Android. Класс Dialog имеет 4 подкласса:
- AlertDialog: это диалоговое окно для различных сообщений приложения, например «Вы хотите купить мое приложение?» или что то в этом роде. AlertDialog поддерживает три кнопки — утвердительную (OK), отрицательную (Cancel) и нейтральную (Later).
- ProgressDialog: это диалоговое окно для отображения выполнения различных процессов, загрузки, например.
- DatePickerDialog: диалоговое окно предлагает пользователю выбрать дату.
- TimePickerDialog: диалоговое окно предлагает пользователю выбрать время
На первом из этого списка, AlertDialog мы и остановимся подробнее.
AlertDialog
Чтобы создать диалоговое окно AlertDialog нам в помощь потребуется экземпляр класса Builder:
AlertDialog.Builder builder = new AlertDialog.Builder(this);
Теперь, когда у нас есть builder, мы можем «строить» свое собственное диалоговое окно. В параметры диалогового окна Вы можете написать множество различных параметров, но основными являются эти:
- setTitle(int resID) — задает заголовок диалогового окна, принимает в качестве аргументов ссылку на ресурс или строку.
- setMessage(int resID) — задает сообщение в диалоговом окне, также принимает ссылку на ресурс или строку.
- setPositiveButton(int textID, DialogInterface.OnClickListener listener) — устанавливает на Вашем диалоговом окне утвердительную кнопку с текстом ресурса textID и слушателем listener. Методы setNegativeButton и setNeutralButton идентичны, с разницей в назначении кнопок.
Пример создания AlertDialog:
В этом примере я использовал setCancelable(true) — это разрешает пользователю закрывать диалоговое окно с помощью хардварной кнопки Back. Еще я создал слушателя для утвердительной кнопки и использовал метод create(). Метод create() возвращает готовое диалоговое окно с вашими параметрами как экземпляр класса AlertDialog.
Вот мы и создали диалоговое окно! Следующая задача — показать его пользователю. Вот тут есть несколько вариантов:
- showDialog(AlertDialog dialog) — самый простой способ показать диалоговое окно, но начиная с версии 3.0 разработчики Android не рекомендуют пользоваться этим методом, и в результате вы получите предупреждение, которое можно обойти только @SurpressWarning, что есть не совсем хорошо.
- AlertDialog dialog.show() — альтернативный способ показать окно, для этого в экземпляре dialog должен лежать результат метода Builder.create().
Второй метод нам подходит больше, но писать в основной активности кучу различных Buider и AlertDialog портит читабельность кода. Поэтому целесообразней вынести создание и обработку диалоговых окон в новый класс, например:
Единственная заметка по поводу этого кода будет про использования метода setView(View view) в диалоге IDD_SETTINGS. У AlertDialog как и у всех остальных диалоговых окон есть одна приятная особенность — им можно задавать собственные Layout, что позволяет полностью видоизменять диалоговые окна и их содержимое. Здесь есть один подводный камень: обработку элементов этого Layout вы должны будете производить именно в той Activity, где вызываете это диалоговое окно. Например я показываю диалоговое окно IDD_SETTINGS в MainActivity с Layout по имени settings:
Соответственно я загружаю это окно в MainActivity:
Метод initSettings класса MainActivity в данном случае будет выглядеть так:
Ну а дальше обрабатываете свои объекты как вам угодно.
Небольшой итог
1) Для большинства целей диалоговых окон подходит AlertDialog
2) AlertDialog может принимать вид layout с любыми объектами
3) Гораздо лучше использовать для диалоговых окон отдельный класс и пользоваться AlertDialog.show()
4) Обработка объектов кастомного layout производится в активности, вызвавшей диалог
В следующей части этой статьи пойдет речь о DialogFragment, который был включен в Android SDK начиная с 3.0 Honeycomb. Надеюсь эта статья поможет новичкам и не очень в своих квестах по завоеванию Google Play.
Источник
Creating Dialogs
A dialog is usually a small window that appears in front of the current Activity. The underlying Activity loses focus and the dialog accepts all user interaction. Dialogs are normally used for notifications and short activities that directly relate to the application in progress.
The Android API supports the following types of Dialog objects:
AlertDialog A dialog that can manage zero, one, two, or three buttons, and/or a list of selectable items that can include checkboxes or radio buttons. The AlertDialog is capable of constructing most dialog user interfaces and is the suggested dialog type. See Creating an AlertDialog below. ProgressDialog A dialog that displays a progress wheel or progress bar. Because it’s an extension of the AlertDialog, it also supports buttons. See Creating a ProgressDialog below. DatePickerDialog A dialog that allows the user to select a date. See the Hello DatePicker tutorial. TimePickerDialog A dialog that allows the user to select a time. See the Hello TimePicker tutorial.
If you would like to customize your own dialog, you can extend the base Dialog object or any of the subclasses listed above and define a new layout. See the section on Creating a Custom Dialog below.
Showing a Dialog
A dialog is always created and displayed as a part of an Activity. You should normally create dialogs from within your Activity’s onCreateDialog(int) callback method. When you use this callback, the Android system automatically manages the state of each dialog and hooks them to the Activity, effectively making it the «owner» of each dialog. As such, each dialog inherits certain properties from the Activity. For example, when a dialog is open, the Menu key reveals the options menu defined for the Activity and the volume keys modify the audio stream used by the Activity.
Note: If you decide to create a dialog outside of the onCreateDialog() method, it will not be attached to an Activity. You can, however, attach it to an Activity with setOwnerActivity(Activity).
When you want to show a dialog, call showDialog(int) and pass it an integer that uniquely identifies the dialog that you want to display.
When a dialog is requested for the first time, Android calls onCreateDialog(int) from your Activity, which is where you should instantiate the Dialog. This callback method is passed the same ID that you passed to showDialog(int). After you create the Dialog, return the object at the end of the method.
Before the dialog is displayed, Android also calls the optional callback method onPrepareDialog(int, Dialog). Define this method if you want to change any properties of the dialog each time it is opened. This method is called every time a dialog is opened, whereas onCreateDialog(int) is only called the very first time a dialog is opened. If you don’t define onPrepareDialog(), then the dialog will remain the same as it was the previous time it was opened. This method is also passed the dialog’s ID, along with the Dialog object you created in onCreateDialog().
The best way to define the onCreateDialog(int) and onPrepareDialog(int, Dialog) callback methods is with a switch statement that checks the id parameter that’s passed into the method. Each case should check for a unique dialog ID and then create and define the respective Dialog. For example, imagine a game that uses two different dialogs: one to indicate that the game has paused and another to indicate that the game is over. First, define an integer ID for each dialog:
Then, define the onCreateDialog(int) callback with a switch case for each ID:
Note: In this example, there’s no code inside the case statements because the procedure for defining your Dialog is outside the scope of this section. See the section below about Creating an AlertDialog, offers code suitable for this example.
When it’s time to show one of the dialogs, call showDialog(int) with the ID of a dialog:
Dismissing a Dialog
When you’re ready to close your dialog, you can dismiss it by calling dismiss() on the Dialog object. If necessary, you can also call dismissDialog(int) from the Activity, which effectively calls dismiss() on the Dialog for you.
If you are using onCreateDialog(int) to manage the state of your dialogs (as discussed in the previous section), then every time your dialog is dismissed, the state of the Dialog object is retained by the Activity. If you decide that you will no longer need this object or it’s important that the state is cleared, then you should call removeDialog(int). This will remove any internal references to the object and if the dialog is showing, it will dismiss it.
Using dismiss listeners
If you’d like your applcation to perform some procedures the moment that a dialog is dismissed, then you should attach an on-dismiss listener to your Dialog.
First define the DialogInterface.OnDismissListener interface. This interface has just one method, onDismiss(DialogInterface), which will be called when the dialog is dismissed. Then simply pass your OnDismissListener implementation to setOnDismissListener().
However, note that dialogs can also be «cancelled.» This is a special case that indicates the dialog was explicitly cancelled by the user. This will occur if the user presses the «back» button to close the dialog, or if the dialog explicitly calls cancel() (perhaps from a «Cancel» button in the dialog). When a dialog is cancelled, the OnDismissListener will still be notified, but if you’d like to be informed that the dialog was explicitly cancelled (and not dismissed normally), then you should register an DialogInterface.OnCancelListener with setOnCancelListener().
Creating an AlertDialog
An AlertDialog is an extension of the Dialog class. It is capable of constructing most dialog user interfaces and is the suggested dialog type. You should use it for dialogs that use any of the following features:
- A title
- A text message
- One, two, or three buttons
- A list of selectable items (with optional checkboxes or radio buttons)
To create an AlertDialog, use the AlertDialog.Builder subclass. Get a Builder with AlertDialog.Builder(Context) and then use the class’s public methods to define all of the AlertDialog properties. After you’re done with the Builder, retrieve the AlertDialog object with create().
The following topics show how to define various properties of the AlertDialog using the AlertDialog.Builder class. If you use any of the following sample code inside your onCreateDialog() callback method, you can return the resulting Dialog object to display the dialog.
Adding buttons
To create an AlertDialog with side-by-side buttons like the one shown in the screenshot to the right, use the set. Button() methods:
First, add a message for the dialog with setMessage(CharSequence). Then, begin method-chaining and set the dialog to be not cancelable (so the user cannot close the dialog with the back button) with setCancelable(boolean). For each button, use one of the set. Button() methods, such as setPositiveButton(), that accepts the name for the button and a DialogInterface.OnClickListener that defines the action to take when the user selects the button.
Note: You can only add one of each button type to the AlertDialog. That is, you cannot have more than one «positive» button. This limits the number of possible buttons to three: positive, neutral, and negative. These names are technically irrelevant to the actual functionality of your buttons, but should help you keep track of which one does what.
Adding a list
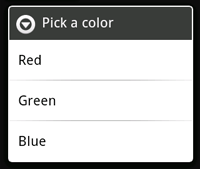
To create an AlertDialog with a list of selectable items like the one shown to the right, use the setItems() method:
First, add a title to the dialog with setTitle(CharSequence). Then, add a list of selectable items with setItems(), which accepts the array of items to display and a DialogInterface.OnClickListener that defines the action to take when the user selects an item.
Adding checkboxes and radio buttons
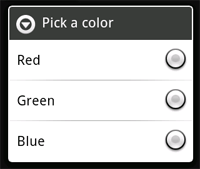
To create a list of multiple-choice items (checkboxes) or single-choice items (radio buttons) inside the dialog, use the setMultiChoiceItems() and setSingleChoiceItems() methods, respectively. If you create one of these selectable lists in the onCreateDialog() callback method, Android manages the state of the list for you. As long as the Activity is active, the dialog remembers the items that were previously selected, but when the user exits the Activity, the selection is lost.
Note: To save the selection when the user leaves or pauses the Activity, you must properly save and restore the setting throughout the Activity Lifecycle. To permanently save the selections, even when the Activity process is completely shutdown, you need to save the settings with one of the Data Storage techniques.
To create an AlertDialog with a list of single-choice items like the one shown to the right, use the same code from the previous example, but replace the setItems() method with setSingleChoiceItems():
The second parameter in the setSingleChoiceItems() method is an integer value for the checkedItem , which indicates the zero-based list position of the default selected item. Use «-1» to indicate that no item should be selected by default.
Creating a ProgressDialog

A ProgressDialog is an extension of the AlertDialog class that can display a progress animation in the form of a spinning wheel, for a task with progress that’s undefined, or a progress bar, for a task that has a defined progression. The dialog can also provide buttons, such as one to cancel a download.
Opening a progress dialog can be as simple as calling ProgressDialog.show(). For example, the progress dialog shown to the right can be easily achieved without managing the dialog through the onCreateDialog(int) callback, as shown here:
The first parameter is the application Context, the second is a title for the dialog (left empty), the third is the message, and the last parameter is whether the progress is indeterminate (this is only relevant when creating a progress bar, which is discussed in the next section).
The default style of a progress dialog is the spinning wheel. If you want to create a progress bar that shows the loading progress with granularity, some more code is required, as discussed in the next section.
Showing a progress bar
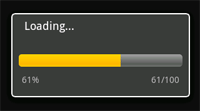
To show the progression with an animated progress bar:
- Initialize the ProgressDialog with the class constructor, ProgressDialog(Context).
- Set the progress style to «STYLE_HORIZONTAL» with setProgressStyle(int) and set any other properties, such as the message.
- When you’re ready to show the dialog, call show() or return the ProgressDialog from the onCreateDialog(int) callback.
- You can increment the amount of progress displayed in the bar by calling either setProgress(int) with a value for the total percentage completed so far or incrementProgressBy(int) with an incremental value to add to the total percentage completed so far.
For example, your setup might look like this:
The setup is simple. Most of the code needed to create a progress dialog is actually involved in the process that updates it. You might find that it’s necessary to create a second thread in your application for this work and then report the progress back to the Activity’s UI thread with a Handler object. If you’re not familiar with using additional threads with a Handler, see the example Activity below that uses a second thread to increment a progress dialog managed by the Activity.
This example uses a second thread to track the progress of a process (which actually just counts up to 100). The thread sends a Message back to the main Activity through a Handler each time progress is made. The main Activity then updates the ProgressDialog.
Creating a Custom Dialog
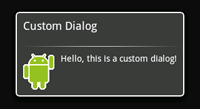
If you want a customized design for a dialog, you can create your own layout for the dialog window with layout and widget elements. After you’ve defined your layout, pass the root View object or layout resource ID to setContentView(View).
For example, to create the dialog shown to the right:
- Create an XML layout saved as custom_dialog.xml :
This XML defines an ImageView and a TextView inside a LinearLayout.
Set the above layout as the dialog’s content view and define the content for the ImageView and TextView elements:
After you instantiate the Dialog, set your custom layout as the dialog’s content view with setContentView(int), passing it the layout resource ID. Now that the Dialog has a defined layout, you can capture View objects from the layout with findViewById(int) and modify their content.
A dialog made with the base Dialog class must have a title. If you don’t call setTitle(), then the space used for the title remains empty, but still visible. If you don’t want a title at all, then you should create your custom dialog using the AlertDialog class. However, because an AlertDialog is created easiest with the AlertDialog.Builder class, you do not have access to the setContentView(int) method used above. Instead, you must use setView(View). This method accepts a View object, so you need to inflate the layout’s root View object from XML.
To inflate the XML layout, retrieve the LayoutInflater with getLayoutInflater() (or getSystemService()), and then call inflate(int, ViewGroup), where the first parameter is the layout resource ID and the second is the ID of the root View. At this point, you can use the inflated layout to find View objects in the layout and define the content for the ImageView and TextView elements. Then instantiate the AlertDialog.Builder and set the inflated layout for the dialog with setView(View).
Here’s an example, creating a custom layout in an AlertDialog:
Using an AlertDialog for your custom layout lets you take advantage of built-in AlertDialog features like managed buttons, selectable lists, a title, an icon and so on.
Источник


