Прошивка для планшета ASUS Transformer Book T100TA 64Gb dock
На этой странице нашего информационного портала вы сможете скачать официальную версию прошивки MIUI 12, MIUI 11, MIUI 10, MIUI 9 кастомную оригинальную прошивку, посмотреть видео обзор, оставить отзыв, ознакомиться с ценами и купить интересующую Вас модель планшета. Чтобы скачать прошивку для планшета ASUS Transformer Book T100TA 64Gb dock с Android 12 или Android 11 , Android 10.0 , Android 9.0 Pie , Android 8.0 Oreo , Android 7.0 Nougat , Android 6.0 Marshmallow , Android 5.0 Lollipop , Android KitKat 4.4.x, 4.1.x, 4.2.x, Андроид 4.3 Jelly Bean необходимо оставить свой полный, развернутый отзыв о данной модели планшета.
В каких случаях следует обновить прошивку вашего планшета ASUS Transformer Book T100TA 64Gb dock:
- Если планшет не включается
- Постоянно перезагружается
- Нужно восстановить планшет после неудачной прошивки
- Хотите установить последюю версию прошивки
Скачать прошивку для ASUS Transformer Book T100TA 64Gb dock
При добавление Вашего отзыва укажите действующий Email адрес – на него будет выслана инструкция и видео обзор на русском языке. Также в прикрепленном файле к письму придет ссылка на скачивание через торрент, по которой вы сможете скачать программу для прошивки ASUS Transformer Book T100TA 64Gb dock с инструкцией на русском языке.
Инструкция по установке
- Загрузите файл с приложением (нажав на красную ссылку «Скачать»)
- Установите приложение на свое устройство
- Запустите приложение
- Выберете нужную версию
- В приложение укажите свой Email адрес, на который будет выслана прошивка с программой
- Загрузите прикрепленный к письму архив
- Следуйте инструкциям из архива
Источник
[Tutorial] Installing a Stable Android OS on ASUS T100TA !
I had been waiting for a stable Android for T100 for a long time. And finally, there is a stable Android which is released by domini99 on XDA.
Now, based on the domini99’s installation tutorial, I add some images in each step for the beginners.
- Download the Android-x86 for T100 from this link (https://drive.google.com/file/d/0B8jVq7lqQUtvUkFyT0RhR2lJT28/view)
(The image is highly compressed again to save space, I would recommend using 7zip to unzip the image) - The zip contains an .apk file, place it on your SD-Card or USB Drive.


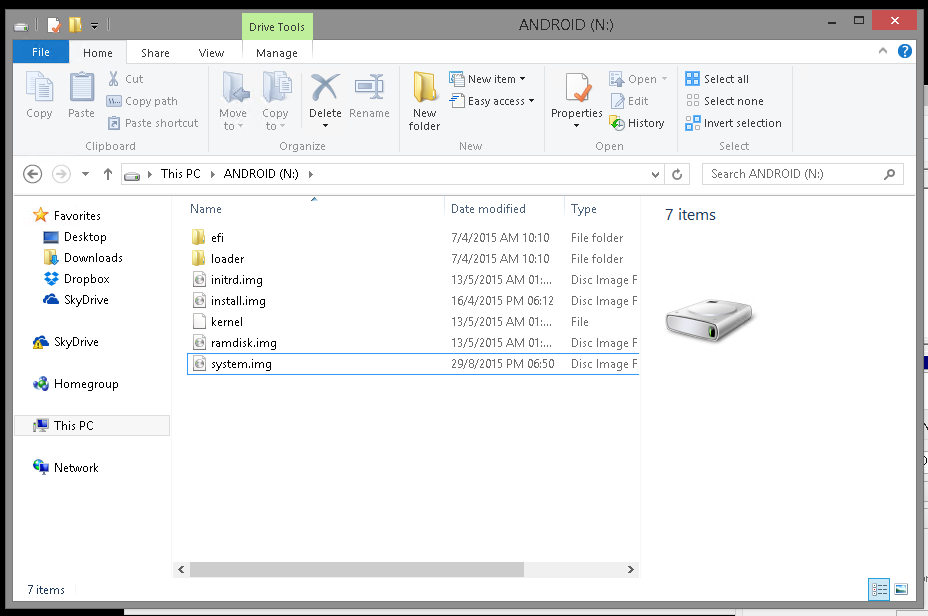
Download toporesize: http://forum.xda-developers.com/showthread.php?t=824154After you have done this, extract toporesize anywhere and run the toporesize .bat file.Select Create New, navigate to your Android partition and type “data.img” in the File Name box. (without quotations)
Drag the slider to the the size of the size you want the image to be.
The data.img acts as your virtual DATA partition


The data.img should be created like this:

Make Android bootable
Download EasyUefi: http://www.easyuefi.com/After you have installed EasyUEFI open it.
Click on “add boot” (the icon that looks like a calculator with a + sign)In “Type” change it to Linux.Select the Android partition
Now click “Browse” (may appear as Brower due to a typo)
Navigate to \efi\boot and select gummiboot32.efi
Give your boot a name in the “Description” box. Call it Android or something
Hit OK
and hit OK again.
You should now see your Android boot option added to the list.
Step 5: Configure android and get logged in with your Google account
Now in order to boot android, shut down windows and wait for a couple of seconds until your tablet has turned off,
Now press the power and the volume down key at the same time, and once the tablet has turned on release the power button but keep pressing down the volume down key.
You should now see a menu that says “Please select boot device:”
Keep pressing volume down until you have selected android, and hit the “start” key. (the key under the volume keys)
Wait for Android to boot.
After Android has booted, connect to a wifi network.
It might take a long time for the setup to get ready, please just wait. This is normal!
Skip all login steps, do not login with your google account!
After this is done you should be at your home screen.
Now open Root Explorer, its is included into the image.
Go to the folder storage, and go to USB3
It will ask you to confirm root permission.
After this, you should see your .apk file.
If you do not see the .apk file, try another folders like USB2, or USB1.
Install the .apk file, and accept verification.
DO NOT OPEN GOOGLE PLAY SERVICES AFTER THE INSTALLATION IS DONE. VERY IMPORTANT!! JUST CLICK DONE.
After the installation of the modified google services APK is complete, go to settings, scroll down and select “add account”
Log in with your Google account. You might see a lot of force closes, just ignore them.
It could take multiple tries to log in, but it should eventually work.
After login is done, the screen might glitch a bit and throw you back to the settings screen.
This is normal. Close any force closes that might pop up, just ignore them.
They will go away by themselves after all this is done.
After this is done, Google Play store should work and your tablet is operational!
Источник
[Tutorial] Installing a Stable Android OS on ASUS T100TA !
I had been waiting for a stable Android for T100 for a long time. And finally, there is a stable Android which is released by domini99 on XDA.
Now, based on the domini99’s installation tutorial, I add some images in each step for the beginners.
- Download the Android-x86 for T100 from this link (https://drive.google.com/file/d/0B8jVq7lqQUtvUkFyT0RhR2lJT28/view)
(The image is highly compressed again to save space, I would recommend using 7zip to unzip the image) - The zip contains an .apk file, place it on your SD-Card or USB Drive.
Download toporesize: http://forum.xda-developers.com/showthread.php?t=824154After you have done this, extract toporesize anywhere and run the toporesize .bat file.Select Create New, navigate to your Android partition and type “data.img” in the File Name box. (without quotations)
Drag the slider to the the size of the size you want the image to be.
The data.img acts as your virtual DATA partition
The data.img should be created like this:
Make Android bootable
Download EasyUefi: http://www.easyuefi.com/After you have installed EasyUEFI open it.
Click on “add boot” (the icon that looks like a calculator with a + sign)In “Type” change it to Linux.Select the Android partition
Now click “Browse” (may appear as Brower due to a typo)
Navigate to \efi\boot and select gummiboot32.efi
Give your boot a name in the “Description” box. Call it Android or something
Hit OK
and hit OK again.
You should now see your Android boot option added to the list.
Step 5: Configure android and get logged in with your Google account
Now in order to boot android, shut down windows and wait for a couple of seconds until your tablet has turned off,
Now press the power and the volume down key at the same time, and once the tablet has turned on release the power button but keep pressing down the volume down key.
You should now see a menu that says “Please select boot device:”
Keep pressing volume down until you have selected android, and hit the “start” key. (the key under the volume keys)
Wait for Android to boot.
After Android has booted, connect to a wifi network.
It might take a long time for the setup to get ready, please just wait. This is normal!
Skip all login steps, do not login with your google account!
After this is done you should be at your home screen.
Now open Root Explorer, its is included into the image.
Go to the folder storage, and go to USB3
It will ask you to confirm root permission.
After this, you should see your .apk file.
If you do not see the .apk file, try another folders like USB2, or USB1.
Install the .apk file, and accept verification.
DO NOT OPEN GOOGLE PLAY SERVICES AFTER THE INSTALLATION IS DONE. VERY IMPORTANT!! JUST CLICK DONE.
After the installation of the modified google services APK is complete, go to settings, scroll down and select “add account”
Log in with your Google account. You might see a lot of force closes, just ignore them.
It could take multiple tries to log in, but it should eventually work.
After login is done, the screen might glitch a bit and throw you back to the settings screen.
This is normal. Close any force closes that might pop up, just ignore them.
They will go away by themselves after all this is done.
After this is done, Google Play store should work and your tablet is operational!
Источник
Прошивка планшета ASUS Transformer Book T100TA
Перед вами подробная пошаговая инструкция по установке Windows на планшет ASUS Transformer Book T100TA. Нашей редакцией были выбраны наиболее подходящие способы по переустановке системы для этой модели ASUS.
Если данная инструкция результата не даст попробуйте доверить прошивку профессионалу. Напомним, что заводской версией системы планшета является — Windows 8.
1. Зарядите прошиваемый планшет на 100%.
2. Сохраняем с флешки, симкарты и памяти планшета все данные которые нельзя терять. Симку (если есть) можно вытащить.
3. Далее следуют два варианта:
• Скачиваем и скидываем на карту памяти или флешку(от 4 Гб) необходимую прошивку (установочную версию Windows), флешку установить в планшет. Подобрать и скачать прошивку можно здесь.
• Если есть докстанция с клавиатурой — хорошо, если нет то к USB-разъему прошиваемого планшета подключаем любую USB клавиатуру.
![]()


• Если в планшете не предусмотрен полноценный USB, то необходим еще и USB OTG кабель.
![]()

• Теперь включаем планшет и на подключенной к нему клавиатуре зажимаем кнопку Esc.
• Откроется BIOS планшета в котором необходимо выбрать диск, на котором размещена установочная система. Это та самая карта памяти или флешка, в каторую мы заранее скидывали установочную версию Windows. Обычно в BIOSе указан основной диск планшета, с которого загружаться сейчас ненужно.
• Далее сохраняем параметры, планшет перезагрузится и начнет установку Windows.
![]()


• Скачиваем и скидываем в отдельный диск на планшете или на карту памяти(от 4 Гб) необходимую прошивку (установочную версию Windows). Подобрать и скачать прошивку можно здесь.
• Запускаем файл установки системы из дистрибутива
![]()
4. Указываем раздел под виндовс или обновляем текущий.
![]()

![]()

5. В процессе установки планшет может пару раз перезагрузится — это нормально.
![]()

6. Установка завершена, настраиваем систему.
7. Готово. Если после загрузки уже установленной системы экран нереагирует на нажатия, значит в Windows не включена поддержка сенсора.
Кнопками клавиатуры выполняем переход по системе до нужного места (как мышкой).
Назначения клавиш:
Пробел — это выбор объекта
Стрелки — можно листать в списке
После этого Windows предоставит выбор метода ввода Перо и сенсорный ввод. Выбираем его и пользуемся.
| Подготовлено техническим отделом Планшеты.ру 23 сентября 2016 |
Внимание! Любые действия Вы выполняете на свой риск. Не следует делать переустановку системы без причины.
Источник


