- Android для orange pi lite
- Установка Android на Orange Pi PC
- Contents
- Android_For_Orange_Pi_v1.0
- Product details
- Further info
- Setting up, running and tweaking 4.2
- Android_for_orangepi_4.4_beta1
- Product details
- Important info!!
- Introduction
- Preparation & what you need
- Using PhoenixCard
- First boot with your Orange Pi
- A few other useful forum threads
- Comments
- DragonFace — editing software for Android images
Android для orange pi lite

Сообщение отредактировал stp101 — 30.06.18, 13:30
По схеме от разъёма питания подключение идёт напрямую к разъёмам USB (не к microUSB). Не стал искать блок питания, а использовал переходник Micro USB Female to USB Male Adapter.
Закатал в Windows 10 с помощью Etcher образ из Armbian_5.20_Orangepilite_Debian_jessie_3.4.112_desktop.7z.
Включил и подождал пару минут, пока отмигали светодиоды.
Подключил к отладочной консоли свисток USB-COM на FT2323RL (уровень сигналов 3.3 В), 115200 8N1
Установил разрешение экрана [email protected] HDMI
# h3disp -m 1080p60
Перегрузился
Проверил наличие поднятого wlan0
#ifconfig
Попробовал сканировать сеть
# iw dev wlan0 scan
В выхлопе без grep разглядел ssid роутера.
Для настройки WiFi сгенерировал ключ
# wpa_passphrase ssid_роутера пароль_роутера > /etc/wpa_supplicant/wpa_supplicant.conf
и вписал параметры для подъёма интерфейса
# nano /etc/network/interfaces
allow-hotplug wlan0
iface wlan0 inet dhcp
wpa-conf /etc/wpa_supplicant/wpa_supplicant.conf
После перезагрузки появилась сеть.
(Cначала, правда, прописал auto, но не приняло dhcp, хотя у роутера IP-адрес был выдан, а вот с allow-hotplug поднялось)

При попытке обновиться (apt-get upgrade после apt-get-update) десктопный Armbian 5.20 пытается дотянуться до 5.23, но вешается на компилении хедеров ядра. С серверным чуть по-легче, а WiFI по дефолту перед настройкой таки надо приподнять
# ip link set wlan0 up
В серверном после обновления ПО и перезагрузки отваливается WiFi и поднять не получается — оно перестает стартовать, при ручном поднятии типа есть, базу при скане эфира видит, но не коннектится. Пробовал перелить, настроить, ну и зафризить wpasupplicant — не помогло, статический IP тоже. Откатил на 5.20 десктоп.
Запитал от 12 В источника через понижающий DC/DC на MP1584, только предварительно сменил диод на SMC корпус — 30BQ40, ну и подстроечником выставил 5 В, подключал к 40-пин гребенке.
К процу и памяти приклеил радиаторы.
Попробовал OpenELEC-H3.arm-7.0-devel-20161026221158-r23113-g64b34b3-opilite.img.gz. Годная штука. Настроил вывод звука через HDMI — из монитора аудиовыход очень даже хорош. С видео пока только смотрел с youtube — цифирьку показывает 720 и не дает сменить, вроде только HD, но не уверен, потому как если поставить оригинальный размер в настройках показа (не youtube), фрейм уменьшается до HD. Но через его WiFi это и так героизм, IMHO. Наверно видео нужно смотреть в оффлайне. Пока не пробовал. Проверил с USB-Ethernet переходником, но не понял, как оно его подцепило — в настройках сети есть оба интерфейса, используется якобы проводной, а с оригинальным размером всё то же. В OpenELEC переключения на русский в экранной клаве не нашел. Предполагаю, что искал правильно и косяк на стороне дистра. Но в общем от OpenELEC впечатления положительные. Радиатор на проце очень горячий — пальцем держаться больно, хоть и не так, чтобы сразу ожог. Наверно градусов 60+, но как посмотреть в OpenELEC — не знаю
Сообщение отредактировал sensor_ua — 13.01.17, 01:50
Взял себе первым делом для просмотра видео с ютуба и прочего.ОС андрои,справляется с етим хорошо,даволен.
Есть такой вопрос
Кому удалось прикрутить пульт на офф. Андроид?
(Я не смог)
Как избавится от передергивания usb флешок после перезагрузки?
Поставил Armbian_5.20_Orangepilite_Debian_jessie_3.4.112_desktop.img
брал отсюда: https://dl.armbian.com/orangepilite/archive/
WiFi поднялся, работает стабильно.
Будет игрушка под тонкий клиент. Осталось только русифицировать.
Сообщение отредактировал phone.pavel — 27.01.17, 23:37
купил себе тож добавку к телеку
ставил опенэлек
все запустилось, вифи поднялся
после вечера тестирования и многократных зависаний оказалось что новая скоростная карта на 16гб ему не идет. замена на старый кингстон на 2гб от 2010г.в. его устроила идеально
заранее припасенная мышка тоже оказалось не нужна(хоть и заработала), т.к. телек поддерживает управление лайта с пульта
приклеил 1/4 алюминиевого радиатора от проца, лепестки радиатора длинные и распушил их в виде цветочка
запитал 5в вентилятор от 3,3в с пинов
плату поставил боком на этот вентилятор и зафиксировал витухой. вентилятор в итоге работает без малейшего шума
максимальный нагрев по опенэлек 35гр после просмотра 1080р фильма на 17гб. картинка не рвется, не рассыпается в квадраты
телек висит на стене, потому это чудо-юдо зажато между стеной и телеком
к плате прицепил внешний жесткий как хранилище дисков
шедшая в комплетке антенна вызвала тошнотное впечатление, т.к. выше 1,5мбит/с я на ней не выжал
седня на работе спаялся переходник на большую антенну, потестю вечером скорость
ЗЫ совсем забыл. имеющийся БП который был ранее не подошел. на нем лайт не стартовал.
зато прекрасно стартует на старом БП от наладонника ASUS и хар-ки и разьем прям эталонно подошли
Сообщение отредактировал Geram74 — 01.02.17, 12:20
Источник
Установка Android на Orange Pi PC

Запустить Andriod на микрокомпьютере Orange Pi очень просто. Однако сразу хочу подчеркнуть, что способ подготовки флеш-карты для Andriod отличается от того, что предлагается для запуска Ubuntu или других систем.
Минимальная комплектация необходимого оборудования:
- Микрокомпьютер Orange Pi. Мы использовали плату серии Orange Pi PC, но подойдет любая.
- Micro-SD карта. Желательно 10 класса. Мы использовали карту на 8 Гб, при этом Android после установки показал размер внутренней памяти 4.9 Гб.
- Блок питания 5V 2A. Платы Orange Pi имеют отдельный разъем питания под разъем 3.5 мм. Через USB, как например Raspberry PI запитать микрокомпьютер не получится.
- Телевизор или монитор с HDMI входом и кабель HDMI.
- Мышь USB.
И так, по порядку.
Для подготовки образа мы использовали ПК под операционной системой Windows 7.
Скачиваем образ Android для Orange Pi по ссылкe с Google диска.
Скачиваем программу PhoenixCard по ссылкe с Google диска.
Образ скачивается в архиве, его необходимо распаковать. После распаковки получаем файл-образ с именем sun8iw7p1_android_dolphin-p1_uart0.img
Программа PhoenixCard не требует установки и запускается прямо из каталога. При помощи этой программы мы запишем образ на SD карту. Эта единственная программа, которая корректно размещает образ Android на флеш-карте.
Запускаем программу PhoenixCard (файл PhoenixCard.exe в каталоге программы). Если программа не запускается, перенесите каталог с программой в корень диска.
Подключаем флеш-карту к компьютеру.
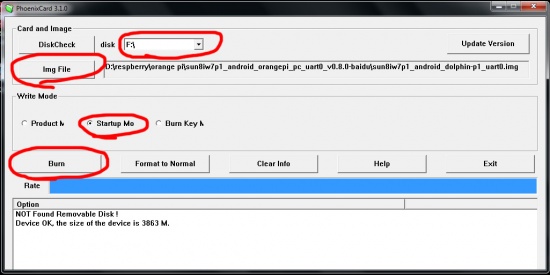
В открывшемся окне программы программе выбираем disk — букву диска вставленной флеш-карты. У нас флешка определилась под буквой F.
Нажимаем кнопку ImgFile и выбираем распакованный образ sun8iw7p1_android_dolphin-p1_uart0.img.
Обязательно устанавливаем галочку в положение Startup Mode.
Нажимаем кнопку Burn. Начнется процесс переноса образа на диск. Этот процесс может занять несколько минут, при этом прогресс-бар может замереть на одном месте, создавая впечатление зависания. Обязательно дождитесь окончания операции.
Теперь можно извлечь флеш-карту из компьютера и вставить ее в карт-ридер микрокомпьютера, который расположен с изнаночной стороны платы. Подключаем микрокомпьютер к телевизору через HDMI кабель, подключаем USB мышь. Последним подключаем питание к микрокомпьютеру.
Если вы все сделали правильно, через несколько секунд на экране телевизора появится логотип Allwinner H3, что означает, что происходит загрузка андроида.
Спустя полминуты загрузится Android версии 4.4.2. Сразу после загрузки стоит поменять язык на русский (или любой), и мы обрадовались, что он есть в списке выбора. По умолчанию установлен китайский язык и предустановлены разные китайские приложения.
Некоторые данные, показываемые в настройках:
- ОЗУ: 1Гб;
- Внутренняя память 5 Гб (с учетом используемой флеш-карты 8 Гб);
- Имеются настройки для WiFi и Bluetooth. Думаю, их можно подключить к USB, которых осталось 2 свободных (1 используется под мышь).
- В настройках экрана можно выбрать HDMI output mode: 720P или 1080P
К нашему удивлению мы увидели встроенную поддержку Ethernet кабеля, чем и воспользовались. Мы подключили кабель от роутера нашей локальной сети и тут же получили доступ в интернет. В установленный андроид оказалась встроена поддержка Google Play, и можно сразу скачать необходимые приложения.
Звук транслируется на телевизор так же по HDMI.
Нам было интересно попробовать микрокомпьютер в качестве приставки для цифрового телевидения. Для андроида есть очень интересное приложение Peers.TV, используя которую можно просматривать большое количество русскоязычных каналов в хорошем качестве. Приложение можно скачать с Google Play. Приложение вполне себе хорошо работает, каналы показываются без пауз в полноэкранном режиме. При желании можно вовсе отказаться от кабельного телевидения.
Очень порадовала встроенная поддержка мыши. Левая кнопка работает как касание пальцем, правая как кнопка «Назад». Колесико прокручивает страницы. Нажатие на колесико работает как кнопка вызова настроек.
Как итог, Orange Pi прекрасно работает под управлением Android.
Источник

Contents
Android_For_Orange_Pi_v1.0
Product details
According to its download page, this file was last updated on: 2015-01-06
Unzipped image file size is 234MB (at the time of writing)
Further info
This image is a Orangepi product and we are actively developing it. Look in our forum
for more information about it, including hints and tips and tricks and loads of advice from those in the know. Modified stock images containing XBMC and other tweaks/less bloatware are also available (from forum user mattrix).
Setting up, running and tweaking 4.2
This section urgently needs some input in the space below. Please help if you can and share your knowledge and experiences of setting up, running and tweaking Android’s Android 4.2.
Android_for_orangepi_4.4_beta1
Product details
Current image at time of writing is 589MB in size (unzipped file).
Version number is «wing_k70-eng 4.4 KRT16S 20140807 test-keys» according to DragonFace.
Make sure that you also download the accompanying ReadMe.txt file that is in the same folder as the image.
Important info!!
Please note that this Android_for_orangepi_4.4_beta1 image is not a Orangepi product and only available from an external website with which we are not affiliated or connected to in any way. We therefore provide no support for this image. However, discussions about it in our forums are freely encouraged.
Introduction
This section of the Wiki for 4.4 Android has been written by me, a relative newcomer to the B-Pi community and very inexperienced concerning all things Linux. (But a bit more knowledge of Android as I’ve had a 4.1.1 tablet PC for about a year, and even at one point got heavily into learning how to flash it with custom ROMs.)
It is not meant to be a definitive guide or the final version. Some of the information in it may be useful to some people but maybe not to others. Just get out of it what you can. I hope the moderators and experienced forum users will update it and improve upon it ASAP.
If you all think it’s too long, perhaps someone can make a shortened/abridged version and we can then have this full guide as a downloadable PDF file via a link from this page.
Preparation & what you need
Use only branded Class 10 8GB SD cards. (Caution: there are many fake ‘branded’ SD cards out there, e.g. SanDisk and a whole host of others. What you see on the label is not necessarily what you get.) For best results, have a variety of different brands on hand. They are readily available and cheap. For example, a well-known and respectable high street computer chain in my area currently has Nikon Class 10 8GB cards for 5 Euros each.
Format your card for very the first time (but only this time) using SD Formatter – see http://www.orangepi.org/Docs/SDcardinstallation.html for more details. After this, we will only be using PhoenixCard for image-writing operations. (However, some people have reported better and more consistent results when using PhoenixCard if they first use SD Formatter. It seems a bit superfluous as Phoenix has its own very weird formatting setup to give multiple partitions, but every computer system and card reader is different so it may be worth a try if you are experiencing difficulties.)
Tip — in general, when formatting and/or burning any image for your Pi, either on your Linux or Windows computer, only have your main hard drive running and only have your SD card inserted in your card reader. Disconnect all other hard drives and SD cards and USB devices. It is very easy to accidentally format or write to the wrong drive and serious hardware damage and/or data loss can occur. You have been warned.
Download the latest 4.4 image from the external website. Unzip it on your desktop or in a named folder.
Using PhoenixCard
To burn your image onto the card, some software called PhoenixCard is needed for the SD Card setup for all Android images. (Do not simply copy the .img file itself to the card.) The current version at the time of writing is V310_20130618.
(This program currently only works in Windows. Versions for other OSs such as Linux are temporarily unavailable — sorry.)
Note: do not try using SD Formatter & Win32 Disk Imager (or the command dd on a Linux-based computer) on any Android image as you do for Orangepi’s Linux images – that method just won’t work!
To get the PhoenixCard software, try any of these links:
Install using ‘Run as Administrator’.
Then start the program (also with ‘Run as Administrator’ using the icon PhoenixCard.exe). Remember to click the ‘Update Version’ button (in the top right of the window) the very first time you run it, and also as often as possible afterwards, before you do any SD card burning.
Please refer to http://www.orangepi.org/Docs/SDcardinstallation.html for more detailed instructions and screenshots.
But in summary, it goes something like this:
Press ‘Update Version’.
Choose the destination drive letter for the SD card. (Check and double check this is correct!)
Tip: In some screenshots that you might have seen for PhoenixCard, the main information window says at this stage «Device OK, the size of the device is XXXXX M». However, depending on your system and if it is an internal/external or single/multi-card reader, you may instead get a message such as «Find 4 device, Please select correct the one» [sic].
Choose the image file.
In ‘Write Mode’ click the radio button ‘Startup’ and click the OK of the pop-up window.
Click ‘Format to Normal’. Wait a few seconds. Click the OK of the window.
Click ‘Burn’ and wait patiently. The process normally takes less than 5 minutes.
DO NOT DISTURB THE CARD OR REMOVE IT OR CLOSE THE PHOENIXCARD WINDOW OR TURN OFF THE COMPUTER DURING THIS PROCEDURE.
You will see in the information pane various sections being written e.g.
and then finally [Disk check]
The concluding message is ‘Burn End’ and the progress bar will then have reached its full extent on the right hand side.
Close the program.
Remember to first soft-eject the card from your card reader using the ‘Safely Remove Hardware’ icon in the system tray/notifications area (bottom right of the screen, just to the left of the clock), and wait for the confirmation message ‘The device can now be safely removed from the computer’ BEFORE you PHYSICALLY remove the card. Data corruption and damage can otherwise occur which will either kill it or seriously shorten its lifespan.
First boot with your Orange Pi
As usual with the Pi, first boots are always longer than subsequent ones.
Insert into your Pi the following:
— your newly burned SD card
— a wired RJ45 Ethernet cable (if you already downloaded the accompanying ReadMe file from the same location you got the image, you will know that this beta build does not support ANY WiFi dongles yet)
— a USB keyboard (optional, as you can use the on-screen Android keyboard but unless you have very good mouse skills, you may find this laborious and extremely tedious)
— a 5 Volt/2 Amp power supply (which is plugged into a switched wall socket) into the DC In socket. Do not switch it on yet. If your PS is only 1 Amp or even 1.5 Amp, it may not be sufficient. (You may also need a second PSU – more on this later.)
— an HDMI-HDMI cable into your TV or monitor
A few words about cables for video output. I found that I was able to boot Android 4.2 via the AV video composite (the yellow RCA/phono plug on the B-Pi) into my old analogue TV. In fact, I had no other option in the beginning as that was the only way I could get it to work. But the colours and resolution were unsatisfactory and difficult to work with.
At that time I was using an HDMI-DVI adaptor cable into my Dell PC monitor. It was fine for all Linux images but for some reason 4.2 and 4.4 Androids had a problem with it, and I was unable to find which settings in sysconfig1.lhs using an image editing program called DragonFace would resolve the issue. Also, any new amended & saved images from DF would then cause PhoenixCard to crash during the burning process.
However, since that time I successfully booted up 4.2 using that very same cable but using another monitor (make and model escapes me for now but it was fairly new, unlike the Dell). It’s possible that 4.4 would have worked as well if I had been a bit more patient and waited a while. So it’s worth experimenting with different combinations of monitors and HDMI-DVI adaptor cables. (Take your Pi and a known-to-be-working Android card to your local friendly computer store and ask to try them out. It may be the first time they have ever heard of or even seen this SBC!!)
So my advice is — if possible — only use an HDMI-HDMI connection. (Make sure the plug is FULLY and FIRMLY pressed into the Pi and at the other end too.) If you are sharing your monitor with your PC as I am (just switching between the sources as needs be), it might be worth (at least for the first few attempts) to shut down the computer and disconnect its video cable (in my case VGA). Otherwise the screen may constantly try reverting back to a working/active source.
Set the source mode of your monitor to ‘HDMI’. As the Pi is currently switched off, it will show no input and the screen’s ‘On’ LED might flash or even go off.
Switch on the Power Supply at the wall to start the Pi. If there is no red LED on the Pi, press the Power button for about 2 seconds. If there is a red LED, but only for a short while and it goes faint or flickers or goes off, press the Power button, again for about 2 seconds.
Unlike Linux distros for the Pi, the green LED will NEVER light up to show disk activity as this function seems to have been programmed out. Likewise for 4.2. (Can someone – preferably one of the developers – explain why this is so? It doesn’t make any sense to me at all!!)
As it states in the aforementioned ReadMe file, for the very first boot you may need a second power supply plugged into the OTG socket. As soon as it reaches the main screen, you can disconnect this, and it should not be required for any subsequent boots. In my case, I didn’t have to use a second PSU.
Now here’s the thing. Android 4.2 will immediately give you on booting up the AllWinner A20 logo, then the green Android screen, and then the white-on-black Android boot animation, all within about the first 10 seconds.
Not with 4.4!! There is a definite time lag (about 20-30 secs, maybe longer) until your monitor will even register an incoming HDMI signal. (Is that bad programming or what. It doesn’t happen like that on a real tablet PC.) Then after another delay of maybe 10-20 secs (or more) you will hopefully see the boot animation which is lots of coloured balls circling and orbiting around the centre of the screen. You should also see the blue Ethernet LED coming on and flashing.
Eventually you will get to the first setup screen. Be aware that there is a LOT of processing going on in the background and it may not be all that responsive. In fact there may be a lot of error messages such as ‘XXX isn’t responding – Wait or Cancel’. Be patient and press ‘Wait’ and let it do its thing.
Skip the WiFi set up screen. As already stated, it doesn’t work in this build, only wired Ethernet does.
You may have a problem with Ethernet not working at first. Go to Settings>>>More>>>Use Ethernet, uncheck the box and then check it again.
To shut down, press the Power button for about 3 seconds (just like you would if it was a tablet PC) and you will see in the centre of the screen the ‘Shutting Down’ window.
However, a better and more computer-friendly way to do this is to install from Play the Store the free app ‘Quick Boot (Reboot)’ from Sirius Applications Limited but this requires root access and (like forum user dlanor) I’m still struggling to ascertain if this build really is rooted or not. ES3 File Explorer says it is, so does the free app ‘Root Checker’ from joeykrim, but SuperSU from Chainfire says not as it will not update itself without going into an endless loop.
After shut down, even after the monitor senses no HDMI signal, the Pi still seems to be ‘alive’ for quite a while, with the blue Ethernet LED and the red Power LED still on. Don’t be in too much of a hurry to turn off the power.
A few other useful forum threads
First announcement of 4.4 being available: related link
mattrix’s 4.2 modified stock (Mod-Stock) image: related link
An excellent fix from dlanor (for 4.2 — not sure if this works in 4.4 as well): related link
mattrix’s squashfs images for BerryBoot (Linux, so therefore unrelated to 4.2 or 4.4, but still extremely useful): related link
Comments
Please comment on this WIP (work in progress) Wiki page
—Roses2at (talk) 19:22, 2 October 2014 (CST)
DragonFace — editing software for Android images
Please contribute to this section of the Wiki if you have extensive experience of using DragonFace.
Software downloadable from external link
The only thing I can add is that apparently only version 2.1.2 (which is what you will get from the link above) seems to work with both of the above-mentioned Android images. Do not allow the software to update itself to a newer version, otherwise any newly saved images may cause PhoenixCard to crash during the burning process.
See this forum thread for further details: related link (Post #1 from mattrix — how to use DF/Post #6 from dlanor — about the update)
Источник


