Представленный материал является неофициальным, в случае неудачных действий и/или гибели аппарата автор ПО и Администрация ресурса ответственности не несут! Все действия производятся на Ваш страх и риск!
Последнее обновление в шапке: 17.04.2011
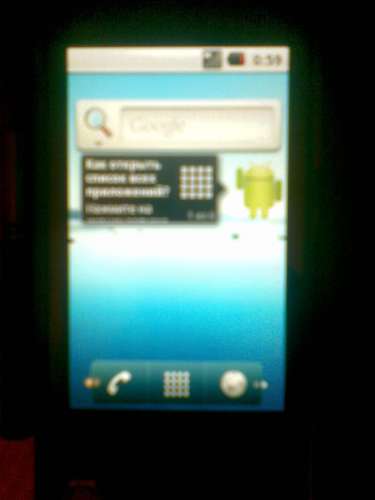
Android 1.5 портировали на www.andromnia.net, они проделали огромную работу в этом направлении, но на данный момент проект заглох. Портировал Android 2.1 и Android 2.2 я (vl(@)d). Дальнейшие эксперементы планирую проводить на Android 2.2.
Инструкция по установке Android OS на наш девайс:
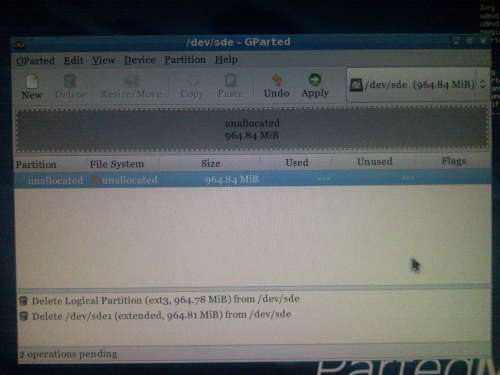
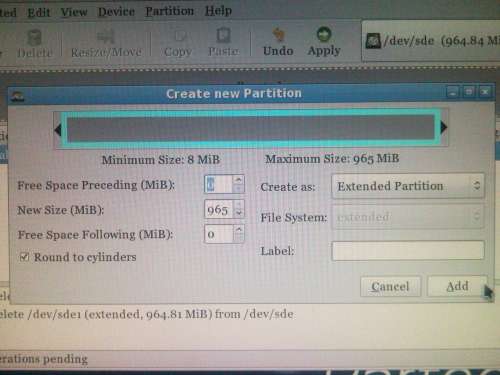
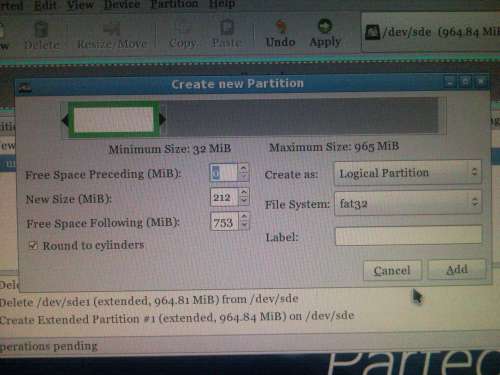
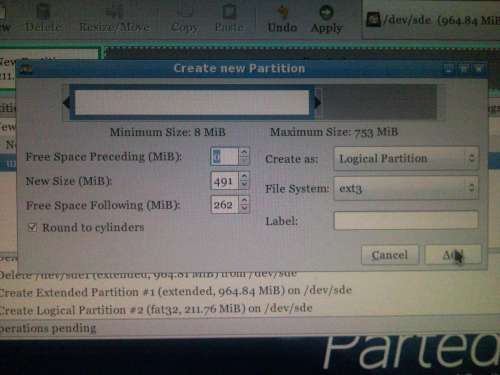
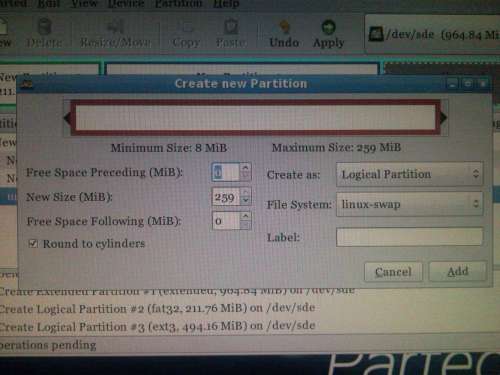
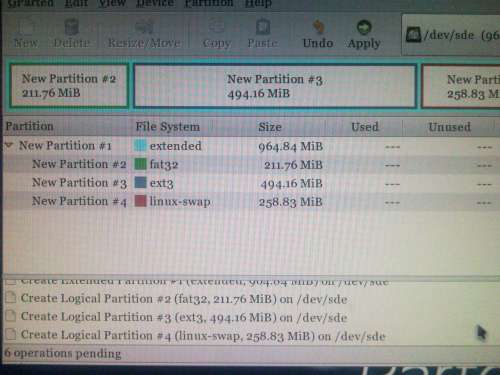
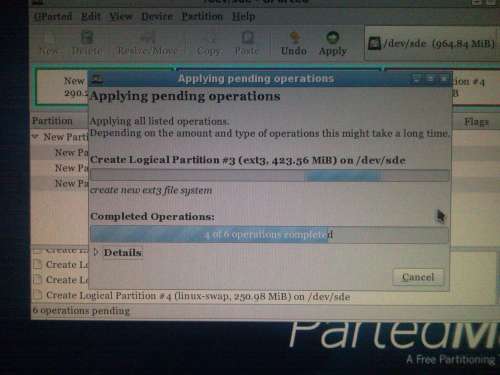
1) Берем любой linux (можно LiveCD) 2) Берем нашу флешку (я использую на 2 гб, на ее примери и опишу установку) 3) Запускаем linux и открываем утилиту для работы с жесткими дисками и флешками (GParted), выбираем нашу флешку и удаляем с ней все разделы. 4) Теперь создаем новый Extended раздел на всю карточку, далее создаем новый Partition раздел в Fat32 размером 500 мб, за тем создаем второй Partition раздел в ext3 размером 900 мб, и создаем третий Partition раздел linux-swap. Все теперь форматируем флешку.
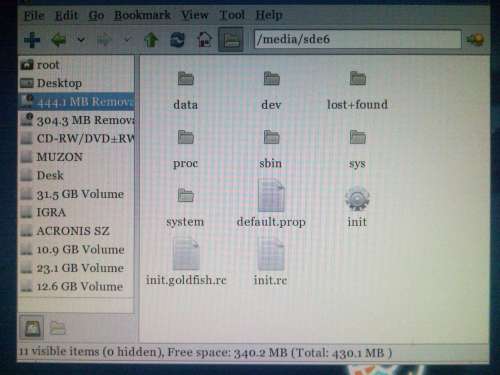
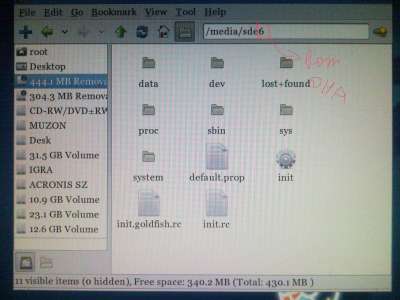
5) В корень раздела ext3 распаковываем файлы архива с нужным Андройдом. Потом размотируем и извлекаем флешку. 6) Распаковываем архив с haret в память телефона. 7) Запускаем через проводник haret.exe и пользуемся андройдом!
У кого не получилось по моей инстрекции есть видео инструкция от Touch’ик Видео или от N1x0N Форматироование
Насчет настройки адреса загрузки в конфиге (я смотрю это вызывает вопросы): root=/dev/mmcblk0p1 — вот эта строка означает скокого раздела памяти будит вестись загрузка. Менять там можно только цифры. Цифра (0) — означает, что загрузка будет вестись с флеш-карты, можно изменить на (1), тогда загрузка будит проходить с внутреней 8/16 гб памяти. Последняя цифра (1) ознчает с какого раздела, выбранной памяти, будит проходить загрузка, может быть любая цифра кроме (0). И в linux хорошо видно эту цифру в диспечере файлов, когда заливаешь файлы на флешку, там у раздела пишиться три буквы и конце цифра, вот ее и надо в конфиг ставить.
Сообщение отредактировал 5[Strogino] — 02.08.10, 10:34
Update (thanks to z720 for getting the resolution right for debugging) we can now boot into a shell. Which is unreachable because of lack of input (keyboard)
Complete steps for booting the android linux kernel (updates follow as we progress):
Select: GNU/Linux (and then Advanced Packages / IA32 GNU/Linux TAR)
Download and Unpack Cross Compiler (www.codesourcery.com/sgpp/lite/arm/portal/package3686/public/arm-none-eabi/arm-2008q3-66-arm-none-eabi-i686-pc-linux-gnu.tar.bz2)
Change in Makefile:
Adjust resolution (Thanks to z720!) open the /arch/arm/mach-pxa/hpipaq214-lcd.c and change the folowing parameters:
Compile kernel: make Image
The compiled and with Haret runable image will be in «arch/arm/boot/Image»
Download Haret (I used the PXA312 version from Oliver Ford from www.handhelds.com)
Change Haret Settings (default.txt)
If you copy the compiled Image to the directory in which you placed Haret, you should be off, the kernel will boot.. Mind you, this is just the booting kernel, the hard work will start from here! [attachment=»183802:Photo0201.jpg»]
Thanx for the picture z720!
Cross Compile busybox with static linking:
Change Makefile to have the cross compiler active again:
Make the static busybox (make menuconfig first and disable all non wanted busybox commands, leave ash, init, rclinux and telnetd active for later use!):
# LDFLAGS=»—static» CFLAGS=»—static» make # file busybox busybox: ELF 32-bit LSB executable, ARM, version 1 (SYSV), statically linked, stripped
Make the initrd.gz ramdisk fromout the initrd directory # find . | cpio —create —‘format=newc’ | gzip >../initrd.gz
Copy it to the directory in which the kernel is placed.
Change default.txt cmdline:
Boot and see why we need a keyboard now Next step is maybe auto configure network and start telnetd in the ramdisk
Еще парочка полезностей:
I’ve got some news for you. First off, let me thank tmzt, without his help I couln’t have accomplished anything of this. So thank you tmzt, and you’re most than welcome to post on this thread.
*New values for pxafb_mode_info structure. No pixclock confirmation for the moment.
*No more flashing nor vibration while booting. This should avoid some potential damage.
*We can now mount an ext2 partition on «my storage». Not in the external memory card yet.
New values for pxafb_mode_info structure.
Open arch/arm/mach-pxa/hpipaq214-lcd.c , and chage «struct pxafb_mode_info» to look like this:
How did we get this?: tmzt asked me to paste this code on haretconsole:
. and a program (decoder?) I don’t know about, he determined the correct margin values for pxafb_mode_info. I think it should have given some info about the pixclock, but unfortunately it didn’t. tmzt suspects this info may be elsewhere in the memory.
No more flashing nor vibration while booting.
Open arch/arm/mach-pxa/hpipaq214.c , and change hpipaq214_init to look like this:
//add the various platform devices platform_add_devices(hpipaq214_devices, ARRAY_SIZE(hpipaq214_devices)); */ >
Open arch/arm/mach-pxa/hpipaq214-lcd.c , and change hpipaq214_init_lcd to look like this:
void __init hpipaq214_init_lcd(void) < /* int err;
err = gpio_request(gpio_lcd_setup, «LCD setup gpio»); if(err) < printk(«Unable to register LCD setup gpio (%i)\n»,gpio_lcd_setup); gpio_lcd_setup = -1; >else < gpio_direction_output(gpio_lcd_setup, 1); //keep it on for now! > */ set_pxa_fb_info(&hpipaq214_lcd_info); >
What’s this for?: As you can see, we’re commenting out a lot of hardware initialization. This will prevent potentially damaging the omnia and let us focus on what we need for the moment. The mmc initialization is needed for the next step, so it’s left uncommented. With the above changes I’m finally able to boot from the «my storage» device, and I don’t quite recall whether I’m able to boot from the card as well.
We can now mount an ext2 partition on «my storage».
Connect your omnia to the computer using the usb cord, and in winmo select «my storage» as usb connection, instead of activesync or the external card.
Make a backup of the complete «my storage» device on your computer. In my computer this was detected as /dev/sde, with /dev/sde1 being an extended partition, and /dev/sde5 being a logical vfat partition. I made the backup using dd, like this: «dd if=/dev/sde of=/home/oxi/mybackup.bin». This kind of backup (a whole device) will ensure you’re keeping not only the partitions content, but the partition table as well, so you should be ok if you ever want to restore. This took around an hour to complete for my 16gb mem. Maybe you can speed up the process by using high blocksize value in dd.
Make the new partition/s on the «my storage» device. You may want to use fdisk or cfdisk for this. Since the default vfat partition is logical, I kept the extended partition, created a new logical 2gb ext2 partition at the end and then created a new logical vfat partition at the beginning. I did this so to prevent possible problems if the omnia/winmo couldn’t rightly handle primary partitions on this memory. Now I must say I’m not that sure I did the right thing. Now winmo is able to see the ext2 partition and depicts it as «my storage2»; also, my computer will mount it as an vfat if no type is specified. So I wouldn’t recommend this partition schema. I will be repartitioning the «my storage» device to have just two primary partitions, the first one being vfat, and the other one ext2, ASAP, because I don’t really like all this behaviour. But I can’t recommend this second schema as I have not tried it yet. Note that the default vfat partition is of type: 0b, not the usual 06.
Edit: Of course, create the new filesystems on the partitions.
I have now tried the second schema, that is, creating two primary partitions. Results are exactly the same. For some strange reason, when you disconnect the usb cord, winmo has the bad habbit of writing two files in each partition, no matter if it’s an ext2 partition, winmo will write them to it in FAT format. This apparently doesn’t pose any problems, but just to be on the safe side I run a fsck.ext2 on the partition everytime before I mount it on my computer.
You can now deploy a busybox(or whatever) on the ext2 partition. Just set the cmdline of default.txt accordingly, by setting the proper init parameter, and setting the root to your ext2 partition. If you’re using an extended, and logical partitions:
If you’re using primary partitions:
Note that if you have an external memory card inserted, you will need to use mmcblk1 to access the «my storage» device, because even if we can’t use yet the external card, it is detected and named as mmcblk0. If no card is inserted then the «my storage» device will be named mmcblk0, and the examples above should work for you.
Edit: Set rootdelay parameter on cmdline to an appropriate value, so to give time for the memories to be detected. A value of 10 is more than enough.
Now I feel we should be directing our efforts on trying to establish a connection with the computer, as a means of communicating with the device without having to constantly reboot, etc. Maybe start by uncommenting the usb initialization related stuff and set up a telnetd or ssh in a busybox.
I hope I’m not leaving anything behind.
Once again, thanks go to tmzt
Needless to say, I don’t take any responsibility for any damage, data loss, etc. you may get by using this info.
Сообщение отредактировал = Woland = — 23.06.09, 14:40
Источник
Android для samsung witu
Представленный материал является неофициальным, в случае неудачных действий и/или гибели аппарата автор ПО и Администрация ресурса ответственности не несут! Все действия производятся на Ваш страх и риск!
Последнее обновление в шапке: 17.04.2011
Android 1.5 портировали на www.andromnia.net, они проделали огромную работу в этом направлении, но на данный момент проект заглох. Портировал Android 2.1 и Android 2.2 я (vl(@)d). Дальнейшие эксперементы планирую проводить на Android 2.2.
Инструкция по установке Android OS на наш девайс:
1) Берем любой linux (можно LiveCD) 2) Берем нашу флешку (я использую на 2 гб, на ее примери и опишу установку) 3) Запускаем linux и открываем утилиту для работы с жесткими дисками и флешками (GParted), выбираем нашу флешку и удаляем с ней все разделы. 4) Теперь создаем новый Extended раздел на всю карточку, далее создаем новый Partition раздел в Fat32 размером 500 мб, за тем создаем второй Partition раздел в ext3 размером 900 мб, и создаем третий Partition раздел linux-swap. Все теперь форматируем флешку.
5) В корень раздела ext3 распаковываем файлы архива с нужным Андройдом. Потом размотируем и извлекаем флешку. 6) Распаковываем архив с haret в память телефона. 7) Запускаем через проводник haret.exe и пользуемся андройдом!
У кого не получилось по моей инстрекции есть видео инструкция от Touch’ик Видео или от N1x0N Форматироование
Насчет настройки адреса загрузки в конфиге (я смотрю это вызывает вопросы): root=/dev/mmcblk0p1 — вот эта строка означает скокого раздела памяти будит вестись загрузка. Менять там можно только цифры. Цифра (0) — означает, что загрузка будет вестись с флеш-карты, можно изменить на (1), тогда загрузка будит проходить с внутреней 8/16 гб памяти. Последняя цифра (1) ознчает с какого раздела, выбранной памяти, будит проходить загрузка, может быть любая цифра кроме (0). И в linux хорошо видно эту цифру в диспечере файлов, когда заливаешь файлы на флешку, там у раздела пишиться три буквы и конце цифра, вот ее и надо в конфиг ставить.
Сообщение отредактировал 5[Strogino] — 02.08.10, 10:34
Update (thanks to z720 for getting the resolution right for debugging) we can now boot into a shell. Which is unreachable because of lack of input (keyboard)
Complete steps for booting the android linux kernel (updates follow as we progress):
Select: GNU/Linux (and then Advanced Packages / IA32 GNU/Linux TAR)
Download and Unpack Cross Compiler (www.codesourcery.com/sgpp/lite/arm/portal/package3686/public/arm-none-eabi/arm-2008q3-66-arm-none-eabi-i686-pc-linux-gnu.tar.bz2)
Change in Makefile:
Adjust resolution (Thanks to z720!) open the /arch/arm/mach-pxa/hpipaq214-lcd.c and change the folowing parameters:
Compile kernel: make Image
The compiled and with Haret runable image will be in «arch/arm/boot/Image»
Download Haret (I used the PXA312 version from Oliver Ford from www.handhelds.com)
Change Haret Settings (default.txt)
If you copy the compiled Image to the directory in which you placed Haret, you should be off, the kernel will boot.. Mind you, this is just the booting kernel, the hard work will start from here! [attachment=»183802:Photo0201.jpg»]
Thanx for the picture z720!
Cross Compile busybox with static linking:
Change Makefile to have the cross compiler active again:
Make the static busybox (make menuconfig first and disable all non wanted busybox commands, leave ash, init, rclinux and telnetd active for later use!):
# LDFLAGS=»—static» CFLAGS=»—static» make # file busybox busybox: ELF 32-bit LSB executable, ARM, version 1 (SYSV), statically linked, stripped
Make the initrd.gz ramdisk fromout the initrd directory # find . | cpio —create —‘format=newc’ | gzip >../initrd.gz
Copy it to the directory in which the kernel is placed.
Change default.txt cmdline:
Boot and see why we need a keyboard now Next step is maybe auto configure network and start telnetd in the ramdisk
Еще парочка полезностей:
I’ve got some news for you. First off, let me thank tmzt, without his help I couln’t have accomplished anything of this. So thank you tmzt, and you’re most than welcome to post on this thread.
*New values for pxafb_mode_info structure. No pixclock confirmation for the moment.
*No more flashing nor vibration while booting. This should avoid some potential damage.
*We can now mount an ext2 partition on «my storage». Not in the external memory card yet.
New values for pxafb_mode_info structure.
Open arch/arm/mach-pxa/hpipaq214-lcd.c , and chage «struct pxafb_mode_info» to look like this:
How did we get this?: tmzt asked me to paste this code on haretconsole:
. and a program (decoder?) I don’t know about, he determined the correct margin values for pxafb_mode_info. I think it should have given some info about the pixclock, but unfortunately it didn’t. tmzt suspects this info may be elsewhere in the memory.
No more flashing nor vibration while booting.
Open arch/arm/mach-pxa/hpipaq214.c , and change hpipaq214_init to look like this:
//add the various platform devices platform_add_devices(hpipaq214_devices, ARRAY_SIZE(hpipaq214_devices)); */ >
Open arch/arm/mach-pxa/hpipaq214-lcd.c , and change hpipaq214_init_lcd to look like this:
void __init hpipaq214_init_lcd(void) < /* int err;
err = gpio_request(gpio_lcd_setup, «LCD setup gpio»); if(err) < printk(«Unable to register LCD setup gpio (%i)\n»,gpio_lcd_setup); gpio_lcd_setup = -1; >else < gpio_direction_output(gpio_lcd_setup, 1); //keep it on for now! > */ set_pxa_fb_info(&hpipaq214_lcd_info); >
What’s this for?: As you can see, we’re commenting out a lot of hardware initialization. This will prevent potentially damaging the omnia and let us focus on what we need for the moment. The mmc initialization is needed for the next step, so it’s left uncommented. With the above changes I’m finally able to boot from the «my storage» device, and I don’t quite recall whether I’m able to boot from the card as well.
We can now mount an ext2 partition on «my storage».
Connect your omnia to the computer using the usb cord, and in winmo select «my storage» as usb connection, instead of activesync or the external card.
Make a backup of the complete «my storage» device on your computer. In my computer this was detected as /dev/sde, with /dev/sde1 being an extended partition, and /dev/sde5 being a logical vfat partition. I made the backup using dd, like this: «dd if=/dev/sde of=/home/oxi/mybackup.bin». This kind of backup (a whole device) will ensure you’re keeping not only the partitions content, but the partition table as well, so you should be ok if you ever want to restore. This took around an hour to complete for my 16gb mem. Maybe you can speed up the process by using high blocksize value in dd.
Make the new partition/s on the «my storage» device. You may want to use fdisk or cfdisk for this. Since the default vfat partition is logical, I kept the extended partition, created a new logical 2gb ext2 partition at the end and then created a new logical vfat partition at the beginning. I did this so to prevent possible problems if the omnia/winmo couldn’t rightly handle primary partitions on this memory. Now I must say I’m not that sure I did the right thing. Now winmo is able to see the ext2 partition and depicts it as «my storage2»; also, my computer will mount it as an vfat if no type is specified. So I wouldn’t recommend this partition schema. I will be repartitioning the «my storage» device to have just two primary partitions, the first one being vfat, and the other one ext2, ASAP, because I don’t really like all this behaviour. But I can’t recommend this second schema as I have not tried it yet. Note that the default vfat partition is of type: 0b, not the usual 06.
Edit: Of course, create the new filesystems on the partitions.
I have now tried the second schema, that is, creating two primary partitions. Results are exactly the same. For some strange reason, when you disconnect the usb cord, winmo has the bad habbit of writing two files in each partition, no matter if it’s an ext2 partition, winmo will write them to it in FAT format. This apparently doesn’t pose any problems, but just to be on the safe side I run a fsck.ext2 on the partition everytime before I mount it on my computer.
You can now deploy a busybox(or whatever) on the ext2 partition. Just set the cmdline of default.txt accordingly, by setting the proper init parameter, and setting the root to your ext2 partition. If you’re using an extended, and logical partitions:
If you’re using primary partitions:
Note that if you have an external memory card inserted, you will need to use mmcblk1 to access the «my storage» device, because even if we can’t use yet the external card, it is detected and named as mmcblk0. If no card is inserted then the «my storage» device will be named mmcblk0, and the examples above should work for you.
Edit: Set rootdelay parameter on cmdline to an appropriate value, so to give time for the memories to be detected. A value of 10 is more than enough.
Now I feel we should be directing our efforts on trying to establish a connection with the computer, as a means of communicating with the device without having to constantly reboot, etc. Maybe start by uncommenting the usb initialization related stuff and set up a telnetd or ssh in a busybox.
I hope I’m not leaving anything behind.
Once again, thanks go to tmzt
Needless to say, I don’t take any responsibility for any damage, data loss, etc. you may get by using this info.
Сообщение отредактировал = Woland = — 23.06.09, 14:40
 andromnia.0.32.zip ( 29.25 МБ )


