- Android Certificate: Generate, Sign And Verify An Apk App
- Looking At A Decompile APK File
- Generating An Android Certificate
- Method 1:
- Method 2:
- Method 3:
- Signing An Android Applicaiton
- Verifying An Android Application
- How to Download and Install a PKCS#12 onto Your Android Device
- How to Download a Certificate onto Your Android Device
- Step 1 — Open Certificate Pick Up Email on Android Device
- Step 2 — Enter Certificate Pick-Up Password
- Step 3 — Create a PKCS#12 Passphrase
- Step 4 — Download the Certificate onto Your Device
- Step 5 – Name Your Certificate
- How to Add a Certificate to Your Android ‘Device Credentials’
- Step 6 — Navigate to Settings > Security
- Step 7 — Locate Your Downloaded Certificate File
- Step 8 — Enter Your PKCS#12 Passphrase
- Step 9 — Adjust Certificate Settings
- Анализ трафика Android-приложений: обход certificate pinning без реверс-инжиниринга
- Что такое certificate pinning?
- Обход certificate pinning
Android Certificate: Generate, Sign And Verify An Apk App

Apk signing has been a part of Android from the beginning of the Android evolution, and android requires all Apks should be signed before it can be installed on the device, There have been numerous articles regarding on how to generate a key and also how to sign an Apk, but we will be looking at it from a Security Perspective, After you decompile or reverse-engineer an Apk file, What file should you look into, To get more info about the Developer who originally sign the app.
Looking At A Decompile APK File
After you unzip the file or using apktool, depending on how you decompile the file, if you unzip the file, The file structure will look like this.
We are looking at the META-INF folder,
Looking at a decompile Apk using Apktool, It includes the certificates details about the developer and the type of hashing algorithm used and so on in the original folder and checking the META-INF folder.
Using keytool to check for the certificate while you are still currently in the META-INF folder.
depending on the name of your certificate alias name, You will see different information of the Owner, Country, Issuer, Certificate Validity from both the date the certificate is issue and when the certificate is set to be expired.
Certificate fingerprints in MD5, SHA1 and SHA256 and also the Signature algorithm used.

Before, I talk about Generating a certificate, lets look at it from security perspective, In analyzing an Android application which you download from third party web site, You can decompile the App and look at the certificate and compare it with the original App, Look at the hashing algorithm used, compare it if probably the application has been modified or tamper with, I wont be talking about analyzing an APK file but may be later.
Generating An Android Certificate
If you decompile your android application and compile it back, You will need to sign the app, and if you don’t sign it the Application wont be installed on the user device. There are different ways of generating a certificate but, we will look at three ways to generate a certificate using keytool.
Method 1:
Open your terminal:
where awwal — is the keystore name, alias — hafsa is the certificate alias name, which after you use it will be added to META-INF folder, -keysize 2048 , but you can use 4096 size, but there are issues regarding that from devices or so. but just use 2048, validity is in days.
Method 2:
Using apk-signer.jar which can be downloaded here https://shatter-box.com/knowledgebase/android-apk-signing-tool-apk-signer/
This is a GUI written in Java that allows generating a certificate and also signing an apk file. Though there’s also an Android App for that in Playstore.

Method 3:
I created a bash script that automate the task of using method 1, As method might require you installing Java Runtime, Just run the script i created which uses keytool and jarsigner.
Download the script here: https://github.com/ShehuAwwal/Apk-Signer

After that follow the instruction which will be prompted to generate your key.
Signing An Android Applicaiton
After you already generate your android application, we will look at how to sign the app, run your terminal:
Where -sigalg is the signature algorithm used, You can find some Apps using MD5 but use SHA1 as when you are verifying the app it will tell you the hashing algorithm used and how weak the algorithm used is.
keystore — awwal is the name of the keystore name used when generating the certificate, and hafsa is the alias name of the certificate, and medium.apk is the name of the app to be sign.
Note: if you MD5 the application will be treated as an unsign app because the algorithm use to sign the App is weak.
And the easier way is to use the Apk-signer.sh which i wrote to make the task easier.
Run the script, and press 2 for signing the app, Also completes also work there for file name and certificate name.

Or also you can make use of the apk-signer.jar also provide the options to sign the app.
Verifying An Android Application
Verify the app using jarsigner, to see the list of resources sign, the hashing algorithm with keysize.
Open your terminal:
where verify only will show either it is sign or unsign and using the verbose options to see the full details of the certificate.
Or you can use Apk-signer to verify the App with auto completion of file name.
Источник
How to Download and Install a PKCS#12 onto Your Android Device

One of the questions we’re most often asked is, «how do I download and install my Digital Certificate to my phone?» If you want to encrypt emails or authenticate to corporate networks using your mobile device, installing the certificate can be a bit of a barrier. Fortunately, Digital Certificates are compatible with most of the leading mobile operating systems, so it’s easy to implement and enforce the same security policies, even on mobile devices.
You can view the full ‘how-to’ video here or continue reading for the in-depth guide.
Note: This post is about how to install certificates onto devices. If you’re looking for information about what mobile certificates can be used for, please visit our mobile page.
The method involved in installing Digital Certificates onto your mobile device will vary by operating system. To help you support mobile devices in your workplace, we’ve put together a user guide that walks through how to install a Digital Certificate or PKCS#12 file onto an Android phone. The overall process is really simple; let’s take a look now:
A couple things before we get started.
- This example will show you how to install a PKCS#12 (as opposed to other file types) onto an Android device, which is our recommended option as the file type is easily accepted and provides the simplest installation experience for the end user.
- I’m running through this using a GlobalSign Digital Certificate and GlobalSign’s certificate issuance process, but the general steps should be the same regardless of the supplier and issuing Certificate Authority.
There are two main parts to downloading and installing a certificate on an Android device — downloading the PKCS#12 or .pfx file onto the Android and adding it to the device’s «credential store». We will take you through the steps involved in each part now. Let’s get rolling!
How to Download a Certificate onto Your Android Device
Step 1 — Open Certificate Pick Up Email on Android Device
Certificate delivery is completed using an over-the-air enrollment method, where the certificate enrollment is delivered directly to your Android device, via email using the email address you specified during the registration process.
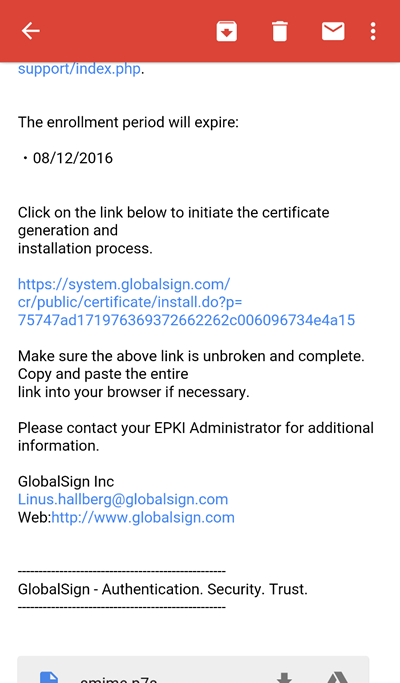
Click the link in your certificate pick up email.
Step 2 — Enter Certificate Pick-Up Password
Click on the enrollment link in the email. Next, you will be prompted to enter the one-time certificate password you created (or an administrator created for you), during the certificate ordering process.
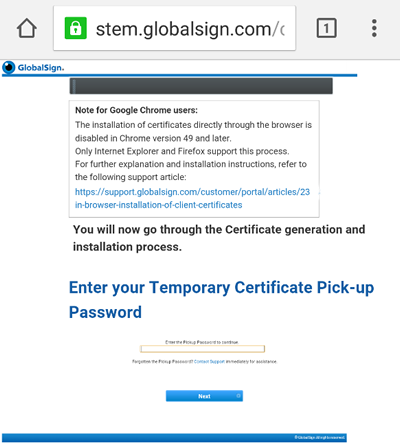
Enter your certificate pick up password when prompted.
Step 3 — Create a PKCS#12 Passphrase
Next, create the password you will use when you install the certificate onto your device (covered in the next section). Our system asks that your password is no less than 12 characters and is only alpha-numeric. That means no special characters. Make sure you read our subscriber agreement and click ‘I agree’ to proceed.
Create the password you will use during the install process.
Step 4 — Download the Certificate onto Your Device
After your certificate has been generated, you will be prompted to download the certificate to your device. The file will appear in the ‘downloads’ folder on your device.
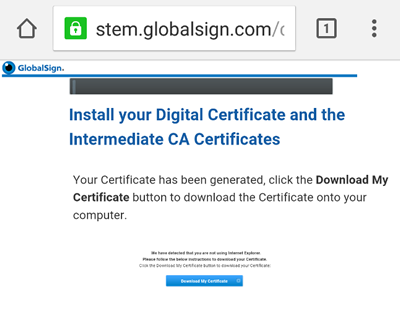
Download the certificate onto your device.
Step 5 – Name Your Certificate
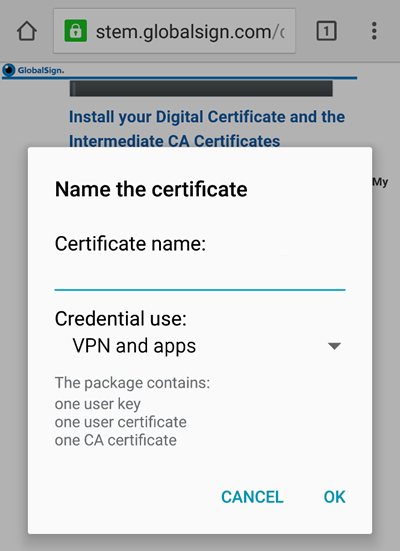
Give your certificate a name so you can easily find it in your certificate store later.
How to Add a Certificate to Your Android ‘Device Credentials’
At this point you may have a warning on your phone saying ‘network may be monitored by a trusted third party’. Technically what Android is saying here is ‘if a malicious or compromised certificate is being installed here then it’s possible someone is monitoring you.’ So the warning is made a little scarier than it needs to be because a certificate doesn’t have to be genuinely malicious to trigger the warning. In the Android developer community people are calling for this feature to be removed. So fear not, let’s move onto the next step.
To complete the install and remove that pesky warning, you need to add the certificate to your device’s security credentials.
Step 6 — Navigate to Settings > Security
Select «Install from device storage» from your security settings to get the certificate file from the ‘downloads’ folder of your device.
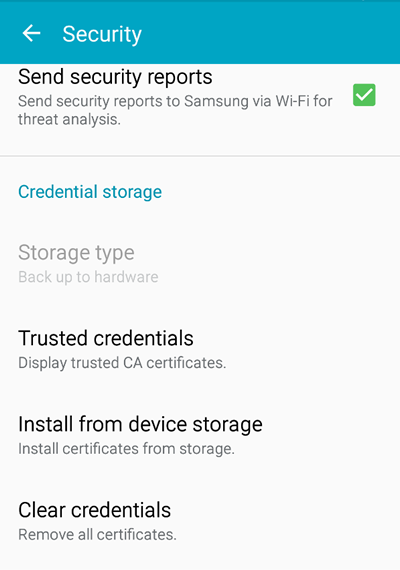
Select «install from phone storage» to find your recently downloaded certificate.
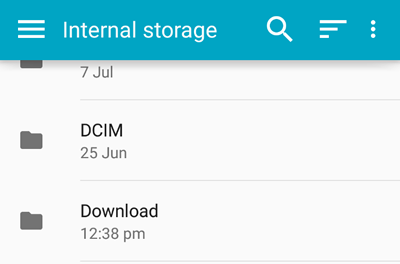
Step 7 — Locate Your Downloaded Certificate File
You should be able to find the ‘downloads’ folder in the left hand menu as soon as you click on ‘Install from device storage’.

If you can’t find it, you can navigate there by clicking «Internal storage» from the list of locations in the «Open from» window. Then navigate to the «Download» folder and select your certificate .pfx file.
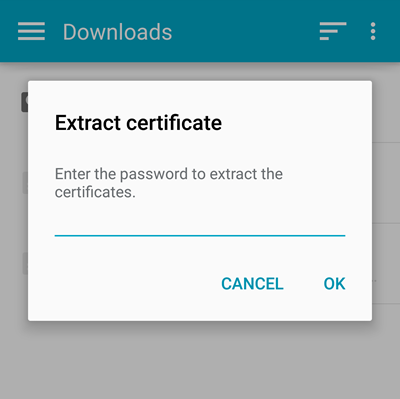
Step 8 — Enter Your PKCS#12 Passphrase
Enter the password you created in Step 3 above.
Enter the PKCS#12 passphrase you created earlier.
Step 9 — Adjust Certificate Settings
Now that the certificate has been added to your device’s credentials, you can set the certificate name and its use — VPN and Apps or Wi-Fi depending on where you plan on using the certificate to authenticate.
Little is known about why this option is given. A certificate should always be able to do both. My advice is to pick the one which is closest to what you want to do with your certificate, but it won’t matter which one you chose as you should still be able to authenticate into both services with an X.509 certificate from GlobalSign.
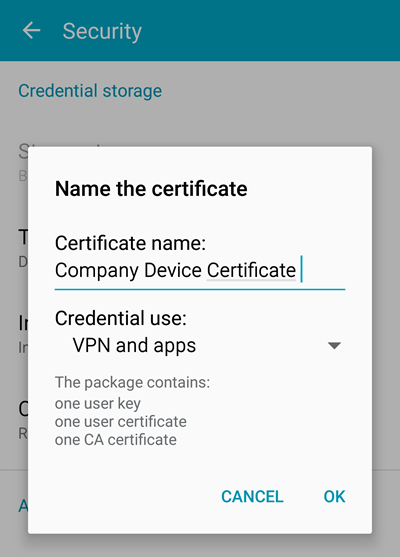
Set your certificate name and purpose.
The certificate is now successfully downloaded onto your Android device. You can now use it as an authentication factor for connecting to VPN clients, Wi-Fi, email and other corporate apps, as well as for digitally signing and encrypting emails (S/MIME).
Источник
Анализ трафика Android-приложений: обход certificate pinning без реверс-инжиниринга
Иногда нужно исследовать работу бэкенда мобильного приложения. Хорошо, если создатели приложения не заморачивались и все запросы уходят по «голому» HTTP. А что, если приложение для запросов использует HTTPS, и отказывается принимать сертификат вашего корневого удостоверяющего центра, который вы заботливо внедрили в хранилище операционной системы? Конечно, можно поискать запросы в декомпилированом приложении или с помощью реверс-инжиниринга вообще отключить применение шифрования, но хотелось бы способ попроще.

Что такое certificate pinning?
Даже при использовании HTTPS пользователь не защищен от атак «Человек посередине», потому что при инициализации соединения злоумышленник может подменить сертификат сервера на свой. Трафик при этом будет доступен злоумышленнику.
Справиться с такой атакой поможет certificate pinning. Эта защитная мера заключается в том, что разработчик «зашивает» в приложение доверенный сертификат. При установке защищенного соединения приложение проверяет, что сертификат, посылаемый сервером, совпадает с (или подписан) сертификатом из хранилища приложения.
Обход certificate pinning
В качестве подопытного выберем приложение Uber. Для анализа HTTP-трафика будем использовать Burp Suite. Также нам понадобится JDK и Android SDK (я использую все последней версии). Из Android SDK нам понадобится только утилита zipalign, так что при желании можно не скачивать весь SDK, а найти ее на просторах интернета.
Заранее облегчим себе жизнь, добавив следующие пути к нужным утилитам в переменную окружения PATH:
Открываем Burp, заходим в Proxy – Options – Add и добавляем Proxy Listener на интерфейсе, который будет доступен подопытному Android-устройству (или эмулятору). На устройстве в свою очередь настраиваем используемую Wi-Fi сеть на использование только что включенного прокси.
Скачаем apk-файл через apkpure.com, установим приложение на устройство и попытаемся войти в свой аккаунт – приложение зависнет на этапе аутентификации.
В логах Burp Suite (вкладка Alerts) при этом мы увидим множественные отчеты о неудачных SSL-рукопожатиях. Обратите внимание на первую строчку – именно через сервер cn-geo1.uber.com в моем случае осуществляется аутентификация, поэтому и не удается войти в приложение.
Дело в том, что Burp Suite при перехвате HTTPS-соединений (а мы помним, что все соединения устройства проксируются через него) подменяет сертификат веб-сервера на свой, который, естественно, не входит в список доверенных. Чтобы устройство доверяло сертификату, выполняем следующие действия. В Burp заходим в Proxy – Options и нажимаем Import/export CA certificate. Далее в диалоге выбираем Export Certificate. Копируем сертификат на устройство, переходим в Настройки – Безопасность – Установить сертификаты и устанавливаем наш сертификат в качестве сертификата для VPN и приложений.
Опять пытаемся войти в свой аккаунт. Сейчас приложение Uber сообщит нам только о неудачной попытке аутентификации – значит прогресс есть, осталось только обойти certificate pinning.
Откроем приложение в вашем любимом архиваторе как zip-архив. В папке res/raw можно заметить файл с говорящим названием ssl_pinning_certs_bk146.bks.
По его расширению можно понять, что Uber использует хранилище ключей в формате BouncyCastle (BKS). Из-за этого нельзя просто заменить сертификат в приложении. Сначала нужно сгенерировать BKS-хранилище. Для этого качаем jar для работы с BKS.
Теперь генерируем BKS-хранилище, которое будет содержать наш сертификат:
На вопрос о доверии сертификату отвечаем «yes». Опять открываем apk в архиваторе и заменяем оригинальное хранилище на наше (сохраняем при этом оригинальное название).
Но на этом все не заканчивается. Каждый apk должен быть подписан сертификатом разработчика. К счастью, это делается не для обеспечения безопасности, а для идентификации приложений, поэтому для наших исследовательских целей мы вполне можем использовать и недоверенный сертификат.
Удаляем из apk папку META-INF со старой подписью приложения и приступаем к генерации новой.
Создаем хранилище ключей и генерируем в нем ключ для подписи apk:
Подписываем только что сгенерированным ключом наш APK:
Теперь осталось выровнять данные в архиве по четырехбайтной границе:
Источник


