- Android car dvd
- Step-By-Step Guide for BMW 5 Series E60 2009-2012 Stereo Navigation System with Bluetooth Carplay
- How to set up Car Radio Navigation System with Bluetooth Carplay in your 2015-2019 Mercedes-Benz C-Class ?
- An easy guide to replacing 2010-2015 Mercedes-Benz E-Class Radio Navigation System with Bluetooth Carplay
- How to install Android Touch Screen in 2010-2015 TOYOTA REIZ Mark X quickly
- How to Install A New Car Audio Navigation System in 2009-2012 Mazda 3?
- How to install a 2007-2018 Toyota FJ CRUISER Bluetooth Radio GPS System
- Hummer H3 Stereo upgrade for Bluetooth
- How to install android map
- The very best Android Audi A4 2013 DVD player with 3G Wifi Bluetooth Tv
- Android Car DVD Player for Mercedes-Benz E-Class W211
- Quick Overview
Android car dvd
Android car dvd player
Step-By-Step Guide for BMW 5 Series E60 2009-2012 Stereo Navigation System with Bluetooth Carplay
In a BMW, there’s nothing better than installing a car radio, especially if the driver is used to using the way of carplay during the driving time. And it is regarded as the smartest and the safest way to use your phone while you’re on the road. Therefore, most of those who pursue high-quality driving life will always put the installation of car stereo as an important role as the correct installation steps can help them reduce the budget as well as the extra energy. As for those who has no experience before installation, I sincerely recommend you to read the following easy guide for BMW 5 Series E60 2009-2012 Stereo Navigation System as a reference.

Before installation, you should pay attention to some important tips. First of all, you can disconnect the power and prepare some tools such as lever before the removal and the installation. Secondly, you should keep all the separate parts from the car and take great care of the dashboard to avoid scratching it during its detachment and installation.
Last but not least, you should keep handy any parts from the car and make use of all the original screws from the car as much as possible so that each related part of the unit can be fixed securely.
Step 1: Take off the left screw and the right screw.

Step 2: Lever original car screen frame and Pull out the frame.

Step 3: Disconnect LVDS connector and the power cable.

Step 4: Lever the vent panel as reveal from the right side and the middle vent panel from the bottom.

Step 5: Lever the left panel as reveal and Take off the emergency light cable.

Step 6: Take off the left screw and the screws on the right side.

Step 7: Pull out the air conditioner panel and Unplug air conditioner connectors

Step 8: Lever the box from the right side and the same box from its left side.

Step 9: Take off the 2 screws, then Pull out the head unit and disconnect power cable.

Step 10: Pull out new wires( power cable, USB wire,GPS antenna) and original car LVDS connector.

Step 11: Connect above wires with the new android screen

Step 12: Install new screen, first put bottom inside, then fix the screen to stand and adjust to exact screw position on the top.

Step 13: Fix the screws and take out original car optical fiber connector.

Step 14: Connect original car power cable with new power cable and the unplugged fiber optical connector with new wiring.

Step 15: Connect new power cable with the car head unit, then Install the head unit and fix the 2 screws.

Step 16: Put the AC vent assembly back and fix 2 screws.

Step 17: After installing AC panel, Connect emergency light wire and Put emergency light assembly back.

After the installation, you can check whether the new head unit can be used as normal. And as you can see the process of the installation is not difficult as long as you would like to learn these steps above even you have no skills before. However, if you think there is still a bit hard for you to get these knowledge from the article, you can ask for a trained professional technicians for help or consult your car dealer directly. There are dozens of resource available on the Internet and you can click them for more information as you wish. Here I would like to shark a link of a product of BMW 5 Series E60 Car Audio System from Seicane. Hope you can benefit from it as you want.
With the latest and fastest responsive operation System -Android 10.0, it supports your entertainment time in a more flexible way. Besides, without uninstalling your old stereo, this new android car navigation system will keep your original radio ,idrive system and amplifer system.
Compared to other car radio ,this one can provide a chance for you to hear from the center being surrounded from all direction instead of hearing of the main sound from front right direction. In addition, with high speed CPU and large storage, you can download various apps and make phone call as smooth as usual when you are driving on the road.
Last but not least, it can be connected to the Internet whenever you drive, and the DVR functions can support you to record every moment in your journey, which will make you never miss anything. So if you have desire to make your car a place you love to be, please grab this chance from now on.

How to set up Car Radio Navigation System with Bluetooth Carplay in your 2015-2019 Mercedes-Benz C-Class ?
It is common that many people prefer to install a car stereo in there car now as it can bring much entertainment and convenience, which benefit their driving life in a degree. However, it is rare for those people to know how to set up car radio exactly in their car, especially for owners of Mercedes-C-Class. Thus, it is essential to get the informative steps of installation from online or offline. And there is a recommended step-by-step guide of 2015-2019 Mercedes-Benz C-Class Stereo Navigation System with Bluetooth Carplay. And follow the steps below, you will learn what you need in the process.

Before installation, you should pay attention to some important tips. First of all, you can disconnect the power and prepare some tools such as lever when you start the removal. Secondly, you should keep all the separate parts from the car and take great care of the dashboard to avoid scratching it during its detachment and installation.
Last but not least, you should keep handy any parts from the car and make use of all the original screws from the car as much as possible so that each related part of the unit can be fixed securely.
Installation Instruction of Mercedes-Benz 2015-2019 C-Class Stereo
Step 1: Pry the top cover of car speaker and take off the 2 screws

Step 2: Pull out car original screen and disconnect wire looms

Step3: Press two buttons, then pry the silver trim

Step 4: Take the trim away and take off marked 2 screws

Step 5: Pull out the car control panel and take out control panel.

Step 6: Pull out car head unit and unplug the wire

Step 7:Put the wire go through the hole as revealed

Step 8: Connect car wires and specific new wire

Step9: Plug the new wire to the head unit instead,then Put the head unit back and fix 2 screws

Step10: Well-place AUX connector as the picture shows and Put AUX connector to trans-connector (AUX trans USB)

Step 11: .Plug the trans-connector(AUX trans USB) to car USB port

Step 12: Put the console panel back and fix the 2 screws

Step 13: Replace the silver trim and Connect LVDS wires well.

Step 14: Pull the wire go through the new bracket then fix the bracket

Step 15: Fix 2 screw shown in the picture

Step 16: Connect the wires to the screen, then fix the screen and 2 screws

Step 17: Put speaker cover back

Now that your basic work have been finished and you are ready to check whether the head unit can be used as a new one and try all its functions. The process maybe a little difficult for the people who have never had experience before. But this guide will show you the main idea of installation and give you useful information as you want. If you still have some questions here, it is recommended to ask for your car dealer for help or consult a professional technician who can offer you help in this way. And here I want to share a link of Mercedes-Benz 2015-2019 C-Class Stereo from Seicane. You can know more details from it including its functions and installation details.
If you want to keep your Mercedes-Benz enjoying the top-level entertainment on the way, this product can be a proper choice for the most owners and lovers as its functions can be covered in a wide range including wireless carplay, split screen, backup camera, high-quality navigation system and even wifi&Bluetooth etc.
With the 10.25 inch round corner designed, road top car touch screen, looks more beautiful. In addition, the high resolution and IPS high-definition picture quality will provide you a clearer and more beautiful image. You can also enjoy faster running with 8-core CPU 4 GB RAM 64GB ROM for downloading more favorite apps to obtain richer car experience.
All in all, it is definitely a perfect choice for those who would like to enjoy themselves during the driving. So what are you waiting for now? Click the page and get this surprise from now on!

An easy guide to replacing 2010-2015 Mercedes-Benz E-Class Radio Navigation System with Bluetooth Carplay
As the owner of Mercedes-Benz E-class, it is not difficult for you to buy the appropriate car radio online or offline . However, installing or replacing a radio can range in difficulty, especially as a person who has no experience of installation before. And there are also some factors that must be considerable such as the consuming time and the personal energy. Thus, I sincerely recommend you to read the following easy guide to replacing your 2010-2015 Mercedes-Benz E-Class Radio from Seicane. In this guide, you can see the whole process of installation and get what you need as you want.

Before installation, you should pay attention to some important tips. First of all, you can disconnect the power and prepare some tools such as lever before the removal and the installation. Secondly, you should keep all the separate parts from the car and take great care of the dashboard to avoid scratching it during its detachment and installation.
Last but not least, you should keep handy any parts from the car and make use of all the original screws from the car as much as possible so that each related part of the unit can be fixed securely.
2010-2015 Mercedes-Benz E-Class car radio installation guide
1. Lever original car screen frame and take off the two screws.

2.Pull out the screen and disconnect the cable.

3.Lever the vent panel and disconnect the emergency light wiring harness.

4.Take off the screws on the both sides.

5.Knock the screw down and pull out the monitor.

6.Pull out the monitor and disconnect the power cable.

7.Pull out the power cable and USB wire from the right side.

8.Connect original LVDS wire together with the new assembly box, the new LVDS wire and the original video power wire(only 4.0 system).

9.Install the new base and fix the screw.

10.Fix the nut cover and connect original car power cable with new power cable.

11.Plug in the new power cable.

12.Install the head unit and fix the 2 screws.

13.Connect the emergency light wiring harness and install the air outlet panel.

14.Connect the wiring harness and install the screen.

15.Fix the two screws to finish installation.

After finishing the whole installation, you can test the function of the car stereo on your own and check whether it can perform as well. As long as you tried all the steps above, you will have your clear plan about how to install your radio at the same time. But if you still feel it hard for you to finish this whole procedure by yourself, you can ask for your car dealer directly who will offer the most professional advice for you. In addition, you can also find various tutorials and relevant resource here on the Internet. Here I want to share one of the most impressive product from Seicane, 2010-2015 Mercedes-Benz E-Class car radio, which owns different functions and act as brilliant as other radios.
Unlike other operation system, it is equipped with the latest operation system Android 10.0, which ensure the best using feeling and care for each user’s need. What’s more, with multiple point high-sensitive touchscreen, it can bring smooth operation and you can enjoy visual feast on this 10.25 inch 1280*480 resolution display.
Built in GPS module, it support both online and offline navigation app from Google Play app market, which means you don’t need to worry about whether you will get lost during the driving with the help of the updated data from these apps.
Besides, integrated with BC6 Bluetooth module, it supports phonebook sync, hand-free call, and music streaming from your phone. And there are also other outstanding functions here such as the rear view camera, which supports RCA AV connector type rear view camera signal input, automatically switch to parking image when reversing gear engaged.
All in all, never hesitate to buy if you really desire it and embrace what you love now !

How to install Android Touch Screen in 2010-2015 TOYOTA REIZ Mark X quickly
In this era, it has been common that nearly every car owner has installed their favorite car radios inside the car. Apparently, the new radios can bring many benefits including entertainment, phone calls and 4G&wifi function. In this case, more and more people prefer to install the touch screen in their own car by themself as it can save money. As a car owner of TOYOTA REIZ Mark X, how do you start to install your new car stereos on your own? Here is a a 2010-2015 TOYOTA REIZ Mark X car radio installation guide from Seicane. You can refer to the following installation guide if you need.

Before installation, you should pay attention to some important tips. First of all, you can disconnect the power and prepare some tools such as lever before the removal and the installation. Secondly, you should keep all the separate parts from the car and take great care of the dashboard to avoid scratching it during its detachment and installation.
Last but not least, you should keep handy any parts from the car and make use of all the original screws from the car as much as possible so that each related part of the unit can be fixed securely.
2010-2015 TOYOTA REIZ Mark X car radio installation guide
1.Remove the trim panels.

2.Remove screws that fix car stereo.

3.Take down the radios and disconnect the plugs.

4.Seperate the main unit and the A/C button panel.

5.keep the A/C button panel and install it back to the dash.
6.Tighten the screws.

7.Connect Power Harness, RCA Cable and CAM Cable to the new radio.

8.Correspondingly connect the new radio cables to the car plugs.

9.Install the Touch Radio to the dash.

10.Install trim panels back.

After reading the 10 steps above, I believe you should have a clear idea about how to install your own car touch screen by yourself. If you find some problems during this procedure, you can ask for a professional for help or consult your car dealer directly. I sure you will get what you want from them. And it is wise for you to surf the internet to search for some useful information which can satisfy your need because there are full of various installation videos and manuals there. And here I would like to share one of the outstanding product from Seicane, 2010-2015 TOYOTA REIZ Mark X car radios, which can show you its brilliant function and specific installation steps.
Built in WIFI module, it supports to connect WiFi hotspots to surfing the Internet. It can also supports 3G internet, require to buy external android compatible 3G USB module and insert SIM card from your local telecom carrier. You can enjoy a high speed entertainment during your driving journey.
With the latest Android 10.0 system, it can support for sophisticate technology and features, which means you can keep things up-to-date as you wish. Moreover, its GPS module can support both online and offline navigation app from Google Play App market, you will never get lost during the driving time.
Besides, it is equipped with many optional function such as HD Digital TV, backup camera, TPMS and DAB+, which and enrich your driving life. With high-quality sound, it offers more radio programs over a specific spectrum than analogue FM radio.
In a word, just grab this chance from this moment and buy what you want !
How to Install A New Car Audio Navigation System in 2009-2012 Mazda 3?
Did your Mazda 3 come with an audio system with touchscreen, Bluetooth, GPS navigation and more? If not, it’s high time for you to upgrade its factory audio system for a new one since it allows you to complete a lot of tasks at the same time while driving. Now in the aftermarket, there are plenty of car audio systems you can opt, with difference in car models, audio functions and prices.
After getting your new car audio, you may want to install it by yourself since the Mazda 3’s factory radio is easy to remove. If you are not sure whether you can do, take a look at this tutorials guide in advance.
| Audio System | Seicane Car Audio Navigation System with Bluetooth WIFI |
| Needed Tools | A hard card, screwdrivers; User manual of Seicane audio system |
| Precautions | Must disconnect the car power before doing anything. |
Steps to remove Mazda 3 factory audio
This is the original audio system in the dashboard.

Step 1, To remove the air outlet: Insert a hard card into the seam of the air outlet, slide the card and use some force to pry the outlet, then you can remove it.

Step 2, Remove the screws fixing the original audio unit.

Step 3, Pull out the audio unit and unplug the connectors.

The removal of the factory radio is done. Following we will guide you to install the Seicane car audio system to your Mazda 3.
Steps to install Seicane car audio navigation system
Step 4, Have a check for the wiring harness and other accessories of the Seicane audio system to make sure a smooth work.

Step 5, Then connect cables between Seicane car audio and car plugs. In this step, it requires your patient and carefulness to recognize plug interfaces, thus have your user manual handy.

Step 6, Fix the new audio unit, turn on your car to test the product whether functions normally.

Step 7, If everything of the product work well, then install the air outlet back. The whole replacement job is finished. If the new unit doesn’t functions, please double check whether the cables are connected correctly.

Comparison of factory radio and Seicane android car audio system
Obviously, the factory radio system was the old-fashioned button-operated radio that you can only listen to music and broadcast, there is less function and no special features.
For the new Seicane audio navigation system, it comes with a large touchscreen that make everything operated easier. What an awesome experience when you see navigation information and videos on such a big screen. Besides, this audio is not limited quantity of songs, it’s feasible to search for the latest album of your favorite singers on this android car audio system.
One of good reasons to use this Seicane audio system is smartphone integration. The product is able to support CarPlay and Android Auto, this gives you ability to connect your smartphone and play its applications including contact books, dialing, navigation app, music etc. freely on the audio display.
You can also choose to add optional functions to the system, such as DVR, AHD night vision parking camera, external OBDⅡ, TPMS and so on, to keep your drive safer and more convenient. I believe you won’t regret investing in Seicane car audio system.

How to install a 2007-2018 Toyota FJ CRUISER Bluetooth Radio GPS System

With the improvement of people’s life, more and more families prefer to buy car for outside activities. However, the factory radio seems can not satisfy their needs, most of them choose to install a Bluetooth Radio GPS System which make it possible to listen to radio or music while navigation. This kind of function may entertain the dull journey and comfort the naught children. There is no doubt that Bluetooth Radio GPS System can make you trip more convenient and easier. Since most people have no idea of how to install the devices, here we will share you a simple way of how to install a 2007-2018 Toyota FJ CRUISER Bluetooth Radio GPS System. You can follow the steps as the video if your car is similar to this one.
Preparation for Installation:
1.Make sure the power has been cut off before installation to avoid any danger.
2. Check your professional car radio dismantling tools, screwdriver, 3M electronic tape, 3M double side tape, sleeve, cotton cloth.
3. Keep all the separate parts from the car.
4. For your convenience, here’s the recommended tools for removal and installation from Seicane, please check for more details: http://www.seicane.com/car-dvd-dismantling-device-srd-400
2007-2018 Toyota FJ CRUISER Bluetooth Radio GPS System Disassembly and Installation Steps:
1. Original dashboard
2. Remove the frame of both left and right side
3. Remove the two screwson each side
4. Take the main frame out and pull out the plug on it
5. Remove the screws inside and take the original radio out
6. Pull out the plug on the original radio
7. Install the new screen on the main frame
8. Plug well the power harness/USB cable/GPS antenna
9. Fasten the two screws on the main frame
10. Fix the two frames on each side
If you still don’t know how to operate after watching the video, you can find professional people around you to help you install the device. And if you don’t know which Bluetooth Radio GPS System is suitable for you, I would like to share you a 2007-2018 Toyota FJ CRUISER Bluetooth Radio GPS System for you. You can click the following link to find more details:
With intelligent pure Android 8.1 operation system and 9 inch full touchscreen, it will be your perfect road companion. The system supports surfing internet via 3G or WiFi.You can download any applications in the android market for access to games.The car stereo is equipped with worldwide real-time navigation function of high accuracy. These function will provide you the best driving experience.
If you are interested in this devices, please don’t hesitate to contact us!
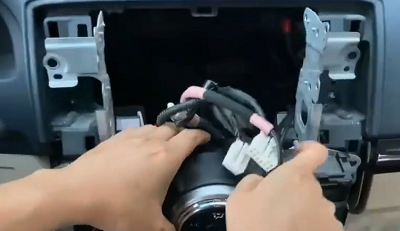
Hummer H3 Stereo upgrade for Bluetooth
Stereo built-in Bluetooth is an in-car wireless hand-free system that relying on wireless Bluetooth technology. It aims at applying drivers hand-free phone talk during driving, and this technology decrease the traffic hidden trouble in a certain extent.
However, if we want to buy a good quality and convenient radio, we need to consider some aspects of it. For example, good sensitive of receiving signal and compatibity and stableness of software and hardware. Secondly, the operation panel must be human oriented design. Thirdly, it needs excellent mechanical anti-vibration and electronic shock protection, and good resolution of screen.
Hummer H3 stereo fits to Hummer H3(2006-2009), for Hummer H3 users, the original screen’s function is very limited, they complained that the original screen almost becomes a decoration for vehicle, and they finally would have sellers in auto Dealerships or auto remodeling factory upgrade the vehicle to get more functions, but it spend much money if you have someone to add one, you can do it yourself.
The video for hummer h3 stereo
How to install android map
Some people don’t know how to install androird map. Here are some pictures about the android map update and installation.If you buy android car DVD player from us,you can update and replace the map by yourself.
The first step is that make the device power on and then enter the android system like below:
 How to install android map
The second step: click the icon “file manager” to find the map which is in the SD card.
 install android map
The third step: click the SD card icon on touch screen
 How to install android map
Next step: click iGO file
 How to install android map
Next step: click the installation file iGO_thin.apk
 android map
Next step: click install
 How to install android map
Next step: the map is installing now,please wait a moment
 How to install android map
At last ,the android map installation is finieshed.With this android map,you can go anywhere you want to.
 How to install android map
There are many kinds of android dvd players here: http://www.seicane.com/android-car-dvd-gps Most peopel are interested in android system.Hope this can help you with android map replacement.
The very best Android Audi A4 2013 DVD player with 3G Wifi Bluetooth Tv
In the real life Weekdays, people are often busy in their business enterprise, so they do not have a great deal time for you to spend with loved ones and good friends who So, on weekends and holidays, many people need to self-driving tour collectively with their household and good friends. Self-driving tour with the Vehicle DVD Navigation has turn out to be a common leisure and entertainment. The strategy to self-driving tour, you’ll be able to view the scenery along the way, which will give a pleasant visual expertise on the road. But to you go exactly where tourism may possibly be a headache. Within this moment you will need the car DVD Navigation to assist your audi a4.
the android operating system car stereo Fit to: Audi A4 2013
all-in-one android vehicle dvd player solution,It is worth shopping for
Easy on installation, do not will need to cut off the plastic and paste the plastic.
Shape really equivalent to original design and style.
Hold original car Bluetooth and Radio Function.
Maintain the car energy amplifier, as well as the sound top quality will have not any harm.
Assistance any function can control by Car or truck Center MMI knob.
Add DVD player and IPOD play Funtion.
Assistance steering wheel handle(Comprise DVD Function).
Disc Play.Compatible with DVD-R/DVD-RW/DVD R/DVD RW/CR-R/CD-RW/MP3/WMA/MPEG4/SVCD/VCD and so forth
USB and SD port
IPOD Support.Ipod can charge up when it playing ipod or iphone
4-CH RCA output
Car or truck backing show: it truly is connected towards the rearview camera
Video output/input: two video output,two video input(a single video input for rearview system)
Built in analog Television. External digital Television as possibilities
Radio: high sensitive FM/AM tuner 30 stations(AM 12/FM 18) restorable.
RDS function
Construct in Bluetooth for hand absolutely free(Coming Tel No. show function & Call out directly by touch screen)
4x45W amplifier
Shock proof memory: 5 seconds esp electronic
DVB-T
1. Constellation qpsk,16qam,64qam ,channel band width 6m/7m/8m
2. Over 1000 channels tv & radio programmable
3. Channel list editing,favorite channel list editing
4. High senstivity incept(-78db??-20dbm)
Operation system Android 4.0.4
Support map Tomtom, IGO, Route 66,Papago etc
Video system automatic PAL/NTSC
Display
Display size 16:9
Screen Size 7 inch
Touch Screen yes
Screen Resolution 800*480 Pixels
Accessories
English User¡¯s Manual yes
RCA Cable yes
iPod Cable yes
USB Cable yes
GPS Antenna yes
touch pen yes
Canbus Box yes
3G module yes
Wifi module yes
Android Car DVD Player for Mercedes-Benz E-Class W211
Now many people like travelling to enjoy life. And many families like driving their own car to travel. So a 2 din Android Car DVD Player for Mercedes-Benz E-Class W211 is essential device to their long journey. On the way to the destination, they always turn the Mercedes-Benz E-Class W211 DVD player to enjoy the music and the film. The Mercedes-Benz E-Class W211 DVD player will bring happiness to the whole family.
Quick Overview
| Fit to: Mercedes-Benz E-Class W211(2002-2008)(E200,E220,E240,E270,E280) | |||||
| GPS | yes | Radio | yes | 3G Net | support |
| DVD | yes | Bluetooth | yes | WiFi | support |
| Analogue TV | yes | Ipod | yes | Camera | opt |
| USB/SD | yes | Rearview | yes | Digital TV | no |
With Mercedes-Benz E-Class W211 car accessories and entertainment, you can have the best music, news or movies as well as the most reliable maps and directions without destroying the appearance of the dashboard of your car. In fact, the additions make the dashboard of your car look more appealing. For people who love music and movies, nothing can beat the Android Mercedes-Benz E-Class W211 DVD player special.Allows the driver and his passengers to listen to music while traveling.Comes with a built in USB port.Give yourself and your passengers a chance to enjoy a car trip by installing the Android Mercedes-Benz E-Class W211 DVD special entertainment package. With this entertainment at hand, you will be in your destination in no time at all.
Overview:
The android unit is the highly integrated multimedia entertainment audio system base on the Telchips8801,and include the below advantages:
1.Use the System Android 2.3
2.Include the HD multimedia, Radio, GPS Navigation, DVD, iPod, Bluetooth, Support reverse video input.
3.Support the USB flash disk, SD card, mobile hard disk and other mobile storage equipment.
4.Support the HD video play, support all of the HD 1080P video format decoding,support RMVB decoding.
The Android Mercedes-Benz E-Class W211 DVD player model also has a built in radio with accesses to numerous radio stations. Through the, you can listen to music while driving. This is very helpful in knowing in advance the weather condition and forecast especially along the route that you will take in your drive and in your destination. You can postpone your trip or use another route if you know beforehand that the roads are impassable or travelling will be dangerous because of bad weather.Equip your car with the Android Mercedes-Benz E-Class W211 DVD player and make driving a safe and pleasant experience for you and for your passengers.
Features.
1.The unit include the double system. (Android and Windows system)
2.Support the external 3G or WiFi
3.support all of the HD 1080P format decoding.
4.Support the HD video, game, MSN, QQ.
For people who need to travel long distances frequently, traveling on long highways and empty roads could be lonely and boring. Couples who take along their kids on long car trips could find it frustrating and annoying when the kids start showing signs of boredom. They would complain, argue and fight, which for the person driving could be distractive. But now, you can easily change this if you are driving an Android Mercedes-Benz E-Class W211 DVD player model. This car is now equipped with Android Mercedes-Benz E-Class W211 DVD player gps navigation Radio that are all highly compatible with this car model. These devices can give satisfactory and delightful entertainment to you and your passengers. You can place them in your car without rewiring.
Источник


