- Android Material Design Floating Label for EditText Tutorial
- What is TextInputLayout ?
- Let’s Get it Working
- Step 1 ) Update build.gradle file
- Step 2) Update strings.xml .
- Step 3) Update dimens.xml .
- Step 4) Update activity_main.xml .
- Step 5) Write Validation Helper Class.
- Step 6) Update Main Activity Class.
- Android edittext material design
- TextInputLayout
- Стилизация
- Обработка ошибки
- Счётчик символов
- TextInputEditText
- Android Material Design and the Design Support Library
- Prerequisites
- Project setup
- AppCompat theme & colors
- Toolbar
- Include the Toolbar
- Setup the action menu
- Customise Toolbar
- TextInputLayout
- Floating Action Button
- Snackbar
- CoordinatorLayout
- PercentRelativeLayout
- Summary
- Adam Jodłowski
- X-Team Weekly
Android Material Design Floating Label for EditText Tutorial
One of the basic UI widgets in Android is an EditText. It is generally used to take inputs from the user. While typing in EditText , it hides the hint which may create problem to identify EditText without label but last year when material design was released, a new concept of floating labels was introduced. This new Android floating label EditText concept initially showed a label as a hint; when user enters a value in the EditText, that hint moves on to the top of the EditText as a floating label. The question is here now : how to implement the new Android floating action EditText. Answer to this, use the new Android TextInputLayout around the EditText.
What is TextInputLayout ?
A TextInputLayout widget behaves exactly as a LinearLayout does, it’s just a wrapper. TextInputLayout only accepts one child element, similar to a ScrollView. The child element needs to be an EditText element . When TextInputLayout is used around an EditText is automatically takes the hint text defined in the EditText and shows it as a floating label. Another feature we can also set an error message to EditText by using setErrorEnabled() and setError() methods .
TextInputLayout takes the value of android:hint assigned to EditText and displays it as floating label.
Let’s Get it Working
In this tutorial we are going to learn how to how to float label on EditText. To really understand the usage of TextInputLayout we will create an app . The App contains simple registration form with floating label, form validations and error messages.
Step 1 ) Update build.gradle file
Before you can use TextInputLayout in your projects you need to add the following compile line to your Gradle dependencies block in your build.gradle file and rebuilt the project .
Step 2) Update strings.xml .
Add the below string values to the string.xml located in res => values => strings.xml .
Step 3) Update dimens.xml .
Add the below dimensions to the dimens.xml located in res => values => dimens.xml .
Step 4) Update activity_main.xml .
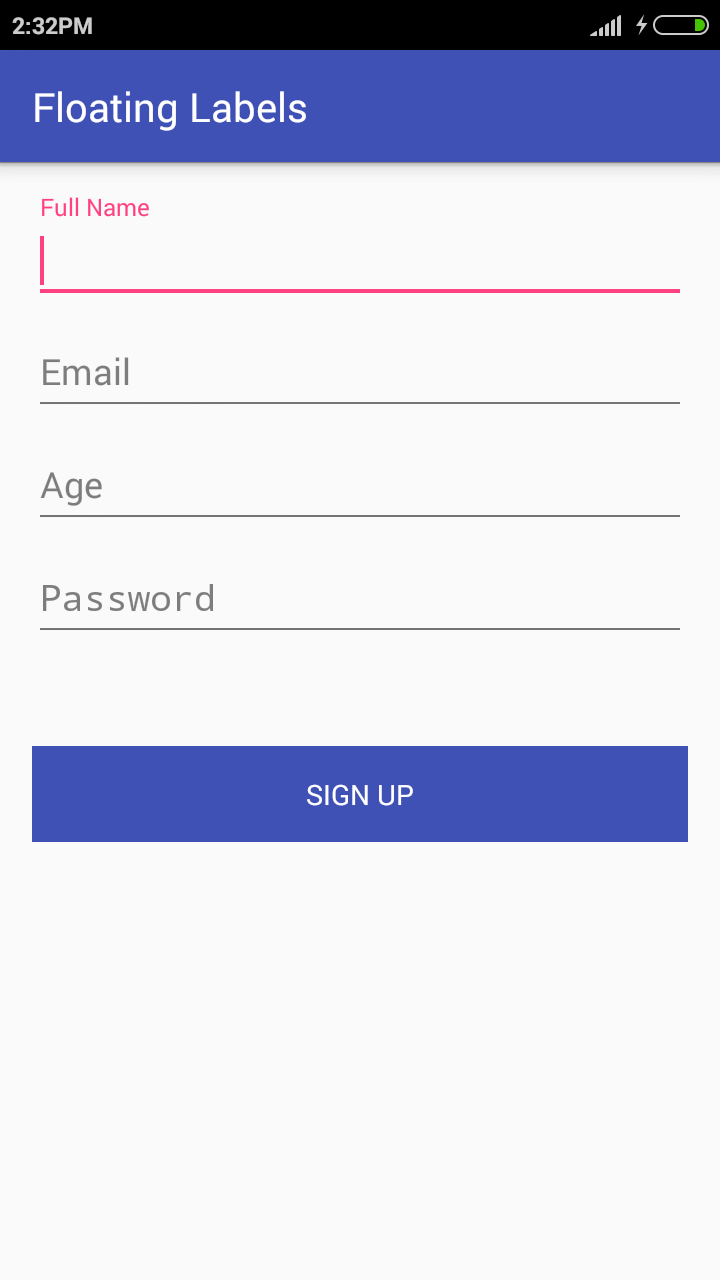
Open the layout file for the MainActivity.java i.e activity_main.xml and add the below code in you layout file . The code will create a simple registration form containing 4 input fields Full Name , Email , Age and Password with Sign Up Button .
Step 5) Write Validation Helper Class.
Create a class named ValidationHelper.java and add below code in it . The code will create validation methods for input field . Validation to check empty input and valid email .
Step 6) Update Main Activity Class.
Now Open MainActivity.java and make some changes in code . Here i added the methods to validate the input fields Full Name,Email,Age and Password using the ValidationHelper class which i described above .
This whole sample would result a screen like this:
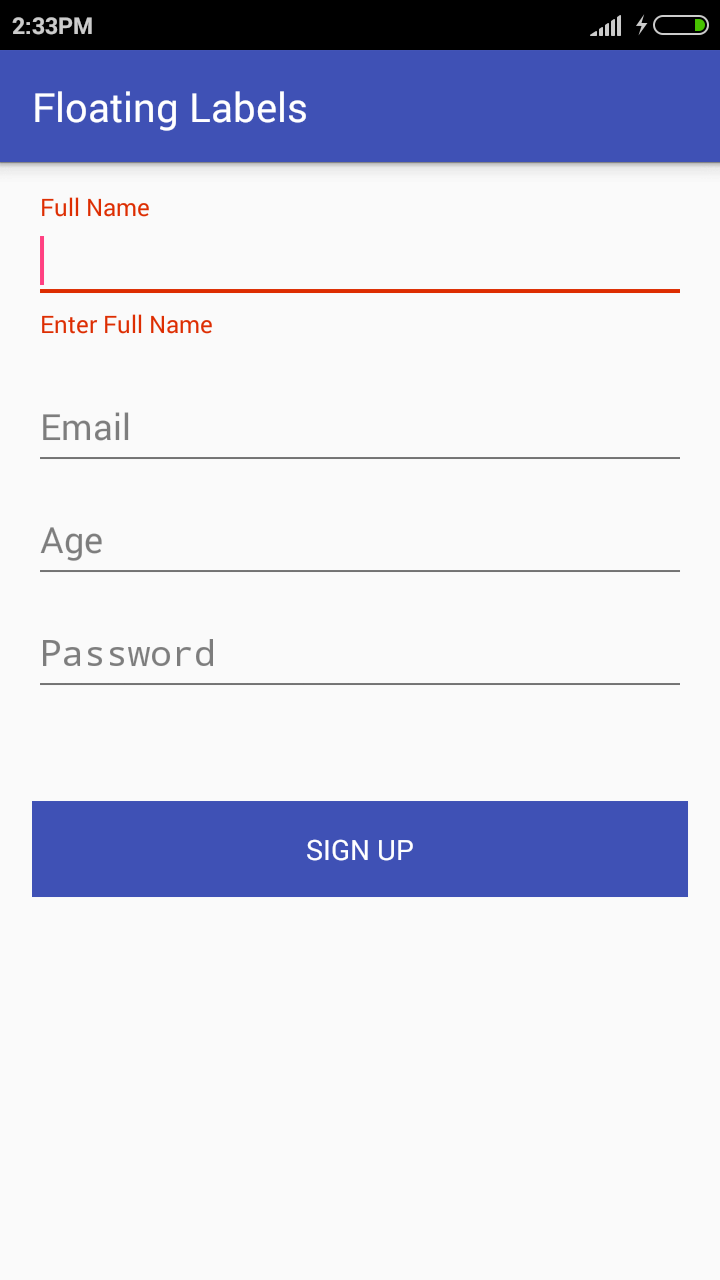
Floating Labels with error message
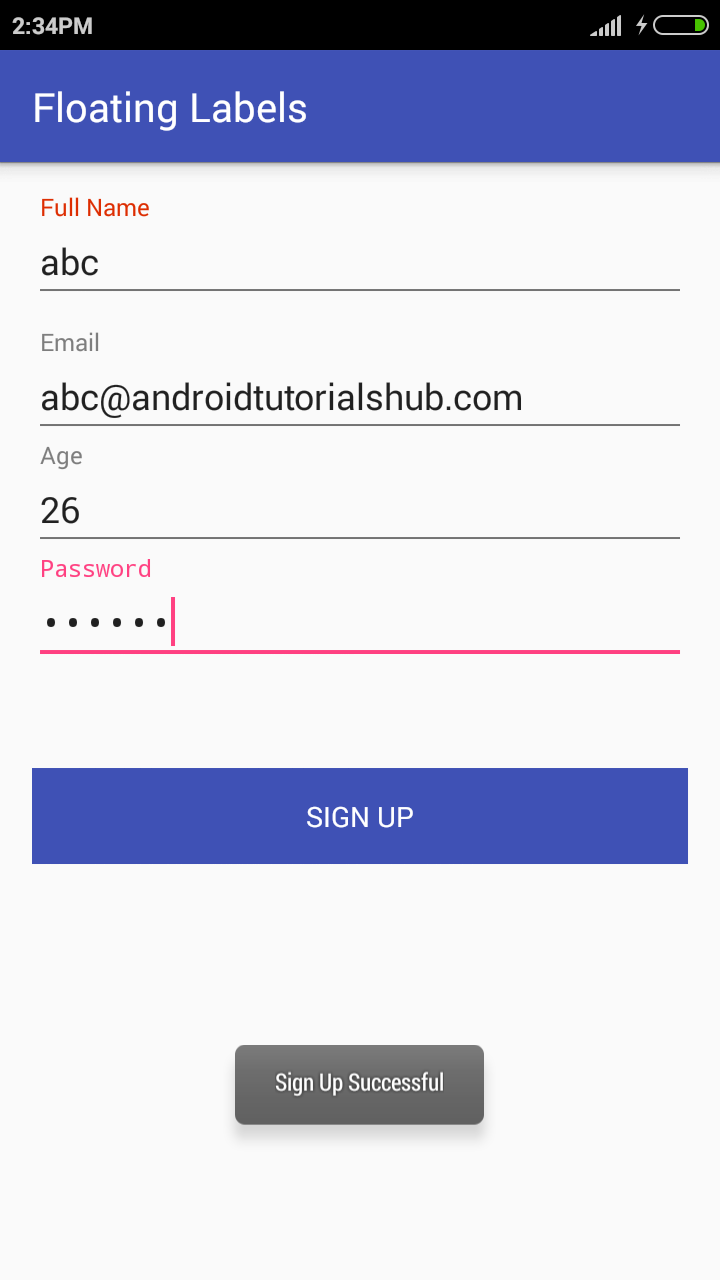
Sign Up Success


Enjoy Coding and Share Knowledge
Источник
Android edittext material design
![]()
NOTE: 2.0 is NOT BACKWARDS COMPATIBLE! See more on wiki or 中文看这里

AppCompat v21 makes it easy to use Material Design EditText in our apps, but it’s so limited. If you’ve tried that, you know what I mean. So I wrote MaterialEditText, the EditText in Material Design, with more features that Google Material Design Spec has introduced.

- Floating Label


custom floating label text:

- Single Line Ellipsis

- Max/Min Characters


- Helper Text and Error Text

- Custom Base/Primary/Error/HelperText Colors

- Custom accent typeface
floating label, error/helper text, character counter, etc.

- Hide Underline

- Material Design Icon
Источник
TextInputLayout
Макет TextInputLayout сначала появился в библиотеке Android Design Support Library и добавляет немного красоты к текстовому полю. Когда пользователь начинает вводить текст в текстовом поле, то подсказка, заданная в этом компоненте, всплывает над ним в специальном TextView. Пример можно увидеть на видео.
Библиотека больше не развивается, поэтому используйте AndroidX, которую я и буду теперь использовать в описании.
Компонент можно найти на панели инструментов в разделе Text.
При добавлении компонента через визуальный редактор автоматически добавляется дочерний элемент TextInputEditText.
Так выглядел компонент в составе Support Library.
Подсказку не обязательно указывать в атрибуте android:hint у текстового поля. Можно программно присвоить через метод:
Стилизация
В AndroidX у компонента появились новые стили: OutlinedBox, FilledBox. Можете самостоятельно запустить пример с двумя стилями и посмотреть на отличия.
Далее идёт текст для старой версии статьи. Вам следует самостоятельно обновить нужные фрагменты кода.
Общая стилизация доступна следующим образом. Пропишем стили в styles.xml:
Обработка ошибки
Предыдущий пример показывал применение подсказки. Но также можно выводить сообщения об ошибке. Здесь потребуется написать немного кода. За вывод ошибки отвечает атрибут app:errorEnabled. Назначим текстовому полю тип клавиатуры и однострочный текст. При наборе текста после нажатия на клавишу Enter проверяем длину текста. Если текст меньше четырёх символов, то выводим сообщение об ошибке.
Текст ошибки выводится снизу от текстового поля.

Стиль для сообщения об ошибке можно стилизовать. Добавим новый атрибут.
В файле стилей res/values/styles.xml добавим новый стиль:
Теперь выводится другим цветом.

Расширенный вид стилей:
Применяем через атрибуты app:errorTextAppearance и android:theme.
Счётчик символов
С помощью атрибутов app:counterEnabled и app:counterMaxLength можно установить счётчик символов с указанием предела, который будет выводиться под текстовым полем.

Когда будет превышен лимит, то цвет счётчика изменится. Этот цвет можно стилизовать через стиль.
Стиль применяется к атрибуту app:counterOverflowTextAppearance:
TextInputEditText
Казалось бы простой компонент, никаких трудностей не возникает. Но не торопитесь. Стоит повернуть устройства в альбомный режим, как текстовое поле растянется на весь экран и никакой подсказки вы не увидите. Возможно, это баг, который когда-нибудь починят. Но проблему легко решить, если вместо стандартного EditText использовать специальный компонент из библиотеки TextInputEditText:
Источник
Android Material Design and the Design Support Library
Android as an operating system has undergone many visual overhauls over the years, and the current incarnation of those is Material Design. The comprehensive guide from Google thoroughly explains its concepts, but probably concerns designers and UI experts the most. From a programmers perspective though, some of the effects were difficult to achieve and were inconsistent across applications because of using custom solutions or third-party libraries. Thankfully, Google created the Design Support Library that now contains all commonly used visual components for us to use. No more custom code needed.
The following tutorial contains an overview of the Material Design UI components with example code for including and customising them in your application. All of them can be used independently from others, so you can treat every section as a reference guide.
Prerequisites
Please refer to the base tutorial How To Get Started With Android Programming for an explanation of basic Android concepts. This tutorial directly expands on that base project — you can download the initial source code here.
Project setup
Open your app’s build.gradle file and add Design Support Library in dependencies section. Sync project.
AppCompat theme & colors
In the newest versions of Android Studio, the theme for the entire application is set by default in the AndroidManifest.xml to AppTheme :
Command-click on the @style/AppTheme to see the resource file located in /res/values/styles.xml folder of your application.
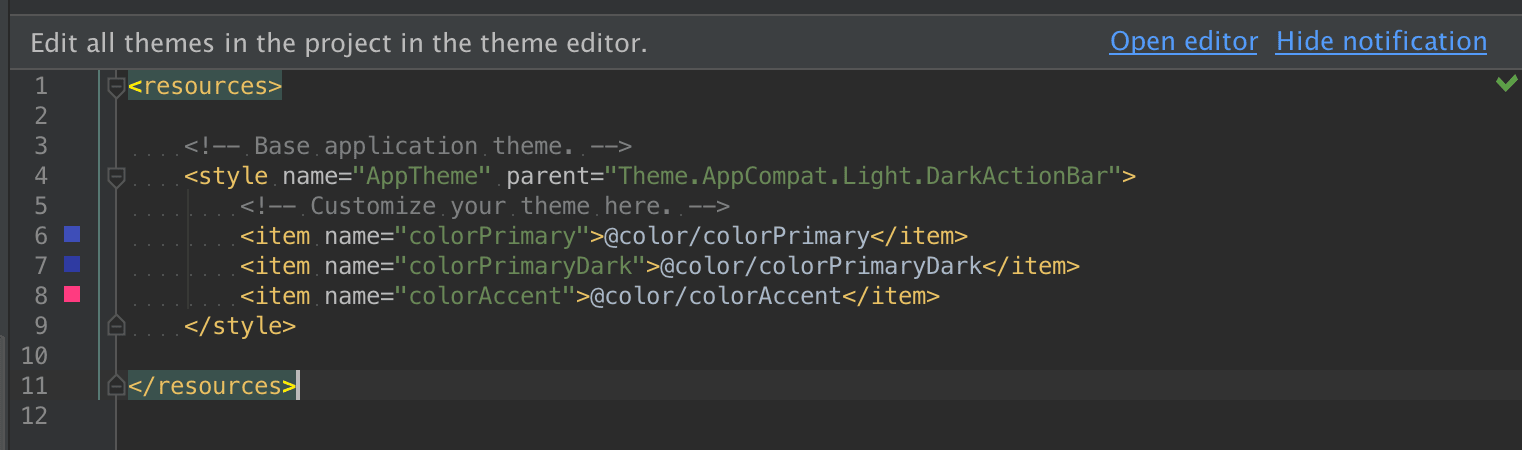
As you can see, our theme has a parent named Theme.AppCompat.Light.DarkActionBar (feel free to modify this using code autocompletion to see what other themes are available) and defines three custom colors: colorPrimary , colorPrimaryDark , and colorAccent . This is a convention introduced by using Material Design and AppCompat, that allows us to quickly change the color scheme of the entire application. This AppCompat Theme is a back-port of Material theme (available only on Android 5.0+) to use on older platforms, which is the preferred way to go for the sake of backward compatibility.
Notice the prompt Edit all themes in the project in the theme editor. — click on Open editor, it will display the visual editor which helps to find the right color scheme by displaying previews of visual components. This is a very helpful tool.

To customise a color scheme manually, you can always go to /res/values/colors.xml and modify the values, or add new ones with the corresponding theme properties in styles.xml .
Toolbar
The Toolbar is essentially a concrete implementation of App Bar, which has been previously known as the Action Bar. Although visually very similar, the Toolbar brings improvements over the well-known actionbar pattern — being a ViewGroup , it can contain arbitrary widgets within itself and can be placed anywhere in your application layout. It is not part of a window decoration (as a theme attribute) anymore.
Include the Toolbar
Our currently applied theme Theme.AppCompat.Light.DarkActionBar does just that — provides the ActionBar. Let us change that to Theme.AppCompat.Light.NoActionBar in styles.xml . Now there is no default ActionBar added to our Activity layouts, so we need to add it as another widget in the View hierarchy.
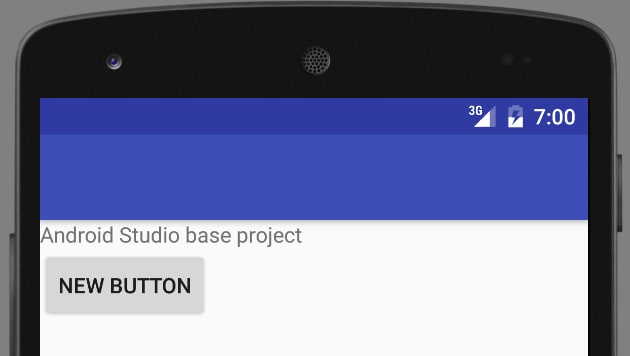
We have added the Toolbar and moved the TextView relatively below it by adding the android:layout_below=»@id/toolbar property. As you can see, so far it is empty.
The Toolbar can be set up as the ActionBar for the Activity, but that needs to be done in code. Modify the MainActivity.java . Notice the support package containing the Toolbar:
Now, run the app. It displays the Playground title in the Toolbar, but it is black on dark blue background — remedy this by setting additional properties on it:
The popupTheme will come in handy in the next section.
Setup the action menu
In order to provide custom actions in the Toolbar, we need to perform the same steps that the ActionBar would require:
- define menu XML
- implement callback methods in the Activity
Create a new resource file /res/menu/main.xml :
Add two methods to the MainActivity.java :
You should see action items in the Toolbar now.
Customise Toolbar
Because it is an ordinary ViewGroup component, we can place arbitrary View hierarchies inside it. Modify the Toolbar node in activity_main.xml :
In MainActivity.java , get a reference to ActionBar in the onCreate() method and hide its title:
Please notice that we are using SupportActionBar. It gives us a reference to the activity’s ActionBar, in this particular case — it is a Toolbar instance, fully compatible with the ActionBar’s API. The final effect should look like this:

TextInputLayout
This handy layout wraps around the TextView and provides a few useful functions that most Android programmers have had to code manually at some point. Add this XML to the activity layout:
And this code at the end of the onCreate() method:
- adds a counter to the TextView, sets its max number of characters and enables it
- adds an error message that normally should be done dynamically in response to some kind of validation method
The final effect looks like this:

Floating Action Button
FAB is a new concept of a single, clearly visible ImageButton that invites the user to take a significant, contextual action specific to the screen he is on. This may be composing a new email, taking a photo, or editing the currently viewed calendar event. It is also a showcase of shiny new Material properties, which are elevation (casting a shadow on elements underneath) and the ripple click effect.
Add the FAB at the end of the layout file:
Let’s add OnClickListener in MainActivity ‘s onCreate() method:
As you can see, the FAB has the additional functionality of animating its view when hiding or showing.

Snackbar
The Snackbar is a next-level Toast. It can briefly appear on the screen and can have one optional action that happens on click. It is usually used to confirm actions, such as archiving an email or sending a message and additionally provides a contextual undo action for what we have just done. It is straightforward to use because the API is similar to its predecessor. Modify the part of the code responsible for the FAB from the previous section:
Play with the Snackbar.LENGTH parameters, different text colors and custom duration you can set via helper setters. As you can see:
- instead of Context , we provide a View for Snackbar construction (see the next section)
- the action text has been capitalized
- the Snackbar appeared on the bottom of the screen, without any changes to the XML layout
- by default, it covers everything underneath — this is not good when we use FAB, but we will fix it in the next section

CoordinatorLayout
What we were missing in the previous section is the CoordinatorLayout — an intelligent FrameLayout that is aware of the interactions between views — scrolling, moving views around, etc. By implementing Behaviors, child views can define their interactions and layout modifications they would like to perform in reaction to others. Support Library components provide default behaviors, and we are going to make use of those now.
Modify the activity_main.xml to accommodate CoordinatorLayout and extract the FAB from the RelativeLayout containing other components:
We have wrapped the FAB into a CoordinatorLayout in XML, now we need to set it as Snackbar’s anchor view in onCreate() :
Thanks to the default Behaviors and CoordinatorLayout, Snackbar pushes up the FAB when it appears on screen.

PercentRelativeLayout
One neat addition to the SupportLibrary is PercentRelativeLayout that (finally) allows us to define relative dimensions as a percentage of available space.
Add the dependency in the build.gradle file:
Change the RelativeLayout to PercentRelativeLayout and alter the width of Toolbar (just for fun) replacing android:layout_width=»wrap_content» attribute with app:layout_widthPercent=»80%» :
Feel free to rotate the screen to see if the width is still relative to the overall width. The final effect should look like this (it also proves that the Toolbar is just another View):

You can encounter errors using those percentage attributes:
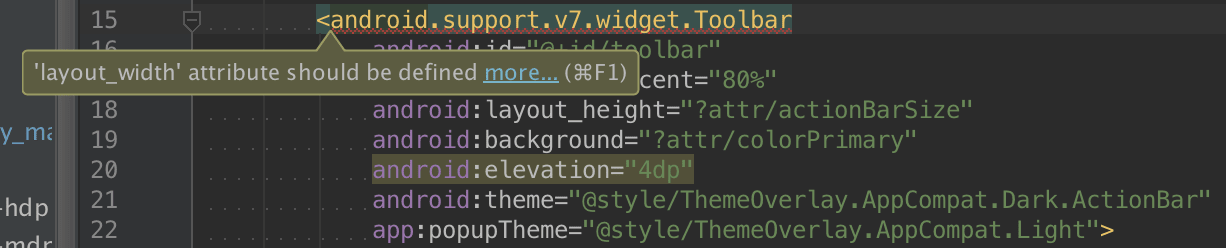
This will go away once the tools get updated to recognize the Percentage Library, but the actual compilation should go just fine.
Summary
In this tutorial, you have learned the basics of Material Design, which dramatically changed how modern Android apps look like, as well as interact with the users. You are now able to take advantage of the most popular building blocks provided by Android and to use the Design Support Library on newest and older Android devices.
The source code for this tutorial can be found on GitHub.

Adam Jodłowski
X-Team Weekly
Our curated newsletter across programming, productivity, and inspiration.
Keep up to date with the X-Team culture.
Источник


