- Полный список
- Android Spinner Tutorial With Example For Beginners | Android Studio
- Methods to create spinner
- Functions Of Spinner
- 1. setAdapter(SpinnerAdapter adapter)
- 2. setGravity(int gravity)
- 3. setEnabled(boolean enabled)
- 4. onTouchEvent(MotionEvent event)
- 5. performClick()
- 6. getDropDownWidth()
- 7. getPopupBackground()
- 8. setDropDownWidth(int pixels)
- Example of Spinners
- Step 1. XML file writings
- Download First Example
- Second Example Of Spinner
- Step 1. Layout file and changes
- Step 2. Adding Images
- Step 3. Adapter For Spinner
- Step 4. Last Java File
- Download Source code
- Useful Spinner Tutorials
- Spinner как edittext
- Android EditText with Examples
- Create a EditText in Layout File
- Create EditText Control in Activity File
- Set the Text of Android EditText
- Get Text of Android EditText
- Android EditText Attributes
- Android EditText Control Example
- activity_main.xml
- MainActivity.java
- Output of Android EditText Example
Полный список
Многовато уроков получилось про адаптеры и списки. Я изначально хотел буквально пару примеров показать, но чето затянуло и расписал чуть ли не все существующие адаптеры ) Напоследок сделаем пару полезных примеров, где еще используются адаптеры. В этом небольшом уроке рассмотрим Spinner.
Spinner – это выпадающий список, позволяющий выбрать одно значение. Он позволяет сэкономить место на экране. Я думаю, все встречали его не только в Android, но и в других языках программирования.
Сделаем простой пример.
Project name: P0561_Spinner
Build Target: Android 2.3.3
Application name: Spinner
Package name: ru.startandroid.develop.p0561spinner
Create Activity: MainActivity
В экран main.xml поместим Spinner:
Код несложен. Создаем адаптер, используем simple_spinner_item в качестве layout для отображения Spinner на экране. А методом setDropDownViewResource указываем какой layout использовать для прорисовки пунктов выпадающего списка.
Метод setPrompt устанавливает текст заголовка выпадающего списка, а setSelection – элемент, который мы хотим выделить. Оба метода, разумеется, необязательны. Я их использовал для демонстрации.
Обработчик выбора элемента из списка присваивается методом setOnItemSelectedListener. Будем выводить на экран позицию выбранного элемента.
Все сохраним и запустим. Нажмем на Spinner.

Виден заголовок Title и выделен элемент с позицией 2. Выберем пункт four.

Обработчик показал, что выделили пункт с позицией 3.
Чтобы определить, какой элемент выделен сейчас, используйте spinner.getSelectedItemPosition(). Чтобы получить текст этого элемента можно сразу выполнять spinner.getSelectedItem().toString().
На следующем уроке:
Присоединяйтесь к нам в Telegram:
— в канале StartAndroid публикуются ссылки на новые статьи с сайта startandroid.ru и интересные материалы с хабра, medium.com и т.п.
— в чатах решаем возникающие вопросы и проблемы по различным темам: Android, Kotlin, RxJava, Dagger, Тестирование
— ну и если просто хочется поговорить с коллегами по разработке, то есть чат Флудильня
— новый чат Performance для обсуждения проблем производительности и для ваших пожеланий по содержанию курса по этой теме
Источник
Android Spinner Tutorial With Example For Beginners | Android Studio

Topic of today is Android Spinner Tutorial With Example For Beginners.
In android development, spinner widget gives us facility to create a drop down menu with multiple options.
User can select any option from this drop down menu and we can track the selection of the user and can write logic with selected option.
Spinner allows user to select only one value. Spinner doe not support multiple selection from the drop down list.
In the default state, a spinner shows its currently selected value. Touching the spinner displays a drop down menu with all other available values, from which the user can select a new one.
Just like ListView or RecyclerView, spinner is also associated with the Adapter. Hence, we need to attach the adapter class to the spinner to populate it with various options.
Methods to create spinner
Generally, developers create spinner with one of the following method.
- Using Array Adapter
- Or with the help of the Custom Adapter
When you want to develop very basic spinner with only text options, you should use the first method.
You can use second method when you want to customize your spinner heavily. For example, you want to add images along with the text in the spinner.
Functions Of Spinner
Android provides some predefined methods which helps developers to make spinner within no time.
1. setAdapter(SpinnerAdapter adapter)
Using this method we can set the SpinnerAdapter to our Spinner.
Adapter will provide data to the spinner.
2. setGravity(int gravity)
Describes how the selected item view is positioned.
3. setEnabled(boolean enabled)
Set the enabled state of this view.
4. onTouchEvent(MotionEvent event)
Implement this method to handle touch screen motion events.
5. performClick()
Call this view’s OnClickListener, if it is defined.
6. getDropDownWidth()
Get the configured width of the spinner’s popup window of choices in pixels.
7. getPopupBackground()
Get the background drawable for the spinner’s popup window of choices.
8. setDropDownWidth(int pixels)
Set the width of the spinner’s popup window of choices in pixels.
Example of Spinners
Let us create two examples of spinner in the android studio.
First example will contain spinner with text options. It will be a simple example where we will use array adapter.
In the second example, we will add image along with the text in every drop down option of spinner.
So let’s make first example step by step.
Step 1. XML file writings
First of all, create a new project in android studio.
Now add the following source code in activity_main.xml file
I have taken spinner in the main layout file. Do not forget to give id to the spinner.
Now in the MainActivity.java file, you should write down the below code block
Let us understand the above code deeply.
Compiler will first create the object of the spinner and will associate a id using findViewById() method.
Then below code will create a simple list.
A list of string called “categories” will have the name of the laptop manufacture companies in the string format.
This list will work as the data source to populate our spinner. User will have options from this category list in the drop down menu.
To set this category list in the spinner, we need one adapter.
Now look at the below coding lines
Compiler will create the object of the Array Adapter class. As you can see that it has three parameters.
First parameter is just a context of the application.
Second parameter is asking for the layout which will help to create the UI of the drop down items. I have used default layout in the above code. You can also make custom file when you are using custom adapter (We will create this in second example).
Last parameter contains the data source which is “categories” list.
After this, compiler will set the adapter to the spinner.
Now read the following code structure
Compiler will run the above code when the user selects any option from the spinner.
Android will show one toast when the user selects the option. Toast will have text like “Selected : Dell”
Watch the output in the below video
Download First Example
Click the below link to download the first spinner example source code.
Second Example Of Spinner
In this second project, we will insert image in the drop down option.
Make another new project in the android studio.
Step 1. Layout file and changes
Following is the code structure for activity_main.xml file.
Again, there is only one spinner in the main layout code.
We will create custom base adapter in this example. For this, we need one separate XML file to create view of the drop down items.
So go ahead and make a new XML file under res->layout directory.
Set the name of this file as sp_item.xml and add the following coding lines in it
I have added one image view and one text view in this file. They are under linearlayout with horizontal orientation.
So these both UI widgets will be added side by side.
Every drop down option will contain this image view and text view.
Step 2. Adding Images
Click the following link to download the images.
Add these images inside the res->drawable folder.
Step 3. Adapter For Spinner
Create a new JAVA class and give it a name like SpinnerAdapter.java
Code lines for this is as the following
Read the constructor in the above code block.
Constructor of adapter have three parameters. First parameter will give us context of the application.
Second one giving us the integer array. This integer array holds the reference to the images that we have added in the drawable folder in step 2.
Third parameter have string array. String array contains the name of the fruits in the text format.
We will create both integer array and string array in the MainActivity.java file. Then we will pass them while creating the object of the SpinnerAdapter.class in the MainActivity.java file only.
In the getView() method, compiler will inflate the sp_item.xml method, which we have created in the first step.
Then it will set the text in the text view and an image in the image view.
Step 4. Last Java File
At last, add the following coding lines in MainActivity.java file.
First two lines are creating an integer array and string array.
Then compiler will create the object of the SpinnerAdapter.java class.
Here, it will pass the integer and string array as the second and third parameter respectively.
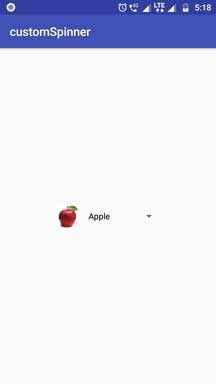
Following images are the outcome of the example.
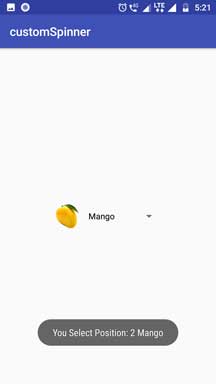 Last View Toast
 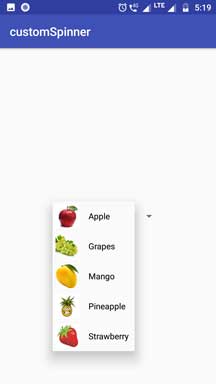 Drop Down
Download Source code
Click the following line to download source code for second spinner example
Useful Spinner Tutorials
Once you are ready to make basic spinner, you can read following tutorial to enhance your skill in spinner.
Источник
Spinner как edittext
У меня есть форма с TextInputLayout + TextInputEditText и прядильщиками. Я хочу, чтобы текст обтекателя увеличился, но в раскрывающемся списке есть большие элементы. Проблема в том, что высота прядильника зависит от высоты выпадающих элементов (simple_spinner_dropdown_item). Я установил стиль = “@style/Base.Widget.AppCompat.Spinner.Underlined”, чтобы добавить строку ниже spinner.
Если вы хотите, чтобы spinner как edittext, это похоже на AutoCompleteTextView. Вы можете настроить свой AppCompatAutoCompleteTextView следующим образом:
И ic_expand_more_black_18dp.png – это изображение:

Результат (вы можете установить адаптер для своего автозаполнения)
Вот обходной путь:
Здесь макет android.R.layout.simple_spinner_dropdown_item используется для dropdown элемента и пользовательского макет custom_spinner_item используются для вращателя view , чтобы показать только TextView .
custom_spinner_item.xml:
FYI, вы можете настроить этот TextView в соответствии с вашими потребностями.
Надеюсь, это поможет
Я использую библиотеки поддержки (AppCompat) и макеты, как показано ниже. Больше информации здесь.
Обновить
для раскрывающегося списка: android.R.layout.simple_spinner_dropdown_item
ANSWER: Я просто установил макет адаптера (попробовал оба макета), но есть конкретный макет раскрывающегося списка.
spinner_item – это настраиваемый макет, который удаляет остальное дополнение:
Источник
Android EditText with Examples
In android, EditText is a user interface control which is used to allow the user to enter or modify the text. While using EditText control in our android applications, we need to specify the type of data the text field can accept using the inputType attribute.
For example, if it accept plain text, then we need to specify the inputType as “text”. In case if EditText field is for password, then we need to specify the inputType as “textPassword”.
In android, EditText control is an extended version of TextView control with additional features and it is used to allow users to enter input values.
In android, we can create EditText control in two ways either in XML layout file or create it in Activity file programmatically.
Create a EditText in Layout File
Following is the sample way to define EditText control in XML layout file in android application.
xml version= «1.0» encoding= «utf-8» ?>
LinearLayout xmlns: android = «http://schemas.android.com/apk/res/android»
android :layout_width= «match_parent»
android :layout_height= «match_parent»
android :orientation= «vertical» >
EditText
android :id= «@+id/txtSub»
android :layout_width= «match_parent»
android :layout_height= «wrap_content»
android :hint= «Subject»
android :inputType= «text»/>
LinearLayout >
If you observe above code snippet, here we defined EditText control to accept plain text by using inpuType as “text” in xml layout file.
Create EditText Control in Activity File
In android, we can create EditText control programmatically in an activity file to allow users to enter text based on our requirements.
Following is the example of creating EditText control dynamically in an activity file.
public class MainActivity extends AppCompatActivity <
@Override
protected void onCreate(Bundle savedInstanceState) <
super .onCreate(savedInstanceState);
setContentView(R.layout. activity_main );
LinearLayout linearLayout = (LinearLayout) findViewById(R.id. linearlayout );
EditText et = new EditText( this );
et.setHint( «Subject» );
linearLayout.addView(et);
>
>
Set the Text of Android EditText
In android, we can set the text of EditText control either while declaring it in Layout file or by using setText() method in Activity file.
Following is the example to set the text of TextView control while declaring it in XML Layout file.
If you observe above example we used android:text property to the set required text for EditText control in XML Layout file.
Following is another way to set the text of EditText control programmatically in activity file using setText() method.
If you observe above code snippet, we are finding the EditText control which we defined in XML layout file using id property and setting the text using setText() method.
Get Text of Android EditText
In android, we can get the text of EditText control by using getText() method in Activity file.
Following is the example to get text of EditText control programmatically in activity file using getText() method.
public class MainActivity extends AppCompatActivity <
@Override
protected void onCreate(Bundle savedInstanceState) <
super .onCreate(savedInstanceState);
setContentView(R.layout. activity_main );
EditText et = (EditText) findViewById(R.id. txtSub );
String name = et.getText().toString();
>
>
If you observe above code snippet, we are finding the EditText control which we defined in XML layout file using id property and getting the text of EditText control using getText() method.
Android EditText Attributes
The following are some of the commonly used attributes related to EditText control in android applications.
| Attribute | Description |
|---|---|
| android:id | It is used to uniquely identify the control |
| android:gravity | It is used to specify how to align the text like left, right, center, top, etc. |
| android:text | It is used to set the text. |
| android:hint | It is used to display the hint text when text is empty |
| android:textColor | It is used to change the color of the text. |
| android:textColorHint | It is used to change the text color of hint text. |
| android:textSize | It is used to specify the size of the text. |
| android:textStyle | It is used to change the style (bold, italic, bolditalic) of text. |
| android:background | It is used to set the background color for edit text control |
| android:ems | It is used to make the textview be exactly this many ems wide. |
| android:width | It makes the TextView be exactly this many pixels wide. |
| android:height | It makes the TextView be exactly this many pixels tall. |
| android:maxWidth | It is used to make the TextView be at most this many pixels wide. |
| android:minWidth | It is used to make the TextView be at least this many pixels wide. |
| android:textAllCaps | It is used to present the text in all CAPS |
| android:typeface | It is used to specify the Typeface (normal, sans, serif, monospace) for the text. |
| android:textColorHighlight | It is used to change the color of text selection highlight. |
| android:inputType | It is used to specify the type of text being placed in text fields. |
| android:fontFamily | It is used to specify the fontFamily for the text. |
| android:editable | If we set false, EditText won’t allow us to enter or modify the text |
Android EditText Control Example
Following is the example of using multiple EditText controls with different input types like password, phone, etc. in LinearLayout to build an android application.
Create a new android application using android studio and give names as EditTextExample. In case if you are not aware of creating an app in android studio check this article Android Hello World App.
Now open an activity_main.xml file from \res\layout path and write the code like as shown below
activity_main.xml
xml version= «1.0» encoding= «utf-8» ?>
LinearLayout xmlns: android = «http://schemas.android.com/apk/res/android»
android :layout_width= «match_parent»
android :layout_height= «match_parent»
android :paddingLeft= «40dp»
android :orientation= «vertical» android :id= «@+id/linearlayout» >
EditText
android :id= «@+id/txtName»
android :layout_width= «wrap_content»
android :layout_height= «wrap_content»
android :layout_marginTop= «25dp»
android :ems= «10»
android :hint= «Name»
android :inputType= «text»
android :selectAllOnFocus= «true»/>
EditText
android :id= «@+id/txtPwd»
android :layout_width= «wrap_content»
android :layout_height= «wrap_content»
android :ems= «10»
android :hint= «Password 0 to 9»
android :inputType= «numberPassword»/>
EditText
android :id= «@+id/txtEmai»
android :layout_width= «wrap_content»
android :layout_height= «wrap_content»
android :ems= «10»
android :hint= «Email»
android :inputType= «textEmailAddress»/>
EditText
android :id= «@+id/txtDate»
android :layout_width= «wrap_content»
android :layout_height= «wrap_content»
android :layout_below= «@+id/editText3»
android :ems= «10»
android :hint= «Date»
android :inputType= «date»/>
EditText
android :id= «@+id/txtPhone»
android :layout_width= «wrap_content»
android :layout_height= «wrap_content»
android :ems= «10»
android :hint= «Phone Number»
android :inputType= «phone»
android :textColorHint= «#FE8DAB»/>
Button
android :id= «@+id/btnSend»
android :layout_width= «wrap_content»
android :layout_height= «wrap_content»
android :text= «submit»
android :textSize= «16sp»
android :textStyle= «normal|bold»/>
TextView
android :layout_width= «wrap_content»
android :layout_height= «wrap_content»
android :id= «@+id/resultView»
android :layout_marginTop= «25dp»
android :textSize= «15dp»/>
LinearLayout >
If you observe above code we created multiple EditText controls with different inputTypes, such as password, email address, date, phone number, plain text.
Once we are done with the creation of layout with required controls, we need to load the XML layout resource from our activity onCreate() callback method, for that open main activity file MainActivity.java from \java\com.tutlane.edittextexample path and write the code like as shown below.
MainActivity.java
package com.tutlane.edittextexample;
import android.support.v7.app.AppCompatActivity;
import android.os.Bundle;
import android.view.View;
import android.widget.Button;
import android.widget.EditText;
import android.widget.TextView;
import org.w3c.dom.Text;
public class MainActivity extends AppCompatActivity <
Button btnSubmit ;
EditText name , password , email , dob , phoneno ;
TextView result ;
@Override
protected void onCreate(Bundle savedInstanceState) <
super .onCreate(savedInstanceState);
setContentView(R.layout. activity_main );
name =(EditText)findViewById(R.id. txtName );
password = (EditText)findViewById(R.id. txtPwd );
email = (EditText)findViewById(R.id. txtEmai );
dob = (EditText)findViewById(R.id. txtDate );
phoneno = (EditText)findViewById(R.id. txtPhone );
btnSubmit = (Button)findViewById(R.id. btnSend );
result = (TextView)findViewById(R.id. resultView );
btnSubmit .setOnClickListener( new View.OnClickListener() <
@Override
public void onClick(View v) <
if ( name .getText().toString().isEmpty() || password .getText().toString().isEmpty() || email .getText().toString().isEmpty() || dob .getText().toString().isEmpty()
|| phoneno .getText().toString().isEmpty()) <
result .setText( «Please Fill All the Details» );
> else <
result .setText( «Name — » + name .getText().toString() + » \n » + «Password — » + password .getText().toString()
+ » \n » + «E-Mail — » + email .getText().toString() + » \n » + «DOB — » + dob .getText().toString()
+ » \n » + «Contact — » + phoneno .getText().toString());
>
>
>);
>
>
If you observe above code we are calling our layout using setContentView method in the form of R.layout.layout_file_name in our activity file. Here our xml file name is activity_main.xml so we used file name activity_main and we are getting the text of our EditText controls whenever we click on button.
Generally, during the launch of our activity, the onCreate() callback method will be called by the android framework to get the required layout for an activity.
Output of Android EditText Example
When we run the above example using the android virtual device (AVD) we will get a result like as shown below.

If you observe the above result, the system displaying an appropriate on-screen keyboard for each EditText control based on the defined inputType attribute and displayed a message if we click on the button without entering details in fields.
Once we enter details in all fields and click on Button we will get a result like as shown below.

This is how we can use EditText control in android applications to allow the user to enter or modify the text based on our requirements.
Источник


