- Playing with elevation in Android 🥧 (part 1)
- Coloured shadows
- Opacity woes
- The cold numbers
- Playing with elevation in Android
- What is that shadow all about
- Elevation tweaks in action
- One last thing before you go
- Elevation & shadows
- Elevation
- Resting elevation
- Dynamic elevation offsets
- Elevation (Android) Expand and collapse content An arrow that points down when collapsed and points up when expanded.
- Resting elevation
- Responsive elevation and dynamic elevation offsets
- Avoiding elevation interference
Playing with elevation in Android 🥧 (part 1)

I recently wrote an article about elevation in Android, showing how you can hack around framework restrictions to obtain elevation shadows that are different than what the Material Design guidelines mandate.

Since then, there’s been a few interesting developments on the topic, and this follow-up article will cover them. Come for the shadows, stay for the code!
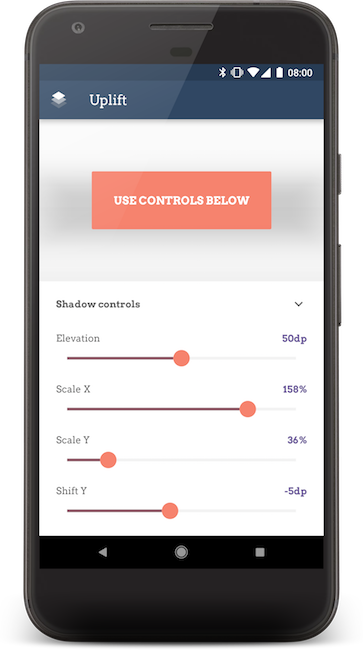
As a side note, I have recently pushed a major update to the app that accompanies last year’s blog post. Uplift has now hit version 3, and there’s a lot more than meets the eye in that release.


As usual, you can download Uplift from the Play Store, and the full source code is available on GitHub.
Coloured shadows
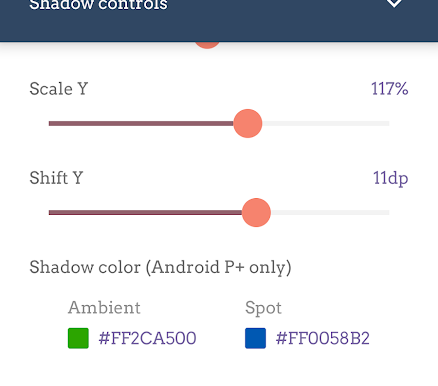
The biggest change in Uplift 3 is the new controls at the bottom of the shadow settings panel that allow you to tint the elevation shadows.
This new feature in the app will only work on Android P and later, because it relies on two new APIs introduced in Android Pie.
The new APIs are setOutlineAmbientShadowColor and setOutlinePostShadowColor and their attribute counterparts, outlineAmbientShadowColor and outlineSpotShadowColor . These two APIs finally allow us to control the shadow colour for views with elevation. But why two distinct values? And what do ambient and spot mean?
If you recall, in the previous article we had this image:

As you can see, the elevation shadow is really two shadows combined together. One is generated by a virtual spotlight positioned above the top of the screen, and is referred to in the above image as the key light; the other by ambient lighting. The former is the source of the key light and casts a harder shadow that is slightly offset towards the bottom of the screen, and the latter casts a subtle, soft shadow that surrounds the objects and is aligned to it.
The two APIs are each controlling the colour of one of the two shadows that compose the elevation shadow. It allows you to have one but not the other by simply setting the colour to fully transparent. I cannot think of a reason why you would ever want to have them in different colours, or only one of the two, though.
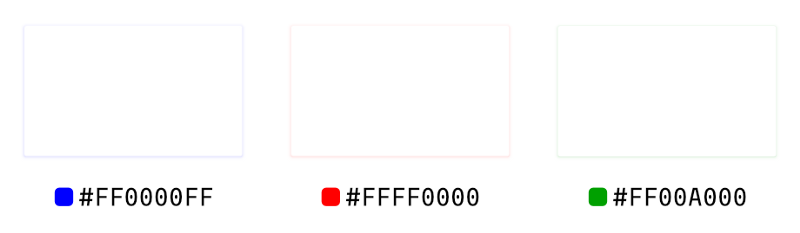
Opacity woes
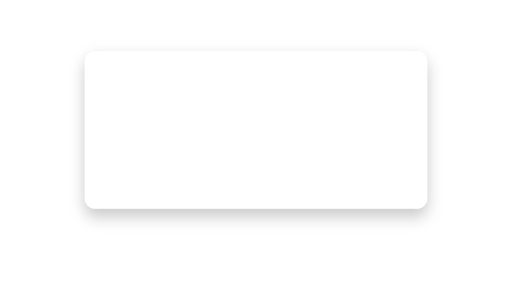
You will notice, though, that setting a fully opaque colour for a shadow does not make your shadow very opaque. This is a fully opaque black shadow ( #FF000000 ), and yet it looks very soft:
The documentation explains why this is:
The opacity of the final spot shadow is a function of the shadow caster height, the alpha channel of the outlineSpotShadowColor (typically opaque), and the R.attr.spotShadowAlpha theme attribute.
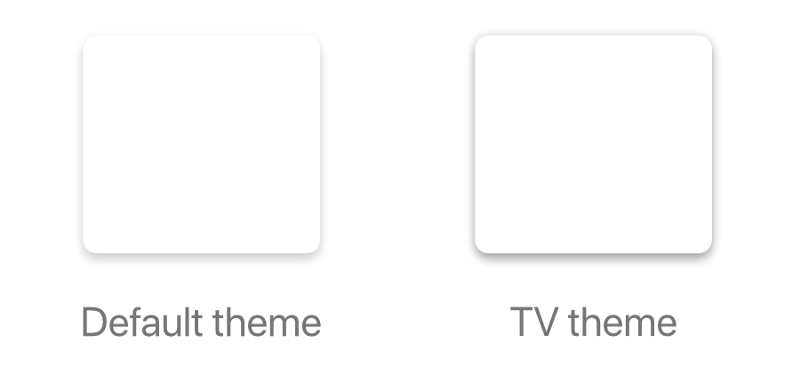
The same goes for outlineAmbientShadowColor and `ambientShadowAlpha`. The values in the Material and AppCompat themes as of API 28 are 0.039 (3.9%) for ambientShadowAlpha and 0.19 (19%) for spotShadowAlpha . The only exception is that TV devices have higher values, set to 0.15 (15%) and 0.3 (30%) respectively:
The cold numbers
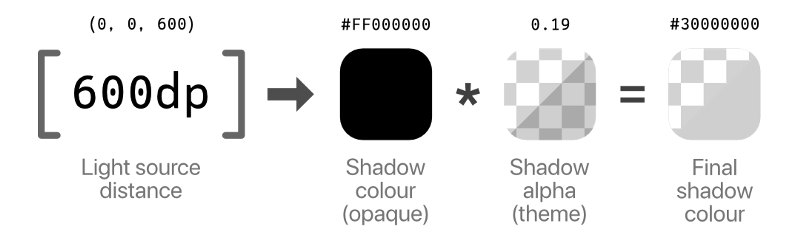
If we look at the colours we are using, it’s easy to see how things get very subtle even with fully black shadow colours. Firstly, the documentation mentions that the shadow casters influence the shadow opacity: those casters are currently fixed. The ambient shadow is cast by an omnidirectional light source, which has no actual position in space, while the spot shadow is cast by a light source positioned at (0dp, 0dp, 600dp) with an 800dp radius.
The light source position is not something we really want to exert any control upon, and we thus don’t consider it in our calculations except to acknowledge that it has an influence.
Then there is the aforementioned alpha factor, which is determined by ambientShadowAlpha and spotShadowAlpha , both determined by the Material theme and without a way to change them at runtime. This is the real reason why our shadows look so subtle. In the example of the spot shadow:
So it looks like we’re destined to have very subtle and muted shadows: we can’t control the light source position, and we’re constrained to having at most 3.9% or 19% opacity (for ambient and spot respectively). Look at these fully saturated elevation shadows as rendered by Android P:
It’s just disappointing. This new API seems designed to prevent us from going overboard with our crazy shadow antics, but what if we could get the bolder, colourful shadows we crave?

In the next part of the article we’ll explore some… creative solutions to get the shadow tinted the way we want, bypassing some of the limitations the OS puts on us.
Источник
Playing with elevation in Android
Everyone knows that Material Design has shadows. Most know that you can control the virtual Z coordinate of Material elements in Android by using the elevation property, to control the shadow. Very few know that there’s so much more you can do to tweak the shadows your UI elements cast!
Update 6th Nov 2018: I just published a follow-up to this article with new APIs added in P, and a bunch of other goodies. Do check it out!
What is that shadow all about
In Material Design, the elevation is a manifestation of the virtual Z coordinate of a material plane relative to the screen’s “base” plane. For example:
 Image shamelessly ripped from the Material Design guidelines.
In the Material Design system, there are two light sources. One is a key light that sits above the top of the screen, and an ambient light that sits directly above the centre of the screen:
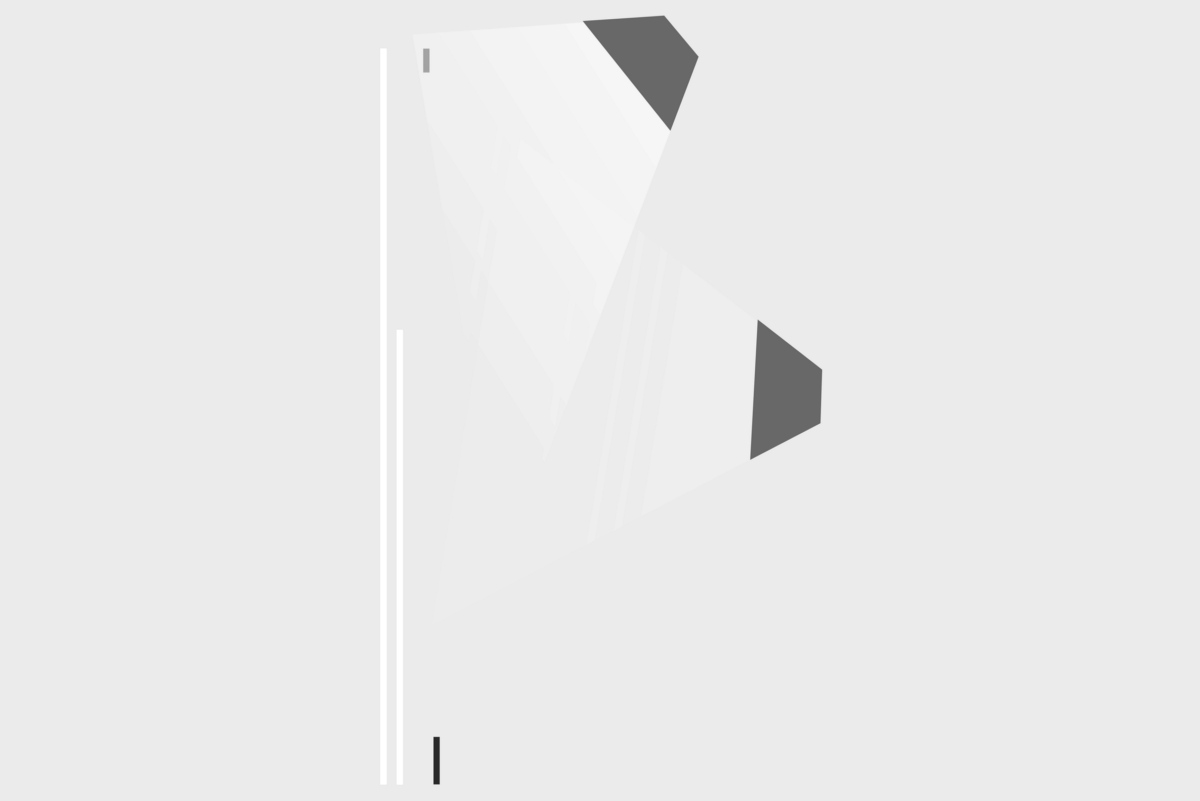 Image shamelessly ripped from the Touchlab blog.
These two lights cast each their own shadow, one which is mostly affecting the bottom edge of a material sheet (key light), and the other which is affecting all edges (ambient light):
Image derived from the Material Design guidelines.
The elevation property directly controls the shape of the resulting shadow; you can see this clearly with buttons, which change their elevation based on their state:
 Image from Vadim Gromov’s Dribbble.
You may think that the elevation property is the only way to control how shadows look, but that’s not true.
In Android, there is a very little known API called Outline that is providing the required information for a Material sheet to project a shadow. The default behaviour for View s is to delegate the outline definition to their background drawable. ShapeDrawable s for example provide outlines that match their shapes, while ColorDrawable s, BitmapDrawable s, etc. provide a rectangle matching their bounds. But nothing says we cannot change that, and tell a view to use a different ViewOutlineProvider , using the setOutlineProvider() method:
If we control the ViewOutlineProvider , we can tweak the resulting Outline , tricking the OS into drawing whatever shadow we want:
You can use elevation and Outline to do all sorts of tweaks to the shape and position of an elevation shadow:
 Believe it or not, I have actually captured this one myself on my phone.
You will notice how the shadow here does not just adapt to different elevation values, but is also translated around and gets a larger or smaller size than the view itself.
Another thing you can do is to assign a shape that is different from the actual outline of the view itself — I cannot think of any situation in which this would make sense, but you could. The only limitation is that the shape must be convex. There are convenience methods on Outline to have ellipses, rectangles and rounded rectangles, but you could also use any arbitrary Path , as long as it’s convex.
Unfortunately it’s not possible to exaggerate some effects too much, since as you can see there are some shortcuts the system takes when rendering the shadows which will create some rather annoying artefacts when you hit them.
In case you are curious how shadows are rendered in Android, the relevant code is in the hwui package in AOSP — you can start looking at AmbientShadow.cpp (note: starting with Android 10, hwui is not really used anymore, and everything is rendered by Skia instead).
Another limitation is that we cannot tint the elevation shadow, we’re stuck with the default grey, but to be honest I don’t believe that’s a bad thing 😉
Elevation tweaks in action
I’ve used this technique to come up with a peculiar elevation appearance for the cards in Squanchy, an open source conference app I’ve been working on in the last year:

As you can see, the cards have a shadow that looks way more diffuse than the regular elevation shadows. This is obtained by having an Outline that is 4dp smaller than the card, and an elevation of 4dp :
The cards have an android:stateListAnimator that also tweaks their elevation and translationZ based on their pressed state, like Material buttons do. You can see how the cardInset* attributes are then used in the CardLayout code to shrink the Outline that we provide to the system.
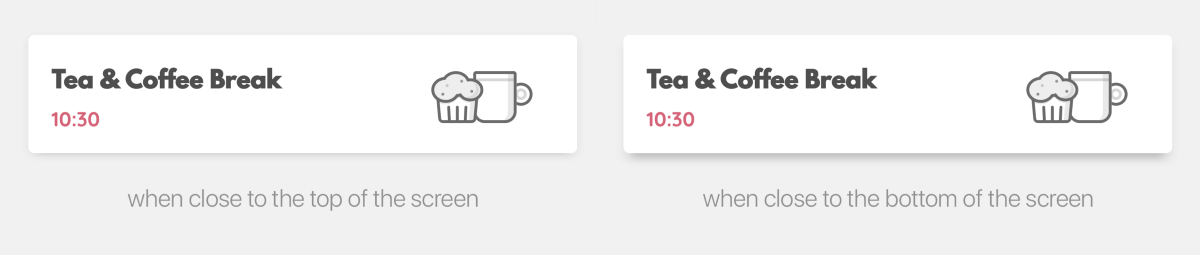
When you scroll the schedule in Squanchy, you might notice that the shadow tends to change size as a card scrolls along the Y axis:

If the effect is too subtle in a gif for you to see, this image makes it crystal clear:
How is that possible? We definitely don’t change the elevation and outline based on the y-position of an item (we could, but it’s really not a good idea as it requires recalculating outlines on each scroll event).
You’ll remember I mentioned earlier how there are two shadows in the Material Design environment, one which sits above the top of the screen, and one that sits directly above the centre. Well, the top light — that is the key light — is casting a longer shadow when an item gets farther away from it. This is actually something that is always true in Android, you just don’t notice it as much in normal circumstances. The Squanchy style makes it more obvious though, and you can even exaggerate it further by using a higher elevation value:

One last thing before you go
Lastly, remember that Outlines aren’t just used for shadows, but by default they define the clipping of the view too! If you have a weird outline and don’t want it to influence the drawing of your actual view, you’ll want to call setClipToOutline(false) on it to avoid nasty surprises.
This is only important when the Outline you provide has canClip() returning true , which is the case when the outline is a rectangle, a rounded rectangle, or a circle. Non-round ovals, and arbitrary paths, are not able to provide clipping, so setClipToOutline() has no effect in those cases.
Fun fact: rectangles and circles are all internally represented as special cases of rounded rectangles. A rectangle is a rounded rectangle with a corner radius of zero, and a circle is a rounded rectangle whose corner radius is equal to half the circle height/width.
If you want to read some more on the topic, the Android Developers website has a page on Defining shadows and clipping views, that goes through the same topics with code examples, and links to some more javadocs.
To play around with elevations on your own Android device, I have cooked up a simple playground app:
The code for the playground app is open source on GitHub.
Источник
Elevation & shadows
In the physical world, objects can be stacked or affixed to one another, but cannot pass through each other. Objects also cast shadows and reflect light.
Material Design reflects these qualities to form a spatial model that is familiar to users and can be applied consistently across apps.
Elevation
Measured from the front of one surface to the front of another, an element’s elevation indicates the distance between surfaces and the depth of its shadow.
Resting elevation
All material elements have resting elevations. While components have consistent resting elevations across apps, they may have different resting elevations across platforms and devices.
Dynamic elevation offsets
Dynamic elevation offsets are the goal elevation that a component moves towards, relative to its resting state.

Elevation (Android) Expand and collapse content An arrow that points down when collapsed and points up when expanded.
Elevation is the relative depth, or distance, between two surfaces along the z-axis.
Specifications:
- Elevation is measured in the same units as the x and y axes, typically in density-independent pixels (dp). Because material elements have depth (all material is 1dp thick), elevation is measured in distance from the top of one surface to the top of another.
- A child object’s elevation is relative to the parent object’s elevation.
The images and values shown are for Android apps.

Multiple elevation measurements for two objects
Resting elevation
All material objects, regardless of size, have a resting elevation, or default elevation that does not change. If an object changes elevation, it should return to its resting elevation as soon as possible.
Desktop resting elevation is 2dp below the listed values to accommodate mouse and non-touch environments.
Component elevations:
- Components maintain consistent resting elevations across apps. For example, the floating action button’s elevation does not vary from one app to another.
- Components may have different resting elevations across platforms and devices, depending on the depth of the environment. For instance, TV has a greater depth than desktop as it has a larger screen and is viewed from further away. Similarly, both TV and desktop have a greater depth than mobile.
Responsive elevation and dynamic elevation offsets
Some component types have responsive elevation, meaning they change elevation in response to user input (e.g., normal, focused, and pressed) or system events. These elevation changes are consistently implemented using dynamic elevation offsets.
Dynamic elevation offsets are the goal elevation that a component moves towards, relative to the component’s resting state. They ensure that elevation changes are consistent across actions and component types. For example, all components that lift on press have the same elevation change relative to their resting elevation.
Once the input event is completed or cancelled, the component will return to its resting elevation.
Avoiding elevation interference
Components with responsive elevations may encounter other components as they move between their resting elevations and dynamic elevation offsets. Because material cannot pass through other material, components avoid interfering with one another any number of ways, whether on a per-component basis or using the entire app layout.
On a component level, components can move or be removed before they cause interference. For example, a floating action button (FAB) can disappear or move off-screen before a user picks up a card, or it can move if a snackbar appears.
On the layout level, design your app layout to minimize opportunities for interference. For example, position the FAB to one side of a stream of cards so the FAB won’t interfere when a user tries to pick up one of cards.
Источник


