- Installing Burp’s CA Certificate in an Android Device
- # Install System CA Certificate on Android Emulator
- # 1. Prerequisites
- # 2. Rename certificate
- # Instructions
- # 3. Insert certificate into system certificate store
- # Instructions for API LEVEL > 28
- # Instructions
- # Instructions for API LEVEL -writable-system option if you want to use your certificate. Otherwise Android will load a “clean” system image.
- kodmunki™ Tweets
- Follow kodmunki™
- What you will need:
- Process:
- 1. Retrieve the Subject Hash for Your Certificate
- 2. Create a Copy of the Target Certificate
- 3. Push your Target Certificate to the Target Emulator
- 4. Verify
- approovm / 00-android-bypass-certificate-pinning-and-mitm-attack-setup.md
- Android 11 tightens restrictions on CA certificates
Installing Burp’s CA Certificate in an Android Device
Before you start:
- Ensure you have configured your Android device to work with Burp.
- Ensure your Android device is able to receive email, and that your email filter does not block .cer files.
Note: Android Nougat no longer trusts user or admin supplied CA certificates. We recommend that you use an older version of Android for your testing. If you must use Android Nougat then you will need to install a trusted CA at the Android OS level on a rooted device or emulator.
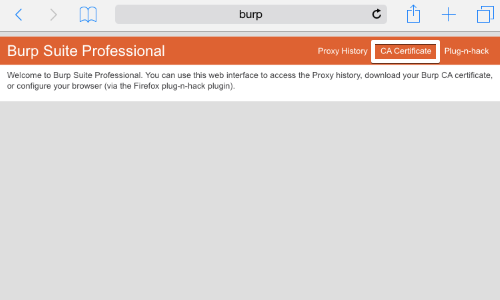
On your computer with Burp running, visit http://burpsuite and click the «CA Certificate» link. Save the certificate file on your computer.
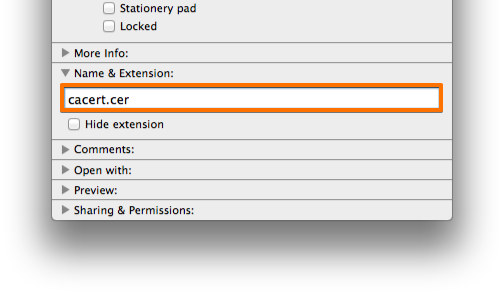
On your computer, rename the file with the .cer file extension, and send the file as an email attachment to an account that you can access from your Android device.
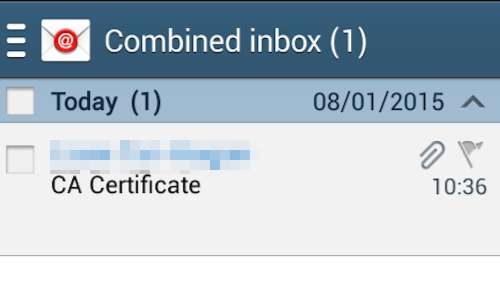
Check your email on the Android device.
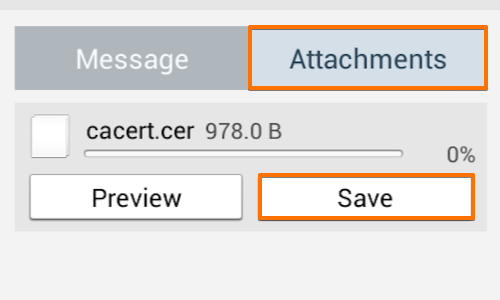
Open the email and tap the attachments button.
Then tap the save button. This should save the certificate file to your Android device’s “Download» folder.

Find your “My Files” folder. This may be located in the “Apps” menu or on one of the device’s home screens.

In “My Files” tap the “All Files” folder.
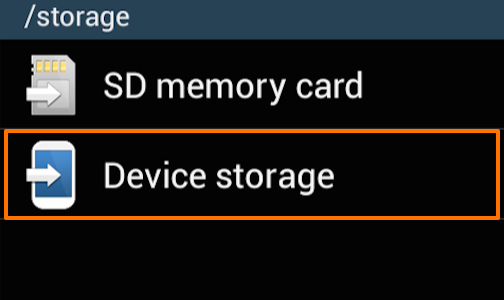
In the “All Files” folder tap “Device storage”.
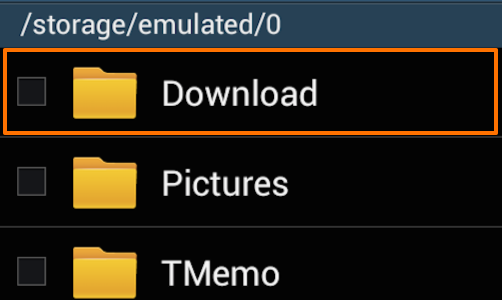
Open the “Download” folder and check that your certificate is correctly located in this folder.
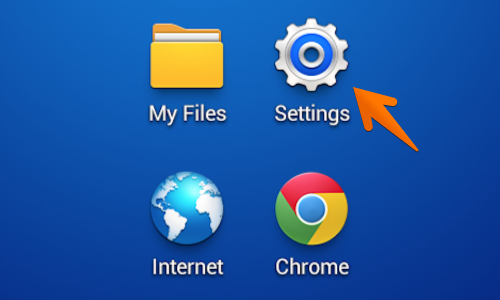
Next locate and tap the «Settings” icon. This may be located in the “Apps” menu or on one of the device’s home screens.
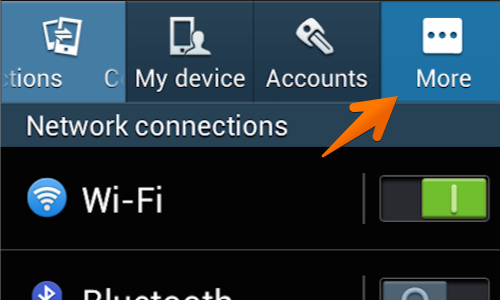
Tap the “More” button.
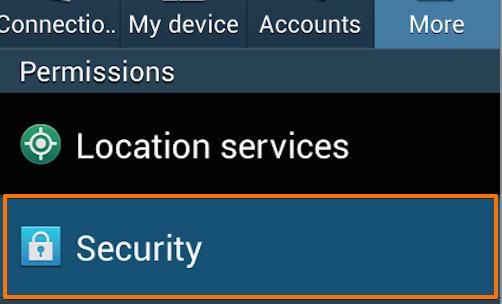
Beneath the “Permissions” header tap the “Security” button.
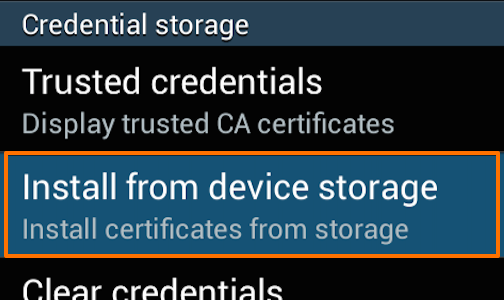
In the “Security” menu select the “Install from device storage” from beneath the «Credential storage» header.
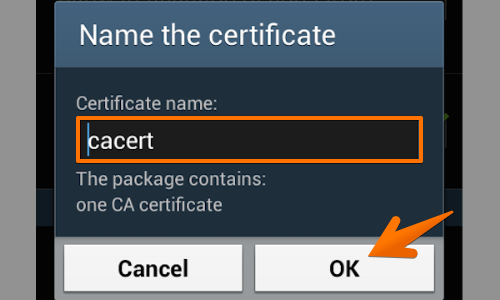
You will now be asked to “Name the certificate”, leave the certificate name as it is and tap “OK”.
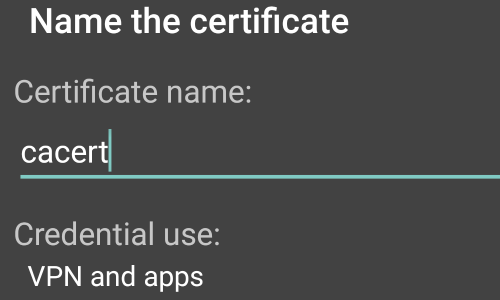
In some versions of Android, your device will ask if you want to use the certificate for «VPN and apps» or «WiFi».
In the «Credential use:» options, you should select «VPN and apps».

The phone will revert to the security menu and will inform you via a small pop up that the certificate is installed.
You can check the Certificate is installed by tapping the “Trusted credentials» button.
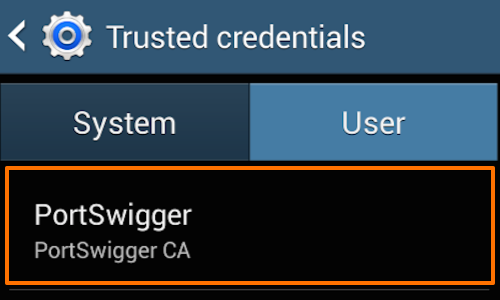
Tap the «User» tab in the “Trusted credentials” window to show the PortSwigger CA certificate.

You should now be able to visit any HTTPS URL via Burp without any security warnings.
Note: It is also possible to import the Burp CA Certificate using a micro SD card. Ensure that you move the Burp CA Certificate from the micro SD card to the phones own storage before using the certificate install function in the “Security” menu.
This article is based on Android version 4.2.2 running on a Samsung mobile device.
Источник
# Install System CA Certificate on Android Emulator
Since Android 7, apps ignore user provided certificates, unless they are configured to use them. As most applications do not explicitly opt in to use user certificates, we need to place our mitmproxy CA certificate in the system certificate store, in order to avoid having to patch each application, which we want to monitor.
Please note, that apps can decide to ignore the system certificate store and maintain their own CA certificates. In this case you have to patch the application.
# 1. Prerequisites
Android Studio/Android Sdk is installed (tested with Version 4.1.3 for Linux 64-bit)
An Android Virtual Device (AVD) was created. Setup documentation available here
- The AVD must not run a production build (these will prevent you from using adb root )
- The proxy settings of the AVD are configured to use mitmproxy. Documentation here
Emulator and adb executables from Android Sdk have been added to $PATH variable
- emulator usually located at /home/ /Android/Sdk/emulator/emulator on Linux systems
- adb usually located at /home/ /Android/Sdk/platform-tools/adb on Linux systems
- I added these lines to my .bashrc
Mitmproxy CA certificate has been created
- Usually located in
/.mitmproxy/mitmproxy-ca-cert.cer on Linux systems
# 2. Rename certificate
CA Certificates in Android are stored by the name of their hash, with a ‘0’ as extension (Example: c8450d0d.0 ). It is necessary to figure out the hash of your CA certificate and copy it to a file with this hash as filename. Otherwise Android will ignore the certificate. By default, the mitmproxy CA certificate is located in this file:
# Instructions
- Enter your certificate folder: cd
/.mitmproxy/
# 3. Insert certificate into system certificate store
Now we have to place our CA certificate inside the system certificate store located at /system/etc/security/cacerts/ in the Android filesystem. By default, the /system partition is mounted as read-only. The following steps describe how to gain write permissions on the /system partition and how to copy the certificate created in the previous step.
# Instructions for API LEVEL > 28
Starting from API LEVEL 29 (Android 10), it seems to be impossible to mount the “/” partition as read-write. Google provided a workaround for this issue using OverlayFS. Unfortunately, at the time of writing this (11. April 2021), the instructions in this workaround will result in your emulator getting stuck in a boot loop. Some smart guy on Stackoverflow found a way to get the /system directory writable anyway.
Keep in mind: You always have to start the emulator using the -writable-system option if you want to use your certificate. Otherwise Android will load a “clean” system image.
Tested on emulators running API LEVEL 29 and 30
# Instructions
- List your AVDs: emulator -list-avds (If this yields an empty list, create a new AVD in the Android Studio AVD Manager)
- Start the desired AVD: emulator -avd -writable-system (add -show-kernel flag for kernel logs)
- restart adb as root: adb root
- disable secure boot verification: adb shell avbctl disable-verification
- reboot device: adb reboot
- restart adb as root: adb root
- perform remount of partitions as read-write: adb remount . (If adb tells you that you need to reboot, reboot again adb reboot and run adb remount again.)
- push your renamed certificate from step 2: adb push
/system/etc/security/cacerts
# Instructions for API LEVEL -writable-system option if you want to use your certificate. Otherwise Android will load a “clean” system image.
/system/etc/security/cacerts
Источник
kodmunki™ Tweets
Follow kodmunki™
The process of setting up working Self-Signed SSL on an Android Emulator is wildly convoluted. The follow attempts to offer a step by step process to set this up.
What you will need:
- Android SDK installed.
- VirtualBox installed (Genymotion requires this)
- Genymotion installed.
- Android adb set up.
- Genymotion configured to use the local Android SDK for adb
Process:
1. Retrieve the Subject Hash for Your Certificate
First, you will need to get the Subject Hash of your target certificate. Assuming that your target certificate is named ca.crt you will run the following to get this hash.
2. Create a Copy of the Target Certificate
Then, you will take this HASH and use it as the file name of the certificate that you will add to your Android emulator in a moment. You can do this with the following script.
(Note: the file name is the HASH that we retrieved plus a .0 file extension):
3. Push your Target Certificate to the Target Emulator
Next, ensure that your target emulator is running and copy your new cert file named as the HASH file into your Android emulator using adb .
4. Verify
Finally, you can verify that your target certificate is now installed in your emulator by going to “Settings > Personal > Security > Credential storage > Trusted Credentials > System” and searching for your certificate. As of the time of this writing, it will be listed by Organization name and have the Common Name as the subheading. If you see this, You’re good!Please, comment on and share this post with others if you enjoy it; follow
@kodmunki on Twitter for regular updates on new developments, deployments, articles, and tools; and check out kodmunki™ on github for cool, managed, and tested kodmunki™ projects.
Источник
approovm / 00-android-bypass-certificate-pinning-and-mitm-attack-setup.md
Android Bypass Certificate Pinning and MitM Attack Setup
This is a gist used in the following blog posts:
In order to intercept the traffic we will need a proxy interceptor tool, and in this tutorial we will use the mitmproxy CLI interface from within a docker container, but feel free to install it by using any other method listed in their docs.
Download the mitmproxy docker image:
Test it works with:
The output should look like this:
Start the mitmproxy
Before we add the mitmproxy certificate to the emulator’s system trusted store we need to first start mitmproxy, so that its certificate is created at
To start mitmproxy we also need to provide the IP address where it will be listening to, and we will use our WiFI IP address because it will be later easy to proxy the emulator through it. Find the WiFi IP Address The emulator will need to reach the proxy via the wifi network where mitimproxy will be listening on port 8080.
To find the wifi ip address:
You should see something like this:
The IP address 192.168.0.08 will be necessary to start the mitmproxy and the emulator, thus you should replace it with your own one in any subsequent command you find it being used.
To Run mitmproxy listening on the WiFi network open a new terminal window or tab and execute:
NOTE: We use the —showhost option to be able to see the domain instead of just the IP address for each http request in the mitmproxy console output. The —view-filter options are to limit the output to requests containing the word approov in the URL, otherwise the output will be very noisy, due to all the other HTTP requests being done by the Android OS and other apps installed.
The proxy is now listening on port 8080 for the IP address of your WiFi network.
Источник
Android 11 tightens restrictions on CA certificates
Your trusted Certificate Authorities (CAs) are the organizations that you trust to guarantee the signatures of your encrypted traffic and content. That’s a lot of power, and the list of trusted authorities is dangerous to mess around with. Nonetheless, it’s also something that power users might want to configure, for Android testing, for app debugging, for reverse engineering or as part of some enterprise network configurations.
Android has tightly restricted this power for a while, but in Android 11 (released this week) it locks down further, making it impossible for any app, debugging tool or user action to prompt to install a CA certificate, even to the untrusted-by-default user-managed certificate store. The only way to install any CA certificate now is by using a button hidden deep in the settings, on a page that apps cannot link to.
To be clear, carefully managing the trusted CAs on Android devices is important! Adding a CA should not be easy to do by accident or unknowingly. Protecting users from themselves is absolutely necessary here, and it’s a hard problem.
That said, there are many legitimate use cases where you want to be able to choose which CAs you trust, and that just got much harder. There’s a balance here to manage, and I’m not sure Android has made the right choice.
Let’s dig into the details:
How did Android CA certificate management work until now?
Until now, an app could ask a user to trust a CA certificate in the user certificate store (but not the system store), using the KeyChain.createInstallIntent() API method. Similarly, the operating system would offer to trust a CA certificate if one was manually opened on the device from the filesystem.
These certificate trust prompts came with a variety of loud warnings & confirmations, and mandated setup of a device pin or other screen lock before you could complete them, if one wasn’t already set. It wasn’t possible to do accidentally, and it was hard to trick users into accepting these scary prompts (although probably not impossible).
That only applied to the user certificate store. This store, in case you’re not familiar, differs significantly from Android system-wide certificate store, and since Android 7 (Nougat, released in 2016) it’s been impossible to install any CA certificates into the system store without fully rooting the device.
The system store is used as the default to verify all certificates — e.g. for your apps’ HTTPS connections — and as a normal user it’s completely impossible to change the certificates here, and has been for quite some time.
Until now however, you could install to the user certificate store, which apps could individually opt into trusting, but which they don’t trust by default.
This was very useful! This allowed developers to opt-into this trust in their local builds to debug traffic, it allowed testers to automatically & easily trust CA certificates so they can mock & verify HTTPS traffic in manual & automated testing, and it was used by a wide variety of debugging tools (including HTTP Toolkit) to easily let developers & testers inspect & rewrite their encrypted HTTPS traffic.
Unfortunately, automating that setup is no longer possible on these devices, and each of these use cases will now require a series of fiddly manual steps that tools can’t lead you to or help with.
In Android 11, the certificate installer now checks who asked to install the certificate. If it was launched by anybody other than the system’s settings application, the certificate install is refused with an obscure alert message:
Can’t install CA certificates CA certificates can put your privacy at risk and must be installed in Settings
This wasn’t clearly announced anywhere, as far as I can tell. The only mention in the Android 11 release information is a small side note in the enterprise features changelog, which notes that the createInstallIntent() API no longer works in some cases.
In practice, this change means the certificate install API no longer works, opening certificate files no longer works, and it’s impossible to initiate a certificate install even from ADB (the Android debugging tool).
It is still possible to install certificates using the device management API, but only in the special case where your application is a pre-installed OEM app, marked during the device’s initial setup as the ‘device owner’. If not, you’re out of luck.
In Android 11, to install a CA certificate, users need to manually:
- Open settings
- Go to ‘Security’
- Go to ‘Encryption & Credentials’
- Go to ‘Install from storage’
- Select ‘CA Certificate’ from the list of types available
- Accept a large scary warning
- Browse to the certificate file on the device and open it
- Confirm the certificate install
Applications and automation tools can send you to the general ‘Security’ settings page, but no further: from there the user must go alone (fiddly if not impossible with test automation tools).
More inconvenient still: with the existing APIs, the app could provide the certificate bytes directly, reading certificates from their own internal data or storage. Now, because the user must browse to it, the certificate has to be in the shared user-accessible storage on the device. This also risks it being rewritten by other apps on the device before it’s trusted, if they have the permissions to write to shared folders (not default, but not uncommon), allowing those apps to sneak their own CA on to unsuspecting users.
While it’s still possible to trust your own CAs on rooted devices, Android is also making a parallel drive for hardware attestation as part of SafetyNet on new OS releases & devices, which will make this far harder.
Hardware attestation makes it possible for Android apps to reliably know whether the OS on the device is the original installed by the OEM. Many apps use SafetyNet to block installs and usage on such devices, and that doesn’t just apply to secure banking apps: apps from Netflix to Pokemon Go to McDonald’s require SafetyNet checks. In a not-so-distant future, these and many other apps will be completely unusable on rooted devices, once hardware attestation becomes standard.
Put together, this is not good. Android’s been locking down on this for a while, but it really feels now like they’re moving to a world where custom ROMs are cut off from much of the Android ecosystem, and official ROMs are completely locked down and inaccessible even to developers.
First up: add a star on the Android bug I’ve filed, suggesting an automatable ADB-based option for CA certificate management, for development use cases like these: https://issuetracker.google.com/issues/168169729.
Once you’ve done that, in the meantime you have a few options:
- Accept that you need to manually install CA certificates, and do so/tell your users how to do so.
- Use a rooted device or emulator, and trust your certificate in the system store (you might be interested in how HTTP Toolkit does this).
- Completely reset the device, preprovision your application (before initial account setup), and configure your application as the device owner with dpm set-device-owner
- Enable debugging on the device, connect to it with ADB, and manually inject touch events to automatically walk through the various settings screens.
- Avoid using Android 11 entirely.
For now, HTTP Toolkit takes options 1 and 2:
- For users using Android Published a year ago by Tim Perry
Источник


