- I Help U
- The problem
- The expected result
- The explanation
- The workaround
- Conclusion
- How To Enable & Disable Developer Options On Your Android Device
- The Benefits Of The Developer Options
- Speed Up Your Device By Slowing Down or Turning Off Animations
- Speed Up High-End Games & Apps
- Enable USB Debugging
- Set a Desktop Backup Password
- Fake Your GPS Location With a Mock Location App
- Stay Awake While Charging
- Show CPU Usage
- View Running Processes
- Background Process Limit
- Install Any App To The SD Card
- Force Any App to Work In Split-Screen Mode
- How To Enable Developer Options
- How To Disable Or Hide Developer Options
I Help U
This post will be about an interesting observation I made when working on a custom View that did not extend EditText , but contained one.
To show an example, I created a project that contains a widget called ToggleEditText. This simple widget has the following features:
- it contains an EditText and a CheckBox
- toggling the CheckBox enables/disables the EditText
- it overrides View ‘s setEnabled(boolean) method to achieve the same result as toggling the checkbox
The problem
Starting with the previous example, let’s say that I would like to make the ToggleEditText start with a disabled state. Since the View class contains the setEnabled method, one could think that this is just as simple as adding android:enabled=»false» to our edit text in the layout:
After trying it with eagerness, we may get a little surprise: it just does not work. You can download the code from here.
The expected result
To illustrate how this should have worked I created a CustomEditText that extends AppCompatEditText and added it to the layout with android:enabled=»false» :
When running the code, You can verify that the custom edit text in the center of the screen is disabled. The main question is… what is the difference between the two cases that makes one of them succeed and the other fail?
The explanation
To find out the cause of the unexpected behavior, two basic concepts have to be revised about custom Views:
- a custom View declares its attributes via a declare-styleable tag
- the values of the attributes are read and applied by using TypedArrays, typically in the constructor
This means that the attributes and code of the View class has to be checked for the answer. The latest version of the Android framework’s attributes can be found here, and the code of the View class can be seen here.
Examining the code of the View class, we can notice that R.styleable.View_enabled is not referenced anywhere in the class. How is this possible? Is this attribute not processed?
Looking at attrs.xml and searching for the enabled attribute, we can finally see that this attribute is not declared for View , but for TextView instead!
Checking the source code of TextView, we can easily find the code that uses the attribute:
The workaround
Fortunately, it is not too hard to add ToggleEditText the ability to use the attribute. First, the attribute has to be declared for it and processed in its constructor(s). The declaration can be seen below. Please note that the type of the attribute is not specified, because the attribute is reused. Specifying its type will result in a compilation failure.
All we have to do is process the value of the attribute this way (notice the android_ part in the name of the styleable attribute):
The code that has this workaround can be seen here. After building and running the app, it can be seen that the ToggleEditText is disabled by default, just as we wanted.
Conclusion
In my opinion, the enabled attribute should be declared and processed by the View class, since the corresponding setEnabled(boolean) method is there. I don’t know if this was an intentional decision by the Android framework developers or it was just accidentally done. To find out, I issued a bug report for Google about this situation in hopes of getting some explanation or a fix for this issue. Until that happens, the desired behavior can still be achieved by redeclaring and reusing the attribute in every custom View where it is needed. However, I think that this should not be necessary.
Источник
How To Enable & Disable Developer Options On Your Android Device
Did you know there’s a secret menu hidden in the Android Settings called “Developer Options” that provides access to additional, useful tools? As the name implies, these tools are mostly meant for developers, but there are some things non-developers might also like, such as turning off animations to speed up your device, faking your GPS location, or turning on USB debugging so you can back up app data on your phone with or without rooting or unlocking it.
Today we are going to show you some of the benefits regarding the developer options, how to enable those options on your Android device, and how to disable them again afterwards. The process is easy – but not obvious.
Table of Contents
The Benefits Of The Developer Options
The term “Developer Options” might seem daunting if you’re not a developer, but there are some features you might still find very useful.
Speed Up Your Device By Slowing Down or Turning Off Animations
When you switch between apps and screens in Android, the animations are played by default. If you have a slow Android device, these animations could slow down your device even further. If you have a fast phone, switching between screens and apps could be instantaneous without the animations. Either way, you can adjust the speed of the animations or turn them off completely.

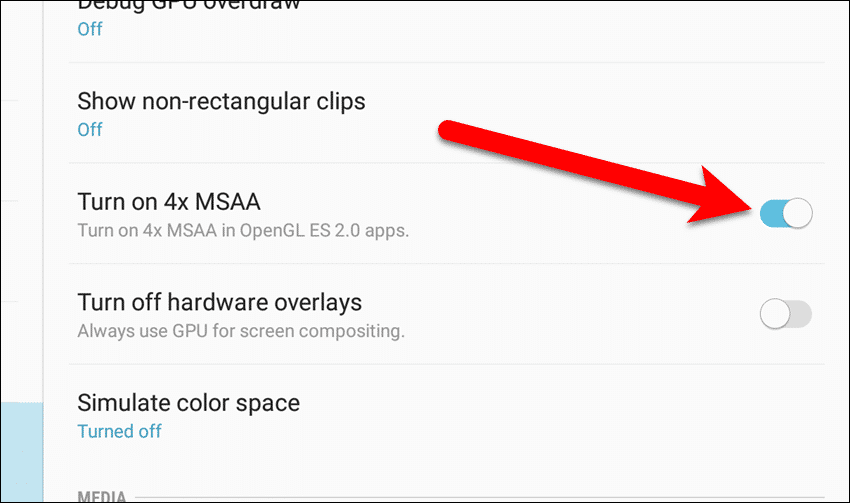
Speed Up High-End Games & Apps
If you’re using a high-end Android device and you play high-end, graphics-intensive games on it, the “Force 4x MSAA” (multisample anti-aliasing) setting in the Developer Options can help improve the images and graphics rendering in OpenGL ES 2.0 games and certain other apps.
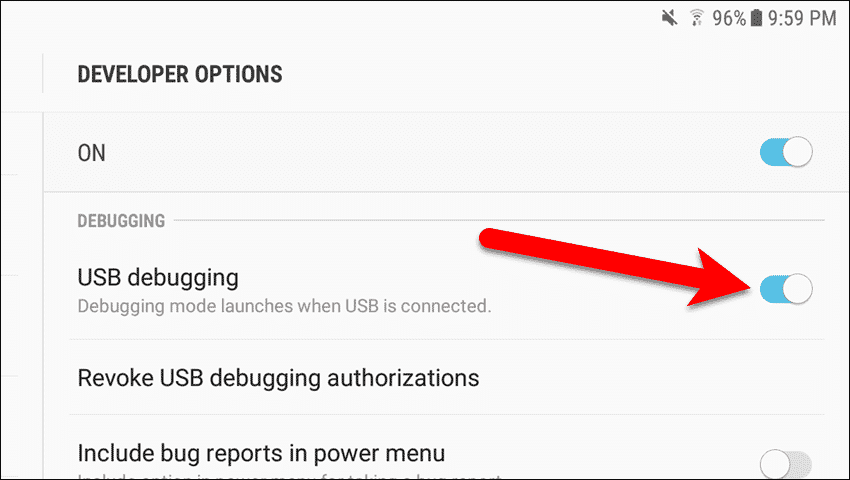
Enable USB Debugging
USB debugging may sound like a scary, programming term, but it’s probably the most widely used Developer option. It allows your Android device to communicate with the Android SDK (Software Developer Kit) using a USB cable. The device can receive commands, files, and other similar items from the computer, and the computer can pull information like log files from your Android device.
So why use USB debugging? It’s required if you want to root, unlock, and install a custom ROM on your Android device. Or if you want to capture screenshots of your device’s screen using a program on your computer. The latter is useful if you’re having problems using the Home button-Power button method of capturing the screen. USB debugging is also required if you want to use Android Debug Bridge (ADB) commands to send files back and forth between your Android device and your computer or create complete local backups of your entire device without rooting it.
However, security is a concern when USB debugging is enabled. Leaving USB debugging on when your Android device is connected via USB keeps your device exposed. This is fine when the device is connected to your own computer while performing tasks that require USB debugging. However, you should disable USB debugging when you’re not using it.
The problem comes into play if you need to plug your phone into an unfamiliar USB port—like a public charging station. Theoretically, someone who had access to that charging station could use USB debugging to access your device and steal private information from your device or copy some kind of malware onto it.
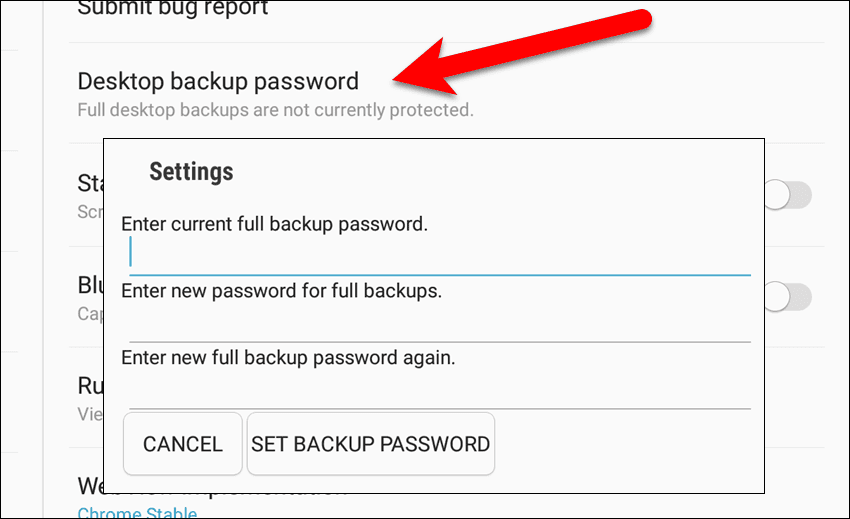
Set a Desktop Backup Password
If you turn on USB debugging and use ADB to create a complete backup of your Android device over USB, as mentioned above, you can protect the backup by encrypting it with a password using the “Desktop backup password” setting in the Developer options. Note that you will not be able to access the backup if you forget the password.
Fake Your GPS Location With a Mock Location App
Faking your GPS location can be useful in different situations. Maybe you want to prevent certain apps from determining where you really are, or you may want to check in someplace without actually going there. In any case, you can fake your GPS location using the “Mock location app” setting in the Developer options and a GPS spoofing app.

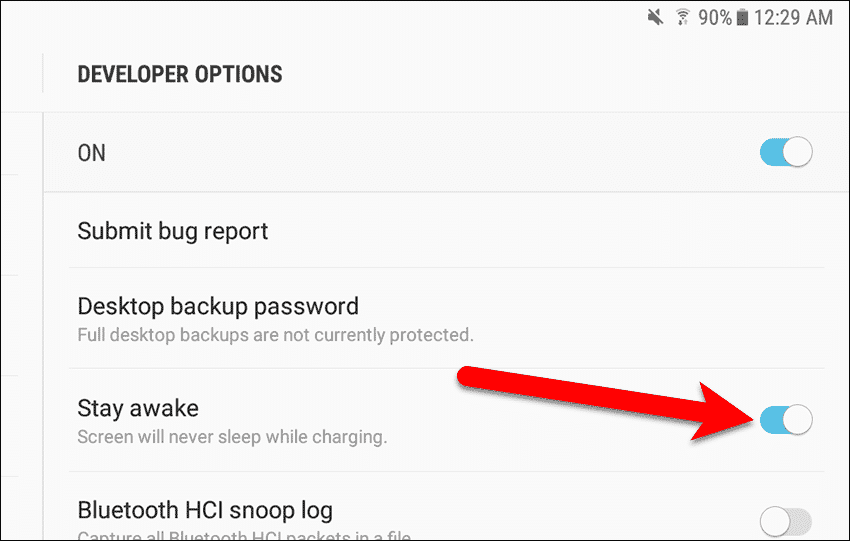
Stay Awake While Charging
The screen on your mobile device turns off after sitting idle for a specified amount of time. You can bypass this time limit while your device is charging using the screen saver function, which allows you to run one of a limited number of apps. However, what if you’ve downloaded a third-party app you want to run while your device is charging, such as an alarm clock app?
The “Stay awake” setting in the Developer options will keep the screen awake while charging and allow you to view and interact with any app at the same time.
Show CPU Usage
If you’re curious about what’s going on behind the scenes on your Android device, you can turn on the “Show CPU usage” setting in the Developer options. The CPU (central processing unit) usage displays on top of any app you’re using. Three numbers are displayed. The numbers represent the system load average on your device over the last one, five, and fifteen minutes (read from left to right).
You probably won’t want this displaying all the time, but the information is handy sometimes and you can avoid installing any third-party floating CPU apps to perform the same task.

View Running Processes
In addition to viewing the system load average, you can view information about the processes running on your Android device. In the Developer options, tap “Running services” to see a list of what services are in use and how much of your RAM each app is using and how many processes and services each app is running.
You can switch between viewing the services in use (“Show Services in Use“), which is the default setting we just mentioned, or viewing cached processes (“Show Cached Processes“). Cached processes are processes for apps that are not currently running in the foreground, meaning you’ve switched away from them.
An example of a cached background process would be an app you opened, did a few things in it, and then pressed the Home button to return to the Home screen. These cached background processes are kept in memory while there is enough memory to do so, so you can switch back to them more quickly.
However, as your Android system requires more RAM for other processes, the cached background processes are the first to get terminated to free up RAM for apps you’re currently using.
Tap the blue text in the upper-right corner of the Running Services screen to switch between showing the services in use and showing the cached processes.

Background Process Limit
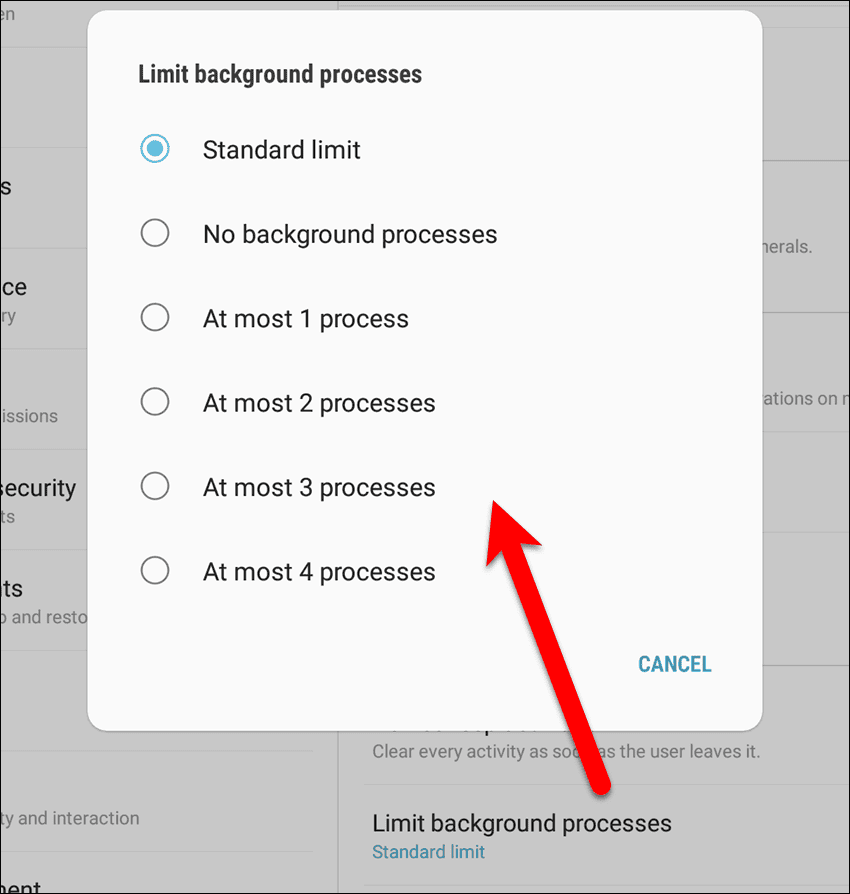
If you looked at the running processes and found a lot of cached background processes running, and you want to claim back some of that memory (maybe you don’t have much memory on your device), you can limit the number of background processes that run. The “Limit background processes” option in the Developer options allows you to limit the number of background processes that are allowed to run or not allow to run.
For example, you can select “At most 2 processes” on the “Limit background processes” dialog box, and the current app and the two most recent apps you ran and switched away from are the only processes that can run at one time. This should free up a good chunk of memory on your device.
Install Any App To The SD Card
If you have limited internal storage space on your Android device, but you have a SD card in the device, you may want to install some apps to the SD card. Not all apps allow this, but the “Force allow apps on external” setting in the Developer options allows you to install any app to the SD card, whether it was programmed to do so or not.
Keep in mind though, sometimes there’s a good reason the developer of an app blocked the ability to install the app to an SD card. Some apps look for files in a specific place and the app won’t be able to find those files if it’s installed in an unexpected place. So when you install an app to your SD card using the “Force allow apps on external” setting, be prepared to uninstall it and reinstall it on the internal storage, if the app doesn’t work when installed on the SD card.
This can save you a lot of internal storage space if you install large apps that will work just as well installed to your SD card.

Force Any App to Work In Split-Screen Mode
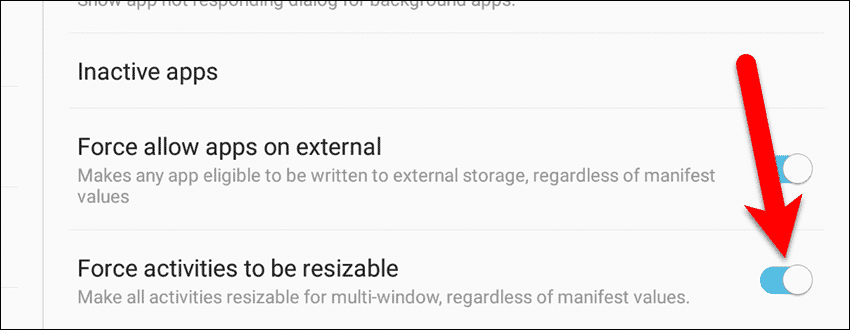
Split screen mode was introduced in Android Nougat and it’s a pretty handy feature. However, some apps don’t work in split screen. The “Force activities to be resizable” setting in the Developer options forces apps that don’t normally work in split screen to do so. Note that split screen view might cause some apps to not work correctly, but sometimes they don’t work simply because they have not been optimized for split screens.
Once you turn on the “Force activities to be resizable” setting, restart your device. Now – theoretically – all your apps will work in split screen mode. Be prepared, however, for some of them to not look so great or to crash altogether.
How To Enable Developer Options
To enable developer options, swipe down from the top of your device’s screen and tap the gear icon in the upper-right corner of the notification bar that displays.
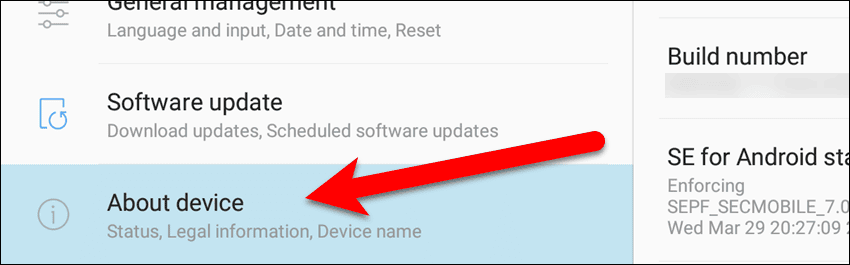
Scroll to the bottom of the list of settings and tap “About device”.
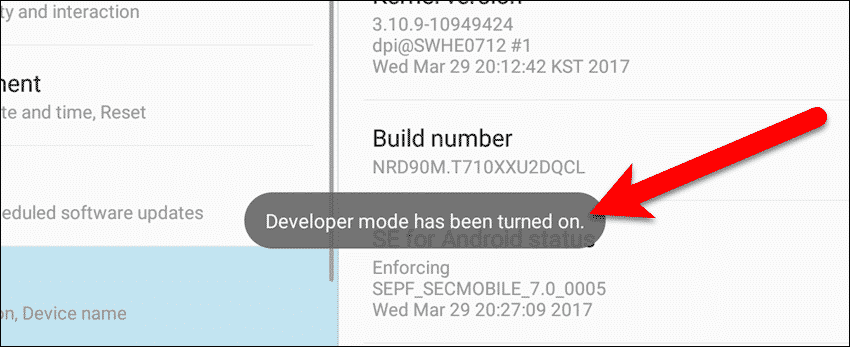
In the right pane, tap “Build number” seven times.
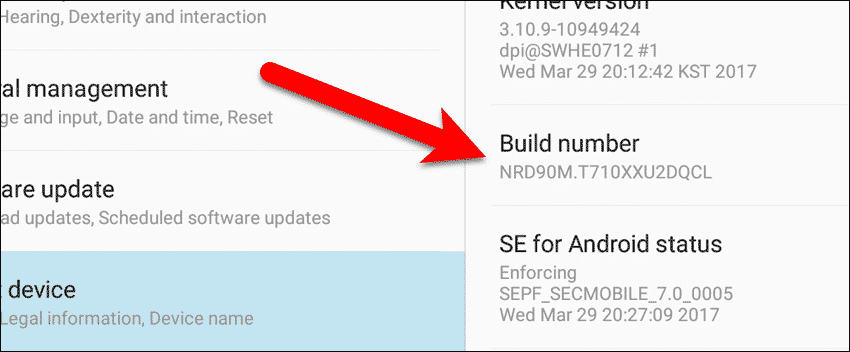
A message briefly displays saying that Developer mode has been turned on.
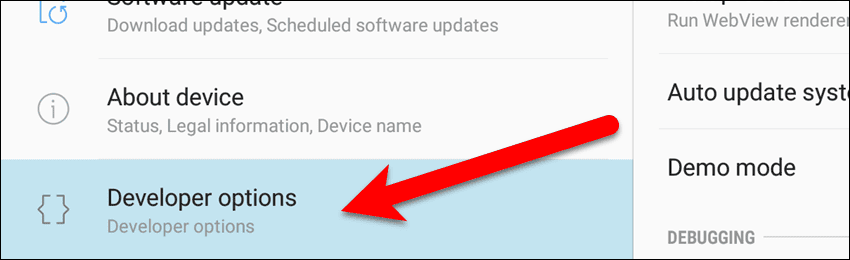
Now, when you scroll down in the left pane past “About device”, the “Developer options” item is available.
How To Disable Or Hide Developer Options
If you no longer need to use the Developer options, you can disable them, leaving the Developer options item still available in the Settings. If you would rather not have the Developer options available at all in the Settings, you can hide the Developer options item entirely.
In either case, we need to be in the Settings. So if it’s not open already, open it again by swiping down from the top of your device’s screen and tapping the gear icon in the upper-right corner of the notification bar that displays.
To disable Developer Options, tap “Developer options” at the bottom of the left pane.

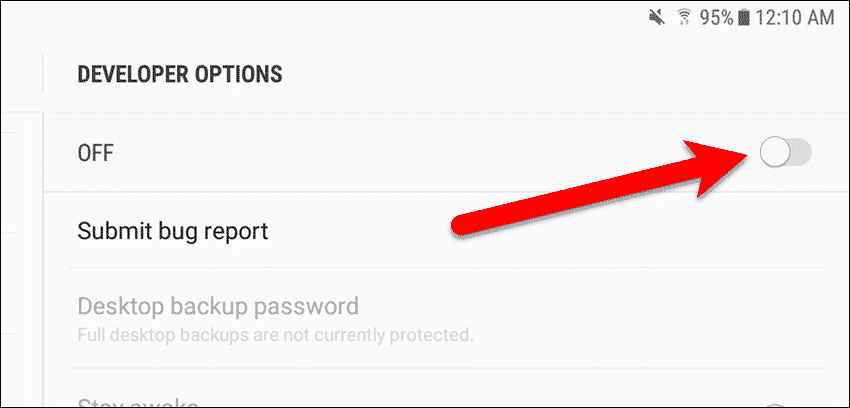
Then, tap the “OFF” slider button at the top of the right pane.
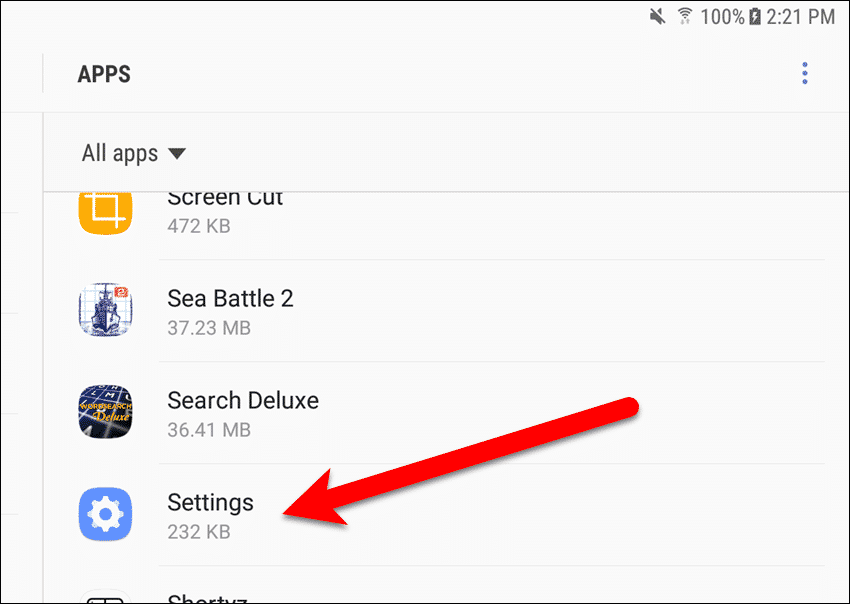
If you’d rather hide the Developer options item completely, tap “Apps” in the left pane.

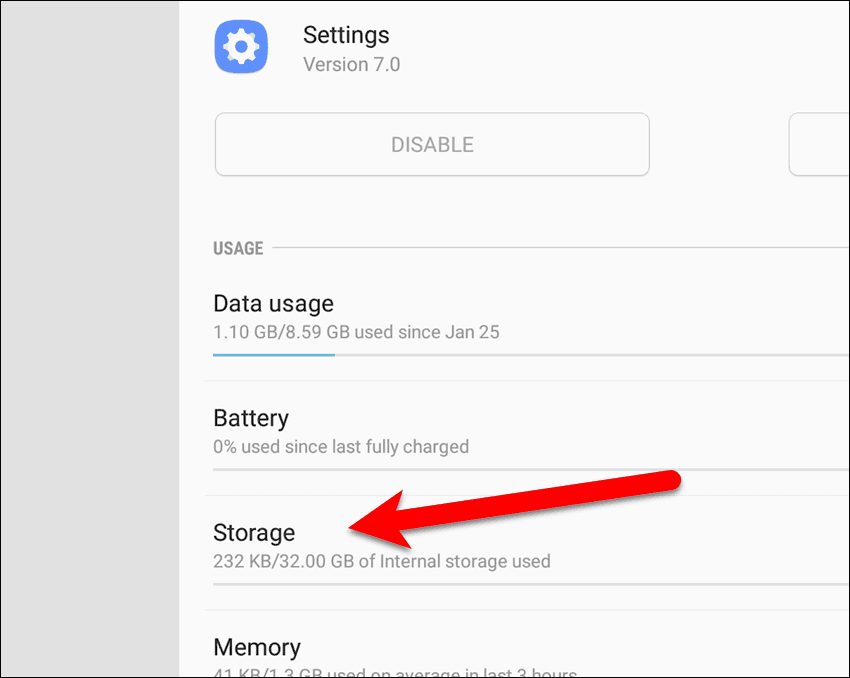
Scroll down in the list in the right pane until you find the “Settings” app and tap on it.
On the Settings App Info screen, tap “Storage“.
Tap the “Clear Data” button on the Settings Storage screen.
![]()
You are warned that all files, settings, accounts databases, etc. will be deleted permanently. DON’T PANIC! Only the Developer options settings are set back to defaults. The other settings on your device are not affected.
So, tap “Delete” on this dialog box.
![]()
The Developer options item is now removed from the left pane in the Settings.

Have you used any of the Developer options features? If so, which ones and how did they work for you? Let us know in the comments.
Lori Kaufman
Freelance technical writer living in the Sacramento, CA area. A gadget and tech geek who loves to write how-to articles about a wide range of topics. Loves watching and reading mysteries, cross stitching, attending musical theatre, and is an avid Doctor Who fan.
Источник


