- B uild complex screens faster on Android⚡ — Our journey with Epoxy
- Backstory
- Epoxy
- Philosophy
- Components
- Why Epoxy?
- Our journey
- Working in a team 👨💻🔀👩💻
- Evolution of UI 🧬
- Building the whole screen in blocks 🧱
- Little things 🐣
- Performance 💯
- The challenges
- Conclusion
- What’s next?
- Building complex screens in a RecyclerView with Epoxy
- 1. Introduction
- 2. What is epoxy
- 3. Some Advantages of Epoxy
- Without epoxy
- With Epoxy
- 4. Epoxy In Action
- Installation
- Basic usage
- RecyclerView Items
- 1. Title Item
- 2. Carousel Item
- 3. Task Item
- 5. Model generation.
- 1. Epoxy Config
- 2. Displaying data
- 3. Carousel
- Conclusion
B uild complex screens faster on Android⚡ — Our journey with Epoxy

RecyclerView is such an important UI component on Android. But using it can get complex and error prone—especially when dealing with different view types and pagination. Moreover, it’s hard when working on the same screen within the team.
In this article, I’m going to share basics of Epoxy and an overview of the problems it helped us solve. Here’s our journey of how we adopted Epoxy at Clue to build our UIs faster in parallel within the team.⚡
Backstory
It all started with our users, who wanted a more understandable and interactive view of their historical tracking data. ✨(For Clue users, this is generally their menstrual cycles & symptoms.)
So our awesome design team came up with this beautiful intuitive design 😍:

I know what you’re thinking already: that’s a lot of view types. And we were definitely concerned about the performance ️and responsiveness of the screen.
That’s when we decided to see if we could use any third-party library to help us with our goal.
Epoxy
Epoxy is a library from Airbnb which takes a declarative / composable approach to build the UI—typically, a list.
- It uses RecyclerView under the hood
- It simplifies creation of static and dynamic layouts
Each item in the list is associated to an epoxy model which defines the item’s layout and manages binding the data and releasing the view’s resources when it’s recycled.
Item Epoxy Model Layout resource
The order of the items shown on the UI is based on how you add the model to the adapter or controller.
Philosophy
Epoxy encourages a usage pattern similar to the popular MVVM and MVI architecture where the data flows in one direction (UDF — uni-directional data flow).

The data forms the state of the UI then goes to EpoxyModel and to the views on the RecyclerView .
The Epoxy Model behaves like a ViewModel and provides the interface between the data and the view. This way the view cannot directly modify the EpoxyModel it gives a callback to modify the state.
Components
There are 2 key components or building blocks in Epoxy:
Every item type is represented by an EpoxyModel , which controls binding of data and how to display the view on the UI. These models are mapped to your custom views or xml layouts.
It’s just like ViewModel that is an immutable class which works as an interface between data and the view.
For example, here’s how a model representing a header will look:
EpoxyController or EpoxyAdapter implementation contains declaration of all the models to show on the RecyclerView .
Epoxy uses annotation processing (yes, I know it adds build time—but it’s worth it until they move to a different approach, or Jetpack Compose arrives), so we can leverage DSL style pattern to create our models.
Without DSL style:
Tip 💡 — You can subclass EpoxyController but I prefer TypedEpoxyController since it adds more type safety
Why Epoxy?
We didn’t compare all the libraries out there, we instantly liked Epoxy mainly due to 3 key things:
- The number of stars 🌟 to the repository and active development
- Detailed documentation
- Syntax and Kotlin support
Our journey
Most of the advantages which we leveraged were because of the loose coupling between the view types and Epoxy model.
Working in a team 👨💻🔀👩💻
Generally with Epoxy each view type is associated with it’s own model class and layout resource which reduces the coupling with other view types and increases reusability ⬆️
View Type Epoxy Model Layout resource
This makes it super easy for every team member to build the model and its layout independently, hence in parallel.
For example,
One member of the team works on the header model and other one works on cycle stats model, making it easier and faster to divide the work among the team.
Evolution of UI 🧬
All the models and their respective layouts are like building blocks, and they have super low coupling—which made it easy to built our UI iteratively. That is: we kept adding new features and fine tuning the UI based on user feedback. Having separate models helped us again to work in parallel and build the UI in blocks.
The side effect of having modular design made it easier to do updates only to the necessary piece, making it easier for maintenance. 🛠
Building the whole screen in blocks 🧱
Epoxy doesn’t just help building a list of items. It can help compose an entire screen.
We built a whole new screen by leveraging Epoxy and the models which normally would be made with a ScrollView and all the basic UI elements, which makes it hard to maintain and evolve over time since it’s less reusable overall.

All the UI items represented by blue outline in the screenshot are composed together using various different models to hash out the final UI.
Little things 🐣
Epoxy provides little things which turn out to be super useful, like:
- It sets LinearLayoutManager by default [before, I always used to forget to do that and then keep wondering why my RecyclerView is not showing anything 🤔]
- Sets clipToPadding to false by default to prevent showing top padding while scrolling
- Declarative style which makes it easier to visualize the UI; to me this feels a bit like Jetpack Compose
- Supports automatic diffing + background diffing (optional)
- Pretty solid documentation and issue tracker
These little things save a lot of time and make a huge difference to the development experience in the end.
Performance 💯
Epoxy is mainly an abstraction on top of RecyclerView with lots of features out of the box, so ideally you should expect the same performance as using RecyclerView without any overhead.
Just make sure to follow the same rules while using RecyclerView and tweak the configuration of “Validating the Epoxy model” in production as mentioned in the wiki to squeeze out more performance. 🏋️♂️
The challenges
Our team faced couple of challenges when adopting Epoxy:
- The learning curve isn’t steep, but there is still a learning curve to use Epoxy which can consume a bit of time especially for new joiners in the team. 📈
- Stack overflow driven-development isn’t very useful for Epoxy as compared to RecyclerView , so you might need to rely on documentation and understanding the internals of Epoxy to figure out any issues or do something complex, though the issue tracker help sometimes
- The number of resources and libraries available for RecyclerView are obviously more than Epoxy, which can be an obstacle sometimes. But the silver lining is you can use most of stuff for Epoxy, since it’s more or less an abstraction on RecyclerView .
- We showed our journey to iOS devs. They wanted to have something similar, but it’s not available for iOS. 🍎 Airbnb has created one for iOS, but it’s not open sourced.
Conclusion
I hope this gives an idea of what Epoxy is like and helps you to understand the possibilities. I also hope our journey makes it easier for you and/or your team to evaluate whether to use it. 🛣
I’d still recommend to spin a sample project with Epoxy to have a first-hand experience and make the final decision.
Our experience in a nutshell 🥜:
- easy to manage different view types
- parallelizing within the team
- meeting complex user design demands like sticky headers, pagination, and more
- easier maintenance
- happy developer experience 😇
What’s next?
In future articles, I will:
- Show how to build an entire screen step by step using Epoxy
- Show how to do really cool and complex things like sync scrolling or sticky headers with Epoxy
- Deep dive into internals of Epoxy
Источник
Building complex screens in a RecyclerView with Epoxy

1. Introduction
The RecylerView is one of the most used Android components when it comes to displaying a list of items in an Android application, and since the arrival of Jetpack in the Android ecosystem, some libraries have come to life to simplify its use.
But when it comes to developing an application that needs to display a heterogeneous list of items or that scrolls in several directions (vertically and horizontally) the use of RecyclerView can be complicated.
In this article we will see step by step how to simplify life when it comes to displaying complex lists using a library called Epoxy.
2. What is epoxy
Epoxy is an Android library for building complex screens in a RecyclerView developed by AirbnbEng
3. Some Advantages of Epoxy
Without epoxy
If you have used the RecyclerView before, you may be familiar with the steps you need to go through to view items in the list as shown in the following figure.

- Add a component of type RecyclerView in the layout.
- Create a view in an XML file that represents an element of the list.
- Create an Adapter to connect the data to the view to display it in the list.
With Epoxy
Of the three stages mentioned above, the most repetitive stage, which becomes more complex depending on the situation, is the third stage, which consists of creating an adapter, and when it comes to having a list with nested RecyclerViews, things can get a little more complicated.
And this is where Epoxy will help us in the sense that with Epoxy it is no longer necessary to create an adapter, Epoxy will do it for us and we will see how in the rest of the article.
4. Epoxy In Action
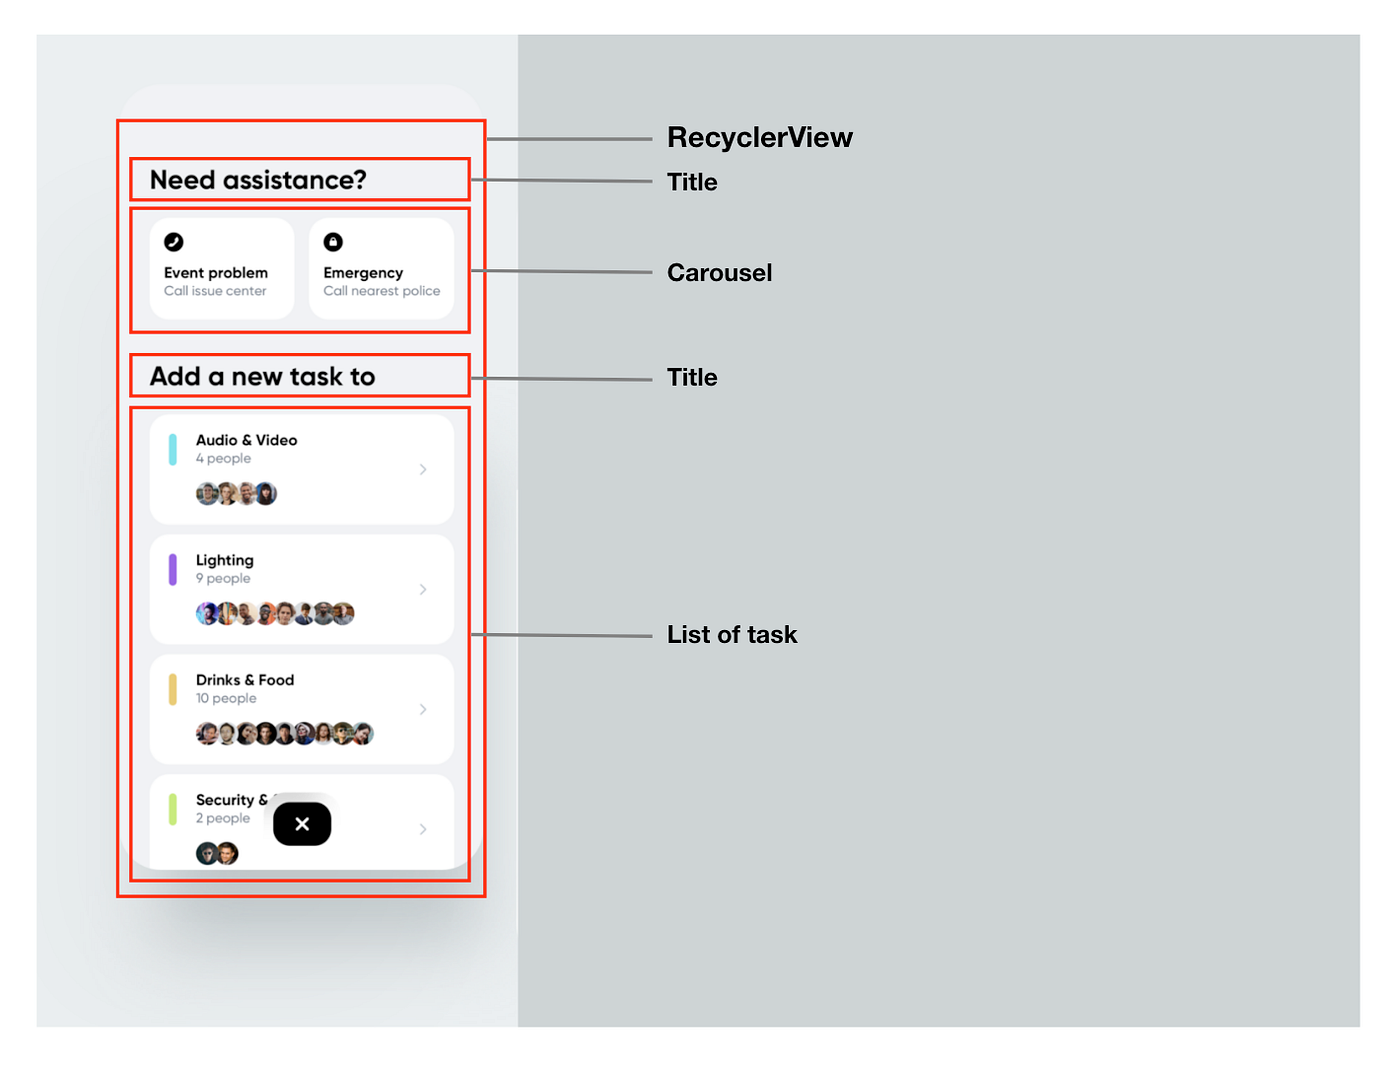
To illustrate the use of epoxy, we are going to develop an application that looks like the following figure
We will only focus on the first view of this image.

If we analyse this view very carefully, we notice that the RecyclerView contains a number of elements
- The title of the carousel.
- A carousel (a horizontal list of elements).
- A title of the tasks.
- A list of tasks.
Installation
Gradle is the only supported build configuration, so just add the dependency to your project build.gradle file, and if you use Kotlin, your build.gradle file will look like this.
Basic usage
After adding Epoxy to the Gradle file, you just have to create the UI of each element of the RecyclerView.
RecyclerView Items
1. Title Item
We are going to create a view that will represent the title in the RecyclerView, and with the dataBinding we will make it possible to inject the title from the outside to facilitate the reuse of this view.

As you have noticed, the layout takes a variable of type String, and the name of the layout begin with item we’ll see what we’ll use it for afterwards.
2. Carousel Item

The view that represents the carousel follows the same principle as the previous view, but this time the view has a variable of type OnClickListener that we have attached CardView in addition to a variable of type CarouselItem.
The complete layout code is as follows.
3. Task Item
The same principle is also applied before to the view that represents a task.

The source code for this view is as follows:
5. Model generation.
1. Epoxy Config
After creating the different views of our RecyclerView, it is now high time to configure Epoxy on how it will generate some components for us
Create a package-info.java file in any package of your project as shown in the following figure
Using the @EpoxyDataBindingPattern annotation on Config interface, you tell epoxy the criteria of the XML files for which it will generate a model that will be used in the code.
In our case layoutPrefix corresponds to the string “item”, this is the reason why all the layouts that will be used as views in the RecyclerView were prefixed by item, so Epoxy will generate a model for
- item_title.xml
- item_task.xml
- item_task_carousesl.xml

2. Displaying data
After indicating to Epoxy the criteria of the layouts to be used, we have to build the project so that Epoxy can generate some classes for us,
After that, replace your RecyclerView with EpoxyRecyclerView in the MainActivity layout, and by default, EpoxyRecyclerView is attached to the LinearLayoutManager so there is no need to put it on.

To display the elements in the EpoxyRecyclerView , just call the different methods that correspond to each item generated by Epoxy inside the withModels method from EpoxyRecyclerView
- For item_title.xml the method to generate is title(String)
- For item_task.xml , the method to generate is task(Task)
- And for item_task_carousesl.xml , the method is titleCarousel(CarouselItem)
All its methods take a lambda as parameter in which we can pass them to layout as a method
Remember that the file item_task.xml had a variable of type Task , that’s why on line 47, we called the method task() by passing a Task object that we would like to display.
Each element must have a unique id to be displayed properly.
3. Carousel
For the carousel the process is a bit different (from line 18 to 33), you have to use the carousel extension method that comes with Epoxy, all the elements placed in the lambda of this method will be displayed in a horizontal list.
For each item, epoxy generates a class following this convention, for :
- item_title.xml : TitleBindingModel_
- item_task.xml : TaskBindingModel_
- item_task_carousesl.xml : TaskCarouselBindingModel_
Those classes extends EpoxyModel
And the method models() of the carousel take a list of EpoxyModel here’s why we converted the CarouselItem List into a List of TaskCarouselBindingModel_ to be displayed.
Conclusion
When developing an Android application sometimes you have to get help avoiding to recreate certain elements, and using Epoxy can save you a lot of time by avoiding you to type repetitive code.
If you want to test the application you can find the source code using the following link
Источник


