- The Android SDK could not be loaded. #418
- Comments
- kyumdbot commented Dec 22, 2017 •
- codeanticode commented Dec 22, 2017
- kyumdbot commented Dec 23, 2017
- pdcxs commented Dec 27, 2017
- KeesR commented Dec 31, 2017
- Bedjes commented Jan 5, 2018 •
- Xendergo commented Jan 7, 2018
- codeanticode commented Jan 23, 2018
- Different Ways to Fix “Select Android SDK” Error in Android Studio
- What’s the Error?
- Method 1
- Method 2
- Method 3
- Method 4
- How to Fix “Failed to install the following Android SDK packages as some licenses have not been accepted” Error in Android Studio?
- What are Android SDK packages?
- How To Solve Failed to install the following Android SDK packages?
- Method 1
- Method 2
- Method 3
- Method 4
- Method 5
- Методы лечения различных ошибок в Android Studio при разработке проекта
The Android SDK could not be loaded. #418
Comments
kyumdbot commented Dec 22, 2017 •

I use the «Locate SDK path manually» and «Download SDK automatically» option, there will be «The Android SDK could not be loaded» error message.
How do I load the Android SDK?
(I use Processing 3.3.6 version)
The text was updated successfully, but these errors were encountered:
codeanticode commented Dec 22, 2017
Thanks for reporting this problem. Is this your first time using the android mode and trying to install the SDK?
kyumdbot commented Dec 23, 2017
I installed Platforms-26 using Android Studio’s SDK Manager, now it is work. (Android Studio default is to install Platforms-27)
But «Download SDK automatically» still does not work.
pdcxs commented Dec 27, 2017
I use windows 10, processing 3.3.6 version, 64bit, even set the location of SDK manually, it doesn’t work. I’m sure I have installed platform 26
KeesR commented Dec 31, 2017
Using windows 10, processing 3.3.6.
When setting the location of SDK manually, during installation, I get same problem.
Log file in C:\Users\Kees\AppData\Roaming\Processing\console (attached
171231_112040.err.log) shows several BadSDKExceptions,
- One is about not finding a wearable location — here the location as requested in AndroidSdk.java (in extras/google) seems to be moved to extras/android on my installation (and the internal structure seems changed as well)
- Another is about not finding the AVD manager — the location as requested (tools/bin) seems to be moved to android-sdk root folder on my installation
Resolved both issues (create required empty wearable dir, and bat file for avdmanager in correct folder) and now android mode is installed.
However due to changed structure of wearable folder, building the sketch will fail.
[wear API 2.0.0 seems to be integrated in the API 26.0, looking at the build exception].
Bedjes commented Jan 5, 2018 •
Hi ! I’m looking since this morning how to succes and I did it ! For every one who need help i will say what to do :
1 : Download Android Studio for ur OS here : https://developer.android.com/studio/index.html
2 : Install Android Studio
3 : Open Android Studio, clik to Configure, SDK Manager, _Appearence & Behavior, System Settings , Android SDK
4 : Download the _Android 8.0 (Oreo)
5 : Remember the path on the top of the screen Android SDK Location
6 : Open Processing
7 : On the top right corner clik on JAVA —> add modes —> download Android Mode then choose the Android Mode insted of JAVA
8 : select the path who is indicate step 5
Normaly it’s done !
Edit :
Processing version : 3.3.6 64 bit
Android Studio version : 3.0.1 64 bit
Windows version : Windows 7 64 bit
Xendergo commented Jan 7, 2018
That’s what I did too, I opened an issue reporting the same thing, got the same answer, and made a stackoverflow answer using it with less detail.
codeanticode commented Jan 23, 2018
You can’t perform that action at this time.
You signed in with another tab or window. Reload to refresh your session. You signed out in another tab or window. Reload to refresh your session.
Источник
Different Ways to Fix “Select Android SDK” Error in Android Studio
Android SDK is one of the most useful components which is required to develop Android Applications. Android SDK is also referred to as the Android Software Development Kit which provides so many features which are required in Android which are given below:
- A sample source code.
- An Emulator.
- Debugger.
- Required set of libraries.
- Required APIs for Android development with their documentation.
- Tutorials required for Android OS development.
What’s the Error?
Sometimes when the developer import an Eclipse-Android-Project into Android Studio then there may be a possibility of getting the following error
Now the point that comes here is how we can f ix the “Select Android SDK” error in Android Studio . So in this article, we are going to discuss four different methods to f ix the “Select Android SDK” error in Android Studio.
Method 1
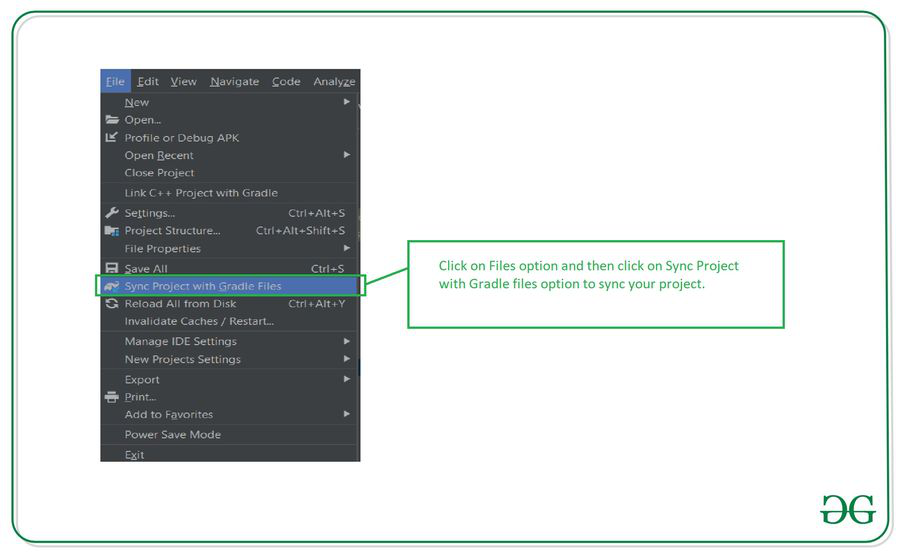
Sync your project with Gradle files
When you open your project now simply sync your project. To sync your project. Click on the Files option. In that option, you will get to see the option as Sync Project with Gradle Files. Click on that option to sync your project. After your project sync, this issue will be resolved. Please refer to the below screenshot.
Method 2
Step 1: Opening project structure
Navigate to the File > Click on Project structure which is shown in the list and click on the Project structure option. After clicking that option you will get to see the below screen.
Inside the above screen, click on the SDK Location option you will get to see the below screen.
In the above image, you will get to see the current SDK location for your Android Studio. To change this SDK location you have to click on the 3 dots which are being displayed and then select your SDK location folder. After selecting this folder click on the OK option to save your SDK path.
Step 2: Sync your project after adding your SDK path
Now sync your project with Gradle files to check that SDK is working fine. To do this click on File > you will get to see the option as Sync Project With Gradle files option click on that option and sync your project. On successful sync of your project, your SDK location is set perfectly and now you are good to go in developing Android Applications.
Method 3
Step 1: Opening Android Studio Settings
Navigate to the File > Settings option you will get to see below dialog screen. Inside that screen. Click on Appearance and Behavior option > System Settings options and then click on the Android SDK option to get to see the below screen.
Inside this screen, you will get to see your SDK path. You can update your SDK path by clicking on the Edit option. After that select your SDK path, then click on Apply option, and then click on the OK option.
Step 2: Sync your project after adding your SDK path
Now sync your project with Gradle files to check that SDK is working fine. To do this click on File > you will get to see the option as Sync Project With Gradle files option click on that option and sync your project. On successful sync of your project, your SDK location is set perfectly and now you are good to go in developing Android Applications.
Method 4
Step 1: Opening project structure
Inside your Android Studio in the top right corner, You can get to see the icon below the image for opening the project structure. Click on that option to open your project structure option. You will get to see the below screen. For opening this Project Structure we can also use a shortcut key as:
| Windows | Ctrl + Alt + Shift + S |
| Mac OS | Command + ; (semi-colan) |
| Linux | Ctrl + Alt + Shift + S |
After clicking on this option we simply have to follow Step 1 to update our Android SDK.
Inside the above screen, click on the SDK Location option you will get to see the below screen.
In the above image, you will get to see the current SDK location for your Android Studio. To change this SDK location you have to click on the 3 dots which are being displayed and then select your SDK location folder. After selecting this folder click on the OK option to save your SDK path.
Step 2: Sync your project after adding your SDK path
Now sync your project with Gradle files to check that SDK is working fine. To do this click on File > you will get to see the option as Sync Project With Gradle files option click on that option and sync your project. On successful sync of your project, your SDK location is set perfectly and now you are good to go in developing Android Applications. On successful sync of your project, your SDK location is set perfectly and now you are good to go in developing Android Applications.
Источник
How to Fix “Failed to install the following Android SDK packages as some licenses have not been accepted” Error in Android Studio?
When you download the latest Android SDK tools version using the command line to install SDKs and you just try to build gradle then this error shows up:
You may face this error even after typing y as the answer for the question: Do you accept the license ‘android-sdk-license-c81a61d9’ [y/n]: y. So we need to look at why this error is popping up? Because of this error, we cannot compile our project. So In this article, we will talk about how to solve this error using five different methods. But before directly jumping to solutions first let’s see something about Android SDK.
What are Android SDK packages?
SDK stands for software development kit or devkit for short. The Android SDK consists of an emulator, development tools, sample projects with source code, and the required libraries to build Android applications. The Android SDK Manager, manages various Android SDK versions, tools, and various other useful packages that you can select and download, to keep your development environment up-to-date.
How To Solve Failed to install the following Android SDK packages?
Method 1
You need to accept the licenses before building. According to Android SDK docs, you can use the following command depending on the SDK manager location: Docs on –licenses option seems to be missing though. yes | sdkmanager –licenses
Windows:
Step 1: Navigate to %ANDROID_HOME%/tools/bin .
%ANDROID_HOME% is the path to SDK. By default it is located at : C:\Users\UserName\AppData\Local\android\Sdk . If you have moved SDK to another directory location then you can follow below steps :
- Search for edit the system environment variables.
- Then in the environment variables, you will see ANDROID_HOME.
- Navigate to that path in cmd
Step 2:
After successfully navigating just type below command and you are done.
GNU/Linux Distributions:
macOS:
export JAVA_HOME=/Applications/Android\ Studio.app/Contents/jre/jdk/Contents/Home
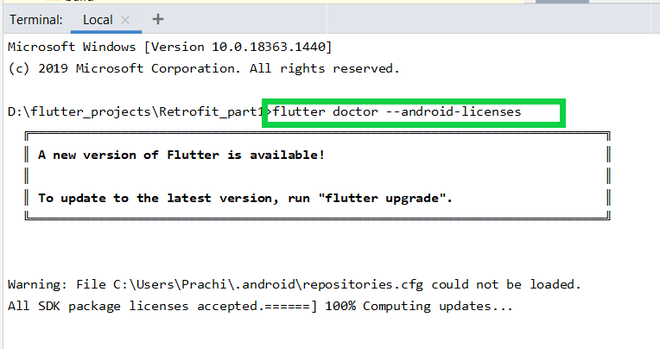
Flutter Users:
Just type flutter doctor –android-licenses in the terminal and wait for few seconds. You will see “All SDK package licenses accepted” on your screen.
Method 2
Step 1: In Android Studio go to Tools > SDK Manager.
Step 2: Go to the SDK Tools tab as shown in the below image.
Step 3: Select the Android SDK Command-line Tools (latest) and download by pressing Apply.
Method 3
in Windows OS go to your sdkmanager path then execute
You can find your sdkmanager at: \Android\tools\bin
IF you don’t know where is your SDK located, then follow these steps:
- Open Android Studio
- Navigate to Your Project > Files > Setting > Appearance and Behavior > Android SDK
Method 4
Step 1:Go to your $ANDROID_HOME/tools/bin and fire the cmd and type the below command:

Accept All licenses listed there.
Step 2:
After this just go to the licenses folder in SDK.
Check that it’s having these five files:
- android-sdk-license
- android-googletv-license
- android-sdk-preview-license
- google-gdk-license
- mips-android-sysimage-license
Step 3:
Give a retry and build again, still, Jenkins giving ‘licenses not accepted” then you have to give full permission to your ‘SDK’ directory and all its parent directories. Here is the command:
If you having sdk in /opt/ directory.
Method 5
For Windows users:
Step 1: Go to the location of your sdkmanager.bat file. By default, it is at Android\sdk\tools\bin inside the %LOCALAPPDATA% folder.
Step 2: Open a terminal window there by typing cmd into the title bar. Then go to the above path(Android\sdk\tools\bin as highlighted by the white line in the below image) and type :
Источник
Методы лечения различных ошибок в Android Studio при разработке проекта
Сегодня хотел бы поделиться своим анализом и способами лечением разных ошибок при разработке своего продукта в Android Studio. Лично я, не раз сталкивался с различными проблемами и ошибками при компиляции и/или тестировании мобильного приложения. Данный процесс, всегда однообразный и в 99% случаев и всегда нужно тратить n-колличество времени на его устранение. Даже, когда ты уже сталкивался с данной проблемой, ты все равно идешь в поисковик и вспоминаешь, как же решить ту или иную ситуацию.
Я для себя завел файлик, в котором отметил самые частые ошибки — потратив на это несколько часов и перечислил самые популярные ошибки (в дальнейшем планирую просто их запомнить), чтоб сократить свое время в дальнейшем.
Итак, начну по порядку с самой распространенной проблемы и дальше буду перечислять их по мере появления:
1) Если подчеркивает красным код, где используются ресурсы: R. — попробовать (но вероятно не поможет): Build -> Clean Project.
В принципе на Build -> Clean Project можно не терять времени, а лучше всего — слева переключиться на Project, открыть каталог .idea, затем каталог libraries и из него удалить все содержимое. Затем нажать кнопку Sync Project. А затем (если все еще красное, но скорее всего уже будет все ок ) Build -> Clean Project.

2) После внезапного выключения компьютера, после перезапуска может быть во всех проектах весь код красным. Перед этим может быть ошибка: Unable to create Debug Bridge: Unable to start adb server: Unable to obtain result of ‘adb version’. Есть три решения — первое помогло, второе нет (но может быть для другого случая), а третье — не пробовал:
а) File — Invalidate Caches/Restart — Invalidate and Restart
б) Закрыть студию. В корне папки проекта удалить файл(ы) .iml и папку .idea. Вновь запустить студию и импортировать проект.
в) Нажать Ctrl-Alt-O и запустить оптимизацию импорта.
Кстати, adb сервер можно проверить на версию (и работоспособность) и затем перезапустить:
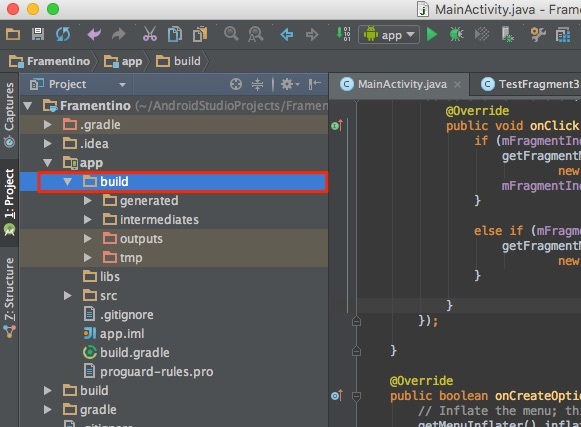
3) Если Android Studio выдает приблизительно такую ошибку: Error:Execution failed for task ‘:app:dexDebug’.
Надо слева переключиться на опцию Project, найти и удалить папку build которая лежит в папке app, т.е. по пути app/build. Затем перестроить весь проект заново: Build -> Rebuild Project.
Такое же решение если ошибка типа: «не могу удалить (создать) папку или файл» и указан путь, который в ведет в app/build. Тоже удаляем папку build и ребилдим проект.
4) В сообщении об ошибке упоминается heap — виртуальная память. А ошибка обычно вызвана ее нехваткой, т.е. невозможностью получить запрашиваемый объем. Поэтому этот запрашиваемый объем надо уменьшить, т.е. переписать дефолтное значение (обычно 2048 MB которое можно изменить в настройках), на меньшее 1024 MB.
В файле проекта gradle.properties пишем:

5) Android Studio пришет примерно такую ошибку: Plugin is too old, please update to a more recent version, or set ANDROID_DAILY_OVERRIDE environment variable to «83648b99316049d63656d7276cb19cc7e95d70a5»
Возможные причины (кроме необходимости регулярного обновления SDK):
а) Загруженный проект был скомпилирован с помощью уже несовместимого старого gradle плагина. В этом случае надо найти и подключить в своем build.gradle проекта этот более старый плагин. т.е. попробовать более старые версии, например: 1.1.3 (часто именно 1.1.x и подходит).
Найти все версии можно здесь.
б) Если в build.gradle проекта используется beta-версия плагина — это означает, что срок ее истек. Посмотреть последние релизы (продакшн и бета) можно также здесь:
6) Иногда при подключении сторонних библиотек могут дублироваться некоторые файлы (обычно связанные с лицензированием). В сообщении будет что-то содержащее слова: duplicate files. Решение — надо посмотреть в сообщении об ошибке или в документации подключенной сторонней библиотеки — какие именно файлы стали избыточными, и перечислить их в build.gradle модуля для исключения (exclude) из билда.
Это делается в директиве packagingOptions (которая, в свою очередь, находится в директиве android).
Источник


