- The Basics of Android Espresso Testing: Activities & Fragments
- Testing Android Fragment in isolation
- Introduction
- Project configuration
- Testing fragments with local and instrumentation tests
- Use case
- Testing fragments
- Instrumentation UI tests
- Local UI tests
- Summary
- Автоматизация Android. Супер простое руководство по созданию первого Espresso-теста
- Что такое Espresso?
- Расскажите поподробнее об автоматизации?
- Основные компоненты Espresso
- Создание простого приложения для автоматизации
- Запуск Espresso-тестов
- Иерархия представлений в Android
- Еще больше Espresso-тестов
- Заключение
The Basics of Android Espresso Testing: Activities & Fragments

Jun 19, 2017 · 4 min read

There comes a point in your software developer journey where you realise that unit testing is really important. This especially happens if you want to make sure that your code still works after you do some changes.
In Android, there are two types of tests:
- JUnit Tests
- Android instrumented unit test
This article focuses on the latter. Espresso testing framework is usually used to automate UI testing with the help of AndroidJUnitRunner test runner. Other libraries also exist such Robolectric.
Firstly, assuming that you have an android project ready, add the below extra gradle dependencies:
Gradle will make sure you compile the needed libraries when you are compiling the test version of your project. The last dependency is a light-weight mock web-server which you can use to test networking code.
Another thing to add is a reference to the test runner:
We are going to test an application which has one activity with the following:
- Text view
- Floating action button
- Snackbar

As mentioned before, we are going to focus on android instrumented tests, so go to your java folder, expand it and expand the folder with (androidTest).
Now let’s get familiar with the Espresso API!
Create a new Java class, name it — in this case, I named it TestMainAcitivty, then open it. You will notice that I added “@RunWith(AndroidJUnit4. class)” to the code.
The @Runwith annotation will tell the JUnit to run the tests in this class using the Android JUnit test runner.
Now we are testing the MainActivity, so we can say that to JUnit by using the @Rule annotation and providing a Test Rule:
The Rule will make sure to launch the MainActivity directly. This means that when testing an n-layer activity, you don’t need to do all the steps to start it. Simply define that in the rule and you are ready to go.
In this example, we don’t use fragments but I am sure every android developer out there uses them and if you’re wondering how to open a fragment at this point, well it’s pretty easy. All you have to do is to tell the JUnit that you need to perform an operation first before running your tests. This is done by making a function, let’s call it “init()”, and annotating it with @Before annotations.
To change the fragment, you need to get the fragment manager and in order to do that, you need to get the activity. All this can be done using the rule object we created:
It’s worth mentioning that for the sake of demonstration, I made the fragment change before running the test. However, you can still do the fragment change inside your test function.
By this point, we have the Activity and a selected fragment up and running before executing our test. Now let’s see how to actually make a test.
Let’s say I want to:
- Test that my text view is visible
- Write 3 letter in the text view
Create your test function and annotate it with @Test which will tell JUnit that this is a test.
To select a view, Espresso framework has a function called “onView()” and to state that we want to select it by its id, we use “withId()”
We also want to do some checks on it first so we use check():
In this case, our check is that the view is visible, which means that the view visibility matches visible (displayed state):
If the view is displayed, we want to type 3 letters as mentioned:
We select the view as before, but instead of using “check()” we use “perform()” because we want to perform some actions on the view. The actions were; clear any previous text “clearText()” and typing “Amr” using “typeText()”.
In the example app I also have a floating action button that if I click will show a Snackbar. To test this, I added another function similar to this:
The major difference here is that in the second “onView()” call, I passed two ViewMatchers instead of one, the id, to make sure that I am matching a piece of text on a certain view which is the Snackbar text.
If you launch your Activity with some Extras, you can test that by modifying the Rule. Here is an example:
Источник
Testing Android Fragment in isolation
Introduction
A fragment is a citizen of many Android applications. When fragment class was introduced as part of the Android SDK, many people had doubts about using it in an Android app, especially after a complicated life cycle. Many applications used different approaches: «Multiple Activities» vs «One Activity with multiple fragments» vs «Mixed approach (multiple Activities and multiple Fragments». Nowadays, many issues with Fragments have been fixed in the AndroidX version of a fragment and the approach with one Activity and many fragments has become more and more popular. When we take a look at the Jetpack Navigation component, the main idea is using multiple fragments and the Jetpack Navigation component helps to navigate between them.
Testing Android application from the very beginning was not an easy task, but later on, the UiAutomator and Espresso frameworks were introduced which simplify UI testing and many developers, and QA engineers started creating many UI test cases, but from the start all UI test cases tested applications; as a result, we had multiple «End to End» tests. These tests were slow, fragile and unstable. Right now, more and more people prefer tests components in isolation. Let’s talk today about testing Android fragments in isolation and speeding up Espresso test cases.
Efficient UI testing series:
The article was updated on 29 November 2020.
Project configuration
I want to start with a project set up for a «fragment-testing» library. This library can be used with Local and Instrumentation tests. We need a Robolectric library for local tests and device or emulator for running Instrumentation test cases.
Let’s add dependencies for local and instrumentation tests.
Note: The fragment-testing library uses a different version than the fragment-ktx one because we use the androidx.test:core:1.3.0, and the fragment-ktx uses an old version of the androidx.test:core library. Once the fragment-ktx library is updated, we can use a similar versions for fragment-ktx and fragment-testing libraries.
We can also create shared tests which can be run as Local and Instrumentation tests (read more here: «Sharing code between local and instrumentation tests»).
Testing fragments with local and instrumentation tests
Local tests can be run on Android JVM. The Robolectric library can help with it. (We should use Robolectric 4.0+). These tests are fast; we can use Espresso syntax for creating such test cases, but on the other hand, we cannot run these test cases on different devices. From time to time, you can face a situation when the application doesn’t work correctly on different devices. In this case, the Instrumentation UI tests can be beneficial.
Instrumentation test cases require device or emulation, and they are slow, but we can run them on different devices simultaneously. However, often you can face a situation when all instrumentation test cases are written in the «End to End» approach. It means we always start the test from the initial screen of or application, like the Login or Splash screen. As a result, our End-To-End test cases are slow because we should spend some time on the navigation to the required screen, and only after it, we can start to verify the screen.
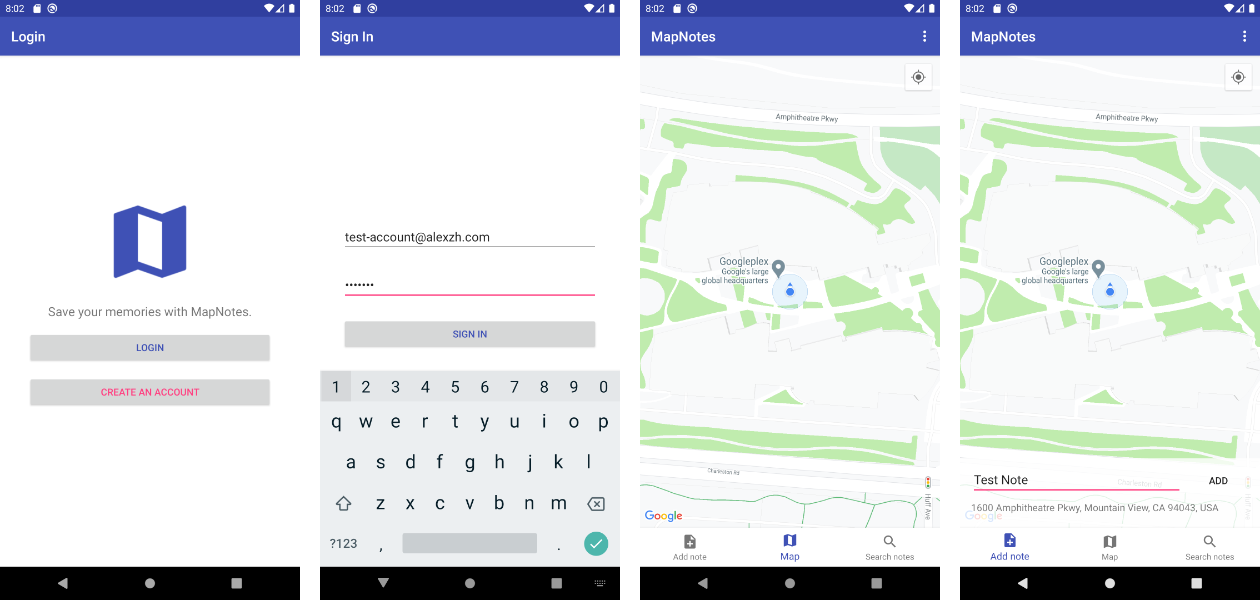 E2E test case: Add a note
Fortunately, we can verify each fragment in isolation, and it speeds up instrumentation testing.
Use case
I propose to create test cases for «Add note» fragment from MapNotes application. This fragment allows us to add notes connected with current latitude and longitude.
So, let’s take a look at UI possibilities of the fragment:
- «ADD» button disabled by default;
- «ADD» button enabled when the text of the note exists.
Let’s visualize the screen of application:
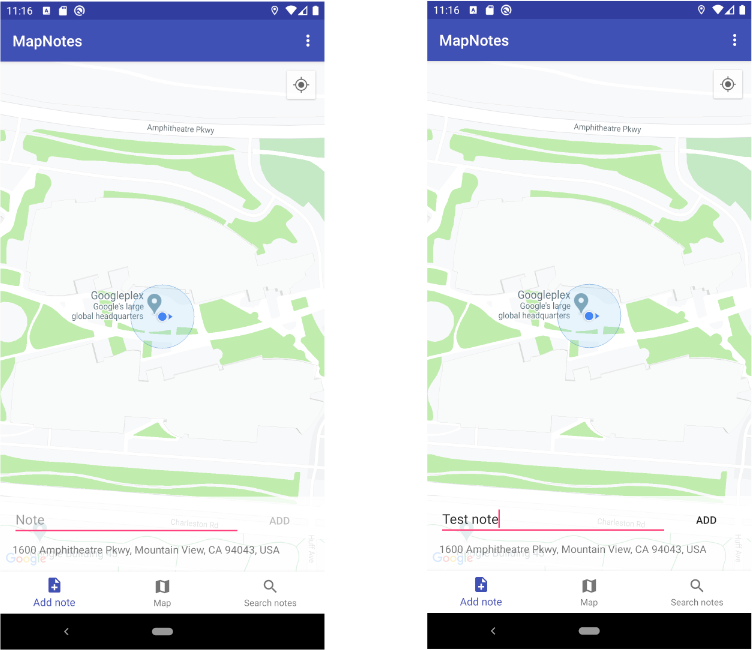 MapNotes — home screen
Testing fragments
I want to start with a way of testing a fragment without a fragment-testing library. It can be useful if you don’t use a Fragment from androidx.fragment package.
First of all, we should start an Activity and afterward, add a Fragment to it. A FragmentTestActivity is a simple Activity with a container for the Fragment.
The first step of any test case where we want to test a Fragment in isolation is adding the required fragment to this Activity. (A setFragment is a custom method which adds required Fragment to the Activity.)
Finally, we can add test cases:
With this approach, you can test a fragment in isolation without any problems, but you need to manually create an empty Activity for attaching the required Fragment.
So, let’s take a look at a new approach of the testing fragments in isolation with a «androidx.fragment:fragment-testing» library.
The launchFragmentInContainer method allows us to launch a fragment which contains UI. Afterwards, your fragment will be attached to the Activity root’s view.
If we want to use custom FragmentFactory for initializing our fragment, we can use the factory parameter.
We can customize parametrs of the Fragment using the fragmentArgs parameter.
In addition to that, we can run a fragment in the required state. Let’s imagine that we want to test fragment in ON_START state:
Note: We can test non-graphical Fragments with the launchFragment method. The fragment will be attached to the empty Activity.
Instrumentation UI tests
The launchFragmentInContainer method creates an empty FragmentActivity with required fragment under the hood. As you can see, this approach is similar to the previous approach, which was popular before because we had an activity with the required fragment.
So, let’s cover the following scenario with a test case:
- «ADD» button is disabled by default;
- Enter the «test note» test into the note EditText;
- «ADD» button is enabled.
As you can see, we can avoid the ActivityTestRule in the test suite and have more possibilities, like:
- Test fragment with the required state;
- Customize bundle for the fragment;
- Clean API for testing fragment in isolation.
Local UI tests
The main benefit of this approach is that we can execute the same test cases with Robolectric without any changes. I recommend checking «Sharing code between local and instrumentation tests» which describe an approach of storing test cases with the possibility to run them as local and instrumentation test cases.
Summary
The fragment-testing library allows us to test graphical and non-graphical fragments in isolation without additional preparation. Of course, the fragment will be attached to the test Activity. This tool allows us to test fragments with local and instrumentation test cases. We can use Robolectric for local tests.
So, let’s try to compare the execution time of the same scenarios for local and instrumentation test cases. We spend around 18 seconds for local tests and 30 seconds for instrumentation tests because we should install 2 apks to external devices. When the test finishes we should also copy a test report from an external device to your workstation. However, instrumentation tests can be executed on different devices simultaneously. If you have issues on various devices, I recommend using instrumentation tests. In general, I recommend using a shared test module where you can store test cases with the possibility of running them as local and instrumentation tests. Local tests can be executed in the pipeline, and you can use instrumentation tests on different devices before release).
Источник
Автоматизация Android. Супер простое руководство по созданию первого Espresso-теста
Здравствуйте, друзья. В преддверии старта курса «Mobile QA Engineer», хотим поделиться с вами переводом интересного материала.

Что такое Espresso?
Нет, это не напиток, который вы пьете каждый день, чтобы взбодриться. Espresso — это тестовый фреймворк с открытым исходным кодом, разработанный Google. Он позволяет выполнять сложные тесты пользовательского интерфейса на реальном устройстве или эмуляторе. Потребуется ли время, чтобы начать писать сложные тесты для Android?
Возможно. Но ничего не мешает вам сделать первый шаг и научиться писать простые тест-кейсы для Android с помощью фреймворка Espresso прямо сейчас.
Расскажите поподробнее об автоматизации?
Конечно. Автоматизация — это способ ускорить выполнение тестов, сделать их более эффективным и масштабируемым. Ручное тестирование очень важно, но наличие автоматических тестов — гораздо лучший вариант в перспективе.
Существует в основном два типа тестовых фреймворков:
- Фреймворки, которым не нужен доступ к исходному коду и которые не интегрированы как часть проекта. Например, WebDriver, Appium, QTP.
- Фреймворки, которым нужен доступ к исходному коду. Например, Espresso, KIF (Keep It Functional).
Espresso — это фреймворк, которому нужен доступ к исходному коду, поэтому для автоматизации нам потребуется доступ к коду проекта. Так как нам нужен проект для работы, давайте создадим его!
Основные компоненты Espresso
Есть три типа методов, доступных в Espresso:
- ViewMatchers — позволяют найти объект в текущей иерархии представлений
- ViewAssertions — позволяют проверить состояние объекта и подтвердить, что состояние соответствует критериям
- ViewActions — эти методы позволяют выполнять различные действия с объектами.
Давайте копнем глубже и посмотрим, как все это работает на реальном примере.
Создание простого приложения для автоматизации
Первое, что нам нужно сделать, — это создать приложение, которое мы будем автоматизировать. Давайте создадим проект в Android Studio. Для этого, конечно, необходимо, чтобы Android Studio был установлен у вас на компьютере.
1. Откройте Android Studio и создайте Bottom Navigation Activity.
Android Studio. Окно «Create New Project»
2. Назовите проект и выберите язык программирования.
Android Studio. Указание имени проекта
3. Перейдите в папку androidTest
Android Studio. Инструментальный тест.
Как вы можете видеть, там написан только один тест, и это не UI-тест, а JUnit-тест.
Сейчас нам нужно добавить простой тест пользовательского интерфейса. Для этого сначала создадим правило для открытия MainActivity.
Давайте добавим импорт аннотации JUnit Rule:
Следующее, что нужно сделать, — это добавить строку кода, указанную ниже, в дополнение к аннотации RunWith:
Теперь мы видим, что ActivityTestRule выделен красным. Это означает, что нам необходимо импортировать функцию ActivityTestRule. Но прежде нам нужно добавить библиотеку, способную сделать это. В двух словах, для этой задачи нам нужна помощь Gradle — системы автоматизации сборки, созданной специально для этой цели.
Давайте перейдем к файлу конфигурации Gradle и добавим эту библиотеку. Откройте файл с именем build.gradle (Module: app) и добавьте строку, указанную ниже:
Android Studio. Добавление зависимости.
После добавления, нужно нажать кнопку для синхронизации проекта и затем вернуться к файлу с реализацией теста.
Теперь, когда библиотека добавлена, следующим шагом будет ее импортирование в файле с инструментальным тестом:
Android Studio. Импорт ActivityTestRule.
Хорошо, теперь мы готовы добавить наш первый тест. Введите этот код в ExampleInstrumentedTest:
Android Studio. Добавление теста и импортирование дополнительных элементов
Для нашего теста требуется импортировать дополнительные элементы, прежде чем он начнет работать. Нажмите кнопку «ОК», и мы, собственно, готовы к запуску нашего теста!
Запуск Espresso-тестов
Щелкните правой кнопкой мыши на нашем тесте слева и выберите «Run ExampleInstrumentedTest».
Поскольку это UI-тест, а не модульный тест, дальше мы увидим окно с выбором устройства, на котором мы хотели бы запустить его. У меня уже есть «Nexus 5X» в качестве устройства, поэтому мне нужно просто выбрать его.
В вашем случае, если вы никогда не развертывали Android-проект, выберите ваше реальное Android-устройство или нажмите «Create New Virtual Device» и создайте новое эмулируемое устройство для запуска тестов. Это может быть любое устройство из списка, на котором бы вы хотели запустить тесты.
Нажмите «ОК» и приготовьтесь увидеть магию!
Android Studio. Результаты выполнения теста
Как вы можете видеть, у нас есть набор из двух пройденных тестов: модульного теста, который уже был там, после создания проекта, и нашего теста «clickHomeButton», который мы только что написали.
Android Studio. Выполненный тест.
Как видно из названия, мы нажали только одну кнопку в нижней панели навигации, которая называется «navigation_home» в иерархии MainActivity.
Давайте проанализируем что мы делали в этой цепочке методов:
- 1. Вызываем «onView». Этот метод является методом типа ViewMatchers. Мы находим объект в нашем Activity для выполнения чего-либо.
- 2. Далее мы вызываем perform(click()). Этот метод является методом типа ViewActions. Мы указываем конкретное действие, которое нужно выполнить в этом случае — сделать одно нажатие (click). В Espresso доступно еще много методов действий, например:
- 3. Последнее, что нам нужно сделать, это подтвердить, что действие, которое мы сделали, действительно соответствует нашим критериям, и для этого мы выполняем метод check(isDisplayed()), который является методом типа ViewAssertions. В этом случае мы проверяем, что этот объект (представление) действительно отображался на экране после выполнения действия нажатия.
Иерархия представлений в Android
Уважаемый читатель, я надеюсь, что смог объяснить вам, как писать базовые UI-тесты для Android с помощью Espresso.
Однако, вероятно, не так просто понять, что именно здесь произошло, если не знать, где все эти кнопки расположены и откуда они берутся. Для того, чтобы это узнать, нам нужно перейти в папку «res» с левой стороны, открыть папку «menu» и выбрать «bottom_nav_menu.xml».
Вот что мы увидим там:
Android Studio. Иерархия представления нижнего меню навигации.
Как видите, это строка, которая присваивает имя элементу меню:
Именно это мы используем в нашем коде для запуска тестов. Также есть кнопки меню “navigation_dashboard” и “navigation_notifications”, доступные внизу, так что давайте продолжим и используем их в наших тестах.
Еще больше Espresso-тестов
Нам нужно вернуться к файлу ExampleInstrumentedTest и добавить туда еще пару тестовых функций:
Единственное, что мы добавили, — это проверка еще нескольких элементов меню: “navigation_dashboard” и “navigation_notifications”.
Android Studio. Добавляем еще два теста.
Конечно, эти тесты можно было бы еще больше упростить, но для того, чтобы показать, как все это работает, допустим, что они прекрасно подходят для наших целей.
Давайте продолжим и запустим эти тесты еще раз. Нажмите кнопку «Run».
Android Studio. Результаты выполнения тестов.
Все 4 теста пройдены. Все представления были найдены, нажаты и подтверждены в иерархии представлений.
Заключение
Espresso — это мощное решение для запуска UI-тестов. Теперь, когда вы знаете, как они создаются, вы готовы писать намного более мощные и сложные тесты.
Источник


