- Tek Eye
- Free Projects to Illustrate Android Programming Techniques
- List of Free Android Example Projects
- List of Free Android Example List Handling Projects
- List of Free Android Example UI Projects
- See Also
- Archived Comments
- Do you have a question or comment about this article?
- Build Your First Android App in Java
- 1. Welcome!
- What you must know already
- What you’ll learn
- Use Android Studio and Java to write Android apps
- Note: This version of the codelab requires Android Studio 3.6 or higher.
- 2. Install Android Studio
- Note: This version of the codelab requires Android Studio 3.6 or higher.
- 3. Task: Create your first project
- What you’ll learn
- Step 1: Create a new project
- Step 2: Get your screen set up
- Step 3: Explore the project structure and layout
- Step 4: Create a virtual device (emulator)
- Step 5: Run your app on your new emulator
Tek Eye
The lists of Android sample projects in this article illustrate various Android programming techniques. Scroll down or click on these topics for free Android example projects on:
The Android projects listed below cover a wide range of subjects. All the following projects were tested in the version of Android Studio available at the time. Studio is a free Integrated Development Environment (IDE) provided by Google for Android app development. (An IDE is a software environment used for writing software, in this case Android apps).
All these free Android example projects come with the source code in a zip archive for importing into Android Studio. A tutorial web page provides a lesson for each of the projects. The example source code is ready to run in Android Studio. Extract the sample app project and use Android Studio import. How? Here’s a quick guide:
- Extract the zip file contents to the required location (preserving directory structure). Studio does not move the project.
- Run Android Studio and use the Import project option. Import is on the New option from the File menu, or on Studio’s Welcome screen. (To get to the Welcome dialog close any open projects.)
- Select the project directory, or the top level build.gradle file in the project directory.
- Accept the sync Gradle message (if displayed) and wait for the IDE to finish configuring the project (look at the status bar at the bottom of Studio).
- When the Run icon (play button) on the toolbar goes green the example project is ready to use.
When opening projects in updated versions of Studio import errors can occur. See the article Opening Pre-Android Studio 3 Projects for tips on resolving errors caused by updates to Studio.
(Import instructions also appear in each zip archive in the file instructions.txt.)
Free Projects to Illustrate Android Programming Techniques
This list of Android example projects will expand as other Android tutorials and code examples are added to the site. A full list of all the Tek Eye Android articles can be found in the Index. A few of the Android examples were contributed to the O’Reilly Android Cookbook. The following tables contain:
- A link to the tutorial article for each Android example project.
- A link to a zip file containing the source code for the example project that can be extracted and then imported into Studio.
- In the pipeline: A link to a compiled version of the example as a signed installable Android packages (.apk file). Ready for executing immediately on an Android device or emulator.
List of Free Android Example Projects
| Article | Source | Package |
|---|---|---|
| Your First Android Java Program | HelloWorld.zip | planned |
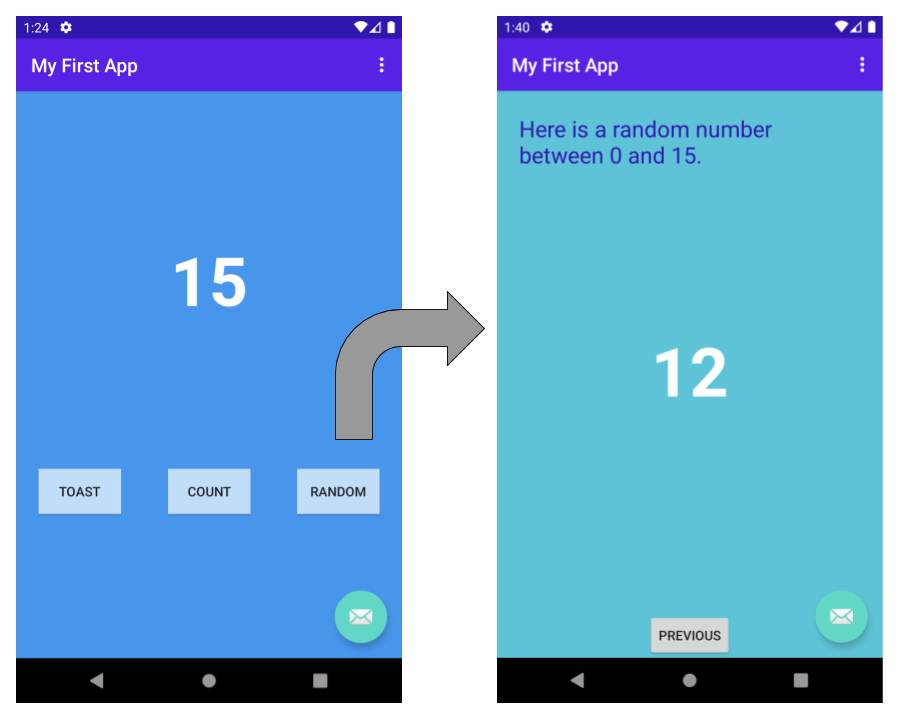
| Start a Second Android Activity | secondscreen.zip | planned |
| Android String Resources Gotchas | stringsxml.zip | planned |
| Android AsyncTask Class Helps Avoid ANRs | slowprocess.zip | planned |
| Different Ways to Code Android Event Listeners | codinglisteners.zip | planned |
| Testing Android’s Activity Lifecycle | lifecycletesting.zip | planned |
| Saving Activity State in an App when it’s Interrupted | restorestate.zip | planned |
| Use the ZXing Barcode Scanner in an Android App | scanbarcode.zip | planned |
| Animated Images in Android | lights.zip | lights.apk |
| Web Search Example In Android | websearch.zip | planned |
| Android Dice Roller Source Code | android_dice_roller.zip | Dice.apk |
| Email Contact Form Using ACTION_SEND | send-email-example.zip | planned |
| Changing the Font for Android TextViews | fonts.zip | planned |
| Understanding Screen Resolutions and Density | density-test.zip | planned |
| Android API Demos | apidemos.zip | planned |
| Android Bitmap Loading | bitmap-loading.zip | planned |
List of Free Android Example List Handling Projects
| Article | Source | Package |
|---|---|---|
| Add a Simple List to an App | simplelist.zip | planned |
| Change ListView Text Color in Android | redlist.zip | planned |
| Two Line Lists in Android | two_line_listactivity.zip | planned |
| Multi Line ListView Entries in Android | multi-line.zip | planned |
| Read the Selection From a Multi Line ListView | read-multi-line.zip | planned |
List of Free Android Example UI Projects
| Article | Source | Package |
|---|---|---|
| Access Android View in Activity | view-id.zip | planned |
| Displaying a Bitmap in Android | imageview-bitmap.zip | planned |
| Add a Border to an Android Layout | layoutborder.zip | planned |
| No Tooltips for Android — Use Hint | hintexample.zip | planned |
| Limit EditText Input with Attributes and TextWatcher | percentage.zip | planned |
| Android Portrait and Landscape Screen Layout Example | portrait-landscape.zip | planned |
| ImageButton Graphics with Inkscape | buttonpress.zip | planned |
| Android 9 Patch Image Files for Buttons and Borders | ninepatch.zip | planned |
| About Box in Android App Using AlertBuilder | aboutbox.zip | planned |
| Swipe View Android Example for Screen Paging | text_swiper.zip | planned |
| How to Get View Size in Android | view-size.zip | planned |
| Load Values into an Android Spinner | loading_spinner.zip | planned |
| Changing Android Spinner Text Size with Styles | styling_spinner.zip | planned |
| Android Menu Vs Action Bar with Example Code | menu-demo.zip | planned |
| Context Menu Example for Android | context-menu.zip | planned |
| SeekBar Demo for Android | seekbar-demo.zip | planned |
| UI Update Demo for Android | is-prime-app.zip | planned |
| Pop-up Window Demo for Android | android-pop-up.zip | planned |
| Android Color Picker Tutorial | color-picker.zip | planned |
| HTML5 in Android App for WebView Display | show-html.zip | planned |
See Also
- There are free Android Developer online samples for the Android SDK available via Studio, see the article Android SDK Samples.
- View the Tek Eye full Index for other Android articles and other interesting technical articles.
- There are samples filterable by language and technology type on the Android Developers website.
- For some interesting fun facts on Android see the Android Infographic at techjury.
Archived Comments
Leo Stalin on January 9, 2013 at 10:56 am said: I am an Android programming beginner.
Tek Eye on January 9, 2013 at 4:45 pm in reply to Leo Stalin said:
Arun kumar G on February 9, 2013 at 2:41 pm said: Hello Sir. This is very useful for me as I’m trying to get into the Android field. I need your help a lot sir. Definitely I’ll utilize you a lot. Thank you Sir.
Bimal on February 23, 2014 at 6:00 am said: Hi! I’m very new in android. I’m a VB developer. Now I need a simple project as follows. How can I get this project. I need source code with full comment. After reading the comment I can compile it my self. I use Android Studio. Thank you.
The project should have 5 editboxes, 1 combo and 1 command button. User will enter numbers in EditBox1. The length may be 16-18 numbers. Then user will select a item from combo. Combo should have 5 items. Then user will click on the button. In click event of the button, I want first 5 number need to go in EditBox2. Second 4 number need to go in EditBox3. Rest of the number need to go in EditBox4. In the last textbox number length may be 7,8 or 9. After breakdown of the string I want to find sum of all EditBoxes: Editbox1 + Editbox2 + EditBox3.
Then I want to subtract a number from the sum value. (Editbox1 + Editbox2 + EditBox3) – a number like 5560 or 6612 or 4258 etc. The subtraction number may be variable, because it depends on list item selected by user. Then I want the result in a Editbox5.
I need this project in email. My email is gpbimal@yahoo.com. If it is payable I will pay for this.
Tek Eye on February 24, 2014 at 8:35 am in reply to Bimal said: If you are familiar with VB take a look at these alternative Android programming IDEs:
Vladislav Bauer on August 10, 2014 at 11:56 am said: A lot of useful open source libraries, tools and projects could be found here: https://android-arsenal.com/
Tek Eye on August 11, 2014 at 10:42 am in reply to Vladislav Bauer said: Thanks for the link, a good place for Android developers to browse for components and other useful items.
Arya on October 4, 2014 at 5:45 am said: Good one.
Sushmita Singh on October 1, 2015 at 10:00 am said: Hey I want an shopping site related mini project.
Asad on October 8, 2016 at 3:39 pm said: How to open zip files in android studio?
Tek Eye on October 10, 2016 at 7:26 am in reply to Asad said: Extract the files first. A good utility for zip files is 7-Zip. Instructions for Studio are at the top of this page.
Geethadevi on January 29, 2017 at 7:39 am said: Useful to illustrate the Android programming techniques.
Author: Daniel S. Fowler Published: 2011-11-23 Updated: 2019-07-21


Do you have a question or comment about this article?
(Alternatively, use the email address at the bottom of the web page.)
↓markdown↓ CMS is fast and simple. Build websites quickly and publish easily. For beginner to expert.
Free Android Projects and Samples:
Источник
Build Your First Android App in Java
1. Welcome!
In this codelab, you’ll learn how to build and run your first Android app in the Java programming language. (If you’re looking for the Kotlin version of this codelab, you can go here.)
What you must know already
This codelab is written for programmers and assumes that you know either the Java or Kotlin programming language. If you are an experienced programmer and adept at reading code, you will likely be able to follow this codelab, even if you don’t have much experience with Java.
What you’ll learn
- How to use Android Studio to build your app.
- How to run your app on a device or in the emulator.
- How to add interactive buttons.
- How to display a second screen when a button is pressed.
Use Android Studio and Java to write Android apps
You write Android apps in the Java programming language using an IDE called Android Studio. Based on JetBrains’ IntelliJ IDEA software, Android Studio is an IDE designed specifically for Android development.
Note: This version of the codelab requires Android Studio 3.6 or higher.
To work through this codelab, you will need a computer that can run Android Studio 3.6 or higher (or already has Android Studio 3.6 or higher installed).
2. Install Android Studio
Note: This version of the codelab requires Android Studio 3.6 or higher.
You can download Android Studio 3.6 from the Android Studio page.
Android Studio provides a complete IDE, including an advanced code editor and app templates. It also contains tools for development, debugging, testing, and performance that make it faster and easier to develop apps. You can use Android Studio to test your apps with a large range of preconfigured emulators, or on your own mobile device. You can also build production apps and publish apps on the Google Play store.
Note: Android Studio is continually being improved. For the latest information on system requirements and installation instructions, see the Android Studio download page.
Android Studio is available for computers running Windows or Linux, and for Macs running macOS. The OpenJDK (Java Development Kit) is bundled with Android Studio.
The installation is similar for all platforms. Any differences are noted below.
- Navigate to the Android Studio download page and follow the instructions to download and install Android Studio.
- Accept the default configurations for all steps, and ensure that all components are selected for installation.
- After the install is complete, the setup wizard downloads and installs additional components, including the Android SDK. Be patient, because this process might take some time, depending on your internet speed.
- When the installation completes, Android Studio starts, and you are ready to create your first project.
Troubleshooting: If you run into problems with your installation, see the Android Studio release notes or Troubleshoot Android Studio.
3. Task: Create your first project
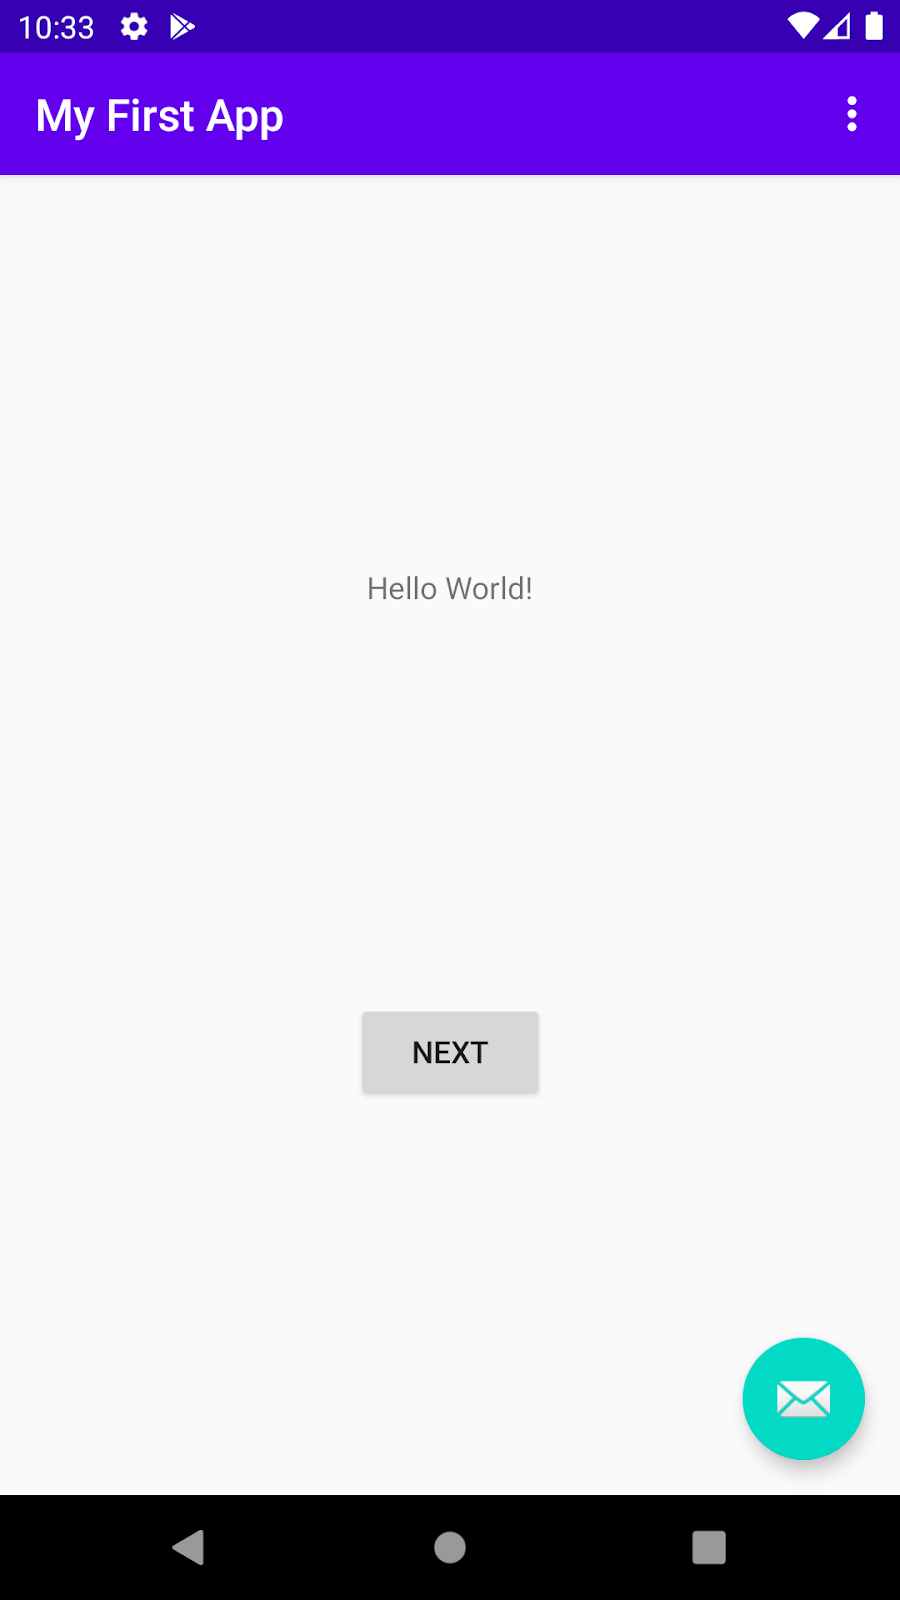
In this step, you will create a new Android project for your first app. This simple app displays the string «Hello World» on the screen of an Android virtual or physical device.
Here’s what the finished app will look like:
What you’ll learn
- How to create a project in Android Studio.
- How to create an emulated Android device.
- How to run your app on the emulator.
- How to run your app on your own physical device, if you have one.
Step 1: Create a new project
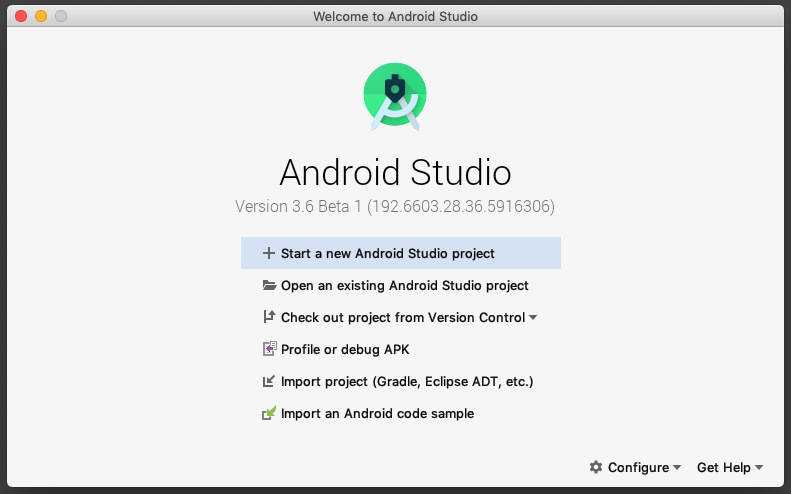
- Open Android Studio.
- In the Welcome to Android Studio dialog, click Start a new Android Studio project.

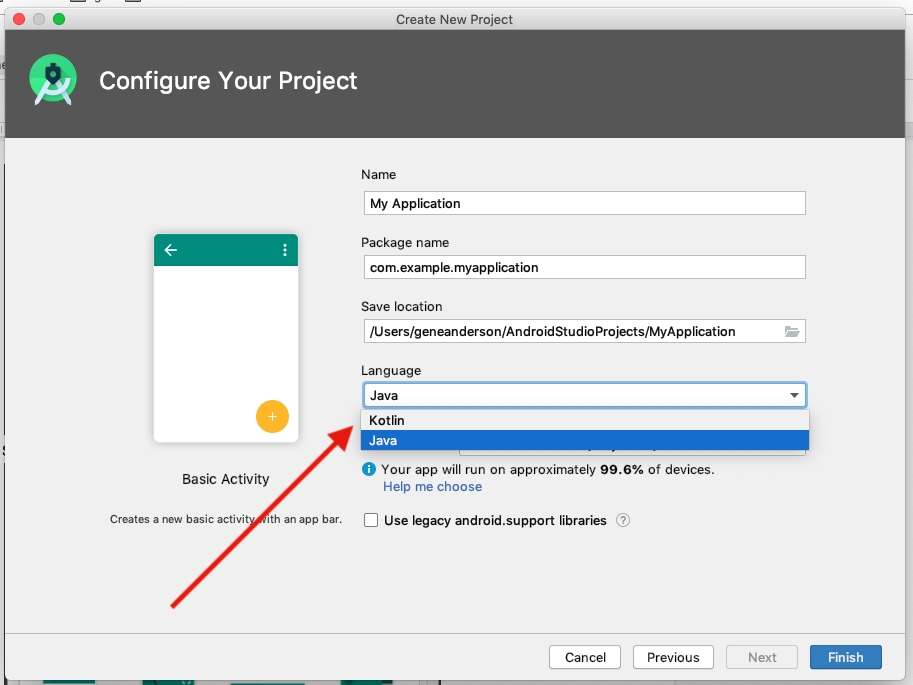
- Select Basic Activity (not the default). Click Next.
- Give your application a name such as My First App.
- Make sure the Language is set to Java.
- Leave the defaults for the other fields.
- Click Finish.

After these steps, Android Studio:
- Creates a folder for your Android Studio project called MyFirstApp. This is usually in a folder called AndroidStudioProjects below your home directory.
- Builds your project (this may take a few moments). Android Studio uses Gradle as its build system. You can follow the build progress at the bottom of the Android Studio window.
- Opens the code editor showing your project.
Step 2: Get your screen set up
When your project first opens in Android Studio, there may be a lot of windows and panes open. To make it easier to get to know Android Studio, here are some suggestions on how to customize the layout.
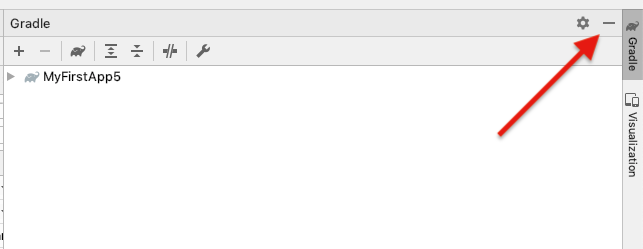
- If there’s a Gradle window open on the right side, click on the minimize button (—) in the upper right corner to hide it.
- Depending on the size of your screen, consider resizing the pane on the left showing the project folders to take up less space.
At this point, your screen should look a bit less cluttered, similar to the screenshot shown below.

Step 3: Explore the project structure and layout
The upper left of the Android Studio window should look similar to the following diagram: 
Based on you selecting the Basic Activity template for your project, Android Studio has set up a number of files for you. You can look at the hierarchy of the files for your app in multiple ways, one is in Project view. Project view shows your files and folders structured in a way that is convenient for working with an Android project. (This does not always match the file hierarchy! To see the file hierarchy, choose the Project files view by clicking (3).)
- Double-click the app (1) folder to expand the hierarchy of app files. (See (1) in the screenshot.)
- If you click Project (2), you can hide or show the Project view. You might need to select View > Tool Windows to see this option.
- The current Project view selection (3) is Project > Android.
In the Project > Android view you see three or four top-level folders below your app folder: manifests, java, java (generated) and res. You may not see java (generated) right away.
- Expand the manifests folder.
This folder contains AndroidManifest.xml . This file describes all the components of your Android app and is read by the Android runtime system when your app is executed. 2. Expand the java folder. All your Java language files are organized here. The java folder contains three subfolders:
com.example.myfirstapp: This folder contains the Java source code files for your app.
com.example.myfirstapp (androidTest): This folder is where you would put your instrumented tests, which are tests that run on an Android device. It starts out with a skeleton test file.
com.example.myfirstapp (test): This folder is where you would put your unit tests. Unit tests don’t need an Android device to run. It starts out with a skeleton unit test file. 3. Expand the res folder. This folder contains all the resources for your app, including images, layout files, strings, icons, and styling. It includes these subfolders:
drawable: All your app’s images will be stored in this folder.
layout: This folder contains the UI layout files for your activities. Currently, your app has one activity that has a layout file called activity_main.xml . It also contains content_main.xml , fragment_first.xml , and fragment_second.xml .
menu: This folder contains XML files describing any menus in your app.
mipmap: This folder contains the launcher icons for your app.
navigation: This folder contains the navigation graph, which tells Android Studio how to navigate between different parts of your application.
values: This folder contains resources, such as strings and colors, used in your app.
Step 4: Create a virtual device (emulator)
In this task, you will use the Android Virtual Device (AVD) manager to create a virtual device (or emulator) that simulates the configuration for a particular type of Android device.
The first step is to create a configuration that describes the virtual device.
- In Android Studio, select Tools >AVD Manager, or click the AVD Manager icon in the toolbar.
- Click +Create Virtual Device. (If you have created a virtual device before, the window shows all of your existing devices and the +Create Virtual Device button is at the bottom.) The Select Hardware window shows a list of pre-configured hardware device definitions.
- Choose a device definition, such as Pixel 2, and click Next. (For this codelab, it really doesn’t matter which device definition you pick).
- In the System Image dialog, from the Recommended tab, choose the latest release. (This does matter.)
- If a Download link is visible next to a latest release, it is not installed yet, and you need to download it first. If necessary, click the link to start the download, and click Next when it’s done. This may take a while depending on your connection speed.

Note: System images can take up a large amount of disk space, so just download what you need.
- In the next dialog box, accept the defaults, and click Finish.
The AVD Manager now shows the virtual device you added.
- If the Your Virtual Devices AVD Manager window is still open, go ahead and close it.
Step 5: Run your app on your new emulator
- In Android Studio, select Run > Run ‘app’ or click the Run icon in the toolbar. The icon will change when your app is already running.
 The icon will change when your app is already running.
If you get a dialog box stating «Instant Run requires that the platform corresponding to your target device (Android N. ) is installed» go ahead and click Install and continue.
- In Run > Select Device, under Available devices, select the virtual device that you just configured. This menu also appears in the toolbar.
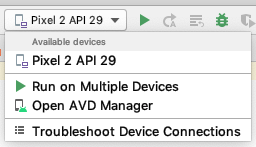
The emulator starts and boots just like a physical device. Depending on the speed of your computer, this may take a while. You can look in the small horizontal status bar at the very bottom of Android Studio for messages to see the progress.
Messages that might appear briefly in the status bar
Gradle build running

Waiting for target device to come on line
Источник


