- ExpandableListView
- Размещение индикаторов групп в заданном месте
- Собственные индикаторы
- Android: Expandable List View Example
- Project Description
- Output
- Environment Used
- Android Project
- strings.xml
- XML layout files
- activity_main.xml
- group_item.xml
- child_item.xml
- Create Android Custom Adapter class for ExpandableListView
- Activity
- AndroidManifest.xml
- Output
- Project Folder Structure
- Android Expandablelistview Tutorial With Example With Custom Adapter
- 1. Android Expandable ListView Tutorial Example
- Final Look
- XML Coding
- Methods Of Expandable Listview
- Making Android Studio Example
- Step 1. Category Layouts
- Step 2. Expandable Adapter
- Step 3. Final Coding
- Explanation of Adapter
- 2. Android Expandable ListView With Checkbox Example Handle Multiple Selection
- Step 1. Create project in Android Studio.
- Step 2. Update colors.xml
- Step 3. Adding Images
- Step 4. Adding files in drawable
- Step 5. Making layout resources files
- Step 6. Making Model Classes
- Step 7. Update Main Activity
- Step 8. Accessing Checked Items
ExpandableListView
Компонент ExpandableListView является расширенным вариантом компонента ListView. Основное отличие — разворачивающий список второго уровня. Получается список в списке. Рассмотрим простейший вариант:
Сам по себе компонент не представляет интереса. Его необходимо заполнить данными. Переключимся в код активности и напишем следующее:

Сначала мы описываем массивы данных – это названия групп (Времена года) и названия элементов для них (месяцы).
Затем описываем коллекцию для групп, коллекции для элементов и Map для атрибутов.
В методе onCreate() заполняем groupData. Это коллекция групп. Каждая группа представляет собой Map. А в Map мы пишем необходимые нам атрибуты для каждой группы. В нашем случае, для каждой группы мы укажем всего один атрибут groupName — это название из массива groups.
Адаптер обычно использует layout-ресурс для отображения пункта списка. В нашем случае пунктами ExpandableListView являются и группа и элемент. В layout-ресурсе могут быть какие-либо TextView. Мы можем заполнить их значениями из атрибутов элементов или групп, которые собраны в Map. Для этого нам надо указать сначала имена атрибутов, которые хотим использовать, а затем идентификаторы TextView, в которые хотим поместить значения этих атрибутов.
Для связки атрибутов и TextView мы используем два массива:
- groupFrom – список имен атрибутов, которые будут считаны. В нашем случае – это groupName, который мы добавили к группе с помощью Map чуть выше в коде, когда собирали группы в groupData.
- groupTo – список ID View-элементов, в которые будут помещены считанные значения атрибутов. Наш используемый layout будет содержать TextView с >Два этих массива сопоставляются по порядку элементов. В итоге, в layout-ресурсе группы найдется элемент с ID = android.R.id.text1 и в него запишется текст из атрибута groupName. Тем самым мы получим отображение имени группы в списке.
Далее формируем коллекции элементов. Создаем общую коллекцию коллекций. А затем создаем коллекции элементов каждой группы. Принцип тот же, что и с группами – создаем Map и в него пишем атрибут monthName со значением равным имени элемента. Коллекцию элементов для каждой группы добавляем в общую коллекцию.
Формируем два массива для сопоставления TextView из layout и атрибутов элементов. Полностью аналогично, как выше мы уже проделали с группами. В итоге при отображении элемента, найдется TextView с ID = android.R.id.text1 и туда запишется текст из атрибута monthName. И мы увидим текст нашего элемента (месяца) в списке.
В конце кода создаем адаптер SimpleExpandableListAdapter и присваиваем его списку.
Параметры для адаптера:
- this – контекст
- groupData – коллекция групп
- android.R.layout.simple_expandable_list_item_1 – layout-ресурс, который будет использован для отображения группы в списке. Соответственно, запросто можно использовать свой layout-файл
- groupFrom – массив имен атрибутов групп
- groupTo – массив ID TextView из layout для групп
- childData – коллекция коллекций элементов по группам
- android.R.layout.simple_list_item_1 — layout-ресурс, который будет использован для отображения элемента в списке. Можно использовать свой layout-файл childFrom – массив имен атрибутов элементов
- childTo — массив ID TextView из layout для элементов
Layout simple_expandable_list_item_1, который мы использовали для отображения групп – это TextView с отступом от левого края, чтобы осталось место для кнопки раскрытия/сворачивания списка. Для эксперимента вы можете попробовать использовать для групп layout simple_list_item_1, который мы использовали для элементов. В этом случае текст будет пересекаться с кнопкой.
А вообще вы можете создать для элементов свою разметку, например, с тремя TextView. И к каждому элементу списка (Map) добавить еще по два атрибута. Далее указываете вашу разметку в конструкторе, формируете соответственно массивы childFrom и childTo чтобы сопоставить атрибуты и TextView, и получится, что каждый элемент группы содержит более подробную информацию.
ExpandableListView редко используется в составе разметки с другими элементами. Обычно такой список занимает весь экран, поэтому для подобных целей лучше использовать специальный класс ExpandableListViewActivity, который уже содержит в своём составе компонент ExpandableListView.
Размещение индикаторов групп в заданном месте
Вы можете указать другое расположение индикаторов групп, например, справа. Для этого используются методы setIndicatorBounds() или setIndicatorBoundsRelative():
В примере использованы «магические числа». Вам лучше самостоятельно вычислить нужные значения.

Собственные индикаторы
Для создания собственных индикаторов приготовьте файлы *.9.png в двух состояниях (обычный и раскрытый) и пропишите их в drawable-ресурсах.
Пропишите селектор в атрибуте groupIndicator.
Источник
Android: Expandable List View Example
Project Description
- In this example, we will see how to create a simple expandable list view using Android’s ExpandableListView widget. Also we will see how to delete child items in listview
- Expandable List allows two levels – groups which can individually be expanded to show its children.
- This example uses custom adapter for ExpandableListView which extends BaseExpandableListAdapter to populate items associated with this view.
- This expandable list view example explains the following;
- Each child item has a TextView and ImageView with delete icon.
- Toast is displayed when a child item is clicked. This is processed in setOnChildClickListener.
- Child item can be deleted by clicking on delete icon.
Output

Environment Used
- JDK 6 (Java SE 6)
- Eclipse Juno IDE for Java EE Developers (4.2)
- Android SDK 4.0.3 / 4.1 Jelly Bean
- Android Development Tools (ADT) Plugin for Eclipse (ADT version 20.0.0)
- Refer this link to setup the Android development environment
Android Project
Create an Android project and name it as ExpandableListDemo.
strings.xml
Open res/values/strings.xml and replace it with following content.
XML layout files
This Android Expandable List View requires three layout files; one for displaying the main layout containing the ExpandableListView, one for group item layout and other for child item layout.
activity_main.xml
This XML layout file (activity_main.xml) is used for defining ExpandableListView.
Open activity_main.xml file in res/layout and copy the following content.
group_item.xml
Create a new layout file group_item.xml in res/layout and copy the following content.
This group layout contains a TextView to display laptop brand.
child_item.xml
Create a new layout file child_item.xml in res/layout and copy the following content.
Each child item contains one TextView to display laptop brand’s model and one ImageView with delete icon to delete a child item.
Create Android Custom Adapter class for ExpandableListView
Create a new Java class “ExpandableListAdapter.java” in package “com.theopentutorials.expandablelist.adapters” and copy the following code.
This class uses BaseExpandableListAdapter for creating custom adapter for ExpandableListView.
Activity
Open your activity class and copy the following code.

- Here, we create list of group items stored in ‘groupList’. We create list of child items for each group stored in ‘childList’.
- We then create a Map where each key is a group name (in this example, it is a laptop brand name) and each value is a list of child (in this example, it is list of laptop models in particular brand).
- We then create expandable list view adapter and set this adapter in ExpandableListView.
- In setOnChildClickListener, we display a Toast.
- By default the group indicator is displayed in left hand side. If you want to display it in right hand side then uncomment “//setGroupIndicatorToRight();” line inside onCreate().
- We get the width of the screen and use setIndicatorBounds(int left, int right) method to set the indicator bounds for the group view of an expandable list view.
AndroidManifest.xml
Define the activity in AndroidManifest.xml file.
Output
Run your application and you will get the output as shown in the beginning of this tutorial.
If you want to set the group indicator of expandable list to right side then uncomment the highlighted line in onCreate() method. You will get the output as shown below. 
Project Folder Structure
The complete folder structure of this example is shown below. 
Источник
Android Expandablelistview Tutorial With Example With Custom Adapter

Android expandablelistview tutorial with example will enhance your knowledge today.
Two android expandablelistview examples are there in this tutorial.
1. Android Expandable ListView Tutorial Example
We will create an app with expandablelistview which will use the custom adapter.
Expandable listview enables you to show the data in two level categories list. First level list is known as parent which includes children items as it’s sub items.
This differs from the Listview by allowing two levels :
- groups which can individually be expanded to show its children.
- The items come from the expandableListAdapter associated with this view.
Developers use expandable listview because using two level listview will give better user experience.
Users can also expand and collapse parent groups as per their requirements.
Final Look
If you have followed all the steps properly then you should get following output from your example.
First of all learn about basic concepts about expandable listview. After that we will create a practical example.
XML Coding
Following code example shows how you can define expandable listview in xml layout file.
It has attributes like id, layout width and height, divider etc.
android:id
id will represent the expandable listview when you are inflating it in the java or kotlin class.
android:devider
The value of this attribute can be a drawable or color. This divider is used to separate two parent items from each other.
android:dividerHeight
This attribute represents the thickness of the divider.
Higher value will lead the divider to more thicker.
You can give divider height value in the form of dp, sp or px.
android:childDivider
It can be a drawable or a simple color which is used as a divider for children. (It will drawn below and above child items.) The height of this will be the same as the height of the normal list item divider.
color is in the form of #rgb, #argb, #rrggbb or #aarrggbb.
android:childIndicator
it shows the specified indicator besides the child view.
android:groupIndicator
Indicator shown beside the group View. This can be a stateful Drawable.
Methods Of Expandable Listview
Android provides many methods to control the expandable listview programmatically.
collapseGroup(int groupPos)
this method will collapse the group (parent) which is already open.
Above line will collapse the first group.
This method returns boolean value. If the group is collapsed then it will return true. If the group is already collapsed then it will return false.
expandGroup(int groupPos)
This method will expand the particular group which is already close.
Above line will expand the first group.
This method also returns boolean value. If the group is expanded then it will return true. If the group is already expanded then it will return false.
getSelectedId()
It returns the ID of the currently selected group or child.
getSelectedPosition()
It gives the position of the currently selected group or child (along with its type).
isGroupExpanded(int groupPosition)
It will return a boolean (true or false) value. If the given group is expanded then it will return a true otherwise false.
setAdapter(ExpandableListAdapter adapter)
It will set the adapter that provides data to this view.
setChildDivider(Drawable childDivider)
It will set the drawable between every two children. Set child divider programmatically using this method.
setChildIndicator(Drawable childIndicator)
Sets the indicator to be drawn next to a child. You can use specific drawable file for this.
setGroupIndicator(Drawable groupIndicator)
Sets the indicator to be drawn next to a group.
setSelectedChild(int groupPosition, int childPosition, boolean shouldExpandGroup)
Sets the selection to the specified child. Last parameter is boolean so it’s value is true then the group of the selected child is open otherwise not.
Making Android Studio Example
In this tutorial, we will show different movies according to the categories like Action Movies, Comedy Movies etc.
Now let us create this example by using base adapter.
Step 1. Category Layouts
I will create each layouts for parent and child rows.
Create one layout resource file named child_layout.xml and add below source code
Now create another file and give it a name parent_layout.xml
Add following source code in it
Just one textview is present in each file which means that we will only show the names of the items.
Step 2. Expandable Adapter
Adapter will fetch the data and it will set this data to their appropriate place.
Write down the below source code in ExpandableAdapter.java class
Read the constructor of the adapter class.
It contains one arraylist and one string array. Arraylist is the data for the sub category or child items and string array is the data for the parent item or main category.
I will explain more about this adapter class later in the step 3.
Step 3. Final Coding
At last, you just need to change code for activity_main.xml and MainActivity.java
Replace the code of activity_main.xml with the following
Copy and paste the below source code into MainActivity.java file
In this class, we will set up data for child and parent items.
Following line will help us to show parent data in the main category of expandable listview.
Above string array is passed as a parameter in the adapter constructor. Adapter will use this string array to populate the parent list.
Look at the below code
Above method will create an Arraylist of String Artaylist.
Action_Movies, Romantic_Movies and Comedy_Movies are the string Arraylists.
All these three string arraylists are added into the another arraylist which is childList.
Explanation of Adapter
Consider following method from the adapter class.
Above method will display the parent list.
Compiler will inflate the parent_layout.xml as the primary layout for showing the parent list.
Each parent list item will have the layout of parent_layout.xml file.
After this the text of the parent is set by using the string array “parents.”
Similarly, child items are set by using the below method from the adapter class.
First of all, the compiler will inflate child_layout.xml file.
The text of the child item is set by using the getChild() method.
Here is the code for the getChild() method.
We will get parent and child position in this method’s parameter.
Then, simply we will use childList (Arraylist of string arrays) to get our desired child name.
So it was all the knowledge about android expandablelistview tutorial.
2. Android Expandable ListView With Checkbox Example Handle Multiple Selection
Android ExpandableListView Checkbox Example is covered in this post.
We will put checkboxes in the child rows of expandable listview.
We will solve the general problems relating to android expandablelistview with checkbox like
- checkbox gets unchecked while scrolling the listview
- Different positioned or multiple checkboxes are checked when click on single box
In this example, we will put checkbox in both parent and child row. It means that we will create expandable listview with multiple checkboxes.
If you click on parent checkbox then all it’s child rows will be also checked. But you can also check few rows of child from the same parent as well.
After selecting required items, we will send these selected items to the next activity also.
First, see the output of the tutorial then we will develop it step by step.
Step 1. Create project in Android Studio.
Make a new project in android studio with empty activity as the default activity.
Step 2. Update colors.xml
Update your colors.xml file with following
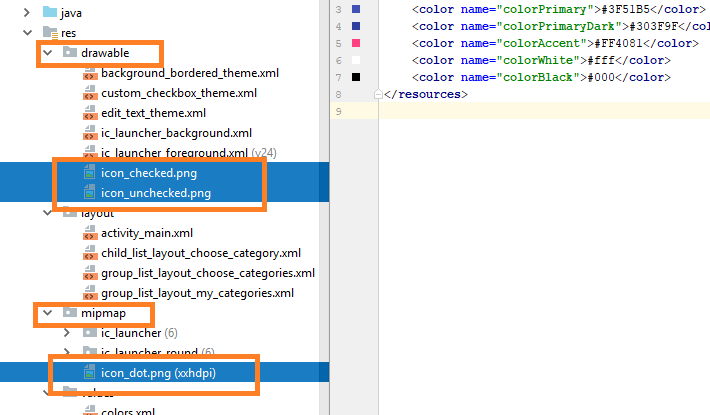
Step 3. Adding Images
Download Images by Clicking following link
[sociallocker] Download Images [/sociallocker]
It contains three images,
- icon_checked,
- icon_unchecked and
- icon_dot
Now, put icon_dot into mipmap folder and copy icon_checked and icon_unchecked into drawable folder.
See below image for reference
Step 4. Adding files in drawable
Make a new layout xml named background_bordered_theme.xml and add below source code in it
Now create another layout xml file and give it a name custom_checkbox_theme.xml
Copy below code into it
Prepare third xml file named edit_text_theme.xml
Code for this file is like
Step 5. Making layout resources files
Create a new layout resource xml file in res->layout folder. It will be called child_list_layout_choose_category.xml
It’s code seems like
Make second xml file in res->layout folder and give it sweet name like group_list_layout_choose_categories.xml
Add below code in it
Prepare last xml file in res->layout and gibe its name group_list_layout_my_categories.xml
Step 6. Making Model Classes
Make a new folder called Model in app->java->your package name (It is the same path where your MainActivity is present)
See below image where you need to put required JAVA classes
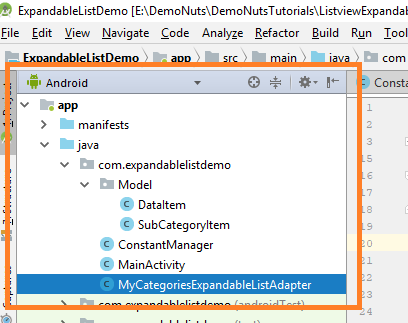
Create a new JAVA class named DataItem.java in Model folder
Add Code for it like
Above class is representing the model structure for parent items or main category.
Make a second Model class named SubCategoryItem.java in Model folder
Add following code in it
Above class will word as a model for sub category or child items.
Make a new JAVA class named “ConstantManager.java” at the path shown in above image
Code for this class will look like
Prepare another JAVA class named MyCategoriesExpandableListAdapter.java
Add below source code in it
Step 7. Update Main Activity
Finally, update activity_main.xml like below
And replace code of MainActivity.java with following
We will create data for expandable listview in this activity.
Step 8. Accessing Checked Items
To get the selected parents and child items, we need to create one new activity.
We will get checked items in this activity. So make one new activity named CheckedActivity.
Add the below source code in activity_checked.xml
Write down the below code in CheckedActivity.java
I have taken one nested for loop in the above code.
Parent for loop will check which parents are selected and it will print them in the textview.
Inner for loop will get the selected child items and then print it on the another textview.
Now run your project and enjoy playing with checkboxes in expandable listview.
Thanks for reading our android expandablelistview tutorial example.
Источник


